2017 NISSAN MURANO change time
[x] Cancel search: change timePage 150 of 466
●position the hand-held transmitter with its
battery area facing away from the
HomeLink® surface.
● press and hold both the HomeLink® and
hand-held transmitter buttons without inter-
ruption.
● position the hand-held transmitter1-3in
(26 - 76 mm) away from the HomeLink®
surface. Hold the transmitter in that position
for up to 15 seconds. If HomeLink® is not
programmed within that time, try holding the
transmitter in another position – keeping the
indicator light in view at all times.
If you have any questions or are having difficulty
programming your HomeLink® buttons, refer to
the HomeLink® web site at: www.homelink.com
or call 1-800-355-3515.
CLEARING THE PROGRAMMED
INFORMATION
The following procedure clears the programmed
information from both buttons. Individual buttons
cannot be cleared. However, individual buttons
can be reprogrammed. For additional informa-
tion, refer to “Reprogramming a single
HomeLink® button” in this section. To clear all programming:
1. Press and hold the two outer HomeLink® buttons until the indicator light begins to
flash in approximately 10 seconds. Do not
hold for longer than 20 seconds.
2. Release both buttons.
HomeLink® is now in the programming mode
and can be programmed at any time beginning
with “Programming HomeLink®” - Step 1.
REPROGRAMMING A SINGLE
HOMELINK® BUTTON
To reprogram a HomeLink® Universal Trans-
ceiver button, complete the following: 1. Press and hold the desired HomeLink® but- ton. DO NOT release the button.
2. The indicator light will begin to flash after 20 seconds. Without releasing the
HomeLink® button, proceed with “Pro-
gramming HomeLink®” - Step 1.
For questions or comments, contact HomeLink®
at: www.homelink.com or 1–800–355–3515
(except Mexico) .
The HomeLink® Universal Transceiver button
has now been reprogrammed. The new device
can be activated by pushing the HomeLink® button that was just programmed. This procedure
will not affect any other programmed HomeLink®
buttons.
IF YOUR VEHICLE IS STOLEN
If your vehicle is stolen, you should change the
codes of any non-rolling code device that has
been programmed into HomeLink®. Consult the
Owner’s Manual of each device or call the manu-
facturer or dealer of those devices for additional
information.
When your vehicle is recovered, you will
need to reprogram the HomeLink® Univer-
sal Transceiver with your new transmitter
information.
FCC Notice:
For USA:
This device complies with Part 15 of the
FCC Rules. Operation is subject to the fol-
lowing two conditions: (1) This device may
not cause harmful interference, and (2) this
device must accept any interference re-
ceived, including interference that may
cause undesired operation.
Instruments and controls2-61
Page 167 of 466
Unlocking doors
1. Press thebutton on the Intelligent
Key.
2. The driver’s door will unlock and the hazard warning lights flash once, and the front and
tail lights will turn on for 30 seconds.
3. Press the
button again within one
minute to unlock the remaining doors. NOTE:
The unlocking operation can be changed in
Selective Unlock in the Vehicle Settings of
the vehicle information display. For addi-
tional information, refer to “Vehicle infor-
mation display” in the “Instruments and
controls” section of this manual.
NOTE:
If Selective Unlock is turned off in the Ve-
hicle Settings, all doors will unlock upon
the first
press of the Intelligent Key
remote.
All doors will be locked automatically unless one
of the following operations is performed within
one minute after pressing the
button:
● Opening any doors.
● Pushing the ignition switch.
The interior light illuminates for a period of time
when a door is unlocked and the room light
switch is in the DOOR position.
The light can be turned off without waiting by
performing one of the following operations:
● Placing the ignition switch in the ON posi-
tion.
● Locking the doors with the Intelligent Key. ●
Switching the room light switch to the OFF
position.
● Switching the Light Off Delay to 0 in Vehicle
Settings of the vehicle information display.
For additional information, refer to “Vehicle
information display” in the “Instruments and
controls” section of this manual.
Opening windows
The Intelligent Key allows you to simultaneously
open windows equipped with automatic opera-
tion.
● To open the windows, press and hold
the
button on the Intelligent Key for
longer than 3 seconds.
The door windows will lower while holding down
the
button on the Intelligent Key.
NOTE:
The windows will stop lowering at the time
the
button is released.
The door windows cannot be closed by
using the Intelligent Key.
LPD2258
3-14Pre-driving checks and adjustments
Page 169 of 466
Answer back horn feature
If desired, the answer back horn feature can be
deactivated using the Intelligent Key. When it is
deactivated and the LOCK
button is
pushed, the hazard indicator lights flash twice.
When the UNLOCK
button is pushed, nei-
ther the hazard indicator lights nor the horn op-
erates. NOTE:
If you change the answer back horn and
hazard indicator lights flash feature with
the Intelligent Key, the vehicle information
display screen will show the current mode
after the ignition switch has been cycled
from the OFF to the ON position. The ve-
hicle information display screen can also
be used to change the answer back horn
mode.
To deactivate:
Press and hold the
andbuttonsfor at least 2 seconds.
The hazard indicator lights will flash three times to
confirm that the answer back horn feature has
been deactivated.
To activate: Press and hold the
andbuttonsfor at least 2 seconds once
more.
The hazard indicator lights will flash once and the
horn will sound once to confirm that the horn
beep feature has been reactivated.
Deactivating the horn beep feature does not si-
lence the horn if the alarm is triggered.
WARNING SIGNALS
To help prevent the vehicle from moving unex-
pectedly by erroneous operation of the Intelligent
Key or to help prevent the vehicle from being
stolen, a chime or buzzer sounds from inside and
outside the vehicle and a warning is displayed in
the instrument panel.
When a chime or beep sounds or a warning is
displayed, be sure to check the vehicle and the
Intelligent Key.
For additional information, refer to the “Trouble-
shooting guide” in this section and “Vehicle infor-
mation display” in the “Instruments and controls”
section of this manual.
TROUBLESHOOTING GUIDE
Verify the location of all Intelligent Keys that are
programmed for the vehicle. If another Intelligent
Key is in range or inside the vehicle, the vehicle
system may respond differently than expected.
LPD2259
3-16Pre-driving checks and adjustments
Page 221 of 466
Reception conditions will constantly change be-
cause of vehicle movement. Buildings, terrain,
signal distance and interference from other ve-
hicles can work against ideal reception. De-
scribed below are some of the factors that can
affect your radio reception.
Some cellular phones or other devices may
cause interference or a buzzing noise to come
from the audio system speakers. Storing the de-
vice in a different location may reduce or elimi-
nate the noise.
FM RADIO RECEPTION
Range: FM range is normally limited to 25 – 30 mi
(40 – 48 km) , with monaural (single channel) FM
having slightly more range than stereo FM. Exter-
nal influences may sometimes interfere with FM
station reception even if the FM station is within
25 mi (40 km) . The strength of the FM signal is
directly related to the distance between the
transmitter and receiver. FM signals follow a line-
of-sight path, exhibiting many of the same char-
acteristics as light. For example, they will reflect
off objects.
Fade and drift: As your vehicle moves away from
a station transmitter, the signals will tend to fade
and/or drift.Static and flutter: During signal interference from
buildings, large hills or due to antenna position
(usually in conjunction with increased distance
from the station transmitter) , static or flutter can
be heard. This can be reduced by adjusting the
treble control to reduce treble response.
Multipath reception: Because of the reflective
characteristics of FM signals, direct and reflected
signals reach the receiver at the same time. The
signals may cancel each other, resulting in mo-
mentary flutter or loss of sound.
AM RADIO RECEPTION
AM signals, because of their low frequency, can
bend around objects and skip along the ground.
In addition, the signals can be bounced off the
ionosphere and bent back to earth. Because of
these characteristics, AM signals are also sub-
ject to interference as they travel from transmitter
to receiver.
Fading: Occurs while the vehicle is passing
through freeway underpasses or in areas with
many tall buildings. It can also occur for several
seconds during ionospheric turbulence even in
areas where no obstacles exist.
Static: Caused by thunderstorms, electrical
power lines, electric signs and even traffic lights.
SATELLITE RADIO RECEPTION
When the satellite radio is used for the first time
or the battery has been replaced, the satellite
radio may not work properly. This is not a mal-
function. Wait more than 10 minutes with satellite
radio ON and the vehicle outside of any metal or
large building for satellite radio to receive all of
the necessary data.
No satellite radio reception is available and “NO
SAT” is displayed when the SAT band option is
selected unless optional satellite receiver and
antenna are installed and a SiriusXM® Satellite
Radio service subscription is active. Satellite ra-
dio is not available in Alaska, Hawaii and Guam.
Satellite radio performance may be affected if
cargo carried on the roof blocks the satellite radio
signal.
If possible, do not put cargo over the satellite
antenna.
A build up of ice on the satellite radio antenna can
affect satellite radio performance. Remove the
ice to restore satellite radio reception.
4-30Display screen, heater, air conditioner, audio and phone systems
Page 232 of 466
3. Programming is now complete.
4. Other buttons can be set in the same man-ner.
If the battery cable is disconnected, or if the fuse
opens, the radio memory will be canceled. In that
case, reset the desired stations.
Compact disc (CD) player operation
If the radio is already operating, it automatically
turns off and the compact disc begins to play.
MEDIA button
With a CD loaded, press the MEDIA button until
the CD mode is displayed on the screen.
CD/MP3 display mode
While listening to an MP3/WMA CD, certain text
may be displayed on the screen if the CD has
been encoded with text information. Depending
on how the MP3/WMA CD is encoded, informa-
tion such as Artist, Song and Folder will be dis-
played.
The track number and the total number of tracks
in the current folder or on the current disc are
displayed on the screen as well.
SEEK/TRACK (Reverse or Fast Forward) button
Press and hold the
orSEEK/TRACK button for 1.5 seconds while the
compact disc is playing to reverse or fast forward
the track being played. The compact disc plays at
an increased speed while reversing or fast for-
warding. When the button is released, the com-
pact disc returns to normal play speed.
SEEK/TRACK button
Press the
SEEK/TRACK button while a CD
or MP3/WMA CD is playing to return to the
beginning of the current track. Press
the
SEEK/TRACK button several times to
skip backward several tracks.
Press the
SEEK/TRACK button while a CD
or MP3/WMA CD is playing to advance one
track. Press the
SEEK/TRACK button sev-
eral times to skip forward several tracks. If the last
track on a CD is skipped, the first track on the
disc is played. If the last track in a folder of an
MP3/WMA CD is skipped, the first track of the
next folder is played. TUNE-SCROLL knob (MP3/WMA CD only)
If an MP3/WMA CD with multiple folders is play-
ing, turn the TUNE-SCROLL knob to change
folders. Turn the knob to the left to skip back a
folder. Turn the knob to the right to skip ahead a
folder.
RPT (repeat) button
When the RPT (repeat) button is pressed while a
compact disc is playing, the play pattern can be
changed as follows:
CD:
1 Track Repeat
←→OFF
CD with MP3 or WMA:
1 Folder Repeat →1 Track Repeat →OFF
1 Track Repeat: the current track will be re-
peated.
1 Folder Repeat: the current folder will be re-
peated.
OFF: No repeat play pattern is applied. The indi-
cator on the display will turn off.
The current play pattern of the CD is displayed on
the screen unless no pattern is applied.
Display screen, heater, air conditioner, audio and phone systems4-41
Page 235 of 466
SEEK/TRACK (Reverse orFast Forward) button
Press and hold the SEEK/TRACK button
(rewind) or SEEK/TRACK button(fast for-
ward) for 1.5 seconds while an audio file on the
USB device is playing to reverse or fast forward
the track being played. The track plays at an
increased speed while reversing or fast forward-
ing. When the button is released, the audio file
returns to normal play speed.
SEEK and TRACK buttons
Press the SEEK button
while an audio file
on the USB device is playing to return to the
beginning of the current track. Press the SEEK
button
several times to skip backward sev-
eral tracks.
Press the TRACK button
while an audio
file on the USB device is playing to advance one
track. Press the TRACK button
several
times to skip forward several tracks. If the last
track in a folder on the USB device is skipped, the
first track of the next folder is played. RDM (random) button
When the RDM (random) button is pressed while
an audio file on the USB device is playing, the
play pattern can be changed as follows:
All Random
→1 Folder Random →OFF
All Random: all tracks on the USB device will be
played randomly.
1 Folder Random: all tracks in the current folder
will be played randomly.
OFF: No random play pattern is applied. The
indicator on the display will turn off.
The current play pattern of the USB device is
displayed on the screen unless no pattern is
applied.
RPT (repeat) button
When the RPT (repeat) button is pressed while
an audio file on the USB device is playing, the
play pattern can be changed as follows:
1 Folder Repeat →1 Track Repeat →OFF
1 Track Repeat: the current track will be re-
peated. 1 Folder Repeat: the current folder will be re-
peated.
OFF: No repeat play pattern is applied. The indi-
cator on the display will turn off.
The current play pattern of the USB device is
displayed on the screen unless no pattern is
applied.
TUNE-SCROLL knob
If there are multiple folders with audio files on the
USB device, turn the TUNE-SCROLL knob to
change folders. Turn the knob to the left to skip
back a folder. Turn the knob to the right to skip
ahead a folder. If there is only one folder of audio
files on the USB device, turning the TUNE-
SCROLL knob in either direction will return to the
first track on the USB device.
4-44Display screen, heater, air conditioner, audio and phone systems
Page 244 of 466
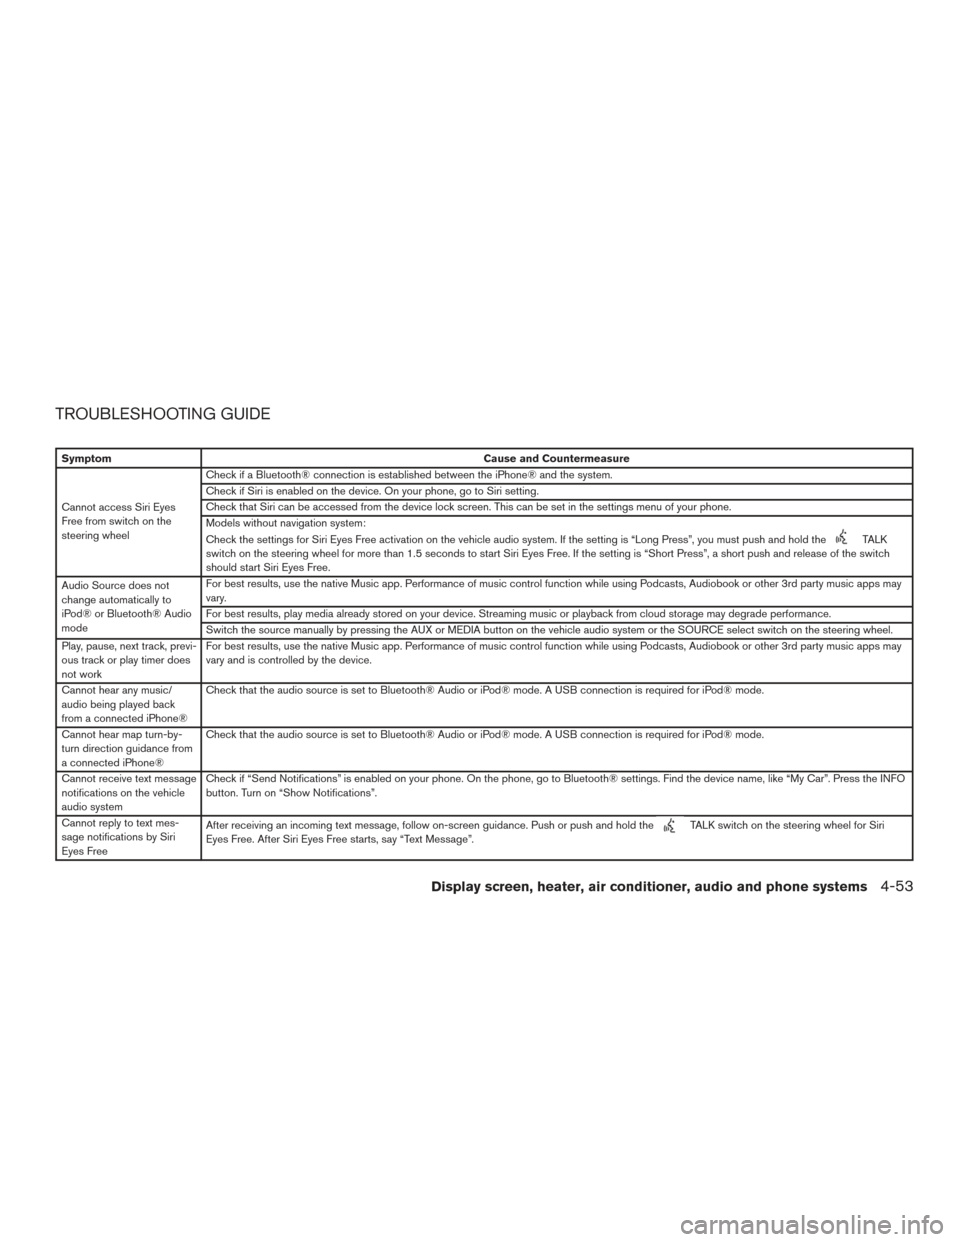
TROUBLESHOOTING GUIDE
SymptomCause and Countermeasure
Cannot access Siri Eyes
Free from switch on the
steering wheel Check if a Bluetooth® connection is established between the iPhone® and the system.
Check if Siri is enabled on the device. On your phone, go to Siri setting.
Check that Siri can be accessed from the device lock screen. This can be set in the settings menu of your phone.
Models without navigation system:
Check the settings for Siri Eyes Free activation on the vehicle audio system. If the setting is “Long Press”, you must push and hold the
TALK
switch on the steering wheel for more than 1.5 seconds to start Siri Eyes Free. If the setting is “Short Press”, a short push and release of the switch
should start Siri Eyes Free.
Audio Source does not
change automatically to
iPod® or Bluetooth® Audio
mode For best results, use the native Music app. Performance of music control function while using Podcasts, Audiobook or other 3rd party music apps may
vary.
For best results, play media already stored on your device. Streaming music or playback from cloud storage may degrade performance.
Switch the source manually by pressing the AUX or MEDIA button on the vehicle audio system or the SOURCE select switch on the steering wheel.
Play, pause, next track, previ-
ous track or play timer does
not work For best results, use the native Music app. Performance of music control function while using Podcasts, Audiobook or other 3rd party music apps may
vary and is controlled by the device.
Cannot hear any music/
audio being played back
from a connected iPhone® Check that the audio source is set to Bluetooth® Audio or iPod® mode. A USB connection is required for iPod® mode.
Cannot hear map turn-by-
turn direction guidance from
a connected iPhone® Check that the audio source is set to Bluetooth® Audio or iPod® mode. A USB connection is required for iPod® mode.
Cannot receive text message
notifications on the vehicle
audio system Check if “Send Notifications” is enabled on your phone. On the phone, go to Bluetooth® settings. Find the device name, like “My Car”. Press the INFO
button. Turn on “Show Notifications”.
Cannot reply to text mes-
sage notifications by Siri
Eyes Free After receiving an incoming text message, follow on-screen guidance. Push or push and hold the
TALK switch on the steering wheel for Siri
Eyes Free. After Siri Eyes Free starts, say “Text Message”.
Display screen, heater, air conditioner, audio and phone systems4-53
Page 261 of 466
WARNING
●Do not leave children or adults who
would normally require the assistance
of others alone in your vehicle. Pets
should also not be left alone. They
could accidentally injure themselves or
others through inadvertent operation of
the vehicle. Also, on hot, sunny days,
temperatures in a closed vehicle could
quickly become high enough to cause
severe or possibly fatal injuries to
people or animals.
● Properly secure all cargo with ropes or
straps to help prevent it from sliding or
shifting. Do not place cargo higher than
the seatbacks. In a sudden stop or col-
lision, unsecured cargo could cause
personal injury.
● Exceeding the roof rack capacity can
change the vehicle’s center of gravity
and adversely affect the handling and
stability of the vehicle resulting in an
accident causing death or serious
injury.
EXHAUST GAS (carbon monoxide)
WARNING
● Do not breathe exhaust gases; they
contain colorless and odorless carbon
monoxide. Carbon monoxide is danger-
ous. It can cause unconsciousness or
death.
● If you suspect that exhaust fumes are
entering the vehicle, drive with all win-
dows fully open, and have the vehicle
inspected immediately.
● Do not run the engine in closed spaces
such as a garage.
● Do not park the vehicle with the engine
running for any extended length of time.
● Keep the liftgate and rear vent windows
closed while driving, otherwise exhaust
gases could be drawn into the passen-
ger compartment. If you must drive with
the liftgate or rear vent windows open,
follow these precautions:
1. Open all the windows.
2. Set the
air recirculation but-
ton to off and the fan control dial to
high to circulate the air. ●
If electrical wiring or other cable con-
nections must pass to a trailer through
the seal on the liftgate or the body,
follow the manufacturer’s recommen-
dation to prevent carbon monoxide en-
try into the vehicle.
● The exhaust system and body should be
inspected by a qualified mechanic
whenever:
a. The vehicle is raised for service.
b. You suspect that exhaust fumes are entering into the passenger
compartment.
c. You notice a change in the sound of the exhaust system.
d. You have had an accident involving damage to the exhaust system, un-
derbody, or rear of the vehicle.
THREE-WAY CATALYST
The three-way catalyst is an emission control
device installed in the exhaust system. Exhaust
gases in the three-way catalyst are burned at
high temperatures to help reduce pollutants.
PRECAUTIONS WHEN STARTING
AND DRIVING
5-2Starting and driving