2017 NISSAN JUKE differential
[x] Cancel search: differentialPage 306 of 416

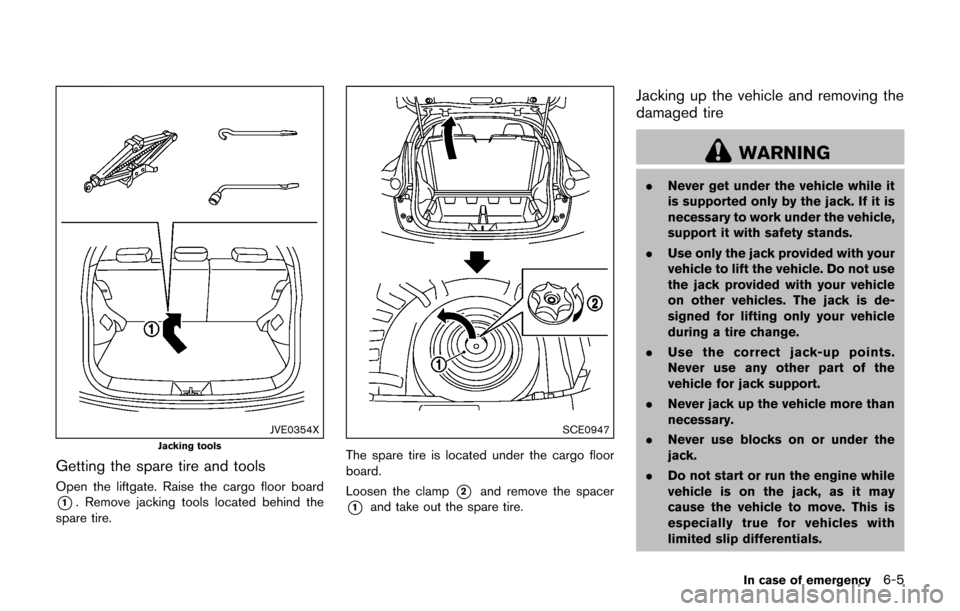
JVE0354XJacking tools
Getting the spare tire and tools
Open the liftgate. Raise the cargo floor board
*1. Remove jacking tools located behind the
spare tire.
SCE0947
The spare tire is located under the cargo floor
board.
Loosen the clamp
*2and remove the spacer
*1and take out the spare tire.
Jacking up the vehicle and removing the
damaged tire
WARNING
. Never get under the vehicle while it
is supported only by the jack. If it is
necessary to work under the vehicle,
support it with safety stands.
. Use only the jack provided with your
vehicle to lift the vehicle. Do not use
the jack provided with your vehicle
on other vehicles. The jack is de-
signed for lifting only your vehicle
during a tire change.
. Use the correct jack-up points.
Never use any other part of the
vehicle for jack support.
. Never jack up the vehicle more than
necessary.
. Never use blocks on or under the
jack.
. Do not start or run the engine while
vehicle is on the jack, as it may
cause the vehicle to move. This is
especially true for vehicles with
limited slip differentials.
In case of emergency6-5
Page 365 of 416

8-40Do-it-yourself
driving conditions and cause an
accident and personal injury.
. If the wheels are changed for any
reason, always replace with wheels
which have the same off-set dimen-
sion. Wheels of a different off-set
could cause premature tire wear,
degrade vehicle handling character-
istics and/or interference with the
brake discs/drums. Such interfer-
ence can lead to decreased braking
efficiency and/or early brake pad/
shoe wear. See “Wheels and tires”
(P.10-9) of this manual for wheel off-
set dimensions.
. Since the spare tire is not equipped
with the TPMS, when a spare tire is
mounted or a wheel is replaced, the
TPMS will not function and the low
tire pressure warning light will flash
for approximately 1 minute. The
light will remain on after 1 minute.
Have your tires replaced and/or
TPMS system reset as soon as
possible. It is recommended you
visit a NISSAN dealer for these
services.
. Replacing tires with those not ori-
ginally specified by NISSAN could affect the proper operation of the
TPMS.
. The TPMS sensor may be damaged
if it is not handled correctly. Be
careful when handling the TPMS
sensor.
. When replacing the TPMS sensor,
the ID registration may be required.
It is recommended you visit a
NISSAN dealer for ID registration.
. Do not use a valve stem cap that is
not specified by NISSAN. The valve
stem cap may become stuck.
. Be sure that the valve stem caps are
correctly fitted. Otherwise the valve
may be clogged up with dirt and
cause a malfunction or loss of
pressure.
. Do not install a damaged or de-
formed wheel or tire even if it has
been repaired. Such wheels or tires
could have structural damage and
could fail without warning.
. The use of retread tire is not re-
commended.
. For additional information regard-
ing tires, refer to “Important Tire
Safety Information” (US) or“Tire Safety Information”
(Canada) in the
Warranty Information Booklet.
All-Wheel Drive (AWD) models
CAUTION
. Always use tires of the same size,
brand, construction (bias, bias-
belted or radial) , and tread pattern
on all four wheels. Failure to do so
may result in a circumference differ-
ence between tires on the front and
rear axles which will cause exces-
sive tire wear and may damage the
transmission, transfer case and rear
differential gears.
. Only use spare tires specified for
each AWD model.
If excessive tire wear is found, it is recom-
mended that all four tires be replaced with tires
of the same size, brand, construction and tread
pattern. The tire pressure and wheel alignment
should also be checked and corrected as
necessary. It is recommended you visit a
NISSAN dealer for this service.
Page 366 of 416

Wheel balance
Unbalanced wheels may affect vehicle handling
and tire life. Even with regular use, wheels can
get out of balance. Therefore, they should be
balanced as required.
Wheel balance service should be per-
formed with the wheels off the vehicle.
Spin balancing the wheels on the vehicle
could lead to mechanical damage.
For additional information regarding tires, refer
to “Important Tire Safety Information” (US) or
“Tire Safety Information” (Canada) in the War-
ranty Information Booklet.
Care of wheels
See “Cleaning exterior” (P.7-2) for details about
care of the wheels.
Spare tire
Since the spare tire is not equipped with the
TPMS, when a spare tire is mounted (TEMPOR-
ARY USE ONLY), the TPMS will not function.
Observe the following precautions if the TEM-
PORARY USE ONLY spare tire must be used,
otherwise your vehicle could be damaged or
involved in an accident.
WARNING
.The TEMPORARY USE ONLY spare
tire should be used for emergency
use. It should be replaced with the
standard tire at the first opportunity
to avoid possible tire or differential
damage.
. Drive carefully while the TEMPOR-
ARY USE ONLY spare tire is in-
stalled. Avoid sharp turns and
abrupt braking while driving.
. Periodically check spare tire infla-
tion pressure. Always keep the
pressure of the TEMPORARY USE
ONLY spare tire at 60 psi (420 kPa,
4.2 bar) .
. With the TEMPORARY USE ONLY
spare tire installed do not drive your
vehicle at speeds faster than 50
MPH (80 km/h) .
. When driving on roads covered with
snow or ice, the TEMPORARY USE
ONLY spare tire should be used on
the rear wheels and original tire
used on the front wheels (drive
wheels) . Use tire chains only on
the front (original) tires. .
Tire tread of the TEMPORARY USE
ONLY spare tire will wear at a faster
rate than the standard tire. Replace
the spare tire as soon as the tread
wear indicators appear.
. Do not use the spare tire on other
vehicles.
. Do not use more than one spare tire
at the same time.
CAUTION
.Do not use tire chains on a TEM-
PORARY USE ONLY spare tire. Tire
chains will not fit properly and may
cause damage to the vehicle.
. Because the TEMPORARY USE
ONLY spare tire is smaller than the
original tire, ground clearance is
reduced. To avoid damage to the
vehicle, do not drive over obstacles.
Also do not drive the vehicle
through an automatic car wash
since it may get caught.
Do-it-yourself8-41
Page 373 of 416

9-6Maintenance and schedules
CHASSIS AND BODY MAINTENANCE
Brake lines and cables:
Visually inspect for proper installation. Check for
chafing, cracks, deterioration, and signs of
leaking. Replace any deteriorated or damaged
parts immediately.
Brake pads and rotors:
Check for wear, deterioration and fluid leaks.
Replace any deteriorated or damaged parts
immediately.
Exhaust system:
Visually inspect the exhaust pipes, muffler and
hangers for leaks, cracks, deterioration, and
damage. Tighten connections or replace parts
as necessary.
In-cabin microfilter:
Replace at specified intervals. When driving for
prolonged periods in dusty conditions, replace
the filter more frequently.
Propeller shaft(s):
Check for damage, looseness, and grease
leakage. (AWD)
Steering gear and linkage, axle and sus-
pension parts, drive shaft boots:
Check for damage, looseness, and leakage of oil
or grease. Under severe driving conditions,
inspect more frequently.Tire rotation:
Tires should be rotated every 5,000 miles
(8,000 km) according to the instructions under
“Explanation of general maintenance items”
(P.9-2) . When rotating tires, check for damage
and uneven wear. Replace if necessary.
Transmission fluid/oil, differential oil and
transfer case oil:
Visually inspect for signs of leakage at specified
intervals.
If using a car-top carrier, or driving on rough or
muddy roads:
.
Replace the manual transmission gear oil
every 20,000 miles (32,000 km) or 24
months.
. Replace the CVT fluid every 60,000 miles
(96,000 km) or request the dealer to inspect
the fluid deterioration data using a CON-
SULT. If the deterioration data is more than
210,000, replace the CVT fluid.
Off-road maintenance:
Check the following items frequently whenever
you drive off-road through deep sand, mud or
water:
. Brake pads and rotors
. Brake linings and drums .
Brake lines and hoses
. Differential, transmission and transfer case
oil
. Steering linkage
. Propeller shaft(s) and front drive shafts
. Engine air filter
. Clutch housing drain (AWD only)
Page 378 of 416

CHASSIS AND BODY MAINTENANCE
Abbreviations: I = Inspect and correct or replace as necessary, R = Replace
MAINTENANCE OPERATION
Perform at of miles, kilometers or
months, whichever comes first.Miles
61,000
(km 61,000)
Months MAINTENANCE INTERVAL
5
(8) 6 10
(16) 12 15
(24) 18 20
(32) 24 25
(40) 30 30
(48) 36 35
(56) 42 40
(64) 48 45
(72) 54 50
(80) 60 55
(88) 66 60
(96) 72
Brake lines and cables II II I I
Brake pads and rotors$ II I I I I
Brake fluid$ RR R
CVT fluid See NOTE (1)
II I I I I
Manual transmission gear oil See NOTE (2) II II I I
Transfer fluid and differential gear
oil See NOTE (2)
II II I I
Steering gear and linkage, axle
and suspension parts$ II I
Tire rotation See NOTE (3)
Propeller shaft (AWD) and drive
shaft boots$ II I I I I
Exhaust system$ II I
In-cabin microfilter RR R R
Intelligent Key battery RR R R
Maintenance and schedules9-11
Page 379 of 416

9-12Maintenance and schedules
MAINTENANCE OPERATION
Perform at of miles, kilometers or
months, whichever comes first.Miles
61,000
(km 61,000)
Months MAINTENANCE INTERVAL
65
(104) 78 70
(112) 84 75
(120) 90 80
(128) 96 85
(136) 102 90
(144) 108 95
(152) 114 100
(160) 120 105
(168) 126 110
(176) 132 115
(184) 138 120
(192) 144
Brake lines and cables II II I I
Brake pads and rotors$ II II I I
Brake fluid$ RR R
CVT fluid See NOTE (1)
II II I I
Manual transmission gear oil See NOTE (2) II II I I
Transfer fluid and differential gear
oil See NOTE (2)
II II I I
Steering gear and linkage, axle
and suspension parts$ II I
Tire rotation See NOTE (3)
Propeller shaft (AWD) and drive
shaft boots$ II II I I
Exhaust system$ III
In-cabin microfilter RRR R
Intelligent Key battery RRR R
Page 388 of 416

Fluid typeCapacity (Approximate)
Recommended Fluids/Lubricants
Metric
Measure US
Measure Imperial
Measure
Manual Transmission (MT) gear oil — — — For NISMO RS models
�ÂGenuine NISSAN Manual Transmission Fluid (MTF) HQ Multi 75W-85 or equivalent
� If Genuine NISSAN Manual Transmission Fluid (MTF) HQ Multi is not available, API GL-4,
Viscosity SAE 75W-85 may be used as a temporary replacement. However, use Genuine
NISSAN Manual Transmission Fluid (MTF) HQ Multi as soon as it is available.
Except for NISMO RS models
�ÂGenuine NISSAN Manual Transmission Fluid (MTF) TL/JR Type 75W-80 or equivalent
� If Genuine NISSAN Manual Transmission Fluid (MTF) TL/JR Type is not available, API GL-4+,
Viscosity SAE 75W-80 may be used as a temporary replacement. However, use Genuine
NISSAN Manual Transmission Fluid (MTF) TL/JR Type as soon as it is available.
Differential gear oil — — —�ÂGenuine NISSAN Differential Oil Hypoid Super GL-5 80W-90 or equivalent conventional
(non-synthetic) oil
Transfer fluid — — —
Brake and clutch fluid Refill to the proper oil level according
to the instructions in the “8. Do-it-
yourself” section. �Â
Genuine NISSAN Super Heavy Duty Brake Fluid
*6or equivalent DOT 3*6: Available in mainland U.S.A. through a NISSAN dealer.
Multi-purpose grease — — —�ÂNLGI No. 2 (Lithium soap base)
Air conditioning system refrigerant — — —�ÂFor additional information, see “Vehicle identification” (P.10-11) for air conditioner
specification label.
� HFC-134a (R-134a)
Air conditioning system lubricants — — —�ÂNISSAN A/C System Oil Type R or exact equivalent
Window washer fluid 4.5 1-1/4 gal 1 gal�ÂGenuine NISSAN Windshield Washer Concentrate Cleaner & Antifreeze or equivalent
Technical and consumer information10-3