Page 17 of 28

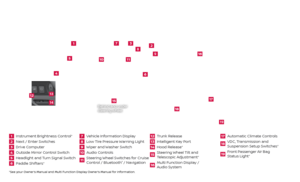
15
AM/FM/SiriusXM®* SATELLITE RADIO WITH CD PLAYER
Touch the ” Audio” key on the Launch Bar to display the current audio source.
Touch the ”
Audio” key a second time to access the source selection screen.
1 (ON•OFF) BUTTON/ VOL (volume) CONTROL KNOB
Press the (on•off ) button to turn the audio system on or off.
Turn the VO L control knob right or lef t to increase or decrease the volume.
2 AUDIO KEY
Touch the ” Audio” key on the Launch Bar to bring up the current source’s
control screen.
*SiriusXM® Satellite Radio is only available on vehicles equipped with an optional satellite radio
subscription service.
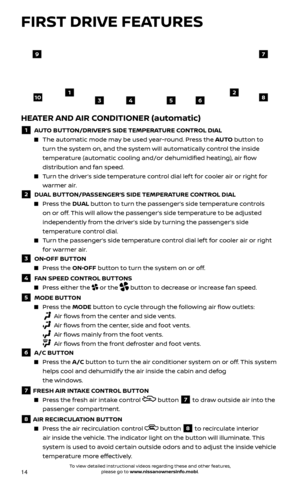
The air recirculation mode cannot be activated when the climate control
system is in the front defroster mode
or the front defroster and foot
vent mode
.
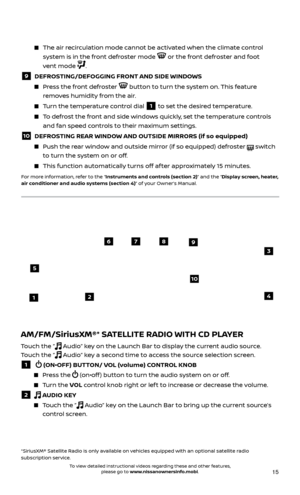
9 DEFROSTING/DEFOGGING FRONT AND SIDE WINDOWS
Press the front defroster button to turn the system on. This feature
removes humidity from the air.
Turn the temperature control dial 1 to set the desired temperature.
To defrost the front and side windows quickly, set the temperature controls and fan speed controls to their maximum settings.
10 DEFROSTING REAR WINDOW AND OUTSIDE MIRRORS (if so equipped)
Push the r ear window and outside mirror (if so equipped) defroster switch
to turn the system on or off.
This func tion automatically turns off af ter approximately 15 minutes.
For more information, refer to the “Instruments and controls (section 2)” and the “Display screen, heater,
air conditioner and audio systems (section 4)” of your Owner’s Manual.
21
5
6789
10
4
3
To view detailed instructional videos regarding these and other features, please go to www.nissanownersinfo.mobi.
Page 18 of 28
 BUTTONS
Press the button or the button to seek up/down to the next
receivable station.
For satellite radio to switch to the first chan")
16
FIRST DRIVE FEATURES
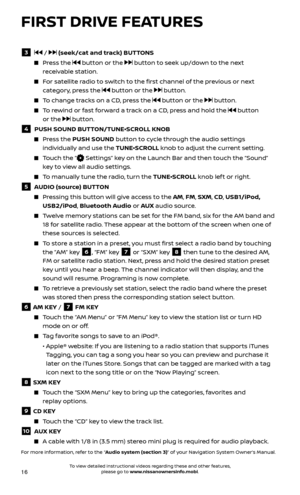
3 / (seek/cat and track) BUTTONS
Press the button or the button to seek up/down to the next
receivable station.
For satellite radio to switch to the first channel of the previous or next category, press the
button or the button.
To change tracks on a CD, press the button or the button.
To rewind or fast forward a track on a CD, press and hold the button
or the
button.
4 PUSH SOUND BUT TON/TUNE•SCROLL KNOB
Press the PUSH SOUND button to cycle through the audio settings
individually and use the TUNE•SCROLL knob to adjust the current setting.
Touch the ” Settings” key on the Launch Bar and then touch the “Sound”
key to view all audio settings.
To manually tune the radio, turn the TUNE•SCROLL knob lef t or right.
5 AUDIO (source) BUTTON
Pressing this button will give access to the AM, FM, SXM, CD, USB1/iPod, USB2/iPod, Bluetooth Audio or AUX audio source.
Twelve memory stations can be set for the FM band, six for the AM band and
18 for satellite radio. These appear at the bottom of the screen when one of
these sources is selected.
To store a station in a preset, you must first select a radio band by touching the ”AM” key
6, “FM” key 7 or “SXM” key 8 then tune to the desired AM,
FM or satellite radio station. Next, press and hold the desired station preset
key until you hear a beep. The channel indicator will then display, and the
sound will resume. Programing is now complete.
To retrieve a previously set station, select the radio band where the preset was stored then press the corresponding station select button.
6 AM KEY / 7 FM KEY
Touch the “AM Menu” or “FM Menu” key to view the station list or turn HD mode on or off.
Tag favorite songs to save to an iPod®.
•
Apple® w
ebsite: If you are listening to a radio station that supports iTunes
Tagging, you can tag a song you hear so you can preview and purchase it
later on the iTunes Store. Songs that can be tagged are marked with a tag
icon next to the song title or on the “Now Playing” screen.
8 SXM KEY
Touch the “SXM Menu” key to bring up the categories, favorites and replay options.
9 CD KEY
Touch the “CD” key to view the track list.
10 AUX KEY
A cable with 1/8 in (3.5 mm) stereo mini plug is required for audio playback.
For more information, refer to the “Audio system (section 3)” of your Navigation System Owner’s Manual.
To view detailed instructional videos regarding these and other features, please go to www.nissanownersinfo.mobi.
Page 19 of 28
.
The system wil l automatically maintain the
set speed until you tap the b")
17
CRUISE CONTROL
The cruise control system enables you to
set a constant cruising speed above
25 mph (40 km/h).
The system wil l automatically maintain the
set speed until you tap the brake pedal,
accelerate, cancel or turn the system off.
To activate the cruise control, push the MAIN switch
1 on the steering wheel. The
CRUISE indicator light in the instrument
panel will illuminate.
To set a cruising speed, accelerate the vehicle to the desired speed, push the SET- switch
2 on the steering wheel and release. The SET indicator light in the
instrument panel will illuminate. Take your foot off the accelerator pedal. Your
vehicle will maintain the set speed.
To reset at a faster cruising speed, push and hold the RES+ switch 3 on the
steering wheel. When the vehicle attains the desired speed, release the switch.
To reset at a slower cruising speed, push and hold the SET- switch 2 on the
steering wheel. Release the switch when the vehicle slows to the desired speed.
To turn cruise control off without erasing the set speed, push the CANCEL switch
4 on the steering wheel. The SET indicator light in the instrument panel
will extinguish.
To turn off cruise control, push the MAIN switch 1 on the steering wheel. Both
the CRUISE indicator light and the SET indicator light in the instrument panel
will extinguish.
For more information, refer to the “Starting and driving (section 5)” of your Owner’s Manual.
1
2
3
4
To view detailed instructional videos regarding these and other features, please go to www.nissanownersinfo.mobi.
Page 20 of 28

18
DRIVE COMPUTER
The drive computer is located in the vehicle information display
1 at the bottom of
the tachometer.
Push the switch
2 to cycle through
the following modes on the vehicle
information display:
• MPG
– Displays the current fuel economy.
• MPH
– Displays the current vehicle speed.
•
CRUISE/MPH
– Displays the set cruise
control status.
•
MPG/MPH
– Displays the average fuel
economy and average speed since the last reset.
—
T
o reset, push and hold the
switch 3 for more than 1 second. Both the
average fuel economy and average speed are reset at the same time.
•
TIME/MILES
– Displays the elapsed time and distance driven since the last reset.
— T
o reset, push and hold the
switch 3 for more than 1 second. Both
elapsed time and distance driven are reset at the same time.
•
RANGE
– Displays the estimated distance the vehicle can be driven
before refueling.
•
OUTSIDE TEMP
– Displays the outside air temperature.
•
SET
TING – Allows you to set reminders or preferences for alerts, maintenance
intervals or language displays in the system.
—
Push the
switch 3 to cycle through the various setting modes.
—
Push the
switch 2 to choose the selected mode.
—
T
o return to the previous setting screen, push and hold the
switch 2
for more than 1 second.
• W
ARNING – Displays when a warning is present.
—
Push the switch 3 to select “Detail” then confirm with the switch
2. When there are multiple warnings, push the switch 2 to cycle
through all of them. To return to the initial warning, push and hold the
switch
2 for more than 1 second.
For more information, refer to the “Instruments and controls (section 2)” of your Owner’s Manual.
1
2
3
SYSTEM GUIDE
To view detailed instructional videos regarding these and other features, please go to www.nissanownersinfo.mobi.
Page 21 of 28

19
BLUETOOTH® HANDS-FREE PHONE SYSTEM1
A cellular telephone should not be used while driving so full attention may be given to
vehicle operation
2.
SYSTEM OPERATING TIPS
Press the button on the steering wheel to
interrupt the voice prompts at any time and
speak a command af ter the tone.
To use the system faster, you may speak the second level commands with the main menu
command on the main menu. For example, press the
button on the steering wheel,
and af ter the tone, say “Call Redial”.
The “Help” c ommand can be used to hear a
list of available commands at any time.
Reduce background noise as much as possible by closing windows and pointing HVAC vents away from the ceiling.
Speak naturally without long pauses and without raising your voice.
If you experience difficulty with the Voice Recognition System recognizing a contact name, please try saying both the first and last name of the contact as this improves recognition accuracy.
To cancel a Voice Recognition session, say “Cancel” or “Quit” or press and hold the
button on the steering wheel for 5 seconds.
For more detailed information and instructions, refer to your cellular phone’s Owner’s Manual and visit www.NissanUSA.com/bluetooth.
CONNECTING PROCEDURE
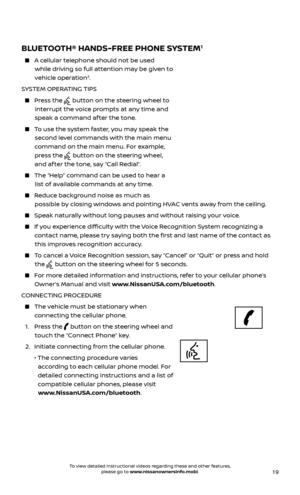
The vehicle must be stationary when connecting the cellular phone.
1.
Press the
button on the steering wheel and
touch the “Connect Phone” key.
2. Initiate c
onnecting from the cellular phone.
• The c
onnecting procedure varies
according to each cellular phone model. For
detailed connecting instructions and a list of
compatible cellular phones, please visit www.NissanUSA.com/bluetooth.
Microphone Bluetooth
®
controls
To view detailed instructional videos regarding these and other features, please go to www.nissanownersinfo.mobi.
Page 22 of 28

20
• When prompted, confirm the PIN on the
display with the PIN shown on the handset. If your device does not support Secure
Simple Pairing and requests you to input a PIN, enter “1234” from the handset.
•
Some c
ellular phones may incorrectly state
that the connection was unsuccessful. Please verify that the touch-screen displays
that the connection is successful, or touch “
Settings” > “Bluetooth” > “Select
BT Device” > “Phone” and confirm that your cellular phone is listed.
3.
When c
onnecting is complete, the screen will return to the Phone menu display.
PHONEBOOK SETUP
Press the MENU button on the control panel.
Touch the “ Settings” key on the Launch Bar, touch the “Phone” key and then
touch the “Phonebook” key.
Depending on y our cellular phone, the system may automatically download your
cellular phone’s entire phonebook to the vehicle’s Bluetooth®,1 system.
The Quick Dial phonebook c an also be set for up to five entries that can be used
with your cellular phone.
1.
T
ouch “Phone” on the Launch Bar and then
touch the “Quick Dial” key.
2.
T
ouch the “Add New” key at the top of the
display. There are different methods to input a phone number. Select one of the following options:
•
Copy from Call History to save a number from the Outgoing, Incoming or Missed
Calls lists.
•
Copy from Phonebook to save a number that has been downloaded from your handset to the vehicle.
•
Enter Number by Keypad to input the number and name manually.
SYSTEM GUIDE
To view detailed instructional videos regarding these and other features, please go to www.nissanownersinfo.mobi.
Page 23 of 28

21
MAKING A CALL
To make a call, follow this procedure:
1.
Press the
button on the steering wheel.
The Phone menu will appear on the control panel display.
2.
T
ouch one of the following:
•
“Quick Dial
”, “Phonebook” or “Call History” key.
Select the desired entry from the list and then the desired number, or
• T
o enter a number manually, touch the
“Dial Number” key, then enter the number and touch “OK”.
RECEIVING/ENDING A CALL
To accept the call:
•
Pr
ess the
button on the steering
wheel, or
• T
ouch the “Answer” key on the
touch-screen display.
To reject the call:
•
Pr
ess the
arrows on the steering wheel
to highlight “Decline” through the vehicle information display and press the OK button on the steering wheel, or
•
Touch the “Decline” key on the touch-screen display.
To hang up:
•
Pr
ess the
button on the steering wheel, or
• T
ouch the “Hang up” key on the touch-screen display.
1 Availability of specific features is dependent upon the phone’s Bluetooth® support. Please refer to your phone owner’s manual for details. Bluetooth® word mark and logos are owned by Bluetooth SIG, Inc.,
and any use of such marks by NISSAN is under license. See www.NissanUSA.com/bluetooth for details.
2 Some jurisdictions prohibit the use of cellular telephones while driving.
Compatible smartphone required. Text rates and/or data usage may apply.
To view detailed instructional videos regarding these and other features, please go to www.nissanownersinfo.mobi.
For more information, refer to the “Hands-Free Phone (section 4)” of the Multi Function Display Owner’s
Manual or please visit www.NissanUSA.com/bluetooth.
To view detailed instructional videos regarding these and other features, please go to www.nissanownersinfo.mobi.
Page 24 of 28
,
you can set up the wireless connection between your Bluetooth®,1 device and
y")
22
BLUETOOTH®,1 STREAMING AUDIO
If you have a compatible Bluetooth®,1 device with streaming audio (A2DP profile),
you can set up the wireless connection between your Bluetooth®,1 device and
your vehicle’s audio system. This connection allows you to listen to audio from
the Bluetooth®
,1 device using your vehicle’s speakers.
A cellular phone should not be used while driving so full attention may be given to vehicle operation2.
1. T
ouch the “
Audio” key and select the “Bluetooth Audio” key.
2.
A pr
ompt to connect your device will display.
• If the devic
e is already paired:
a.
T
ouch the “Select Devices” key to play
from an already paired device.
b
.
Selec
t the desired device and touch the
“Connect” key
1.
c.
The last pla
yed audio will start playing
once the device is connected.
• If the devic
e needs to be connected:
a.
Touch the “
Settings” key.
b
. Touch the “Bluetooth” key.
c.
Touch the “Connect Device” key.
Touch the “BT Menu” key to view track listing, artist, songs or albums.
Touch the “BT Settings” key to change which device is playing audio.1 Availability of specific features is dependent upon the phone’s Bluetooth® support. Please refer to your phone owner’s manual for details. Bluetooth® word mark and logos are owned by Bluetooth SIG, Inc., and
any use of such marks by NISSAN is under license. See www.NissanUSA.com/bluetooth for details.
2 Some jurisdictions prohibit the use of cellular telephones while driving.
Compatible smartphone required. Text rates and/or data usage may apply.
For more information, refer to the“Hands-Free Phone (section 4)” of the Multi Function Display Owner’s
Manual or please visit www.NissanUSA.com/bluetooth.
1
SYSTEM GUIDE
To view detailed instructional videos regarding these and other features, please go to www.nissanownersinfo.mobi.