2017 NISSAN GT-R steering
[x] Cancel search: steeringPage 178 of 248
7. Voice recognition
INFO:
Push <
>to stop the help announcements.
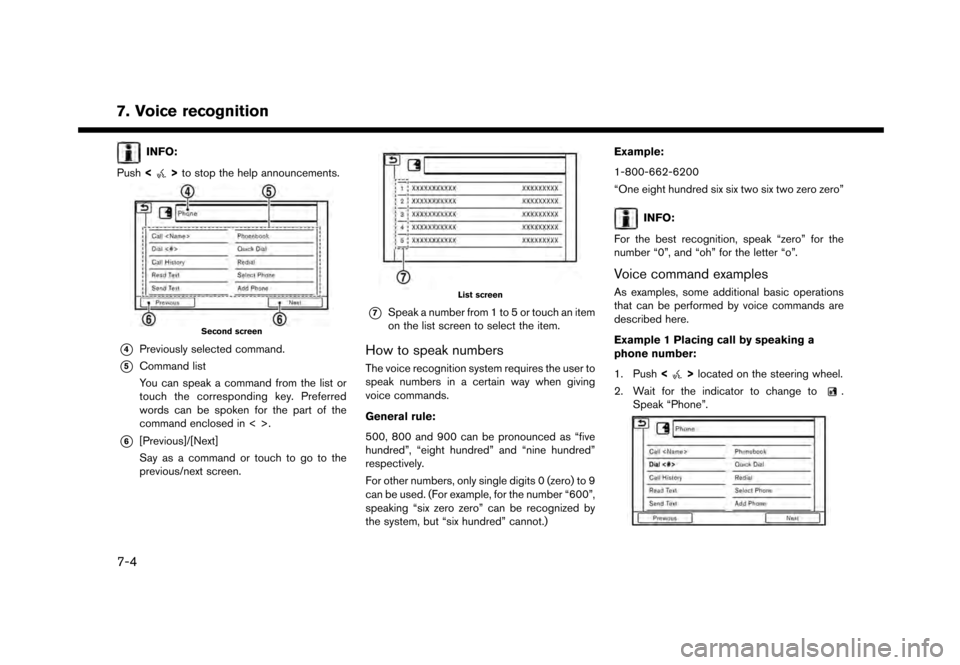
Second screen
*4Previously selected command.
*5Command list
You can speak a command from the list or
touch the corresponding key. Preferred
words can be spoken for the part of the
command enclosed in < >.
*6[Previous]/[Next]
Say as a command or touch to go to the
previous/next screen.
List screen
*7Speak a number from 1 to 5 or touch an item
on the list screen to select the item.
How to speak numbers
The voice recognition system requires the user to
speak numbers in a certain way when giving
voice commands.
General rule:
500, 800 and 900 can be pronounced as “five
hundred”, “eight hundred” and “nine hundred”
respectively.
For other numbers, only single digits 0 (zero) to 9
can be used. (For example, for the number “600”,
speaking “six zero zero” can be recognized by
the system, but “six hundred” cannot.) Example:
1-800-662-6200
“One eight hundred six six two six two zero zero”
INFO:
For the best recognition, speak “zero” for the
number “0”, and “oh” for the letter “o”.
Voice command examples
As examples, some additional basic operations
that can be performed by voice commands are
described here.
Example 1 Placing call by speaking a
phone number:
1. Push <
>located on the steering wheel.
2. Wait for the indicator to change to
.
Speak “Phone”.
7-4
Page 179 of 248
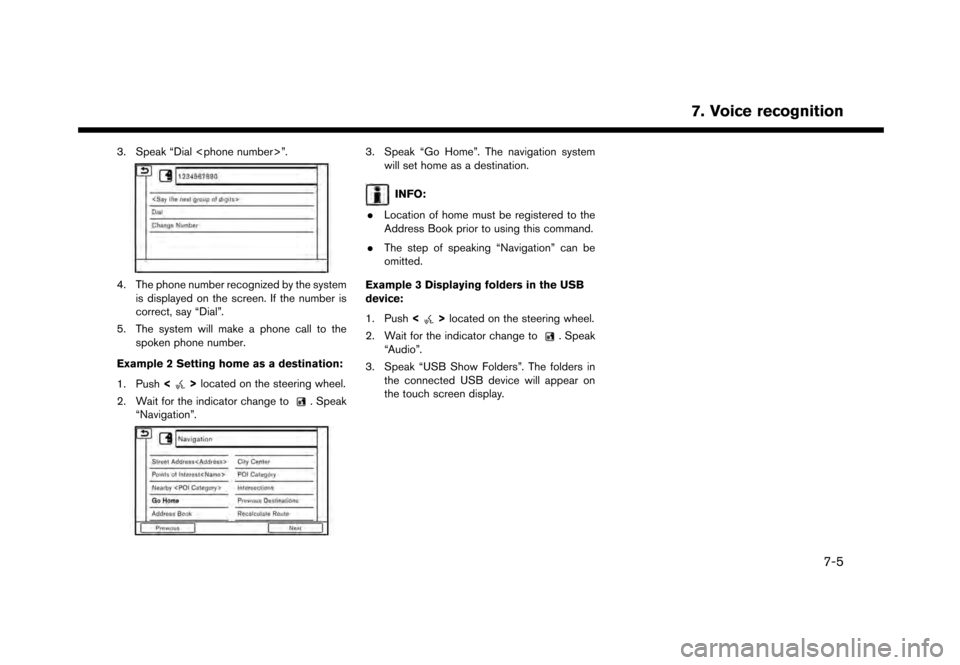
3. Speak “Dial
4. The phone number recognized by the systemis displayed on the screen. If the number is
correct, say “Dial”.
5. The system will make a phone call to the spoken phone number.
Example 2 Setting home as a destination:
1. Push <
>located on the steering wheel.
2. Wait for the indicator change to
. Speak
“Navigation”.
3. Speak “Go Home”. The navigation system will set home as a destination.
INFO:
. Location of home must be registered to the
Address Book prior to using this command.
. The step of speaking “Navigation” can be
omitted.
Example 3 Displaying folders in the USB
device:
1. Push <
>located on the steering wheel.
2. Wait for the indicator change to
. Speak
“Audio”.
3. Speak “USB Show Folders”. The folders in the connected USB device will appear on
the touch screen display.
7. Voice recognition
7-5
Page 193 of 248
8 Multi function meter
About multi function meter ...................................................... 8-2Safety notes ........................................................................\
.. 8-2
Multi function meter display .............................................. 8-2
Basic operation ........................................................................\
.. 8-3 How to view the function meter screen ......................... 8-3
How to switch screens ...................................................... 8-4
Custom view screen ................................................................. 8-5
Selecting panels .................................................................. 8-5 Performance and vehicle information panels .............. 8-7
Driving support screen ......................................................... 8-15
Acceleration screen ....................................................... 8-15
Braking screen ................................................................ 8-17
Steering screen .............................................................. 8-19
Driving record screen ........................................................... 8-20 Stopwatch screen .......................................................... 8-20
Page 198 of 248

8. Multi function meter
3. Touch the preferred item. The panel will bereplaced to show the selected item.
Panel list
Available items for large panels and small
panels:
Item Larg-
e pa- nel Small
panel
Engine Coolant Temperature X X
Engine Oil Temperature X X
Engine Oil Pressure X X
Transmission Oil Temperature X X
Transmission Oil Pressure X X
Boost X X
Speed X
Fuel/Range X X
Fuel Flow X X
Recent Fuel Economy X X
Torque Split X
Accel Pedal X
Brake Pedal X
Steering X
Accelerating G-Force X
Braking G-Force X
Cornering G-Force X X
Accel/Braking G-Force X XItem
Larg-
e pa- nel Small
panel
Total G-Force X X
Clock X
Reset the CUSTOM VIEW #(1-5)
to Default XX
INFO:
. Each panel selected will be saved.
. Panels will remain saved in the system even
after the engine is turned off.
. Two of the same panels cannot be displayed
at the same time.
. Two of the same panels of different sizes
cannot be displayed at the same time.
. Panels that have not been assigned a display
item remain empty.
Initializing display
The customized performance/vehicle information
screens can be initialized to return to the default
view.
8-6
Page 203 of 248
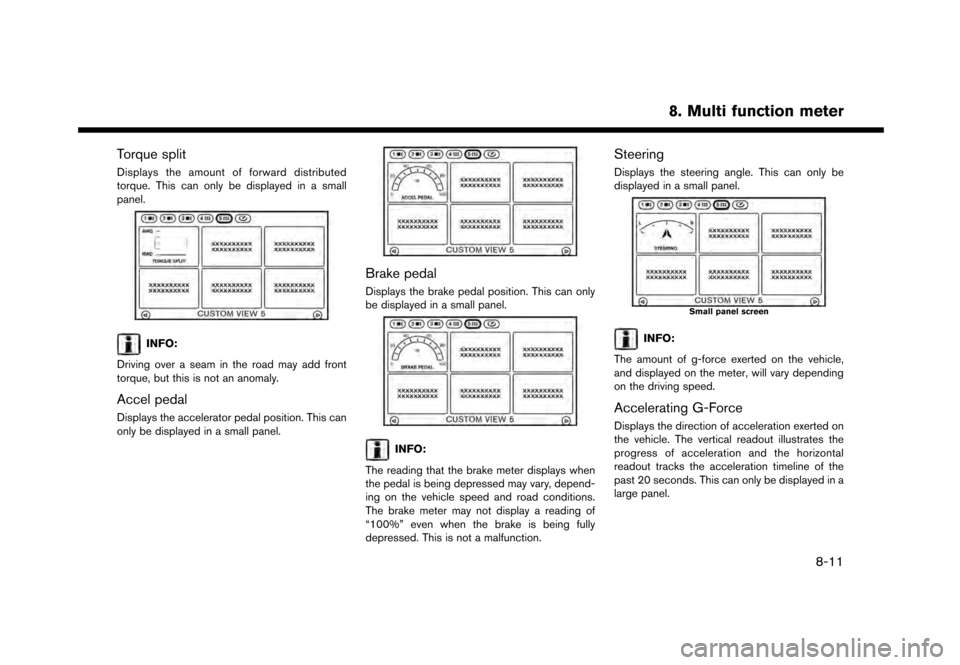
Torque split
Displays the amount of forward distributed
torque. This can only be displayed in a small
panel.
INFO:
Driving over a seam in the road may add front
torque, but this is not an anomaly.
Accel pedal
Displays the accelerator pedal position. This can
only be displayed in a small panel.
Brake pedal
Displays the brake pedal position. This can only
be displayed in a small panel.
INFO:
The reading that the brake meter displays when
the pedal is being depressed may vary, depend-
ing on the vehicle speed and road conditions.
The brake meter may not display a reading of
“100%” even when the brake is being fully
depressed. This is not a malfunction.
Steering
Displays the steering angle. This can only be
displayed in a small panel.
Small panel screen
INFO:
The amount of g-force exerted on the vehicle,
and displayed on the meter, will vary depending
on the driving speed.
Accelerating G-Force
Displays the direction of acceleration exerted on
the vehicle. The vertical readout illustrates the
progress of acceleration and the horizontal
readout tracks the acceleration timeline of the
past 20 seconds. This can only be displayed in a
large panel.
8. Multi function meter
8-11
Page 211 of 248
*4Because the brake pedal was depressed
quickly the vehicle stopped abruptly. The
graph becomes perpendicular to the time
scale.
STEERING SCREEN
The steering screen allows you to confirm how
the vehicle responds to your driving by displaying
the results of how you operate the vehicle. The
results of your driving are displayed as a timeline
of the g-force exerted on the vehicle. Use the
displayed information to improve your steering
smoothness.
WARNING
.Use the information from the multi
function meter strictly as a reference
to make your driving more comforta-
ble. The readings are not meant to
prevent accidents caused by reckless
driving or poor driving conditions
(due to weather, road condition,
etc.) . Always obey all traffic regula-
tions and posted speed limits.
. Red zone readings are configured to
function only as a guide for smooth
driving. The readings are not in-
tended to prevent accidents caused by reckless driving.
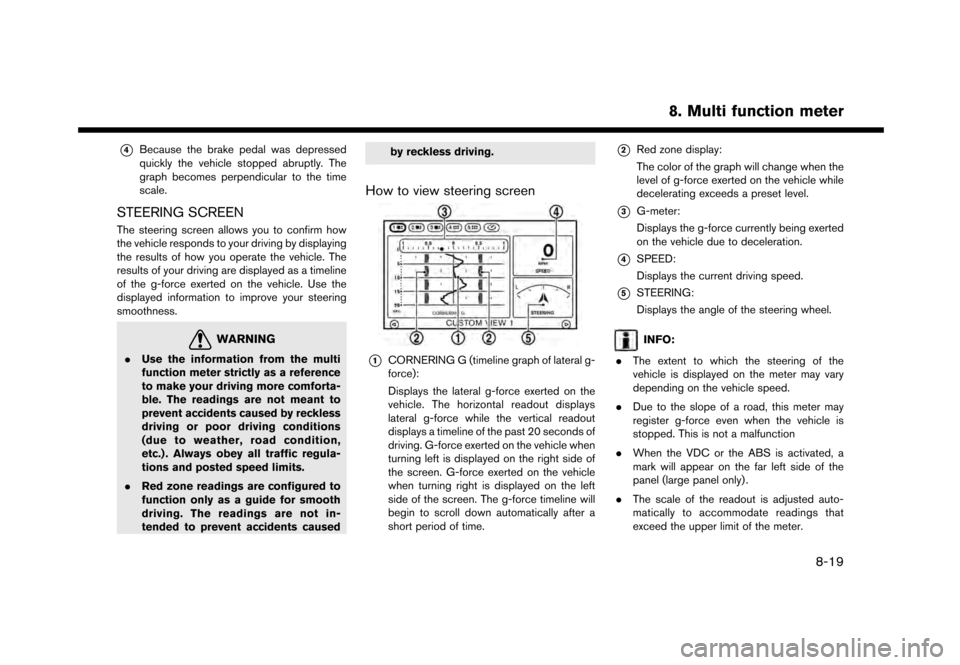
How to view steering screen
*1CORNERING G (timeline graph of lateral g-
force):
Displays the lateral g-force exerted on the
vehicle. The horizontal readout displays
lateral g-force while the vertical readout
displays a timeline of the past 20 seconds of
driving. G-force exerted on the vehicle when
turning left is displayed on the right side of
the screen. G-force exerted on the vehicle
when turning right is displayed on the left
side of the screen. The g-force timeline will
begin to scroll down automatically after a
short period of time.
*2Red zone display:
The color of the graph will change when the
level of g-force exerted on the vehicle while
decelerating exceeds a preset level.
*3G-meter:
Displays the g-force currently being exerted
on the vehicle due to deceleration.
*4SPEED:
Displays the current driving speed.
*5STEERING:
Displays the angle of the steering wheel.
INFO:
. The extent to which the steering of the
vehicle is displayed on the meter may vary
depending on the vehicle speed.
. Due to the slope of a road, this meter may
register g-force even when the vehicle is
stopped. This is not a malfunction
. When the VDC or the ABS is activated, a
mark will appear on the far left side of the
panel (large panel only) .
. The scale of the readout is adjusted auto-
matically to accommodate readings that
exceed the upper limit of the meter.
8. Multi function meter
8-19
Page 212 of 248
8. Multi function meter
Using result screens to improve driving
This section explains how to use the driving
timeline screens. Use this information to make
your driving smoother.
INFO:
The criteria for smooth driving may vary depend-
ing on road conditions. Use this information for
reference purposes only.
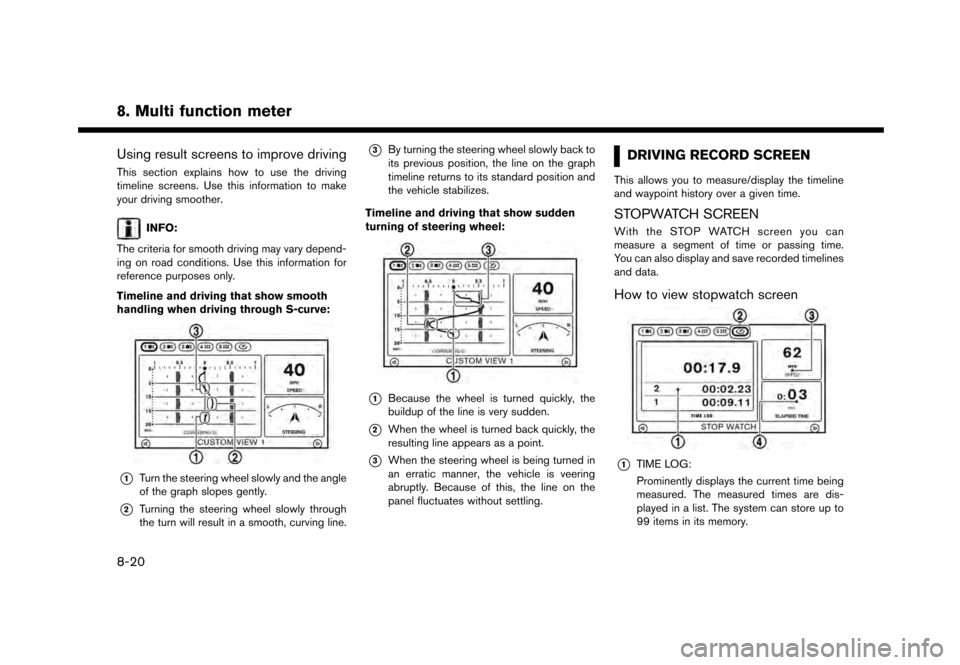
Timeline and driving that show smooth
handling when driving through S-curve:
*1Turn the steering wheel slowly and the angle
of the graph slopes gently.
*2Turning the steering wheel slowly through
the turn will result in a smooth, curving line.
*3By turning the steering wheel slowly back to
its previous position, the line on the graph
timeline returns to its standard position and
the vehicle stabilizes.
Timeline and driving that show sudden
turning of steering wheel:
*1Because the wheel is turned quickly, the
buildup of the line is very sudden.
*2When the wheel is turned back quickly, the
resulting line appears as a point.
*3When the steering wheel is being turned in
an erratic manner, the vehicle is veering
abruptly. Because of this, the line on the
panel fluctuates without settling.
DRIVING RECORD SCREEN
This allows you to measure/display the timeline
and waypoint history over a given time.
STOPWATCH SCREEN
With the STOP WATCH screen you can
measure a segment of time or passing time.
You can also display and save recorded timelines
and data.
How to view stopwatch screen
*1TIME LOG:
Prominently displays the current time being
measured. The measured times are dis-
played in a list. The system can store up to
99 items in its memory.
8-20
Page 213 of 248
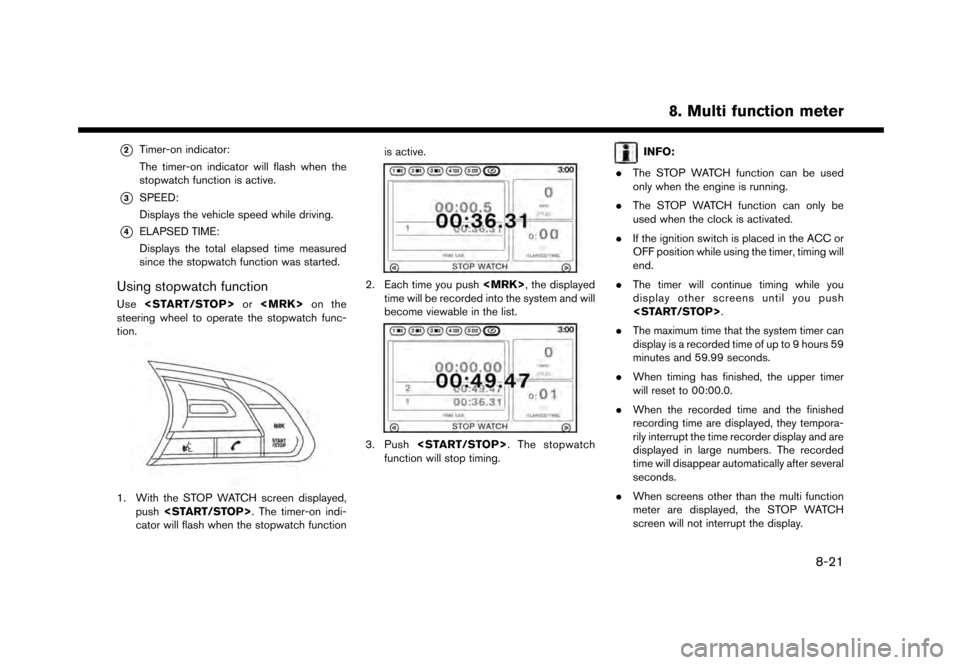
*2Timer-on indicator:
The timer-on indicator will flash when the
stopwatch function is active.
*3SPEED:
Displays the vehicle speed while driving.
*4ELAPSED TIME:
Displays the total elapsed time measured
since the stopwatch function was started.
Using stopwatch function
Use
steering wheel to operate the stopwatch func-
tion.
1. With the STOP WATCH screen displayed, push
cator will flash when the stopwatch function is active.
2. Each time you push
time will be recorded into the system and will
become viewable in the list.
3. Push
function will stop timing.
INFO:
. The STOP WATCH function can be used
only when the engine is running.
. The STOP WATCH function can only be
used when the clock is activated.
. If the ignition switch is placed in the ACC or
OFF position while using the timer, timing will
end.
. The timer will continue timing while you
display other screens until you push
. The maximum time that the system timer can
display is a recorded time of up to 9 hours 59
minutes and 59.99 seconds.
. When timing has finished, the upper timer
will reset to 00:00.0.
. When the recorded time and the finished
recording time are displayed, they tempora-
rily interrupt the time recorder display and are
displayed in large numbers. The recorded
time will disappear automatically after several
seconds.
. When screens other than the multi function
meter are displayed, the STOP WATCH
screen will not interrupt the display.
8. Multi function meter
8-21