Page 9 of 28

7
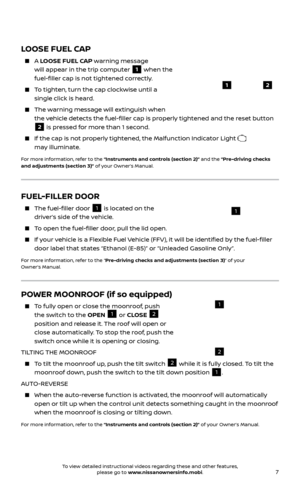
LOOSE FUEL CAP
A LOOSE FUEL CAP warning message
will appear in the trip computer
1 when the
fuel-filler cap is not tightened correctly.
To tighten, turn the cap clockwise until a single click is heard.
The warning message will extinguish when the vehicle detects the fuel-filler cap is properly tightened and the reset button
2 is pressed for more than 1 second.
If the cap is not properly tightened, the Malfunction Indicator Light
may illuminate.
For more information, refer to the “Instruments and controls (section 2)” and the “Pre-driving checks
and adjustments (section 3)” of your Owner’s Manual.
12
POWER MOONROOF (if so equipped)
To fully open or close the moonroof, push
the switch to the OPEN 1 or CLOSE 2
position and release it. The roof will open or
close automatically. To stop the roof, push the
switch once while it is opening or closing.
TILTING THE MOONROOF
To tilt the moonroof up, push the tilt switch 2 while it is fully closed. To tilt the
moonroof down, push the switch to the tilt down position
1.
AUTO-REVERSE
When the auto-r everse function is activated, the moonroof will automatically
open or tilt up when the control unit detects something caught in the moonroof
when the moonroof is closing or tilting down.
For more information, refer to the “Instruments and controls (section 2)” of your Owner’s Manual.
2
1
FUEL-FILLER DOOR
The fuel-filler door 1 is located on the
driver’s side of the vehicle.
To open the fuel-filler door, pull the lid open.
If your vehicle is a Flexible Fuel Vehicle (FFV), it will be identified by the fuel-filler door label that states “Ethanol (E-85)” or “Unleaded Gasoline Only”.
For more information, refer to the “Pre-driving checks and adjustments (section 3)” of your
Owner’s Manual.
1
To view detailed instructional videos regarding these and other features, please go to www.nissanownersinfo.mobi.
Page 10 of 28

FM/AM/SAT RADIO WITH COMPACT DISC (CD)
PLAYER (if so equipped)
1.
Pr
ess the ENTER/SETTING button
1 to
show the “Sett")
8
6
4
5
ESSENTIAL INFORMATION
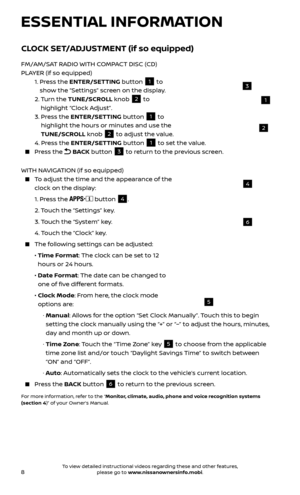
CLOCK SET/ADJUSTMENT (if so equipped)
FM/AM/SAT RADIO WITH COMPACT DISC (CD)
PLAYER (if so equipped)
1.
Pr
ess the ENTER/SETTING button
1 to
show the “Settings” screen on the display.
2.
Turn the TUNE/SCROLL knob
2 to
highlight “Clock Adjust”.
3.
Pr
ess the ENTER/SETTING button
1 to
highlight the hours or minutes and use the
TUNE/SCROLL knob
2 to adjust the value.
4.
Pr
ess the ENTER/SETTING button 1 to set the value. Press the
BACK button 3 to return to the previous screen.
WITH NAVIGATION (if so equipped)
To adjust the time and the appearance of the clock on the display:
1.
Press the
button
4.
2.
Touch the “Settings” key.
3.
Touch the “System” key.
4.
Touch the “Clock” key.
The following settings can be adjusted:
•
Time F
ormat: The clock can be set to 12
hours or 24 hours.
•
Date F
ormat: The date can be changed to
one of five different formats.
•
Clock Mode
: From here, the clock mode
options are:
·
Manual: Allows for the option “Set Clock Manually”. Touch this to begin
setting the clock manually using the “+” or “–” to adjust the hours, minutes,
day and month up or down.
·
Time Zone: Touch the “Time Zone” key
5 to choose from the applicable
time zone list and/or touch “Daylight Savings Time” to switch between
“ON” and “OFF”.
·
Auto: Automatically sets the clock to the vehicle’s current location.
Press the B ACK button
6 to return to the previous screen.
For more information, refer to the “Monitor, climate, audio, phone and voice recognition systems
(section 4)” of your Owner’s Manual.
1
3
2
To view detailed instructional videos regarding these and other features, please go to www.nissanownersinfo.mobi.
Page 11 of 28

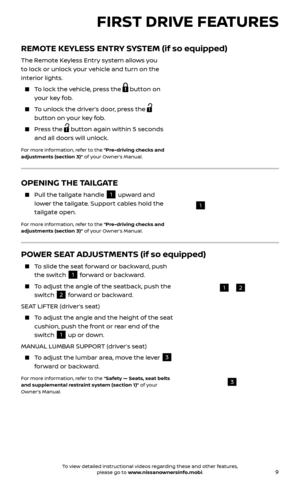
To slide the seat forward or backward, push the switch
1 forward or backward.
To adjust the angle of the seatback, push the
s")
9
FIRST DRIVE FEATURES
POWER SEAT ADJUSTMENTS (if so equipped)
To slide the seat forward or backward, push the switch
1 forward or backward.
To adjust the angle of the seatback, push the
switch
2 forward or backward.
SEAT LIFTER (driver’s seat)
To adjust the angle and the height of the seat cushion, push the front or rear end of the
switch
1 up or down.
MANUAL LUMBAR SUPPORT (driver’s seat)
To adjust the lumbar area, move the lever 3
forward or backward.
For more information, refer to the “Safety — Seats, seat belts
and supplemental restraint system (section 1)” of your
Owner’s Manual.
REMOTE KEYLESS ENTRY SYSTEM (if so equipped)
The Remote Keyless Entry system allows you
to lock or unlock your vehicle and turn on the
interior lights.
To lock the vehicle, press the button on
your key fob.
To unlock the driver’s door, press the
button on your key fob.
Press the button again within 5 seconds
and all doors will unlock.
For more information, refer to the “Pre-driving checks and
adjustments (section 3)” of your Owner’s Manual.
12
3
OPENING THE TAILGATE
Pull the tailgate handle 1 upward and
lower the tailgate. Support cables hold the
tailgate open.
For more information, refer to the “Pre-driving checks and
adjustments (section 3)” of your Owner’s Manual.
1
To view detailed instructional videos regarding these and other features, please go to www.nissanownersinfo.mobi.
Page 12 of 28

The outside mirror control switch is located
on the lef t side of the instrument panel.
To select the lef t or right mir")
10
FIRST DRIVE FEATURES
OUTSIDE MIRROR CONTROL SWITCH (if so equipped)
The outside mirror control switch is located
on the lef t side of the instrument panel.
To select the lef t or right mirror, move the switch
1.
Adjust each mirror to the desired position
using the switch
2.
To prevent accidentally moving the mirror,
move the switch
1 to the center
(neutral) position.
For more information, refer to the “Pre-driving checks and adjustments (section 3)” of your
Owner’s Manual.
STARTING/STOPPING THE ENGINE
AUTOMATIC TRANSMISSION (if so equipped)
Depress the brake pedal.
Move the shif t lever to the P (PARK) position.
Turn the ignition switch to S TA R T .
MANUAL TRANSMISSION (if so equipped)
Depress the brake pedal.
Depress the clutch pedal to the floor.
Move the shif t lever to the N (NEUTRAL) position.
Turn the ignition switch to S TA R T .
TURNING THE ENGINE OFF
For an automatic transmission, move the shif t lever to the P (PARK) position, apply the parking brake and turn the ignition switch to the LOCK position.
For a manual transmission, apply the clutch, apply the foot brake, move the shif t lever to 1st (FIRST) gear, apply the parking brake and turn the ignition switch to
the LOCK position.
For more information, refer to the “Starting and driving (section 5)” of your Owner’s Manual.
1
2
To view detailed instructional videos regarding these and other features, please go to www.nissanownersinfo.mobi.
Page 13 of 28

11
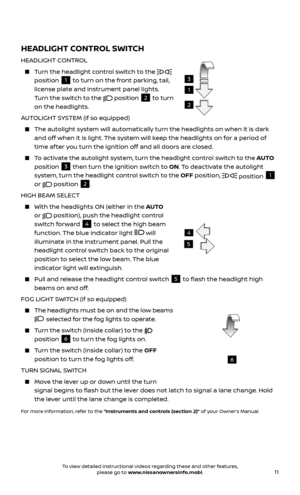
HEADLIGHT CONTROL SWITCH
HEADLIGHT CONTROL
Turn the headlight control switch to the
position 1 to turn on the front parking, tail,
license plate and instrument panel lights.
Turn the switch to the
position
2 to turn
on the headlights.
AUTOLIGHT SYSTEM (if so equipped)
The autolight system wil l automatically turn the headlights on when it is dark
and off when it is light. The system will keep the headlights on for a period of
time af ter you turn the ignition off and all doors are closed.
To activate the autolight system, turn the headlight control switch to the AUTO
position
3 then turn the ignition switch to ON. To deactivate the autolight
system, turn the headlight control switch to the OFF position, position 1
or position
2.
HIGH BEAM SELECT
With the he adlights ON (either in the AUTO
or
position), push the headlight control
switch forward
4 to select the high beam
function. The blue indicator light will
illuminate in the instrument panel. Pull the
headlight control switch back to the original
position to select the low beam. The blue
indicator light will extinguish.
Pull and release the headlight control switch 5 to flash the headlight high
beams on and off.
FOG LIGHT SWITCH (if so equipped)
The headlights must be on and the low beams
selected for the fog lights to operate.
Turn the switch (inside collar) to the
position 6 to turn the fog lights on.
Turn the switch (inside collar)
to the OFF
position to turn the fog lights off.
TURN SIGNAL SWITCH
Move the lever up or down until the turn signal begins to flash but the lever does not latch to signal a lane change. Hold
the lever until the lane change is completed.
For more information, refer to the “Instruments and controls (section 2)” of your Owner’s Manual.
4
5
6
1
3
2
To view detailed instructional videos regarding these and other features, please go to www.nissanownersinfo.mobi.
Page 14 of 28
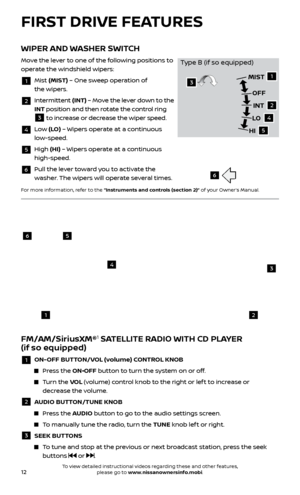
 – One sweep operation of
the wipers.
2 Intermi")
12
FIRST DRIVE FEATURES
WIPER AND WASHER SWITCH
Move the lever to one of the following positions to
operate the windshield wipers:
1 Mist (MIST) – One sweep operation of
the wipers.
2 Intermittent (INT) – Move the lever down to the
INT position and then rotate the control ring
3 to increase or decrease the wiper speed.
4 Low (LO) – Wipers operate at a continuous
low-speed.
5 High (HI) – Wipers operate at a continuous
high-speed.
6 Pull the lever toward you to activate the washer. The wipers will operate several times.
For more information, refer to the “Instruments and controls (section 2)” of your Owner’s Manual.
6
1
2
4
5
MIST
OFFINT
LO
HI3
Type B (if so equipped)
56
3
1
4
2
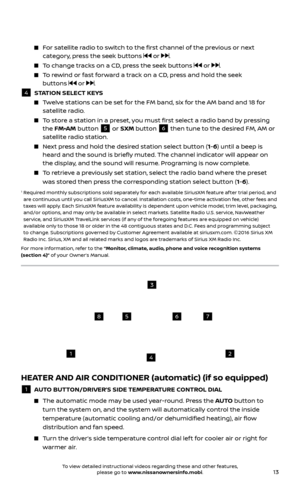
FM/AM/SiriusXM®1 SATELLITE RADIO WITH CD PLAYER
(if so equipped)
1 ON-OFF BUT TON/VOL (volume) CONTROL KNOB
Press the ON•OFF button to turn the system on or off.
Turn the VO L (volume) control knob to the right or lef t to increase or
decrease the volume.
2 A UDIO BUTTON/TUNE KNOB
Press the AUDIO button to go to the audio settings screen.
To manually tune the radio, turn the TUNE knob lef t or right.
3 SEEK BUT TONS
To tune and stop at the previous or next broadcast station, press the seek
buttons
or .
To view detailed instructional videos regarding these and other features, please go to www.nissanownersinfo.mobi.
Page 15 of 28
 (if so equipped)
1 AUTO BUTTON/DRIVER’S SIDE TEMPERATURE CONTROL DIAL
The automatic mode ma
y be used year-round. Press the AUTO button to
turn the s")
13
HEATER AND AIR CONDITIONER (automatic) (if so equipped)
1 AUTO BUTTON/DRIVER’S SIDE TEMPERATURE CONTROL DIAL
The automatic mode ma
y be used year-round. Press the AUTO button to
turn the system on, and the system will automatically control the inside
temperature (automatic cooling and/or dehumidified heating), air flow
distribution and fan speed.
Turn the driver’s side temperature control dial lef t for cooler air or right for warmer air.
For satellite radio to switch to the first channel of the previous or next category, press the seek buttons or .
To change tracks on a CD, press the seek buttons or .
To rewind or fast forward a track on a CD, press and hold the seek buttons or .
4 S TATION SELECT KEYS Twelve stations can be set for the FM band, six for the AM band and 18 for
satellite radio.
To store a station in a preset, you must first select a radio band by pressing the FM•AM button 5 or SXM button 6 then tune to the desired FM, AM or
satellite radio station.
Next press and hold the desired station select button (1-6) until a beep is heard and the sound is briefly muted. The channel indicator will appear on
the display, and the sound will resume. Programing is now complete.
To retrieve a previously set station, select the radio band where the preset was stored then press the corresponding station select button (1-6).
1 Required monthly subscriptions sold separately for each available SiriusXM feature af ter trial period, and are continuous until you call SiriusXM to cancel. Installation costs, one-time activation fee, other fees and
taxes will apply. Each SiriusXM feature availability is dependent upon vehicle model, trim level, packaging,
and/or options, and may only be available in select markets. Satellite Radio U.S. service, NavWeather
service, and SiriusXM TravelLink services (if any of the foregoing features are equipped on vehicle)
available only to those 18 or older in the 48 contiguous states and D.C. Fees and programming subject
to change. Subscriptions governed by Customer Agreement available at siriusxm.com. ©2016 Sirius XM
Radio Inc. Sirius, XM and all related marks and logos are trademarks of Sirius XM Radio Inc.
For more information, refer to the “Monitor, climate, audio, phone and voice recognition systems
(section 4)” of your Owner’s Manual.
1
5
2
6
3
7
4
8
To view detailed instructional videos regarding these and other features, please go to www.nissanownersinfo.mobi.
Page 16 of 28

14
FIRST DRIVE FEATURES
2 DUAL BUTTON/PASSENGER’S SIDE TEMPERATURE CONTROL DIAL Press the
DU AL button to turn the passenger’s side temperature controls
on or off. This will allow the passenger’s side temperature to be adjusted
independently from the driver’s side.
Turn the passenger’s side temperature control dial lef t for cooler air or right for warmer air.
3 F AN SPEED CONTROL DIAL/OFF BUTTON Turn the dial to the lef t to decrease fan speed or to the right to increase
fan speed.
Press the button to turn the system off.
To stop air from coming through the vents with the blower off, press the air recirculation button
7 .
4 AIR FL OW CONTROL BUTTONS Press one of the following air flow control buttons to manually control air flow:
Air flows from the center and side vents.
Air flows from the center, side and foot vents.
Air flo ws mainly from the foot vents.
Air flows from the front defroster and foot vents.
5 DEFR OSTING FRONT AND SIDE WINDOWS Press the front defroster button
to turn the system on. The A/C
automatically turns on when the front defroster mode is selected. This
feature removes humidity from the air.
Set the temper ature control dial
1 and the fan speed control dial 3 to
their maximum settings.
6 REAR WINDOW AND OUTSIDE MIRROR DEFROSTER SWITCH (if so equipped) Push the r
ear window defroster switch
to turn the system on or off.
The rear window defroster automatically turns off af ter approximately
15 minutes.
7 AIR RECIR CULATION BUTTON Press the air recirculation button
to recirculate air inside the vehicle.
The indicator light on the button will illuminate. This system is used to avoid
certain outside odors and to help adjust the inside vehicle temperature
more effectively.
Press the air recirculation button again to turn air recirculation off. This
allows outside air to be drawn into the passenger compartment to prevent
fogging in the front defroster, foot vent or front defroster/foot vent mode.
The air recirculation mode cannot be activated when the climate control system is in the front defroster mode
or the front defroster and foot
vent mode
.
8 A/C BUT TON Press the A/C button to manually turn the A/C on or off.
For more information, refer to the “Instruments and controls (section 2)” and the “Monitor, climate,
audio, phone and voice recognition systems (section 4)” of your Owner’s Manual.
To view detailed instructional videos regarding these and other features, please go to www.nissanownersinfo.mobi.