2017 NISSAN ARMADA warning light
[x] Cancel search: warning lightPage 192 of 614
SPA2450-A
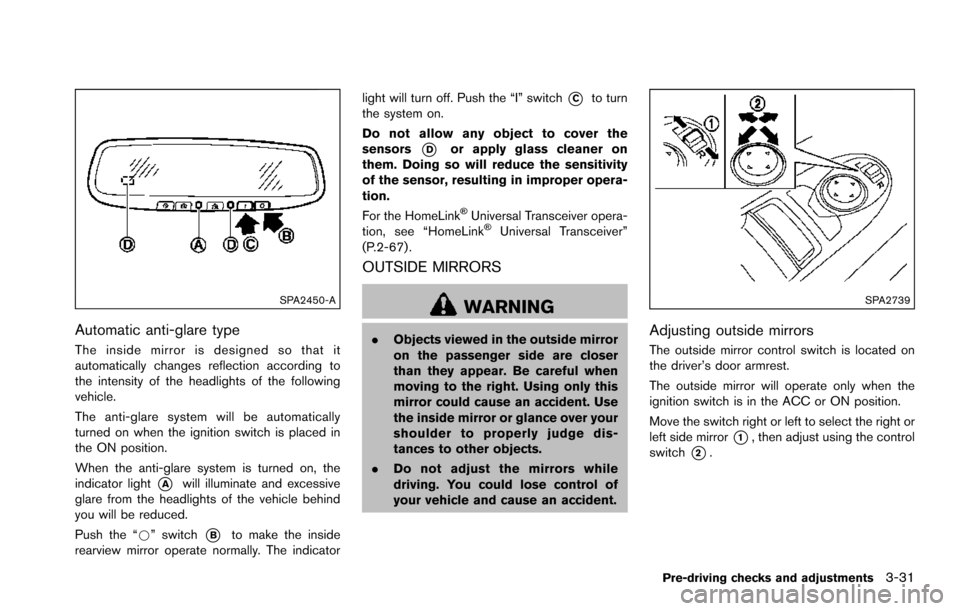
Automatic anti-glare type
The inside mirror is designed so that it
automatically changes reflection according to
the intensity of the headlights of the following
vehicle.
The anti-glare system will be automatically
turned on when the ignition switch is placed in
the ON position.
When the anti-glare system is turned on, the
indicator light
*Awill illuminate and excessive
glare from the headlights of the vehicle behind
you will be reduced.
Push the “*” switch
*Bto make the inside
rearview mirror operate normally. The indicator light will turn off. Push the “I” switch
*Cto turn
the system on.
Do not allow any object to cover the
sensors
*Dor apply glass cleaner on
them. Doing so will reduce the sensitivity
of the sensor, resulting in improper opera-
tion.
For the HomeLink
�ŠUniversal Transceiver opera-
tion, see “HomeLink�ŠUniversal Transceiver”
(P.2-67) .
OUTSIDE MIRRORS
WARNING
. Objects viewed in the outside mirror
on the passenger side are closer
than they appear. Be careful when
moving to the right. Using only this
mirror could cause an accident. Use
the inside mirror or glance over your
shoulder to properly judge dis-
tances to other objects.
. Do not adjust the mirrors while
driving. You could lose control of
your vehicle and cause an accident.
SPA2739
Adjusting outside mirrors
The outside mirror control switch is located on
the driver’s door armrest.
The outside mirror will operate only when the
ignition switch is in the ACC or ON position.
Move the switch right or left to select the right or
left side mirror
*1, then adjust using the control
switch
*2.
Pre-driving checks and adjustments3-31
Page 207 of 614
4-10Monitor, heater, air conditioner, audio, phone and voice recognition systems
SAA2479
SAA2480
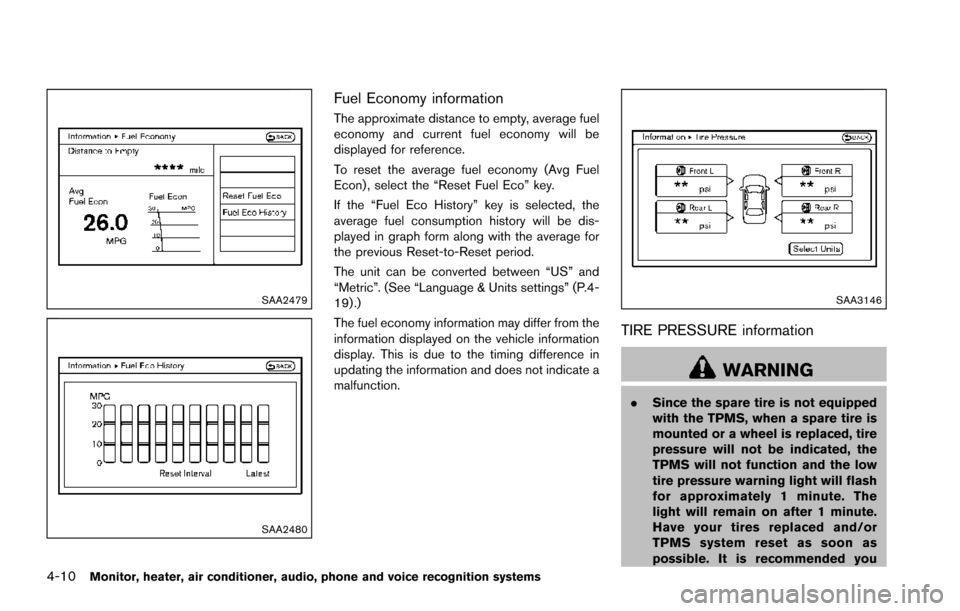
Fuel Economy information
The approximate distance to empty, average fuel
economy and current fuel economy will be
displayed for reference.
To reset the average fuel economy (Avg Fuel
Econ) , select the “Reset Fuel Eco” key.
If the “Fuel Eco History” key is selected, the
average fuel consumption history will be dis-
played in graph form along with the average for
the previous Reset-to-Reset period.
The unit can be converted between “US” and
“Metric”. (See “Language & Units settings” (P.4-
19) .)
The fuel economy information may differ from the
information displayed on the vehicle information
display. This is due to the timing difference in
updating the information and does not indicate a
malfunction.
SAA3146
TIRE PRESSURE information
WARNING
.Since the spare tire is not equipped
with the TPMS, when a spare tire is
mounted or a wheel is replaced, tire
pressure will not be indicated, the
TPMS will not function and the low
tire pressure warning light will flash
for approximately 1 minute. The
light will remain on after 1 minute.
Have your tires replaced and/or
TPMS system reset as soon as
possible. It is recommended you
Page 220 of 614
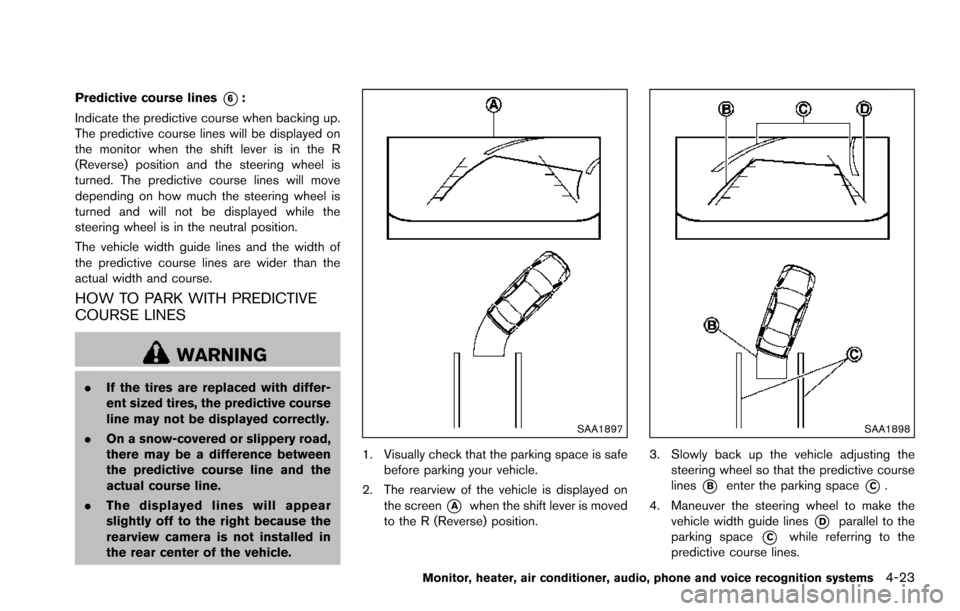
Predictive course lines*6:
Indicate the predictive course when backing up.
The predictive course lines will be displayed on
the monitor when the shift lever is in the R
(Reverse) position and the steering wheel is
turned. The predictive course lines will move
depending on how much the steering wheel is
turned and will not be displayed while the
steering wheel is in the neutral position.
The vehicle width guide lines and the width of
the predictive course lines are wider than the
actual width and course.
HOW TO PARK WITH PREDICTIVE
COURSE LINES
WARNING
. If the tires are replaced with differ-
ent sized tires, the predictive course
line may not be displayed correctly.
. On a snow-covered or slippery road,
there may be a difference between
the predictive course line and the
actual course line.
. The displayed lines will appear
slightly off to the right because the
rearview camera is not installed in
the rear center of the vehicle.
SAA1897
1. Visually check that the parking space is safe
before parking your vehicle.
2. The rearview of the vehicle is displayed on the screen
*Awhen the shift lever is moved
to the R (Reverse) position.
SAA1898
3. Slowly back up the vehicle adjusting the steering wheel so that the predictive course
lines
*Benter the parking space*C.
4. Maneuver the steering wheel to make the vehicle width guide lines
*Dparallel to the
parking space
*Cwhile referring to the
predictive course lines.
Monitor, heater, air conditioner, audio, phone and voice recognition systems4-23
Page 230 of 614
WARNING
.Objects in the bird’s-eye view will
appear further than the actual dis-
tance.
. Tall objects, such as a curb or
vehicle, may be misaligned or not
displayed at the seam of the views.
. Objects that are above the camera
cannot be displayed.
. The view for the bird’s-eye view may
be misaligned when the camera
position alters.
. A line on the ground may be mis-
aligned and is not seen as being
straight at the seam of the views.
The misalignment will increase as
the line proceeds away from the
vehicle.
. Tire angle display does not indicate
the actual tire angle.
JVH1141X
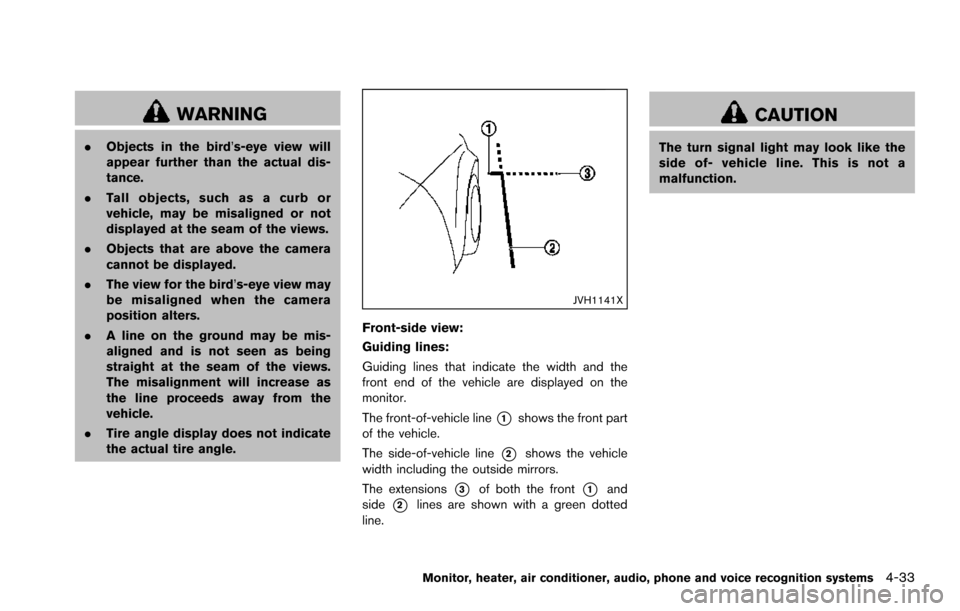
Front-side view:
Guiding lines:
Guiding lines that indicate the width and the
front end of the vehicle are displayed on the
monitor.
The front-of-vehicle line
*1shows the front part
of the vehicle.
The side-of-vehicle line
*2shows the vehicle
width including the outside mirrors.
The extensions
*3of both the front*1and
side
*2lines are shown with a green dotted
line.
CAUTION
The turn signal light may look like the
side of- vehicle line. This is not a
malfunction.
Monitor, heater, air conditioner, audio, phone and voice recognition systems4-33
Page 235 of 614
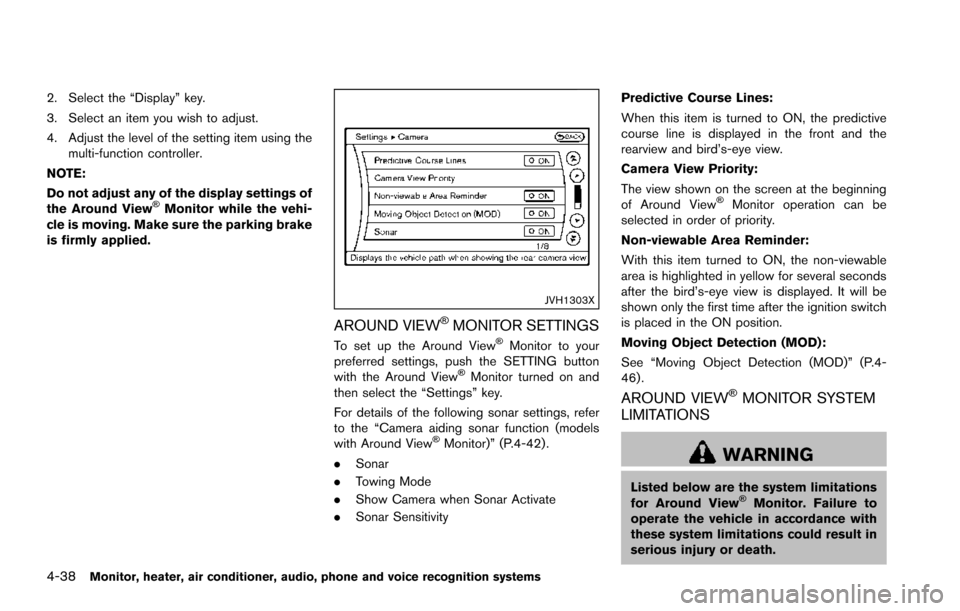
4-38Monitor, heater, air conditioner, audio, phone and voice recognition systems
2. Select the “Display” key.
3. Select an item you wish to adjust.
4. Adjust the level of the setting item using themulti-function controller.
NOTE:
Do not adjust any of the display settings of
the Around View
�ŠMonitor while the vehi-
cle is moving. Make sure the parking brake
is firmly applied.
JVH1303X
AROUND VIEW�ŠMONITOR SETTINGS
To set up the Around View�ŠMonitor to your
preferred settings, push the SETTING button
with the Around View
�ŠMonitor turned on and
then select the “Settings” key.
For details of the following sonar settings, refer
to the “Camera aiding sonar function (models
with Around View
�ŠMonitor)” (P.4-42) .
. Sonar
. Towing Mode
. Show Camera when Sonar Activate
. Sonar Sensitivity Predictive Course Lines:
When this item is turned to ON, the predictive
course line is displayed in the front and the
rearview and bird’s-eye view.
Camera View Priority:
The view shown on the screen at the beginning
of Around View
�ŠMonitor operation can be
selected in order of priority.
Non-viewable Area Reminder:
With this item turned to ON, the non-viewable
area is highlighted in yellow for several seconds
after the bird’s-eye view is displayed. It will be
shown only the first time after the ignition switch
is placed in the ON position.
Moving Object Detection (MOD):
See “Moving Object Detection (MOD)” (P.4-
46) .
AROUND VIEW�ŠMONITOR SYSTEM
LIMITATIONS
WARNING
Listed below are the system limitations
for Around View�ŠMonitor. Failure to
operate the vehicle in accordance with
these system limitations could result in
serious injury or death.
Page 246 of 614
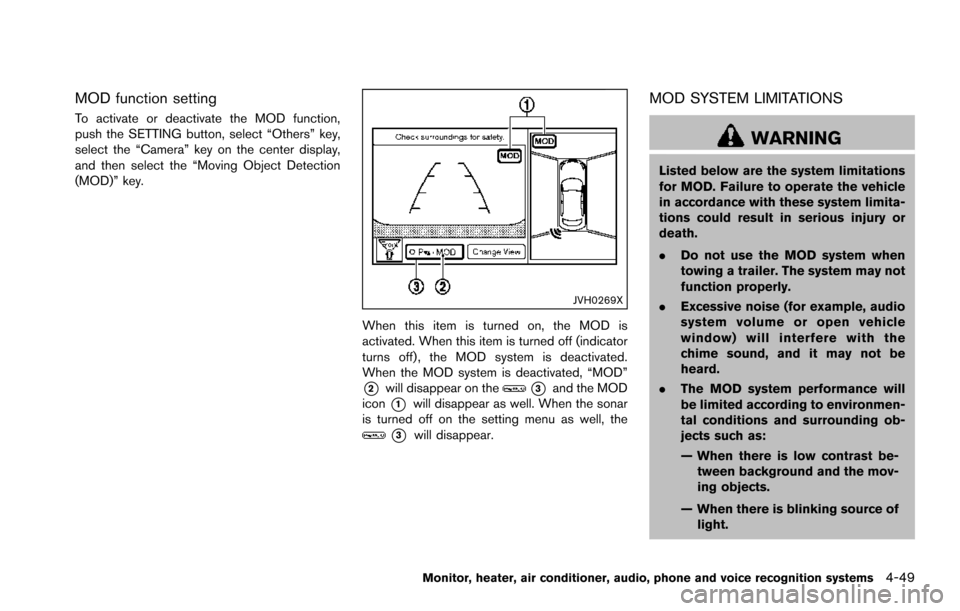
MOD function setting
To activate or deactivate the MOD function,
push the SETTING button, select “Others” key,
select the “Camera” key on the center display,
and then select the “Moving Object Detection
(MOD)” key.
JVH0269X
When this item is turned on, the MOD is
activated. When this item is turned off (indicator
turns off) , the MOD system is deactivated.
When the MOD system is deactivated, “MOD”
*2will disappear on the*3and the MOD
icon
*1will disappear as well. When the sonar
is turned off on the setting menu as well, the
*3will disappear.
MOD SYSTEM LIMITATIONS
WARNING
Listed below are the system limitations
for MOD. Failure to operate the vehicle
in accordance with these system limita-
tions could result in serious injury or
death.
. Do not use the MOD system when
towing a trailer. The system may not
function properly.
. Excessive noise (for example, audio
system volume or open vehicle
window) will interfere with the
chime sound, and it may not be
heard.
. The MOD system performance will
be limited according to environmen-
tal conditions and surrounding ob-
jects such as:
— When there is low contrast be-
tween background and the mov-
ing objects.
— When there is blinking source of light.
Monitor, heater, air conditioner, audio, phone and voice recognition systems4-49
Page 289 of 614
4-92Monitor, heater, air conditioner, audio, phone and voice recognition systems
ANTENNA
Window antenna
The antenna pattern is printed inside the rear
side glass.
CAUTION
.Do not place metalized film near the
3rd row seat window or attach any
metal parts to it. This may cause
poor reception or noise.
. When cleaning the inside of the rear
side window, be careful not to
scratch or damage the rear side
window antenna. Lightly wipe along
the antenna with a dampened soft
cloth.
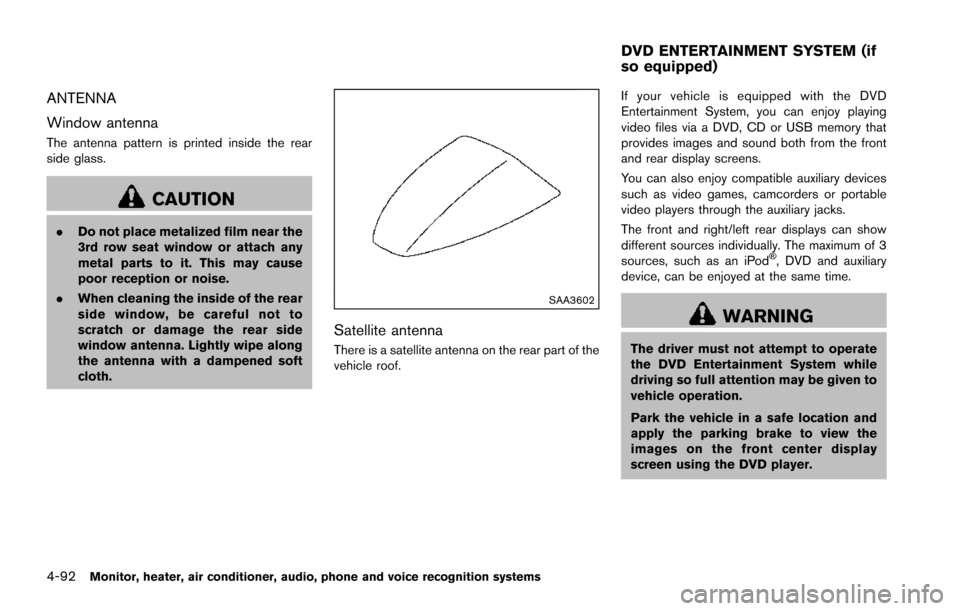
SAA3602
Satellite antenna
There is a satellite antenna on the rear part of the
vehicle roof. If your vehicle is equipped with the DVD
Entertainment System, you can enjoy playing
video files via a DVD, CD or USB memory that
provides images and sound both from the front
and rear display screens.
You can also enjoy compatible auxiliary devices
such as video games, camcorders or portable
video players through the auxiliary jacks.
The front and right/left rear displays can show
different sources individually. The maximum of 3
sources, such as an iPod
�Š, DVD and auxiliary
device, can be enjoyed at the same time.
WARNING
The driver must not attempt to operate
the DVD Entertainment System while
driving so full attention may be given to
vehicle operation.
Park the vehicle in a safe location and
apply the parking brake to view the
images on the front center display
screen using the DVD player.
DVD ENTERTAINMENT SYSTEM (if
so equipped)
Page 343 of 614
System malfunction .......................................................... 5-55
System maintenance ....................................................... 5-55
Back-up Collision Intervention (BCI) (if
so equipped) ........................................................................\
... 5-56
BCI system operation ..................................................... 5-58
Turning the BCI system ON/OFF ................................ 5-62
How to enable/disable the BCI system ..................... 5-62
BCI system precautions ................................................. 5-64
System temporarily unavailable ..................................... 5-65
System malfunction .......................................................... 5-66
System maintenance ....................................................... 5-66
Cruise control (if so equipped) .......................................... 5-67 Precautions on cruise control ....................................... 5-67
Cruise control operations ............................................... 5-67
Intelligent Cruise Control (ICC) (if so equipped) .......... 5-69 How to select the cruise control mode ...................... 5-71
Vehicle-to-vehicle distance control mode .................. 5-71
Conventional (fixed speed) cruise control mode ..... 5-87
Distance Control Assist (DCA) (if so equipped) ........... 5-91 DCA system operation .................................................. 5-93
Turning the DCA system ON/OFF .............................. 5-96
How to enable/disable the DCA system ................... 5-97
DCA system display and indicators ............................ 5-98
DCA system limitations ................................................... 5-98
System temporarily unavailable .................................. 5-102
System malfunction ....................................................... 5-104
System maintenance .................................................... 5-104 Forward Emergency Braking (FEB) (if
so equipped) ....................................................................... 5-105
FEB system operation ............................................... 5-107
Turning the FEB system ON/OFF .......................... 5-108
FEB system limitations .............................................. 5-109
System temporarily unavailable ............................... 5-110
System malfunction .................................................... 5-111
System maintenance .................................................. 5-111
Predictive Forward Collision Warning (PFCW) (if
so equipped) ....................................................................... 5-112 PFCW system operation ........................................... 5-114
Turning the PFCW system ON/OFF ...................... 5-115
PFCW system limitations .......................................... 5-118
System temporarily unavailable ............................... 5-119
System malfunction .................................................... 5-119
System maintenance .................................................. 5-120
Break-in schedule .............................................................. 5-121
Fuel efficient driving tips .................................................. 5-121
Increasing fuel economy ................................................... 5-122
NISSAN all-mode 4WD
�Š(if so equipped) ................. 5-123
NISSAN all-mode 4WD�Šsystem ........................... 5-123
4WD shift switch ........................................................ 5-127
4WD shift indicator .................................................... 5-128
4WD warning light ..................................................... 5-128
Hill Start Assist system ..................................................... 5-130
Parking/parking on hills ..................................................... 5-131
TOW mode ........................................................................\
.. 5-132