2017 NISSAN ARMADA brake light
[x] Cancel search: brake lightPage 480 of 614
The computer has a built-in diagnostic feature
that tests the system each time you start the
engine and move the vehicle forward or in
reverse at a slow speed. When the self-test
occurs, you may hear a “clunk” noise and/or feel
a pulsation in the brake pedal. This is normal and
is not an indication of a malfunction.
WARNING
.The VDC system is designed to help
improve driving stability but does
not prevent accidents due to abrupt
steering operation at high speeds or
by careless or dangerous driving
techniques. Reduce vehicle speed
and be especially careful when driv-
ing and cornering on slippery sur-
faces and always drive carefully.
. Do not modify the vehicle’s suspen-
sion. If suspension parts such as
shock absorbers, struts, springs,
stabilizer bars, bushings and
wheels are not NISSAN recom-
mended for your vehicle or are
extremely deteriorated, the VDC
system may not operate properly.
This could adversely affect vehicle
handling performance, and the VDC warning light
may illuminate.
. If brake related parts such as brake
pads, rotors and calipers are not
NISSAN recommended or are extre-
mely deteriorated, the VDC system
may not operate properly and the
VDC warning light
may illumi-
nate.
. If engine control related parts are
not NISSAN recommended or are
extremely deteriorated, the VDC
warning light
may illuminate.
. When driving on extremely inclined
surfaces such as higher banked
corners, the VDC system may not
operate properly and the VDC warn-
ing light
may illuminate. Do not
drive on these types of roads.
. When driving on an unstable sur-
face such as a turntable, ferry,
elevator or ramp, the VDC warning
light
may illuminate. This is not
a malfunction. Restart the engine
after driving onto a stable surface.
. If wheels or tires other than the
NISSAN recommended ones are
used, the VDC system may not
operate properly and the VDC warn- ing light
may illuminate.
. The VDC system is not a substitute
for winter tires or tire chains on a
snow covered road.
Starting and driving5-139
Page 496 of 614
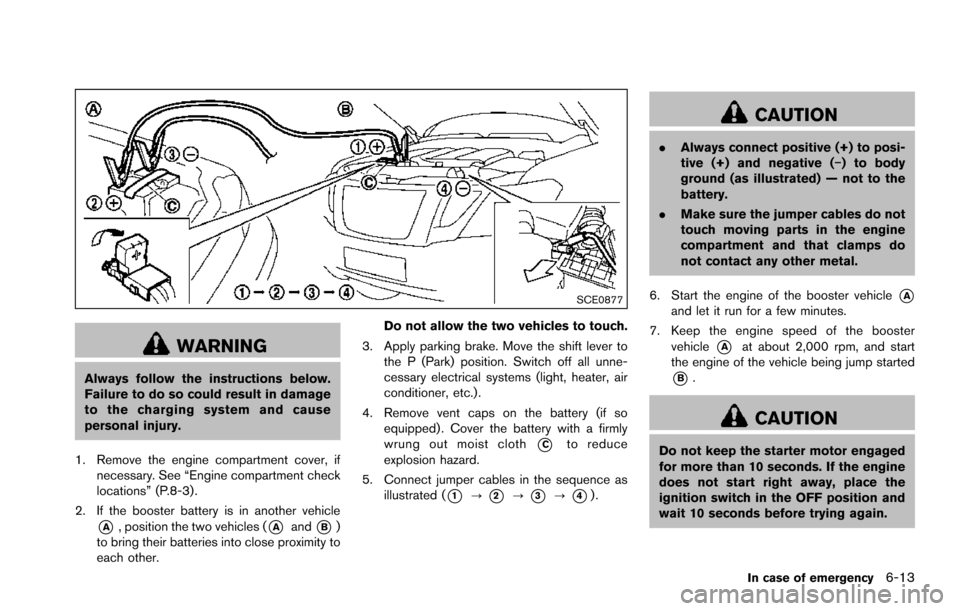
SCE0877
WARNING
Always follow the instructions below.
Failure to do so could result in damage
to the charging system and cause
personal injury.
1. Remove the engine compartment cover, if necessary. See “Engine compartment check
locations” (P.8-3).
2. If the booster battery is in another vehicle
*A, position the two vehicles (*Aand*B)
to bring their batteries into close proximity to
each other. Do not allow the two vehicles to touch.
3. Apply parking brake. Move the shift lever to the P (Park) position. Switch off all unne-
cessary electrical systems (light, heater, air
conditioner, etc.) .
4. Remove vent caps on the battery (if so equipped) . Cover the battery with a firmly
wrung out moist cloth
*Cto reduce
explosion hazard.
5. Connect jumper cables in the sequence as illustrated (
*1?*2?*3?*4).
CAUTION
.Always connect positive (+) to posi-
tive (+) and negative (�í) to body
ground (as illustrated) — not to the
battery.
. Make sure the jumper cables do not
touch moving parts in the engine
compartment and that clamps do
not contact any other metal.
6. Start the engine of the booster vehicle
*Aand let it run for a few minutes.
7. Keep the engine speed of the booster vehicle
*Aat about 2,000 rpm, and start
the engine of the vehicle being jump started
*B.
CAUTION
Do not keep the starter motor engaged
for more than 10 seconds. If the engine
does not start right away, place the
ignition switch in the OFF position and
wait 10 seconds before trying again.
In case of emergency6-13
Page 503 of 614
6-20In case of emergency
Rocking a stuck vehicle
If your vehicle is stuck in sand, snow, mud, etc.,
use the following procedure:
1. Turn off the Vehicle Dynamic Control (VDC)system.
2. Make sure the area in front and behind the vehicle is clear of obstructions.
3. Turn the steering wheel right and left to clear an area around the front tires.
4. Slowly rock the vehicle forward and back- ward.
.Shift back and forth between R (Reverse)and D (Drive) .
.Apply the accelerator as little as possibleto maintain the rocking motion.
.Release the accelerator pedal before
shifting between R and D.
.Do not spin the tires above 35 MPH (55 km/h) .
5. If the vehicle cannot be freed after a few tries, contact a professional towing service
to remove the vehicle. This section describes the procedure for manu-
ally shifting the vehicle into the 4WD mode (4L
position) in case of an emergency.
WHEN 4WD WARNING LIGHT ILLU-
MINATES
If the 4WD warning light illuminates while
driving, there may be a malfunction in the
4WD system. Stop the vehicle and have the
vehicle checked as soon as possible. It is
recommended you contact a NISSAN dealer
for this service. (See “NISSAN all-mode 4WD
�Š”
(P.5-123) .)
When the vehicle is stuck on an uneven road
(desert, mud, etc.) and the 4WD warning light is
illuminated, be sure to place the 4WD shift
switch in the 4L position. If only the rear wheels
are spinning, this means that the transfer has not
switched to the 4L position electrically.
If this situation occurs, contact a dealer or road
assistance service for help. If an immediate
service is not available, perform the following
procedure to switch to the 4L position manually
and free the vehicle.
CAUTION
Only perform this procedure in an
emergency. If the vehicle is driven for a long period
of time over a long distance with a
component detached, foreign material
such as water, sand, etc. may enter from
the opening and this may cause a
malfunction in the drivetrain system.
After freeing a vehicle that has become
stuck, it is recommended you contact a
NISSAN dealer for inspection and re-
pair.
WARNING
.
Ensure your safety before perform-
ing the operations. The vehicle may
move unexpectedly.
. Place the ignition switch in the OFF
position, apply the parking brake
and let the vehicle cool down.
. Do not perform the following proce-
dure immediately after driving the
vehicle. Parts such as exhaust com-
ponents, the transmission, etc. are
very hot and may cause a burn
injury.
. Make sure that the parts that will be
operated as well as related parts
FOUR-WHEEL DRIVE (4WD)
MANUAL SHIFTING (4WD models)
Page 516 of 614
8 Do-it-yourself
Maintenance precautions ........................................................ 8-2
Engine compartment check locations .................................. 8-3VK56VD engine ................................................................... 8-3
Engine cooling system ............................................................. 8-4 Checking engine coolant level ......................................... 8-5
Changing engine coolant .................................................. 8-5
Engine oil ........................................................................\
............ 8-6 Checking engine oil level .................................................. 8-6
Changing engine oil and filter .......................................... 8-6
Automatic Transmission Fluid (ATF) ..................................... 8-8
Power steering fluid .................................................................. 8-8
Brake fluid ........................................................................\
........... 8-9
Window washer fluid ............................................................ 8-10
Battery ........................................................................\
............... 8-11 Jump starting ..................................................................... 8-13
Variable voltage control system .......................................... 8-13
Drive belts ........................................................................\
........ 8-13
Spark plugs ........................................................................\
..... 8-14 Replacing spark plugs .................................................... 8-14
Air cleaner ........................................................................\
........ 8-15 Windshield wiper blades ..................................................... 8-16
Cleaning ........................................................................\
... 8-16
Replacing ........................................................................\
. 8-16
Rear window wiper blades ................................................. 8-17
Brakes ........................................................................\
.............. 8-17 Self-adjusting brakes .................................................... 8-17
Brake pad wear warning .............................................. 8-17
Brake booster ................................................................. 8-18
Fuses ........................................................................\
................ 8-18 Engine compartment ..................................................... 8-19
Passenger compartment .............................................. 8-20
Intelligent Key battery replacement ................................... 8-21
Lights ........................................................................\
................ 8-24
Headlights ........................................................................\
8-25
Exterior and interior lights ............................................ 8-26
Wheels and tires ................................................................... 8-30
Tire pressure ................................................................... 8-30
Tire labeling ..................................................................... 8-34
Types of tires ................................................................... 8-36
Tire chains ....................................................................... 8-36
Changing wheels and tires .......................................... 8-37
Page 525 of 614
8-10Do-it-yourself
SDI2513
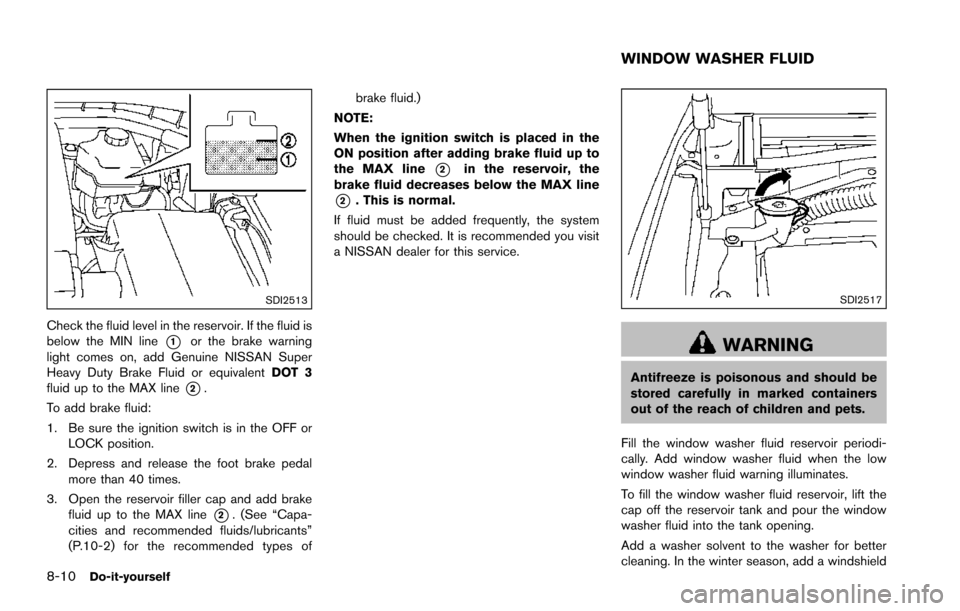
Check the fluid level in the reservoir. If the fluid is
below the MIN line
*1or the brake warning
light comes on, add Genuine NISSAN Super
Heavy Duty Brake Fluid or equivalent DOT 3
fluid up to the MAX line
*2.
To add brake fluid:
1. Be sure the ignition switch is in the OFF or LOCK position.
2. Depress and release the foot brake pedal more than 40 times.
3. Open the reservoir filler cap and add brake fluid up to the MAX line
*2. (See “Capa-
cities and recommended fluids/lubricants”
(P.10-2) for the recommended types of brake fluid.)
NOTE:
When the ignition switch is placed in the
ON position after adding brake fluid up to
the MAX line
*2in the reservoir, the
brake fluid decreases below the MAX line
*2. This is normal.
If fluid must be added frequently, the system
should be checked. It is recommended you visit
a NISSAN dealer for this service.
SDI2517
WARNING
Antifreeze is poisonous and should be
stored carefully in marked containers
out of the reach of children and pets.
Fill the window washer fluid reservoir periodi-
cally. Add window washer fluid when the low
window washer fluid warning illuminates.
To fill the window washer fluid reservoir, lift the
cap off the reservoir tank and pour the window
washer fluid into the tank opening.
Add a washer solvent to the washer for better
cleaning. In the winter season, add a windshield
WINDOW WASHER FLUID
Page 533 of 614
8-18Do-it-yourself
occasional brake squeak, squeal or other noise
may be heard. Occasional brake noise during
light to moderate stops is normal and does not
affect the function or performance of the brake
system.
Proper brake inspection intervals should
be followed.For additional information, see the
maintenance schedule shown in the “9. Main-
tenance and schedules” section.
BRAKE BOOSTER
Check the brake booster function as follows:
1. With the engine off, depress and release the foot brake pedal more than 20 times. When
the foot brake pedal movement (distance of
travel) remains the same from one pedal
application to the next, continue on to the
next step.
2. While depressing the foot brake pedal, start the engine.
3. With the foot brake pedal depressed, stop the engine. Keep the pedal depressed for
about 30 seconds.
4. Run the engine for 1 minute without depressing the foot brake pedal, then turn
it off. Depress the foot brake pedal several
times. The pedal travel distance will de-
crease gradually with each depression as
the hydraulic pressure decreases. If the brakes do not operate properly, have the
brakes checked. It is recommended that you visit
a NISSAN dealer for repair.
SDI2518
SDI2532
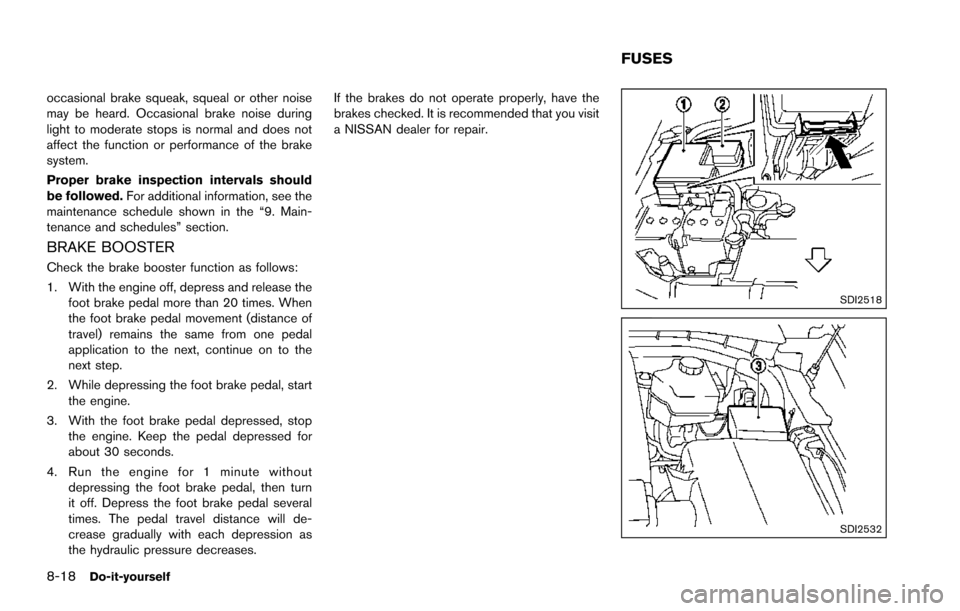
FUSES
Page 554 of 614
tires on the rear axle. Placing new
tires on the front axle may cause
loss of vehicle control in some
driving conditions and cause an
accident and personal injury.
. If the wheels are changed for any
reason, always replace with wheels
which have the same off-set dimen-
sion. Wheels of a different off-set
could cause premature tire wear,
degrade vehicle handling character-
istics and/or interference with the
brake discs/drums. Such interfer-
ence can lead to decreased braking
efficiency and/or early brake pad/
shoe wear. See “Wheels and tires”
(P.10-9) for wheel off-set dimen-
sions.
. Since the spare tire is not equipped
with the TPMS, when a spare tire is
mounted or a wheel is replaced, the
TPMS will not function and the low
tire pressure warning light will flash
for approximately 1 minute. The
light will remain on after 1 minute.
Have your tires replaced and/or
TPMS system reset as soon as
possible. It is recommended you
visit a NISSAN dealer for these services.
. Replacing tires with those not ori-
ginally specified by NISSAN could
affect the proper operation of the
TPMS.
. The TPMS sensor may be damaged
if it is not handled correctly. Be
careful when handling the TPMS
sensor.
. When replacing the TPMS sensor,
the ID registration may be required.
It is recommended you visit a
NISSAN dealer for ID registration.
. Do not use a valve stem cap that is
not specified by NISSAN. The valve
stem cap may become stuck.
. Be sure that the valve stem caps are
correctly fitted. Otherwise the valve
may be clogged up with dirt and
cause a malfunction or loss of
pressure.
. Do not install a damaged or de-
formed wheel or tire even if it has
been repaired. Such wheels or tires
could have structural damage and
could fail without warning.
. The use of retread tire is not re-
commended. .
For additional information regard-
ing tires, refer to “Important Tire
Safety Information” (US) or“Tire
Safety Information” (Canada) in the
Warranty Information Booklet.
Four-Wheel Drive (4WD) models
CAUTION
. Always use tires of the same type,
size, brand, construction (bias, bias-
belted or radial) , and tread pattern
on all four wheels. Failure to do so
may result in a circumference differ-
ence between tires on the front and
rear axles which will cause exces-
sive tire wear and may damage the
transmission, transfer case and dif-
ferential gears.
. ONLY use spare tires specified for
the 4WD model.
If excessive tire wear is found, it is recom-
mended that all four tires be replaced with tires
of the same size, brand, construction and tread
pattern. The tire pressure and wheel alignment
should also be checked and corrected as
Do-it-yourself8-39
Page 558 of 614
When driving in areas using road salt or other
corrosive materials, check lubrication frequently.
Lights*:Clean the headlights on a regular basis.
Make sure that the headlights, stop lights, tail
lights, turn signal lights, and other lights are all
operating properly and installed securely. Also
check headlight aim.
Road wheel nuts (lug nuts)*: When checking
the tires, make sure no wheel nuts are missing,
and check for any loose wheel nuts. Tighten if
necessary.
Tire rotation*: Tires should be rotated every
5,000 miles (8,000 km) .
Tires*: Check the pressure with a gauge often
and always prior to long distance trips. If
necessary, adjust the pressure in all tires,
including the spare, to the pressure specified.
Check carefully for damage, cuts or excessive
wear.
Tire Pressure Monitoring System (TPMS)
transmitter components: Replace the TPMS
transmitter grommet seal, valve core and cap
when the tires are replaced due to wear or age.
Wheel alignment and balance: If the vehicle
should pull to either side while driving on a
straight and level road, or if you detect uneven or
abnormal tire wear, there may be a need for
wheel alignment. If the steering wheel or seat vibrates at normal
highway speeds, wheel balancing may be
needed.
For additional information regarding tires, refer
to “Important Tire Safety Information” (US) or
“Tire Safety Information” (Canada) in the
NISSAN Warranty Information Booklet.
Windshield:
Clean the windshield on a regular
basis. Check the windshield at least every six
months for cracks or other damage. Have a
damaged windshield repaired by a qualified
repair facility.
Windshield wiper blades*: Check for cracks
or wear if they do not wipe properly.
Inside the vehicle
The maintenance items listed here should be
checked on a regular basis, such as when
performing scheduled maintenance, cleaning
the vehicle, etc.
Accelerator pedal: Check the pedal for
smooth operation and make sure the pedal
does not catch or require uneven effort. Keep
the floor mat away from the pedal.
Automatic transmission P (Park) mechan-
ism: On a fairly steep hill, check that your
vehicle is held securely with the shift lever in the
P (Park) position without applying any brakes. Brake pedal:
Check the pedal for smooth
operation. If the brake pedal suddenly goes
down further than normal, the pedal feels
spongy or the vehicle seems to take longer to
stop, have your vehicle checked immediately. It
is recommended you visit a NISSAN dealer for
this service. Keep the floor mat away from the
pedal.
Brakes: Check that the brakes do not pull the
vehicle to one side when applied.
Parking brake: Check the parking brake
operation regularly. The vehicle should be
securely held on a fairly steep hill with only the
parking brake applied. If the parking brake needs
adjusted, it is recommended you visit a NISSAN
dealer for this service.
Seats: Check seat position controls such as
seat adjusters, seatback recliner, etc. to ensure
they operate smoothly and that all latches lock
securely in every position. Check that the head
restraints move up and down smoothly and that
the locks (if so equipped) hold securely in all
latched positions.
Seat belts: Check that all parts of the seat belt
system (for example, buckles, anchors, adjuster
and retractors) operate properly and smoothly,
and are installed securely. Check the belt
webbing for cuts, fraying, wear or damage.
Maintenance and schedules9-3