2017 NISSAN ARMADA oil
[x] Cancel search: oilPage 510 of 614
damage the vehicle finish.
Machine compound or aggressive polishing on a
base coat/clear coat paint finish may dull the
finish or leave swirl marks.
REMOVING SPOTS
Remove tar and oil spots, industrial dust,
insects, and tree sap as quickly as possible
from the paint surface to avoid lasting damage
or staining. Special cleaning products are
available at a NISSAN dealer or any automotive
accessory stores.
UNDERBODY
In areas where road salt is used in winter, the
underbody must be cleaned regularly. This will
prevent dirt and salt from building up and
causing the acceleration of corrosion on the
underbody and suspension. Before the winter
period and again in the spring, the underseal
must be checked and, if necessary, re-treated.
GLASS
Use glass cleaner to remove smoke and dust
film from the glass surfaces. It is normal for glass
to become coated with a film after the vehicle is
parked in the hot sun. Glass cleaner and a soft
cloth will easily remove this film.
CAUTION
When cleaning the inside of the win-
dows, do not use sharp-edged tools,
abrasive cleaners or chlorine-based
disinfectant cleaners. They could da-
mage the electrical conductors, radio
antenna elements or rear window
defroster elements.
WHEELS
Wash the wheels when washing the vehicle to
maintain their appearance.
. Clean the inner side of the wheels when the
wheel is changed or the underside of the
vehicle is washed.
. Inspect wheel rims regularly for dents or
corrosion. Such damage may cause loss of
pressure or poor seal at the tire bead.
. NISSAN recommends that the road wheels
be waxed to protect against road salt in
areas where it is used during winter.
CAUTION
Do not use abrasive cleaners when
washing the wheels.
Aluminum alloy wheels
Wash regularly with a sponge dampened in a
mild soap solution, especially during winter
months in areas where road salt is used. Salt
could discolor the wheels if not removed.
CAUTION
Follow the directions below to avoid
staining or discoloring the wheels:
.Do not use a cleaner that uses
strong acid or alkali contents to
clean the wheels.
. Do not apply wheel cleaners to the
wheels when they are hot. The
wheel temperature should be the
same as ambient temperature.
. Rinse the wheel to completely re-
move the cleaner within 15 minutes
after the cleaner is applied.
Bright wheels (if so equipped)
The bright wheels use a different coating
process than typical aluminum alloy wheel and
they are not plated wheels. These wheels are
clear-coated and require the following special
cleaning. They should be regularly washed with
a soft sponge soaked in a lot of water. After
Appearance and care7-3
Page 511 of 614
7-4Appearance and care
washing with water, wipe clean with a dry, soft
cloth and dry completely. When there is
chemical or tire wax, or dirt such as an antifreeze
agent on the surface, wash them with water as
soon as possible.
CAUTION
.The surfaces of the wheels use a
different coating process than typi-
cal aluminum alloy wheels. Do not
use aluminum alloy wheel cleaners
or abrasive cleaners to clean the
wheels. Using such cleaners could
damage the wheel surfaces.
. Do not use an automatic car wash if
the vehicle is equipped with bright
wheels. The wheel coating may be
damaged.
. Do not use a brush to wash the
wheels if the vehicle is equipped
with bright wheels. The wheel coat-
ing may be damaged.
CHROME PARTS
Clean chrome parts regularly with a non-
abrasive chrome polish to maintain the finish.
TIRE DRESSING
NISSAN does not recommend the use of tire
dressings. Tire manufacturers apply a coating to
the tires to help reduce discoloration of the
rubber. If a tire dressing is applied to the tires, it
may react with the coating and form a com-
pound. This compound may come off the tire
while driving and stain the vehicle paint.
If you choose to use a tire dressing, take the
following precautions:
.Use a water-based tire dressing. The coat-
ing on the tire dissolves more easily with an
oil-based tire dressing.
. Apply a light coat of tire dressing to help
prevent it from entering the tire tread/
grooves (where it would be difficult to
remove) .
. Wipe off excess tire dressing using a dry
towel. Make sure the tire dressing is
completely removed from the tire tread/
grooves.
. Allow the tire dressing to dry as recom-
mended by tire dressing manufacturer. Occasionally remove loose dust from the interior
trim, plastic parts and seats using a vacuum
cleaner or soft bristled brush. Wipe the vinyl and
leather surfaces with a clean, soft cloth dam-
pened in mild soap solution, then wipe clean
with a dry soft cloth.
Regular care and cleaning is required in order to
maintain the appearance of the leather.
Before using any fabric protector, read the
manufacturer’s recommendations. Some fabric
protectors contain chemicals that may stain or
bleach the seat material.
Use a cloth dampened only with water, to clean
the meter and gauge lens.
WARNING
Do not use water or acidic cleaners (hot
steam cleaners) on the seat. This can
damage the seat or occupant classifica-
tion sensors. This can also affect the
operation of the air bag system and
result in serious personal injury.
CLEANING INTERIOR
Page 512 of 614
CAUTION
.Never use benzine, thinner, or any
similar material.
. For cleaning, use a soft cloth, dam-
pened with water. Never use a rough
cloth, alcohol, benzine, thinner or
any kind of solvent or paper towel
with a chemical cleaning agent.
They will scratch or cause discolora-
tion to the lens.
. Do not spray any liquid such as
water on the meter lens. Spraying
liquid may cause the system to
malfunction.
. Small dirt particles can be abrasive
and damaging to the leather sur-
faces and should be removed
promptly. Do not use saddle soap,
car waxes, polishes, oils, cleaning
fluids, solvents, detergents or am-
monia-based cleaners as they may
damage the leather’s natural finish.
. Only use fabric protectors approved
by NISSAN.
. Do not use glass or plastic cleaner
on meter or gauge lens covers. It may damage the lens cover.AIR FRESHENERS
Most air fresheners use a solvent that could
affect the vehicle interior. If you use an air
freshener, take the following precautions:
.
Hanging-type air fresheners can cause
permanent discoloration when they contact
vehicle interior surfaces. Place the air
freshener in a location that allows it to hang
free and not contact an interior surface.
. Liquid-type air fresheners typically clip on
the vents. These products can cause
immediate damage and discoloration when
spilled on interior surfaces.
Carefully read and follow the manufacturer’s
instructions before using air fresheners.
FLOOR MATS
WARNING
To avoid potential pedal interference
that may result in a collision, injury or
death:
. NEVER place a floor mat on top of
another floor mat in the driver front
position or install them upside
down or backwards. .
Use only genuine NISSAN floor
mats or equivalent floor mats that
are specifically designed for use in
your vehicle model and model year.
. Properly position the mats in the
floorwell using the floor mat posi-
tioning hooks. See “Floor mat in-
stallation” (P.7-6) .
. Make sure the floor mat does not
interfere with pedal operation.
. Periodically check the floor mats to
make sure they are properly in-
stalled.
. After cleaning the vehicle interior,
check the floor mats to make sure
they are properly installed.
The use of genuine NISSAN floor mats can
extend the life of your vehicle carpet and make it
easier to clean the interior. Mats should be
maintained with regular cleaning and replaced if
they become excessively worn.
Appearance and care7-5
Page 516 of 614
8 Do-it-yourself
Maintenance precautions ........................................................ 8-2
Engine compartment check locations .................................. 8-3VK56VD engine ................................................................... 8-3
Engine cooling system ............................................................. 8-4 Checking engine coolant level ......................................... 8-5
Changing engine coolant .................................................. 8-5
Engine oil ........................................................................\
............ 8-6 Checking engine oil level .................................................. 8-6
Changing engine oil and filter .......................................... 8-6
Automatic Transmission Fluid (ATF) ..................................... 8-8
Power steering fluid .................................................................. 8-8
Brake fluid ........................................................................\
........... 8-9
Window washer fluid ............................................................ 8-10
Battery ........................................................................\
............... 8-11 Jump starting ..................................................................... 8-13
Variable voltage control system .......................................... 8-13
Drive belts ........................................................................\
........ 8-13
Spark plugs ........................................................................\
..... 8-14 Replacing spark plugs .................................................... 8-14
Air cleaner ........................................................................\
........ 8-15 Windshield wiper blades ..................................................... 8-16
Cleaning ........................................................................\
... 8-16
Replacing ........................................................................\
. 8-16
Rear window wiper blades ................................................. 8-17
Brakes ........................................................................\
.............. 8-17 Self-adjusting brakes .................................................... 8-17
Brake pad wear warning .............................................. 8-17
Brake booster ................................................................. 8-18
Fuses ........................................................................\
................ 8-18 Engine compartment ..................................................... 8-19
Passenger compartment .............................................. 8-20
Intelligent Key battery replacement ................................... 8-21
Lights ........................................................................\
................ 8-24
Headlights ........................................................................\
8-25
Exterior and interior lights ............................................ 8-26
Wheels and tires ................................................................... 8-30
Tire pressure ................................................................... 8-30
Tire labeling ..................................................................... 8-34
Types of tires ................................................................... 8-36
Tire chains ....................................................................... 8-36
Changing wheels and tires .......................................... 8-37
Page 517 of 614
8-2Do-it-yourself
When performing any inspection or mainte-
nance work on your vehicle, always take care
to prevent serious accidental injury to yourself or
damage to the vehicle. The following are general
precautions which should be closely observed.
WARNING
.Park the vehicle on a level surface,
apply the parking brake securely
and block the wheels to prevent
the vehicle from moving. Move the
shift lever to P (Park) .
. Be sure the ignition switch is in the
OFF or LOCK position when per-
forming any parts replacement or
repairs.
. Never connect or disconnect the
battery or any transistorized com-
ponent while the ignition switch is
in the ON position.
. Never leave the engine or automatic
transmission related component
harnesses disconnected while the
ignition switch is in the ON position.
. If you must work with the engine
running, keep your hands, clothing,
hair and tools away from moving fans, belts and any other moving
parts.
. It is advisable to secure or remove
any loose clothing and remove any
jewelry, such as rings, watches, etc.
before working on your vehicle.
. Always wear eye protection when-
ever you work on your vehicle.
. If you must run the engine in an
enclosed space such as a garage, be
sure there is proper ventilation for
exhaust gases to escape.
. Never get under the vehicle while it
is supported only by a jack. If it is
necessary to work under the vehicle,
support it with safety stands.
. Keep smoking materials, flame and
sparks away from fuel tank and the
battery.
. Your vehicle is equipped with an
automatic engine cooling fan. It may
come on at any time without warn-
ing, even if the ignition key is in the
OFF position and the engine is not
running. To avoid injury, always
disconnect the negative battery
cable before working near the fan. .
Because the fuel lines are under
high pressure even when the engine
is off, it is recommended you visit a
NISSAN dealer for service of the
fuel filter or fuel lines.CAUTION
.Do not work under the hood while
the engine is hot. Turn the engine
off and wait until it cools down.
. Avoid direct contact with used en-
gine oil and coolant. Improperly
disposed engine oil, coolant, and/
or other vehicle fluids can damage
the environment. Always conform to
local regulations for disposal of
vehicle fluid.
This “8. Do-it-yourself” section gives instruc-
tions regarding only those items which are
relatively easy for an owner to perform.
A genuine NISSAN Service Manual is also
available. (See “Owner’s Manual/Service Man-
ual order information” (P.10-33).)
You should be aware that incomplete or
improper servicing may result in operating
MAINTENANCE PRECAUTIONS
Page 518 of 614
difficulties or excessive emissions, and could
affect your warranty coverage.If in doubt
about any servicing, it is recommended
you have it done by a NISSAN dealer.
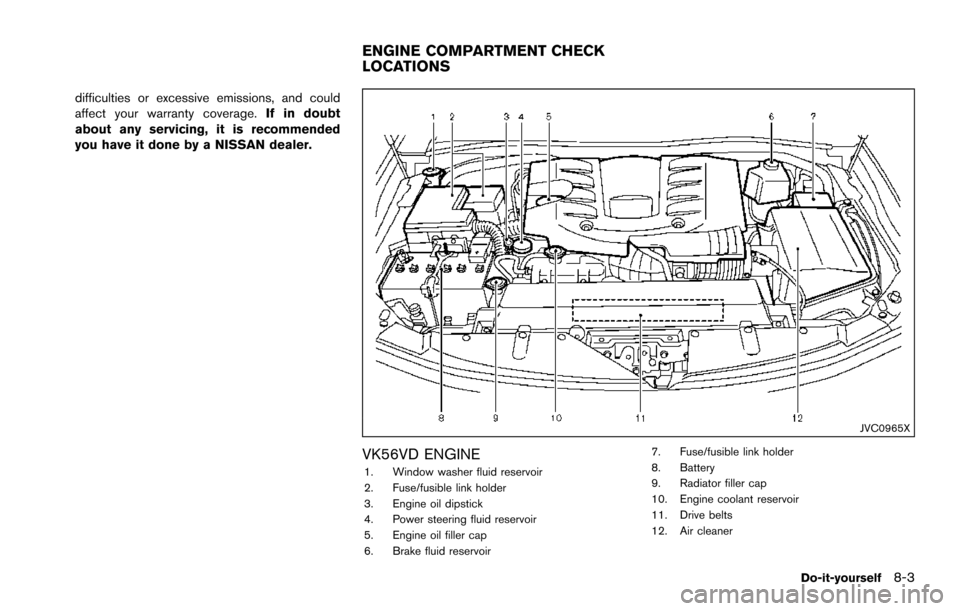
JVC0965X
VK56VD ENGINE1. Window washer fluid reservoir
2. Fuse/fusible link holder
3. Engine oil dipstick
4. Power steering fluid reservoir
5. Engine oil filler cap
6. Brake fluid reservoir 7. Fuse/fusible link holder
8. Battery
9. Radiator filler cap
10. Engine coolant reservoir
11. Drive belts
12. Air cleaner
Do-it-yourself8-3
ENGINE COMPARTMENT CHECK
LOCATIONS
Page 521 of 614
8-6Do-it-yourself
JVM0728X
CHECKING ENGINE OIL LEVEL
1. Park the vehicle on a level surface and applythe parking brake.
2. Run the engine until it reaches operating temperature.
3. Turn off the engine. Wait more than 15
minutes for the oil to drain back into
the oil pan.
4. Remove the dipstick and wipe it clean. Reinsert it all the way.
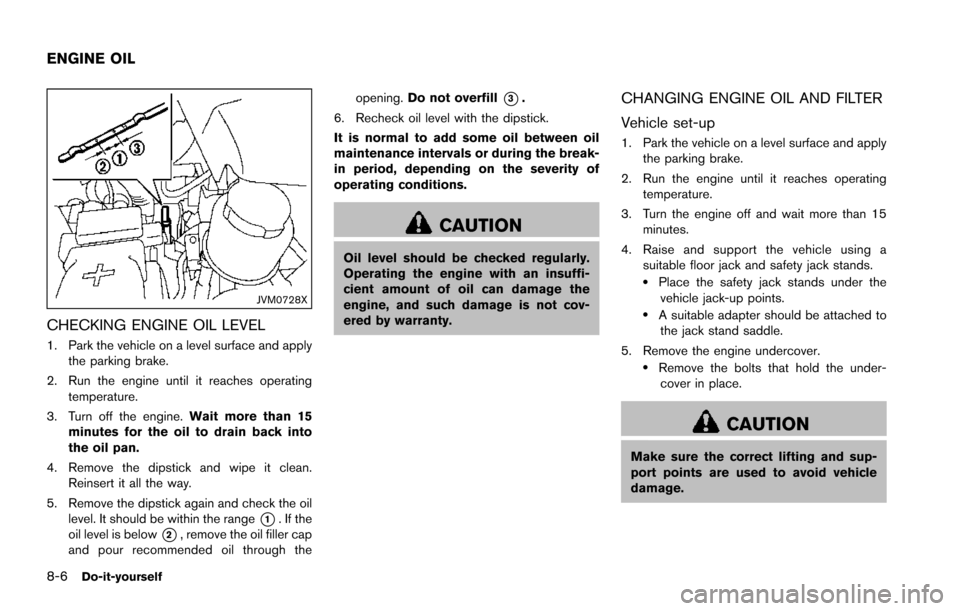
5. Remove the dipstick again and check the oil level. It should be within the range
*1. If the
oil level is below
*2, remove the oil filler cap
and pour recommended oil through the opening.
Do not overfill
*3.
6. Recheck oil level with the dipstick.
It is normal to add some oil between oil
maintenance intervals or during the break-
in period, depending on the severity of
operating conditions.
CAUTION
Oil level should be checked regularly.
Operating the engine with an insuffi-
cient amount of oil can damage the
engine, and such damage is not cov-
ered by warranty.
CHANGING ENGINE OIL AND FILTER
Vehicle set-up
1. Park the vehicle on a level surface and apply the parking brake.
2. Run the engine until it reaches operating temperature.
3. Turn the engine off and wait more than 15 minutes.
4. Raise and support the vehicle using a suitable floor jack and safety jack stands.
.Place the safety jack stands under the
vehicle jack-up points.
.A suitable adapter should be attached tothe jack stand saddle.
5. Remove the engine undercover.
.Remove the bolts that hold the under- cover in place.
CAUTION
Make sure the correct lifting and sup-
port points are used to avoid vehicle
damage.
ENGINE OIL
Page 522 of 614
SDI2528
Engine oil and filter
1. Place a large drain pan under the drain plug.
2. Remove the oil filler cap.
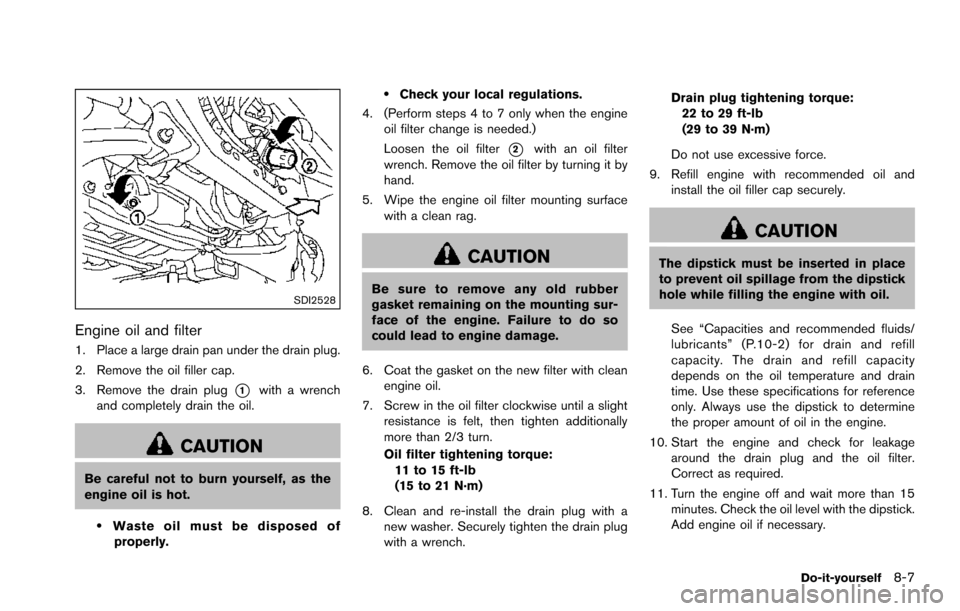
3. Remove the drain plug
*1with a wrench
and completely drain the oil.
CAUTION
Be careful not to burn yourself, as the
engine oil is hot.
.Waste oil must be disposed of properly.
.Check your local regulations.
4. (Perform steps 4 to 7 only when the engine oil filter change is needed.)
Loosen the oil filter
*2with an oil filter
wrench. Remove the oil filter by turning it by
hand.
5. Wipe the engine oil filter mounting surface with a clean rag.
CAUTION
Be sure to remove any old rubber
gasket remaining on the mounting sur-
face of the engine. Failure to do so
could lead to engine damage.
6. Coat the gasket on the new filter with clean engine oil.
7. Screw in the oil filter clockwise until a slight resistance is felt, then tighten additionally
more than 2/3 turn.
Oil filter tightening torque:11 to 15 ft-lb
(15 to 21 N·m)
8. Clean and re-install the drain plug with a new washer. Securely tighten the drain plug
with a wrench. Drain plug tightening torque:
22 to 29 ft-lb
(29 to 39 N·m)
Do not use excessive force.
9. Refill engine with recommended oil and install the oil filler cap securely.
CAUTION
The dipstick must be inserted in place
to prevent oil spillage from the dipstick
hole while filling the engine with oil.
See “Capacities and recommended fluids/
lubricants” (P.10-2) for drain and refill
capacity. The drain and refill capacity
depends on the oil temperature and drain
time. Use these specifications for reference
only. Always use the dipstick to determine
the proper amount of oil in the engine.
10. Start the engine and check for leakage around the drain plug and the oil filter.
Correct as required.
11. Turn the engine off and wait more than 15 minutes. Check the oil level with the dipstick.
Add engine oil if necessary.
Do-it-yourself8-7