2017 NISSAN ARMADA ESP
[x] Cancel search: ESPPage 348 of 614
and all tires are properly inflated, it
is recommended you consult a
NISSAN dealer.
. Since the spare tire is not equipped
with the TPMS, when a spare tire is
mounted or a wheel is replaced, the
TPMS will not function and the low
tire pressure warning light will flash
for approximately 1 minute. The
light will remain on after 1 minute.
Have your tires replaced and/or
TPMS system reset as soon as
possible. It is recommended you
visit a NISSAN dealer for these
services.
. Replacing tires with those not ori-
ginally specified by NISSAN could
affect the proper operation of the
TPMS.
. Do not inject any tire liquid or
aerosol tire sealant into the tires,
as this may cause a malfunction of
the tire pressure sensors.CAUTION
.The TPMS may not function properly
when the wheels are equipped with
tire chains or the wheels are buried
in snow.
. Do not place metalized film or any
metal parts (antenna, etc.) on the
windows. This may cause poor re-
ception of the signals from the tire
pressure sensors, and the TPMS will
not function properly.
Some devices and transmitters may temporarily
interfere with the operation of the TPMS and
cause the low tire pressure warning light to
illuminate. Some examples are:
. Facilities or electric devices using similar
radio frequencies are near the vehicle.
. If a transmitter set to similar frequencies is
being used in or near the vehicle.
. If a computer (or similar equipment) or a DC/
AC converter is being used in or near the
vehicle.
Low tire pressure warning light may illuminate in
the following cases.
. If the vehicle is equipped with a wheel and
tire without TPMS. .
If the TPMS has been replaced and the ID
has not been registered.
. If the wheel is not originally specified by
NISSAN.
FCC Notice:
For USA:
This device complies with Part 15 of the
FCC Rules. Operation is subject to the
following two conditions: (1) This device
may not cause harmful interference, and
(2) this device must accept any interfer-
ence received, including interference that
may cause undesired operation.
Note: Changes or modifications not ex-
pressly approved by the party responsible
for compliance could void the user’s
authority to operate the equipment.
For Canada:
This device complies with Industry Canada
licence-exempt RSS standard(s) . Opera-
tion is subject to the following two condi-
tions: (1) this device may not cause
interference, and (2) this device must
accept any interference, including interfer-
ence that may cause undesired operation
of the device.
Starting and driving5-7
Page 350 of 614
significantly more likely to be injured or
killed than a person properly wearing a
seat belt.
ON-PAVEMENT AND OFF-ROAD
DRIVING PRECAUTIONS
Utility vehicles have a significantly higher
rollover rate than other types of vehicles.
They have higher ground clearance than pas-
senger cars to make them capable of performing
in a variety of on-pavement and off-road
applications. This gives them a higher center of
gravity than ordinary cars. An advantage of
higher ground clearance is a better view of the
road, allowing you to anticipate problems.
However, they are not designed for cornering
at the same speeds as conventional passenger
cars any more than low-slung sports cars are
designed to perform satisfactorily under off-road
conditions. If at all possible, avoid sharp turns or
abrupt maneuvers, particularly at high speeds.
As with other vehicles of this type, failure to
operate this vehicle correctly may result in loss
of control or vehicle rollover. Seat belts help
reduce the risk of injury in collisions and
rollovers. In a rollover crash, an unbelted or
improperly belted person is significantly more
likely to be injured or killed than a person
properly wearing a seat belt.Be sure to read “Driving safety precautions”
(P.5-10) .
OFF-ROAD RECOVERY
While driving, the right side or left side wheels
may unintentionally leave the road surface. If this
occurs, maintain control of the vehicle by
following the procedure below. Please note that
this procedure is only a general guide. The
vehicle must be driven as appropriate based on
the conditions of the vehicle, road and traffic.
1. Remain calm and do not overreact.
2. Do not apply the brakes.
3. Maintain a firm grip on the steering wheel
with both hands and try to hold a straight
course.
4. When appropriate, slowly release the accel- erator pedal to gradually slow the vehicle.
5. If there is nothing in the way, steer the vehicle to follow the road while the vehicle
speed is reduced. Do not attempt to drive
the vehicle back onto the road surface until
vehicle speed is reduced.
6. When it is safe to do so, gradually turn the steering wheel until both tires return to the
road surface. When all tires are on the road
surface, steer the vehicle to stay in the
appropriate driving lane.
.If you decide that it is not safe to returnthe vehicle to the road surface based on
vehicle, road or traffic conditions, gradu-
ally slow the vehicle to a stop in a safe
place off the road.
RAPID AIR PRESSURE LOSS
Rapid air pressure loss or a “blow-out” can
occur if the tire is punctured or is damaged due
to hitting a curb or pothole. Rapid air pressure
loss can also be caused by driving on under-
inflated tires.
Rapid air pressure loss can affect the handling
and stability of the vehicle, especially at highway
speeds.
Help prevent rapid air pressure loss by main-
taining the correct air pressure and visually
inspect the tires for wear and damage. See
“Wheels and tires” (P.8-30).
If a tire rapidly loses air pressure or “blows-out”
while driving maintain control of the vehicle by
following the procedure below. Please note that
this procedure is only a general guide. The
vehicle must be driven as appropriate based on
the conditions of the vehicle, road and traffic.
Starting and driving5-9
Page 353 of 614
5-12Starting and driving
ment even if the other two wheels
are raised off the ground. Make sure
you inform test facility personnel
that your vehicle is equipped with
4WD before it is placed on a dy-
namometer. Using the wrong test
equipment may result in drivetrain
damage or unexpected vehicle
movement which could result in
serious vehicle damage or personal
injury (4WD models) .
. When a wheel is off the ground due
to an unlevel surface, do not spin
the wheel excessively.
. Accelerating quickly, sharp steering
maneuvers or sudden braking may
cause loss of control.
. If at all possible, avoid sharp turning
maneuvers, particularly at high
speeds. Your vehicle has a higher
center of gravity than a conventional
passenger car. The vehicle is not
designed for cornering at the same
speeds as conventional passenger
cars. Failure to operate this vehicle
correctly could result in loss of
control and/or a rollover accident.
. Always use tires of the same type,
size, brand, construction (bias, bias- belted or radial) , and tread pattern
on all four wheels. Install tire chains
on the rear wheels when driving on
slippery roads and drive carefully.
. Be sure to check the brakes imme-
diately after driving in mud or water.
See “Brake system” (P.5-136) for wet
brakes.
. Avoid parking your vehicle on steep
hills. If you get out of the vehicle
and it rolls forward, backward or
sideways, you could be injured.
. Whenever you drive off-road
through sand, mud or water as deep
as the wheel hub, more frequent
maintenance may be required. See
the maintenance schedule shown in
the "9. Maintenance and schedules"
section.
. Spinning the rear wheels on slip-
pery surfaces may cause the 4WD
warning light to flash. The 4WD
system may also automatically
switch from the 4WD mode to the
2WD mode. This could reduce trac-
tion. Be especially careful when
towing a trailer (4WD models) .WARNING
Do not operate the push-button ignition
switch while driving the vehicle except
in an emergency. (The engine will stop
when the ignition switch is pushed 3
consecutive times or the ignition switch
is pushed and held for more than 2
seconds.) If the engine stops while the
vehicle is being driven, this could lead
to a crash and serious injury.
Before operating the push-button ignition
switch, be sure to move the shift lever to the P
(Park) position.
PUSH-BUTTON IGNITION SWITCH
Page 357 of 614
5-16Starting and driving
1. Apply the parking brake.
2. Move the shift lever to the P (Park) or N(Neutral) position. (P is recommended.)
The starter is designed not to operate unless
the shift lever is in either of the above
positions.
3. Push the ignition switch to the ON position. Depress the brake pedal and push the
ignition switch to start the engine.
To start the engine immediately, push and
release the ignition switch while depressing
the brake pedal with the ignition switch in
any position.
.If the engine is very hard to start inextremely cold weather or when restart-
ing, depress the accelerator pedal a little
(approximately 1/3 to the floor) and while
holding, crank the engine. Release the
accelerator pedal when the engine starts.
.If the engine is very hard to start becauseit is flooded, depress the accelerator
pedal all the way to the floor and hold it.
Push the ignition switch to the ON
position to start cranking the engine.
After 5 or 6 seconds, stop cranking by
pushing the ignition switch to OFF. After
cranking the engine, release the accel-
erator pedal. Crank the engine with your
foot off the accelerator pedal bydepressing the brake pedal and pushing
the push-button ignition switch to start
the engine. If the engine starts, but fails
to run, repeat the above procedure.
CAUTION
Do not operate the starter for more
than 15 seconds at a time. If the engine
does not start, push the ignition switch
to OFF and wait 10 seconds before
cranking again, otherwise the starter
could be damaged.
4. Warm-up
Allow the engine to idle for at least 30
seconds after starting. Do not race the
engine while warming it up. Drive at
moderate speed for a short distance first,
especially in cold weather. In cold weather,
keep the engine running for a minimum of 2 -
3 minutes before shutting it off. Starting and
stopping the engine over a short period of
time may make the vehicle more difficult to
start.
When racing the engine up to 4,000 rpm or
more under the no load condition, the
engine will enter the fuel cut mode. 5. To stop the engine, shift the shift lever to the
P (Park) position and push the ignition
switch to the OFF position.
In preparation for the next engine start, the
engine may have a slightly delayed shutoff after
placing the ignition switch in the OFF position,
depending on the driving conditions.
NOTE:
Care should be taken to avoid situations
that can lead to potential battery discharge
and potential no-start conditions such as:
1. Installation or extended use of electro-
nic accessories that consume battery
power when the engine is not running
(Phone chargers, GPS, DVD players,
etc.)
2. Vehicle is not driven regularly and/or
only driven short distances.
In these cases, the battery may need to be
charged to maintain battery health.
REMOTE START (if so equipped)
Vehicles started with the remote engine start
function require the ignition switch to be placed
in the ON position before the shift lever can be
moved from the P (Park) position. To place the
ignition switch in the ON position, perform the
following steps:
STARTING THE ENGINE
Page 359 of 614
5-18Starting and driving
reduced speed may be lower than other
traffic, which could increase the chance
of a collision. Be especially careful
when driving. If the vehicle cannot
maintain a safe driving speed, pull to
the side of the road in a safe area.
Allow the engine to cool and return to
normal operation. See“If your vehicle
overheats” (P.6-14) .
CAUTION
Running the engine with the engine oil
pressure warning light on could cause
serious damage to the engine almost
immediately. Such damage is not cov-
ered by warranty. Turn off the engine as
soon as it is safe to do so.
AUTOMATIC TRANSMISSION
7 speed automatic transmission
The automatic transmission in your vehicle is
electronically controlled by a transmission con-
trol module to produce maximum efficiency and
smooth operation.
Shown on the following pages are the recom-
mended operating procedures for this transmis-
sion. Follow these procedures for maximum
vehicle performance and driving enjoyment.
Starting the vehicle
After starting the engine, fully depress the foot
brake pedal and push the shift lever button
before shifting the shift lever to the R (Reverse) ,
N (Neutral) , D (Drive) or Manual shift mode
position. Be sure the vehicle is fully stopped
before attempting to shift the shift lever.
This automatic transmission model is de-
signed so that the foot brake pedal must
be depressed before shifting from P (Park)
to any drive position while the ignition
switch position is ON.
The shift lever cannot be moved out of the
P (Park) position and into any of the other
gear positions if the ignition switch is
pushed to the LOCK, OFF or ACC position. 1. Keep the foot brake pedal depressed and
push the shift lever button to shift into a
driving gear.
2. Release the parking brake and foot brake, then gradually start the vehicle in motion.
WARNING
.Do not depress the accelerator
pedal while shifting from P (Park)
or N (Neutral) to R (Reverse) , D
(Drive) or manual shift mode. Al-
ways depress the brake pedal until
shifting is completed. Failure to do
so could cause you to lose control
and have an accident.
. Cold engine idle speed is high, so
use caution when shifting into a
forward or reverse gear before the
engine has warmed up.
. Never shift to either the P (Park) or
R (Reverse) position while the vehi-
cle is moving forward and P (Park) ,
D (Drive) position or manual shift
mode while the vehicle is moving
rearward. This could cause an acci-
dent or damage the transmission.
Page 364 of 614
WARNING
Failure to follow the warnings and
instructions for proper use of the LDW
and LDP systems could result in serious
personal injury or death.
.The LDW and LDP systems will not
prevent loss of control. It is the
driver’s responsibility to stay alert,
drive safely, keep the vehicle in the
traveling lane, and be in control of
the vehicle at all times.
. The LDP system may activate if you
change lanes without first activating
your turn signal or, for example, if a
construction zone directs traffic to
cross an existing lane marker. If this
occurs, you may need to apply
corrective steering to complete your
lane change.
. Because the LDP system may not
activate under the road, weather,
and lane marker conditions de-
scribed in this section, it may not
activate every time your vehicle
begins to leave its lane and you will
need to apply corrective steering. .
Lane Departure Warning (LDW) system
— warns the driver with a warning light and
chime that the vehicle is beginning to
leave the driving lane.
. Lane Departure Prevention (LDP) system
— warns the driver with a warning light and
chime, and helps assist the driver to
return the vehicle to the center of the
traveling lane by applying the brakes to
the left or right wheels individually (for a
short period of time) .
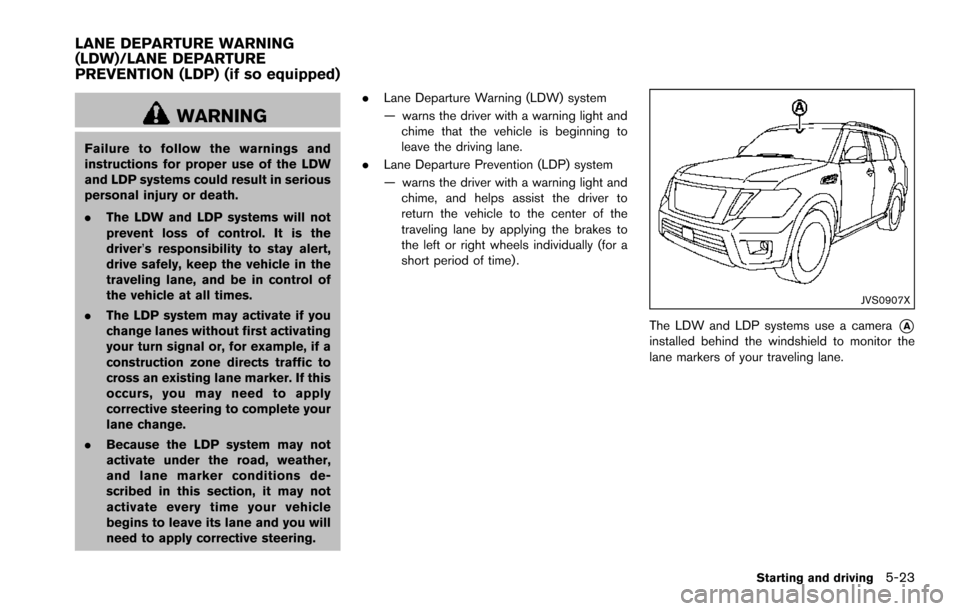
JVS0907X
The LDW and LDP systems use a camera*Ainstalled behind the windshield to monitor the
lane markers of your traveling lane.
Starting and driving5-23
LANE DEPARTURE WARNING
(LDW)/LANE DEPARTURE
PREVENTION (LDP) (if so equipped)
Page 383 of 614
5-42Starting and driving
Action to take:
Stop the vehicle in a safe location, place the
vehicle in the P (Park) position, turn the engine
off and restart the engine.
If the BSW system warning light continues to
illuminate, have the system checked. It is
recommended you visit a NISSAN dealer for
this service.
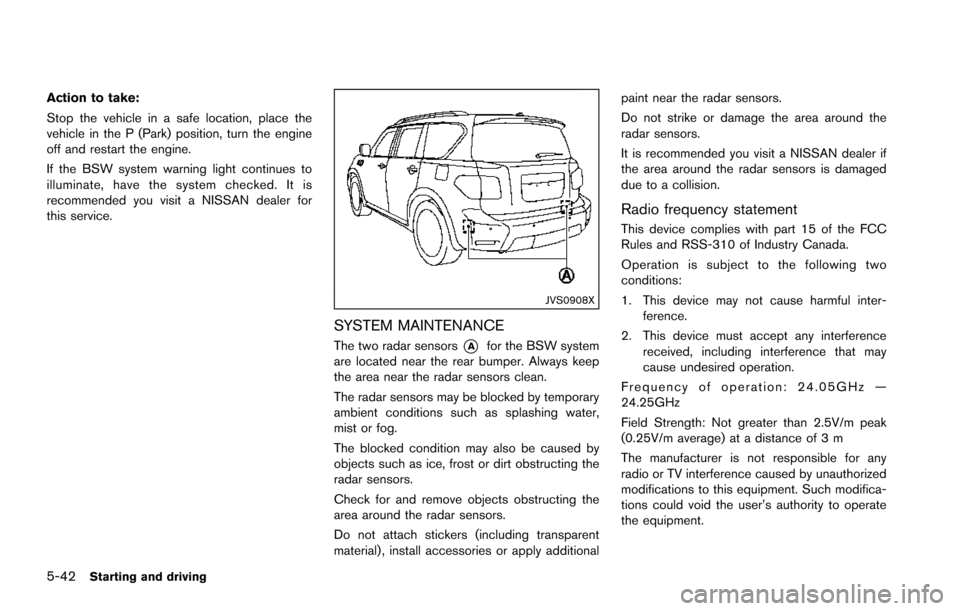
JVS0908X
SYSTEM MAINTENANCE
The two radar sensors*Afor the BSW system
are located near the rear bumper. Always keep
the area near the radar sensors clean.
The radar sensors may be blocked by temporary
ambient conditions such as splashing water,
mist or fog.
The blocked condition may also be caused by
objects such as ice, frost or dirt obstructing the
radar sensors.
Check for and remove objects obstructing the
area around the radar sensors.
Do not attach stickers (including transparent
material) , install accessories or apply additional paint near the radar sensors.
Do not strike or damage the area around the
radar sensors.
It is recommended you visit a NISSAN dealer if
the area around the radar sensors is damaged
due to a collision.
Radio frequency statement
This device complies with part 15 of the FCC
Rules and RSS-310 of Industry Canada.
Operation is subject to the following two
conditions:
1. This device may not cause harmful inter-
ference.
2. This device must accept any interference received, including interference that may
cause undesired operation.
Frequency of operation: 24.05GHz —
24.25GHz
Field Strength: Not greater than 2.5V/m peak
(0.25V/m average) at a distance of 3 m
The manufacturer is not responsible for any
radio or TV interference caused by unauthorized
modifications to this equipment. Such modifica-
tions could void the user’s authority to operate
the equipment.
Page 397 of 614
5-56Starting and driving
Radio frequency statement
This device complies with part 15 of the FCC
Rules and RSS-310 of Industry Canada.
Operation is subject to the following two
conditions:
1. This device may not cause harmful inter-ference.
2. This device must accept any interference received, including interference that may
cause undesired operation.
Frequency of operation: 24.05GHz —
24.25GHz
Field Strength: Not greater than 2.5V/m peak
(0.25V/m average) at a distance of 3 m
The manufacturer is not responsible for any
radio or TV interference caused by unauthorized
modifications to this equipment. Such modifica-
tions could void the user’s authority to operate
the equipment.WARNING
Failure to follow the warnings and
instructions for proper use of the BCI
system could result in serious injury or
death.
. The BCI system is not a replacement
for proper driving procedure, is not
designed to prevent contact with
vehicles or objects and does not
provide full brake power. When
backing out of parking spaces, al-
ways use the inside and rear mirrors
and turn and look in the direction
you will move. Never rely solely on
the BCI system.
. There is a limitation to the detection
capability of the radar or the sonar.
Using the BCI system under some
road, ground, traffic or weather
conditions could lead to improper
system operation. Always rely on
your own operation to avoid acci-
dents.
The BCI system can help alert the driver of an
approaching vehicle or objects behind the
vehicle when the driver is backing out of a parking space.
BACK-UP COLLISION
INTERVENTION (BCI) (if so
equipped)