2017 NISSAN ARMADA width
[x] Cancel search: widthPage 232 of 614
JVH1214X
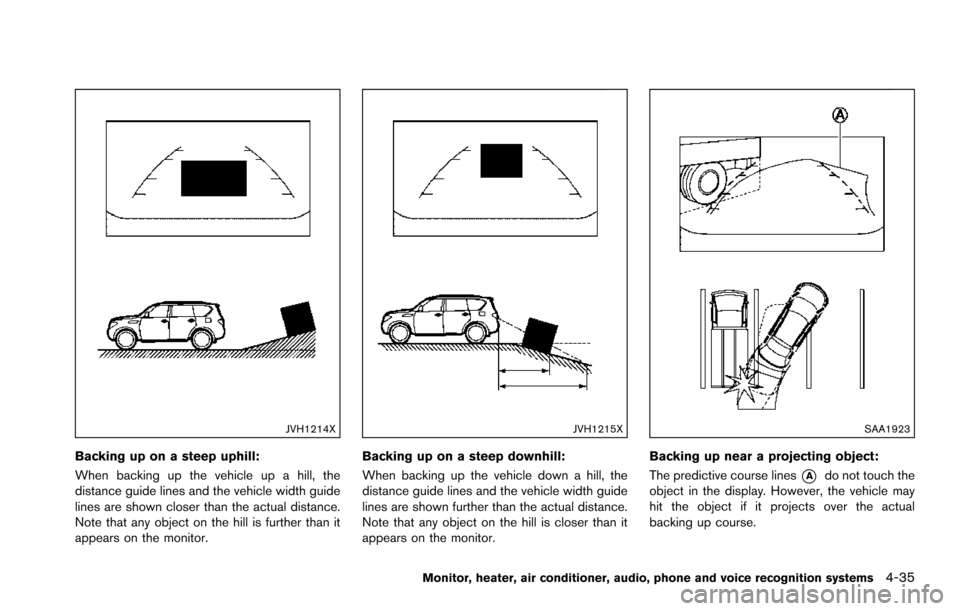
Backing up on a steep uphill:
When backing up the vehicle up a hill, the
distance guide lines and the vehicle width guide
lines are shown closer than the actual distance.
Note that any object on the hill is further than it
appears on the monitor.
JVH1215X
Backing up on a steep downhill:
When backing up the vehicle down a hill, the
distance guide lines and the vehicle width guide
lines are shown further than the actual distance.
Note that any object on the hill is closer than it
appears on the monitor.
SAA1923
Backing up near a projecting object:
The predictive course lines
*Ado not touch the
object in the display. However, the vehicle may
hit the object if it projects over the actual
backing up course.
Monitor, heater, air conditioner, audio, phone and voice recognition systems4-35
Page 234 of 614
SAA1898
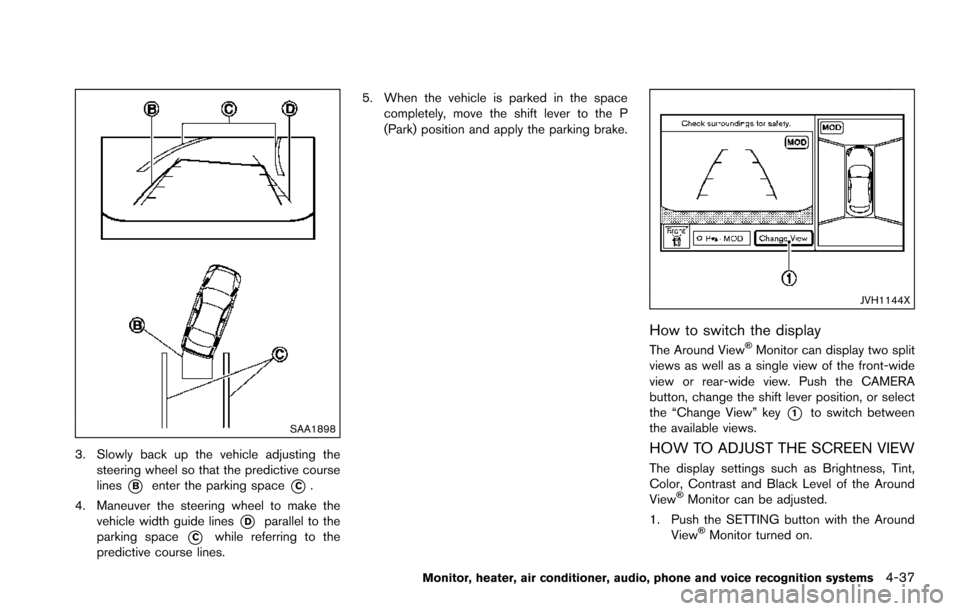
3. Slowly back up the vehicle adjusting thesteering wheel so that the predictive course
lines
*Benter the parking space*C.
4. Maneuver the steering wheel to make the vehicle width guide lines
*Dparallel to the
parking space
*Cwhile referring to the
predictive course lines. 5. When the vehicle is parked in the space
completely, move the shift lever to the P
(Park) position and apply the parking brake.
JVH1144X
How to switch the display
The Around View�ŠMonitor can display two split
views as well as a single view of the front-wide
view or rear-wide view. Push the CAMERA
button, change the shift lever position, or select
the “Change View” key
*1to switch between
the available views.
HOW TO ADJUST THE SCREEN VIEW
The display settings such as Brightness, Tint,
Color, Contrast and Black Level of the Around
View
�ŠMonitor can be adjusted.
1. Push the SETTING button with the Around View
�ŠMonitor turned on.
Monitor, heater, air conditioner, audio, phone and voice recognition systems4-37
Page 264 of 614
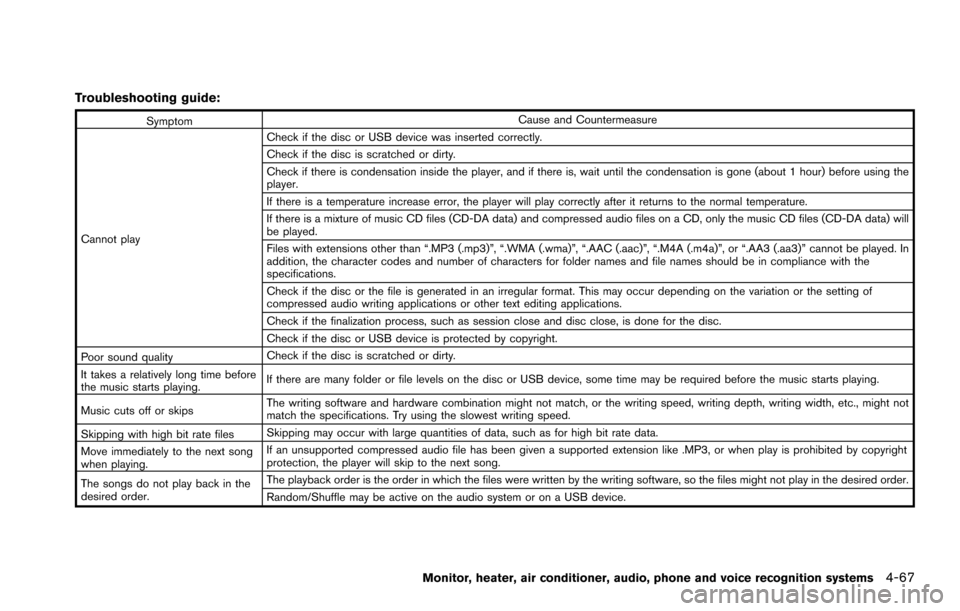
Troubleshooting guide:
SymptomCause and Countermeasure
Cannot play Check if the disc or USB device was inserted correctly.
Check if the disc is scratched or dirty.
Check if there is condensation inside the player, and if there is, wait until the condensation is gone (about 1 hour) before using the
player.
If there is a temperature increase error, the player will play correctly after it returns to the normal temperature.
If there is a mixture of music CD files (CD-DA data) and compressed audio files on a CD, only the music CD files (CD-DA data) will
be played.
Files with extensions other than “.MP3 (.mp3)”, “.WMA (.wma)”, “.AAC (.aac)”, “.M4A (.m4a)”, or “.AA3 (.aa3)” cannot be played. In
addition, the character codes and number of characters for folder names and file names should be in compliance with the
specifications.
Check if the disc or the file is generated in an irregular format. This may occur depending on the variation or the setting of
compressed audio writing applications or other text editing applications.
Check if the finalization process, such as session close and disc close, is done for the disc.
Check if the disc or USB device is protected by copyright.
Poor sound quality Check if the disc is scratched or dirty.
It takes a relatively long time before
the music starts playing. If there are many folder or file levels on the disc or USB device, some time may be required before the music starts playing.
Music cuts off or skips The writing software and hardware combination might not match, or the writing speed, writing depth, writing width, etc., might not
match the specifications. Try using the slowest writing speed.
Skipping with high bit rate files Skipping may occur with large quantities of data, such as for high bit rate data.
Move immediately to the next song
when playing. If an unsupported compressed audio file has been given a supported extension like .MP3, or when play is prohibited by copyright
protection, the player will skip to the next song.
The songs do not play back in the
desired order. The playback order is the order in which the files were written by the writing software, so the files might not play in the desired order.
Random/Shuffle may be active on the audio system or on a USB device.
Monitor, heater, air conditioner, audio, phone and voice recognition systems4-67
Page 370 of 614
SSD1002
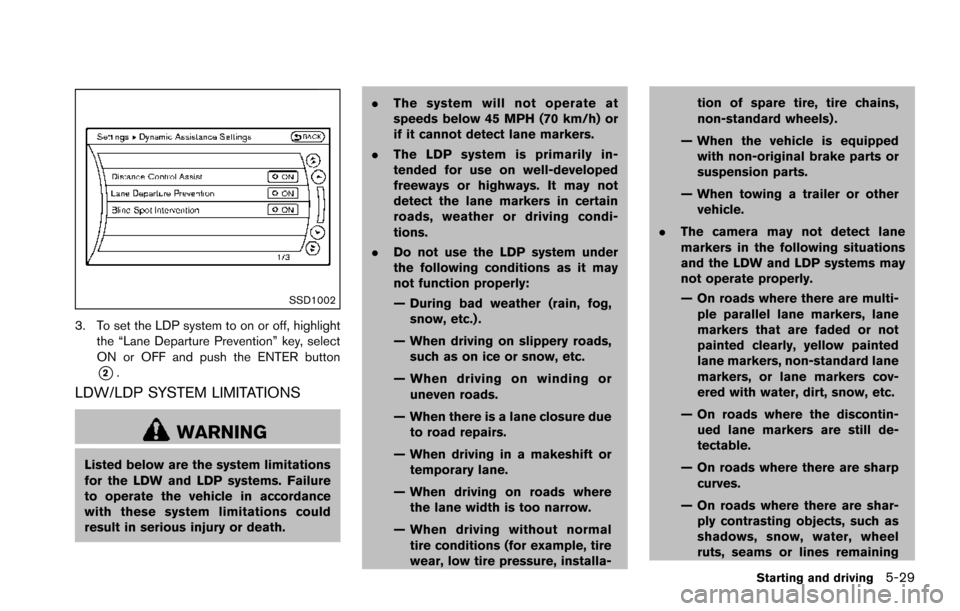
3. To set the LDP system to on or off, highlightthe “Lane Departure Prevention” key, select
ON or OFF and push the ENTER button
*2.
LDW/LDP SYSTEM LIMITATIONS
WARNING
Listed below are the system limitations
for the LDW and LDP systems. Failure
to operate the vehicle in accordance
with these system limitations could
result in serious injury or death. .
The system will not operate at
speeds below 45 MPH (70 km/h) or
if it cannot detect lane markers.
. The LDP system is primarily in-
tended for use on well-developed
freeways or highways. It may not
detect the lane markers in certain
roads, weather or driving condi-
tions.
. Do not use the LDP system under
the following conditions as it may
not function properly:
— During bad weather (rain, fog,
snow, etc.) .
— When driving on slippery roads, such as on ice or snow, etc.
— When driving on winding or uneven roads.
— When there is a lane closure due to road repairs.
— When driving in a makeshift or temporary lane.
— When driving on roads where the lane width is too narrow.
— When driving without normal tire conditions (for example, tire
wear, low tire pressure, installa- tion of spare tire, tire chains,
non-standard wheels) .
— When the vehicle is equipped with non-original brake parts or
suspension parts.
— When towing a trailer or other vehicle.
. The camera may not detect lane
markers in the following situations
and the LDW and LDP systems may
not operate properly.
— On roads where there are multi-
ple parallel lane markers, lane
markers that are faded or not
painted clearly, yellow painted
lane markers, non-standard lane
markers, or lane markers cov-
ered with water, dirt, snow, etc.
— On roads where the discontin- ued lane markers are still de-
tectable.
— On roads where there are sharp curves.
— On roads where there are shar- ply contrasting objects, such as
shadows, snow, water, wheel
ruts, seams or lines remaining
Starting and driving5-29
Page 378 of 614
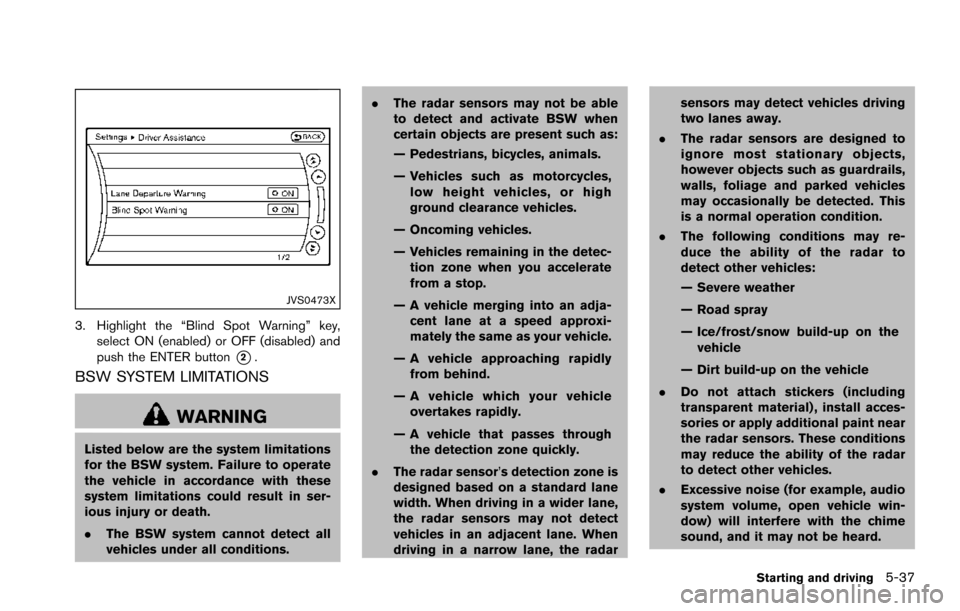
JVS0473X
3. Highlight the “Blind Spot Warning” key,select ON (enabled) or OFF (disabled) and
push the ENTER button
*2.
BSW SYSTEM LIMITATIONS
WARNING
Listed below are the system limitations
for the BSW system. Failure to operate
the vehicle in accordance with these
system limitations could result in ser-
ious injury or death.
.The BSW system cannot detect all
vehicles under all conditions. .
The radar sensors may not be able
to detect and activate BSW when
certain objects are present such as:
— Pedestrians, bicycles, animals.
— Vehicles such as motorcycles,
low height vehicles, or high
ground clearance vehicles.
— Oncoming vehicles.
— Vehicles remaining in the detec- tion zone when you accelerate
from a stop.
— A vehicle merging into an adja- cent lane at a speed approxi-
mately the same as your vehicle.
— A vehicle approaching rapidly from behind.
— A vehicle which your vehicle overtakes rapidly.
— A vehicle that passes through the detection zone quickly.
. The radar sensor’s detection zone is
designed based on a standard lane
width. When driving in a wider lane,
the radar sensors may not detect
vehicles in an adjacent lane. When
driving in a narrow lane, the radar sensors may detect vehicles driving
two lanes away.
. The radar sensors are designed to
ignore most stationary objects,
however objects such as guardrails,
walls, foliage and parked vehicles
may occasionally be detected. This
is a normal operation condition.
. The following conditions may re-
duce the ability of the radar to
detect other vehicles:
— Severe weather
— Road spray
— Ice/frost/snow build-up on the
vehicle
— Dirt build-up on the vehicle
. Do not attach stickers (including
transparent material) , install acces-
sories or apply additional paint near
the radar sensors. These conditions
may reduce the ability of the radar
to detect other vehicles.
. Excessive noise (for example, audio
system volume, open vehicle win-
dow) will interfere with the chime
sound, and it may not be heard.
Starting and driving5-37
Page 389 of 614
5-48Starting and driving
.The radar sensors may not be able
to detect and activate BSI when
certain objects are present such as:
— Pedestrians, bicycles, animals.
— Vehicles such as motorcycles,
low height vehicles, or high
ground clearance vehicles.
— Vehicles remaining in the detec- tion zone when you accelerate
from a stop.
— Oncoming vehicles.
— A vehicle merging into an adja- cent lane at a speed approxi-
mately the same as your vehicle.
— A vehicle approaching rapidly from behind.
— A vehicle which your vehicle overtakes rapidly.
— A vehicle that passes through the detection zone quickly.
. The radar sensor’s detection zone is
designed based on a standard lane
width. When driving in a wider lane,
the radar sensors may not detect
vehicles in an adjacent lane. When
driving in a narrow lane, the radar sensors may detect vehicles driving
two lanes away.
. The radar sensors are designed to
ignore most stationary objects,
however objects such as guardrails,
walls, foliage and parked vehicles
may occasionally be detected. This
is a normal operation condition.
. The camera may not detect lane
markers in the following situations
and the BSI system may not operate
properly.
— On roads where there are multi-
ple parallel lane markers; lane
markers that are faded or not
painted clearly; yellow painted
lane markers; non-standard lane
markers; lane markers covered
with water, dirt, snow, etc.
— On roads where discontinued lane markers are still detect-
able.
— On roads where there are sharp curves.
— On roads where there are shar- ply contrasting objects, such as
shadows, snow, water, wheel
ruts, seams or lines remaining after road repairs.
— On roads where the traveling lane merges or separates.
— When the vehicle’s traveling di- rection does not align with the
lane markers.
— When traveling close to the vehicle in front of you, which
obstructs the lane camera unit
detection range.
— When rain, snow or dirt adheres to the windshield in front of a
lane camera unit.
— When the headlights are not bright due to dirt on the lens or
if aiming is not adjusted prop-
erly.
— When strong light enters a lane camera unit. (For example: light
directly shines on the front of
the vehicle at sunrise or sunset.)
— When a sudden change in brightness occurs. (For example:
when the vehicle enters or exits
a tunnel or under a bridge.)
Page 390 of 614
.Do not use the BSI system under the
following conditions because the
system may not function properly.
— During bad weather. (For exam-
ple: rain, fog, snow, etc.)
— When driving on slippery roads, such as on ice or snow, etc.
— When driving on winding or uneven roads.
— When there is a lane closure due to road repairs.
— When driving in a makeshift or temporary lane.
— When driving on roads where the lane width is too narrow.
— When driving with a tire that is not within normal tire conditions
(for example, tire wear, low tire
pressure, installation of spare
tire, tire chains, non-standard
wheels) .
— When the vehicle is equipped with non-original brake parts or
suspension parts.
— When towing a trailer or other vehicle. .
Excessive noise (for example, audio
system volume, open vehicle win-
dow) will interfere with the chime
sound, and it may not be heard.
BSI DRIVING SITUATIONS
Indicator on
Indicator off
Indicator flashing
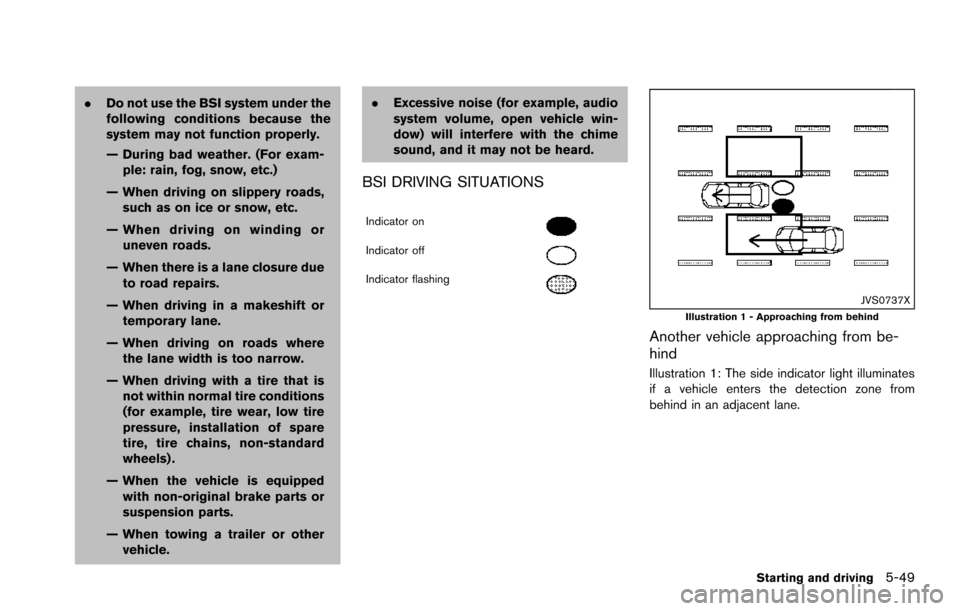
JVS0737XIllustration 1 - Approaching from behind
Another vehicle approaching from be-
hind
Illustration 1: The side indicator light illuminates
if a vehicle enters the detection zone from
behind in an adjacent lane.
Starting and driving5-49
Page 549 of 614
8-34Do-it-yourself
SDI1575Example
TIRE LABELING
Federal law requires tire manufacturers
to place standardized information on the
sidewall of all tires. This information
identifies and describes the fundamental
characteristics of the tire and also
provides the tire identification number
(TIN) for safety standard certification.
The TIN can be used to identify the tire
in case of a recall.
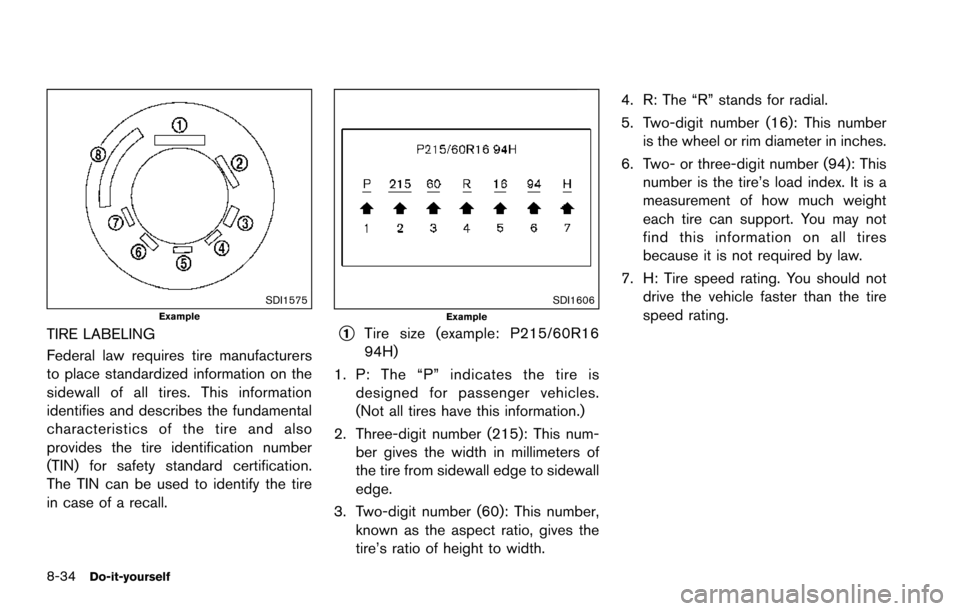
SDI1606Example
*1Tire size (example: P215/60R16
94H)
1. P: The “P” indicates the tire isdesigned for passenger vehicles.
(Not all tires have this information.)
2. Three-digit number (215): This num- ber gives the width in millimeters of
the tire from sidewall edge to sidewall
edge.
3. Two-digit number (60): This number, known as the aspect ratio, gives the
tire’s ratio of height to width. 4. R: The “R” stands for radial.
5. Two-digit number (16): This number
is the wheel or rim diameter in inches.
6. Two- or three-digit number (94): This number is the tire’s load index. It is a
measurement of how much weight
each tire can support. You may not
find this information on all tires
because it is not required by law.
7. H: Tire speed rating. You should not drive the vehicle faster than the tire
speed rating.