2017 NISSAN ARMADA warning
[x] Cancel search: warningPage 191 of 614
3-30Pre-driving checks and adjustments
CAUTION
.Do not store the main sun visor
before storing the extension sun
visor.
. Do not pull the extension sun visor
forcedly downward.
1. To block out glare from the front, swing down the main sun visor
*1.
2. To block glare from the side, remove the main sun visor from the center mount and
swing it to the side
*2.
3. Draw out the extension sun visor
*3from
the main sun visor to block from further
glare.
SPA2447
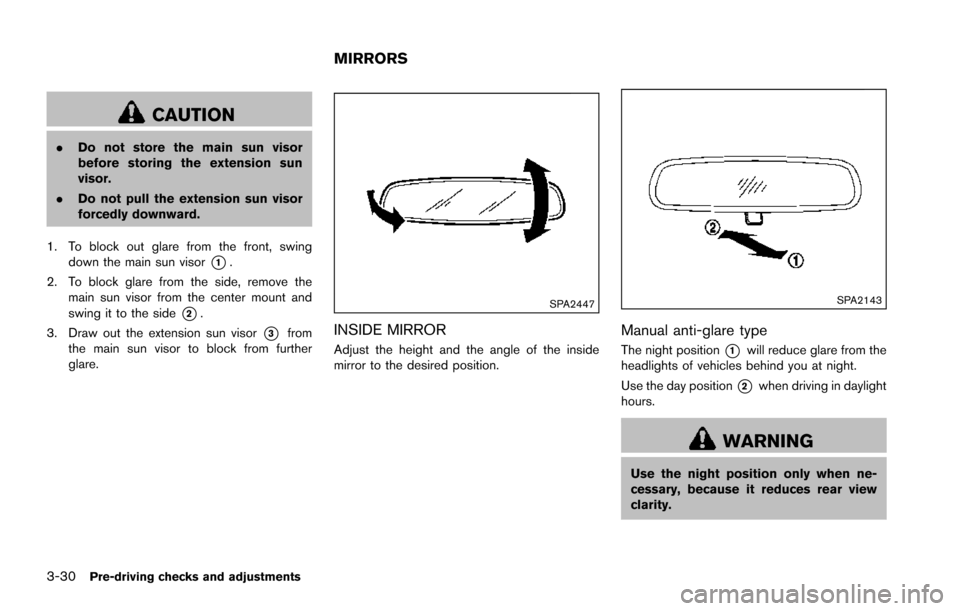
INSIDE MIRROR
Adjust the height and the angle of the inside
mirror to the desired position.
SPA2143
Manual anti-glare type
The night position*1will reduce glare from the
headlights of vehicles behind you at night.
Use the day position
*2when driving in daylight
hours.
WARNING
Use the night position only when ne-
cessary, because it reduces rear view
clarity.
MIRRORS
Page 192 of 614
SPA2450-A
Automatic anti-glare type
The inside mirror is designed so that it
automatically changes reflection according to
the intensity of the headlights of the following
vehicle.
The anti-glare system will be automatically
turned on when the ignition switch is placed in
the ON position.
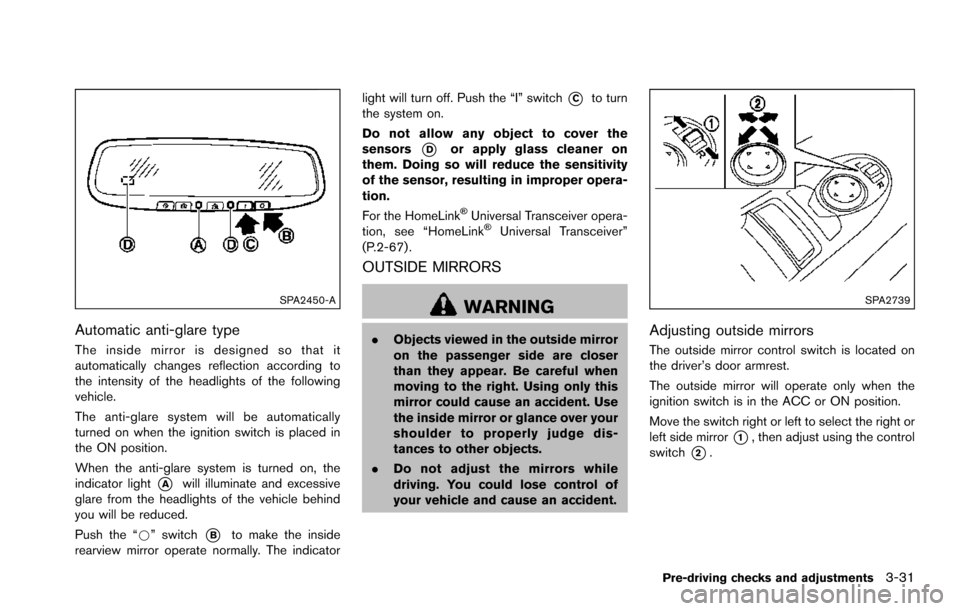
When the anti-glare system is turned on, the
indicator light
*Awill illuminate and excessive
glare from the headlights of the vehicle behind
you will be reduced.
Push the “*” switch
*Bto make the inside
rearview mirror operate normally. The indicator light will turn off. Push the “I” switch
*Cto turn
the system on.
Do not allow any object to cover the
sensors
*Dor apply glass cleaner on
them. Doing so will reduce the sensitivity
of the sensor, resulting in improper opera-
tion.
For the HomeLink
�ŠUniversal Transceiver opera-
tion, see “HomeLink�ŠUniversal Transceiver”
(P.2-67) .
OUTSIDE MIRRORS
WARNING
. Objects viewed in the outside mirror
on the passenger side are closer
than they appear. Be careful when
moving to the right. Using only this
mirror could cause an accident. Use
the inside mirror or glance over your
shoulder to properly judge dis-
tances to other objects.
. Do not adjust the mirrors while
driving. You could lose control of
your vehicle and cause an accident.
SPA2739
Adjusting outside mirrors
The outside mirror control switch is located on
the driver’s door armrest.
The outside mirror will operate only when the
ignition switch is in the ACC or ON position.
Move the switch right or left to select the right or
left side mirror
*1, then adjust using the control
switch
*2.
Pre-driving checks and adjustments3-31
Page 200 of 614
WARNING
.Do not disassemble or modify this
system. If you do, it may result in
accidents, fire, or electric shock.
. Do not use this system if you notice
any abnormality, such as a frozen
screen or lack of sound. Continued
use of the system may result in
accident, fire or electric shock.
. In case you notice any foreign
object in the system hardware, spill
liquid on it, or notice smoke or smell
coming from it, stop using the
system immediately. It is recom-
mended you visit a NISSAN dealer
for servicing. Ignoring such condi-
tions may lead to accidents, fire, or
electric shock.
. Park the vehicle in a safe location
and apply the parking brake to view
the images on the front center dis-
play screen.
Do not attempt to operate the system in
extreme temperature conditions [below
�í 48F( �í208 C) and above 1588 F (708C)].
Operating this system under these condi- tions may result in system malfunctions.
Monitor, heater, air conditioner, audio, phone and voice recognition systems4-3
SAFETY NOTE
Page 202 of 614
SAA3025
HOW TO USE MULTI-FUNCTION
CONTROLLER
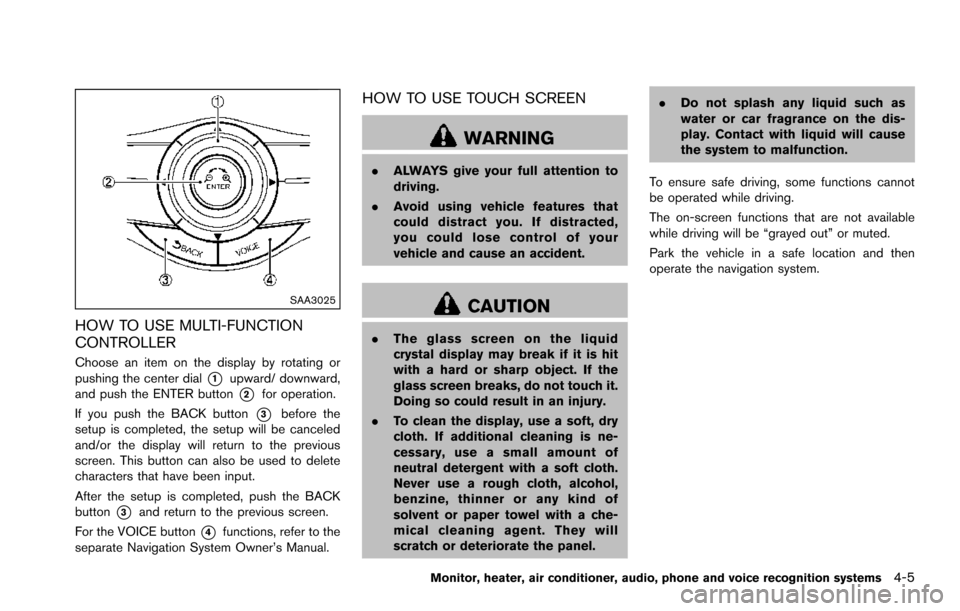
Choose an item on the display by rotating or
pushing the center dial
*1upward/ downward,
and push the ENTER button
*2for operation.
If you push the BACK button
*3before the
setup is completed, the setup will be canceled
and/or the display will return to the previous
screen. This button can also be used to delete
characters that have been input.
After the setup is completed, push the BACK
button
*3and return to the previous screen.
For the VOICE button
*4functions, refer to the
separate Navigation System Owner’s Manual.
HOW TO USE TOUCH SCREEN
WARNING
. ALWAYS give your full attention to
driving.
. Avoid using vehicle features that
could distract you. If distracted,
you could lose control of your
vehicle and cause an accident.
CAUTION
.The glass screen on the liquid
crystal display may break if it is hit
with a hard or sharp object. If the
glass screen breaks, do not touch it.
Doing so could result in an injury.
. To clean the display, use a soft, dry
cloth. If additional cleaning is ne-
cessary, use a small amount of
neutral detergent with a soft cloth.
Never use a rough cloth, alcohol,
benzine, thinner or any kind of
solvent or paper towel with a che-
mical cleaning agent. They will
scratch or deteriorate the panel. .
Do not splash any liquid such as
water or car fragrance on the dis-
play. Contact with liquid will cause
the system to malfunction.
To ensure safe driving, some functions cannot
be operated while driving.
The on-screen functions that are not available
while driving will be “grayed out” or muted.
Park the vehicle in a safe location and then
operate the navigation system.
Monitor, heater, air conditioner, audio, phone and voice recognition systems4-5
Page 207 of 614
4-10Monitor, heater, air conditioner, audio, phone and voice recognition systems
SAA2479
SAA2480
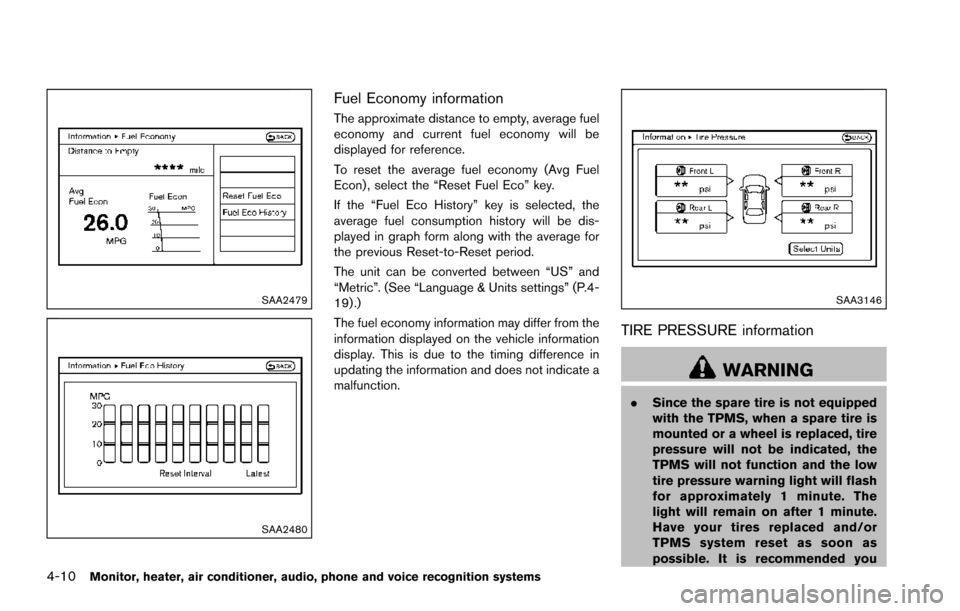
Fuel Economy information
The approximate distance to empty, average fuel
economy and current fuel economy will be
displayed for reference.
To reset the average fuel economy (Avg Fuel
Econ) , select the “Reset Fuel Eco” key.
If the “Fuel Eco History” key is selected, the
average fuel consumption history will be dis-
played in graph form along with the average for
the previous Reset-to-Reset period.
The unit can be converted between “US” and
“Metric”. (See “Language & Units settings” (P.4-
19) .)
The fuel economy information may differ from the
information displayed on the vehicle information
display. This is due to the timing difference in
updating the information and does not indicate a
malfunction.
SAA3146
TIRE PRESSURE information
WARNING
.Since the spare tire is not equipped
with the TPMS, when a spare tire is
mounted or a wheel is replaced, tire
pressure will not be indicated, the
TPMS will not function and the low
tire pressure warning light will flash
for approximately 1 minute. The
light will remain on after 1 minute.
Have your tires replaced and/or
TPMS system reset as soon as
possible. It is recommended you
Page 212 of 614
Ringtone/Incoming Call/Outgoing Call:
For the details of these items, see “Bluetooth�Š
Hands-Free Phone System” (P.4-106) .
Switch Beeps:
When this item is turned to ON, you will hear a
beep sound when you use a button.
Guidance Voice:
When this item is turned to ON, you will hear
voice guidance in the navigation operation or in
other operations.
JVH1487X
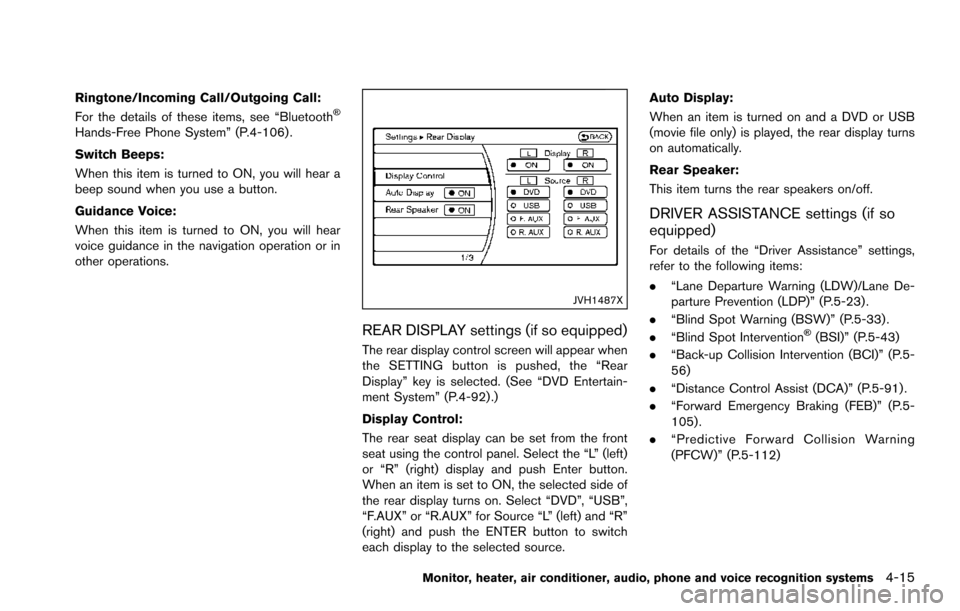
REAR DISPLAY settings (if so equipped)
The rear display control screen will appear when
the SETTING button is pushed, the “Rear
Display” key is selected. (See “DVD Entertain-
ment System” (P.4-92) .)
Display Control:
The rear seat display can be set from the front
seat using the control panel. Select the “L” (left)
or “R” (right) display and push Enter button.
When an item is set to ON, the selected side of
the rear display turns on. Select “DVD”, “USB”,
“F.AUX” or “R.AUX” for Source “L” (left) and “R”
(right) and push the ENTER button to switch
each display to the selected source.Auto Display:
When an item is turned on and a DVD or USB
(movie file only) is played, the rear display turns
on automatically.
Rear Speaker:
This item turns the rear speakers on/off.
DRIVER ASSISTANCE settings (if so
equipped)
For details of the “Driver Assistance” settings,
refer to the following items:
.
“Lane Departure Warning (LDW)/Lane De-
parture Prevention (LDP)” (P.5-23) .
. “Blind Spot Warning (BSW)” (P.5-33) .
. “Blind Spot Intervention
�Š(BSI)” (P.5-43)
. “Back-up Collision Intervention (BCI)” (P.5-
56)
. “Distance Control Assist (DCA)” (P.5-91) .
. “Forward Emergency Braking (FEB)” (P.5-
105) .
. “Predictive Forward Collision Warning
(PFCW)” (P.5-112)
Monitor, heater, air conditioner, audio, phone and voice recognition systems4-15
Page 218 of 614
.(Previous)
Select the “
” key to display the previous
file.
Setting the Image Viewer:
The Image Viewer setting display will appear
when selecting the “Settings” key on the full
screen display. The following settings are
available for the full screen display.
. Slideshow Speed
Select the “Slideshow Speed” key. From the
following display, select the changing time
from 5, 10, 30, 60 seconds or “No Auto
Change”.
. Slideshow Order
Select the “Slideshow Order” key. From the
following display, select “Random” or “Order
List”. For “Order List”, the image order is the
order of the files as stored on the USB
memory.
Operating tips:
. Only files that meet the following conditions
will be displayed.
— Image type: JPEG
— File Extensions: *.jpg, *jpeg
— Maximum Resolution: 2048 61536
pixels — Maximum Size: 2 MB
— Colors: 32768 (15 bit)
— Maximum File Name lengths: 253 Bytes
— Maximum Folders: 500
— Maximum Images per Folder: 1024
. If an electronic device (such as a digital
camera) is directly connected to the vehicle
using a USB cable, no image will be
displayed on the screen.
. If the file name is too long, some file names
may not be entirely displayed.
. When the total number of characters in the
file name exceeds 100 or if 1 file name in a
directory exceeds 100 characters, all files
will show a shortened 8-character version.
The image will still be displayed when
selected.WARNING
Failure to follow the warnings and
instructions for proper use of the Rear-
View Monitor system could result in
serious injury or death.
.The RearView Monitor is a conve-
nience but it is not a substitute for
proper backing. Always turn and
look out the windows, and check
mirrors to be sure that it is safe to
move before operating the vehicle.
Always back up slowly.
. The system is designed as an aid to
the driver in showing large station-
ary objects directly behind the vehi-
cle, to help avoid damaging the
vehicle.
. The distance guide line and the
vehicle width line should be used
as a reference only when the vehicle
is on a level paved surface. The
distance viewed on the monitor is
for reference only and may be
different than the actual distance
between the vehicle and displayed
objects.
Monitor, heater, air conditioner, audio, phone and voice recognition systems4-21
REARVIEW MONITOR (if so
equipped)
Page 220 of 614
Predictive course lines*6:
Indicate the predictive course when backing up.
The predictive course lines will be displayed on
the monitor when the shift lever is in the R
(Reverse) position and the steering wheel is
turned. The predictive course lines will move
depending on how much the steering wheel is
turned and will not be displayed while the
steering wheel is in the neutral position.
The vehicle width guide lines and the width of
the predictive course lines are wider than the
actual width and course.
HOW TO PARK WITH PREDICTIVE
COURSE LINES
WARNING
. If the tires are replaced with differ-
ent sized tires, the predictive course
line may not be displayed correctly.
. On a snow-covered or slippery road,
there may be a difference between
the predictive course line and the
actual course line.
. The displayed lines will appear
slightly off to the right because the
rearview camera is not installed in
the rear center of the vehicle.
SAA1897
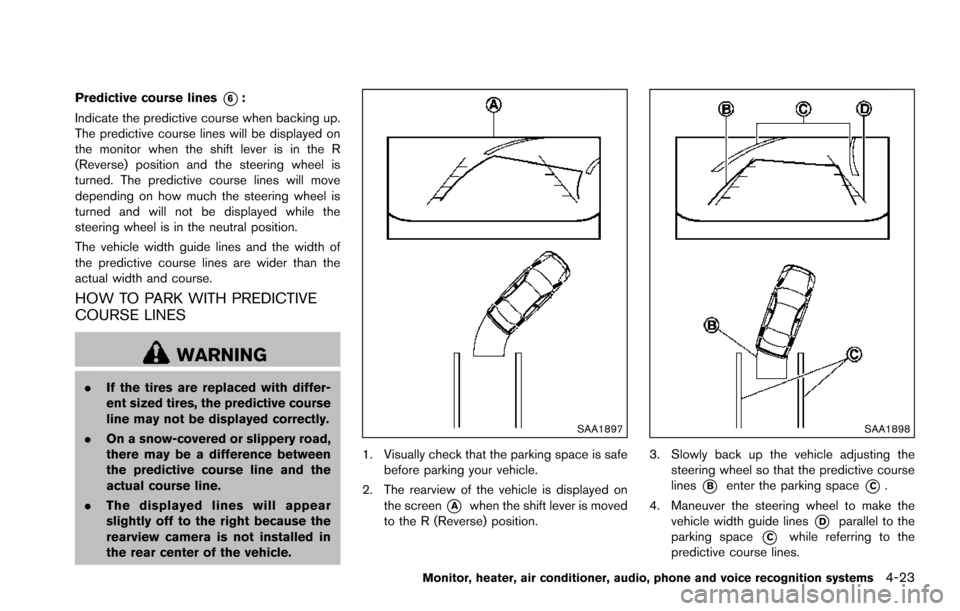
1. Visually check that the parking space is safe
before parking your vehicle.
2. The rearview of the vehicle is displayed on the screen
*Awhen the shift lever is moved
to the R (Reverse) position.
SAA1898
3. Slowly back up the vehicle adjusting the steering wheel so that the predictive course
lines
*Benter the parking space*C.
4. Maneuver the steering wheel to make the vehicle width guide lines
*Dparallel to the
parking space
*Cwhile referring to the
predictive course lines.
Monitor, heater, air conditioner, audio, phone and voice recognition systems4-23