2017 NISSAN ARMADA Lift gate
[x] Cancel search: Lift gatePage 11 of 614
0-4Illustrated table of contents
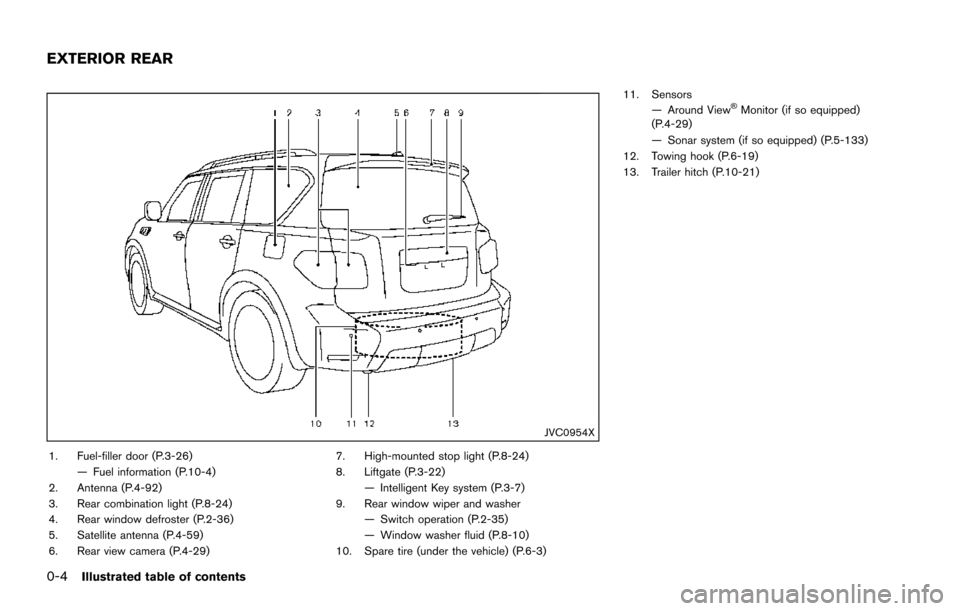
JVC0954X
1. Fuel-filler door (P.3-26)— Fuel information (P.10-4)
2. Antenna (P.4-92)
3. Rear combination light (P.8-24)
4. Rear window defroster (P.2-36)
5. Satellite antenna (P.4-59)
6. Rear view camera (P.4-29) 7. High-mounted stop light (P.8-24)
8. Liftgate (P.3-22)
— Intelligent Key system (P.3-7)
9. Rear window wiper and washer — Switch operation (P.2-35)
— Window washer fluid (P.8-10)
10. Spare tire (under the vehicle) (P.6-3) 11. Sensors
— Around View
�ŠMonitor (if so equipped)
(P.4-29)
— Sonar system (if so equipped) (P.5-133)
12. Towing hook (P.6-19)
13. Trailer hitch (P.10-21)
EXTERIOR REAR
Page 13 of 614
0-6Illustrated table of contents
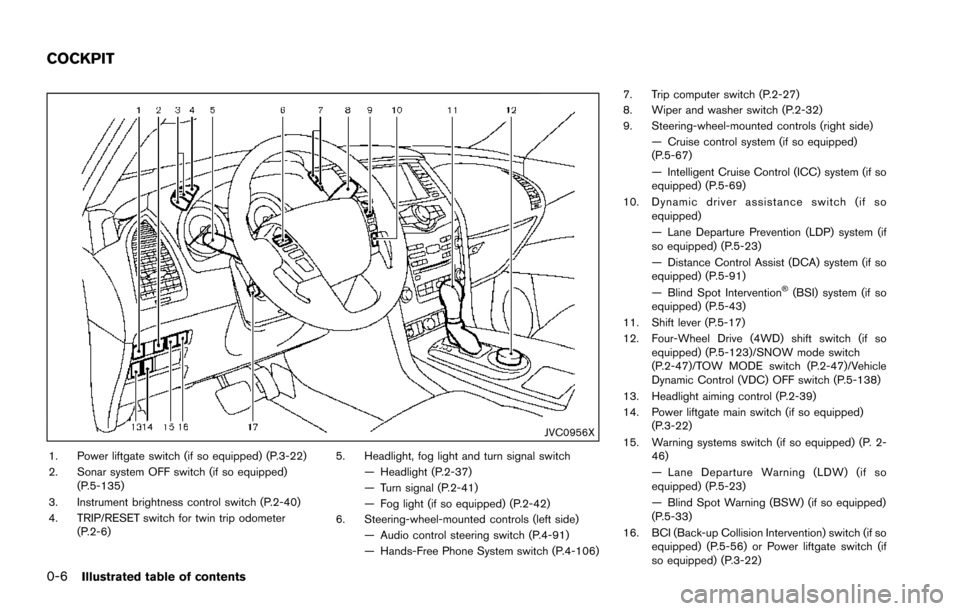
JVC0956X
1. Power liftgate switch (if so equipped) (P.3-22)
2. Sonar system OFF switch (if so equipped)(P.5-135)
3. Instrument brightness control switch (P.2-40)
4. TRIP/RESET switch for twin trip odometer (P.2-6) 5. Headlight, fog light and turn signal switch
— Headlight (P.2-37)
— Turn signal (P.2-41)
— Fog light (if so equipped) (P.2-42)
6. Steering-wheel-mounted controls (left side) — Audio control steering switch (P.4-91)
— Hands-Free Phone System switch (P.4-106) 7. Trip computer switch (P.2-27)
8. Wiper and washer switch (P.2-32)
9. Steering-wheel-mounted controls (right side)
— Cruise control system (if so equipped)
(P.5-67)
— Intelligent Cruise Control (ICC) system (if so
equipped) (P.5-69)
10. Dynamic driver assistance switch (if so equipped)
— Lane Departure Prevention (LDP) system (if
so equipped) (P.5-23)
— Distance Control Assist (DCA) system (if so
equipped) (P.5-91)
— Blind Spot Intervention
�Š(BSI) system (if so
equipped) (P.5-43)
11. Shift lever (P.5-17)
12. Four-Wheel Drive (4WD) shift switch (if so equipped) (P.5-123)/SNOW mode switch
(P.2-47)/TOW MODE switch (P.2-47)/Vehicle
Dynamic Control (VDC) OFF switch (P.5-138)
13. Headlight aiming control (P.2-39)
14. Power liftgate main switch (if so equipped) (P.3-22)
15. Warning systems switch (if so equipped) (P. 2- 46)
— Lane Departure Warning (LDW) (if so
equipped) (P.5-23)
— Blind Spot Warning (BSW) (if so equipped)
(P.5-33)
16. BCI (Back-up Collision Intervention) switch (if so equipped) (P.5-56) or Power liftgate switch (if
so equipped) (P.3-22)
COCKPIT
Page 92 of 614
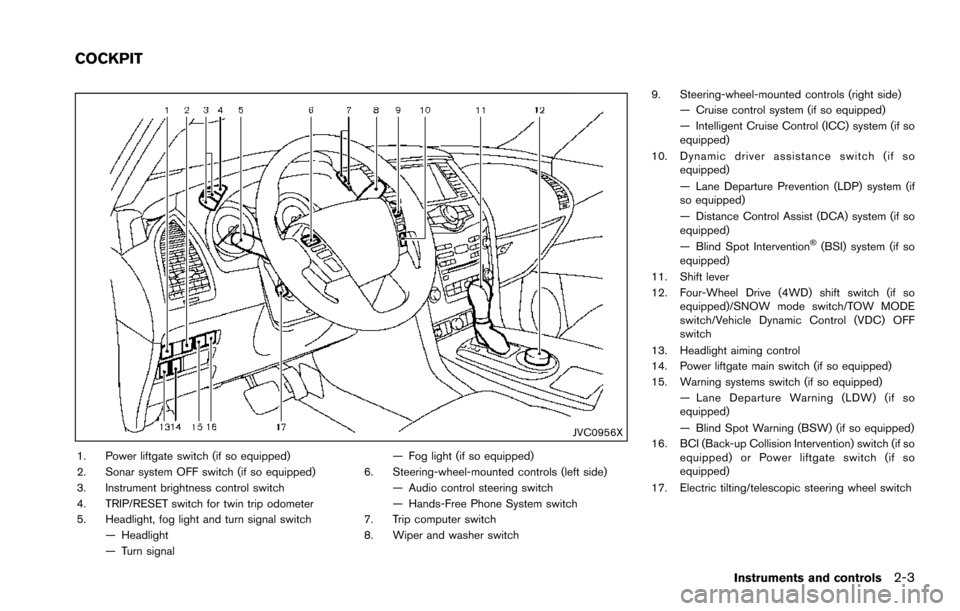
JVC0956X
1. Power liftgate switch (if so equipped)
2. Sonar system OFF switch (if so equipped)
3. Instrument brightness control switch
4. TRIP/RESET switch for twin trip odometer
5. Headlight, fog light and turn signal switch— Headlight
— Turn signal — Fog light (if so equipped)
6. Steering-wheel-mounted controls (left side) — Audio control steering switch
— Hands-Free Phone System switch
7. Trip computer switch
8. Wiper and washer switch 9. Steering-wheel-mounted controls (right side)
— Cruise control system (if so equipped)
— Intelligent Cruise Control (ICC) system (if so
equipped)
10. Dynamic driver assistance switch (if so equipped)
— Lane Departure Prevention (LDP) system (if
so equipped)
— Distance Control Assist (DCA) system (if so
equipped)
— Blind Spot Intervention
�Š(BSI) system (if so
equipped)
11. Shift lever
12. Four-Wheel Drive (4WD) shift switch (if so equipped)/SNOW mode switch/TOW MODE
switch/Vehicle Dynamic Control (VDC) OFF
switch
13. Headlight aiming control
14. Power liftgate main switch (if so equipped)
15. Warning systems switch (if so equipped) — Lane Departure Warning (LDW) (if so
equipped)
— Blind Spot Warning (BSW) (if so equipped)
16. BCI (Back-up Collision Intervention) switch (if so equipped) or Power liftgate switch (if so
equipped)
17. Electric tilting/telescopic steering wheel switch
Instruments and controls2-3
COCKPIT
Page 105 of 614
2-16Instruments and controls
and all tires are properly inflated, it
is recommended you consult a
NISSAN dealer.
. Since the spare tire is not equipped
with the TPMS, when a spare tire is
mounted or a wheel is replaced, the
TPMS will not function and the low
tire pressure warning light will flash
for approximately 1 minute. The
light will remain on after 1 minute.
Have your tires replaced and/or
TPMS system reset as soon as
possible. It is recommended you
visit a NISSAN dealer for these
services.
. Replacing tires with those not ori-
ginally specified by NISSAN could
affect the proper operation of the
TPMS.
CAUTION
.The TPMS is not a substitute for the
regular tire pressure check. Be sure
to check the tire pressure regularly.
. If the vehicle is being driven at
speeds of less than 16 MPH (25
km/h) , the TPMS may not operate correctly.
. Be sure to install the specified size
of tires to the four wheels correctly.
Master warning light
When the ignition switch is in the ON position,
the master warning light illuminates if any of the
following are displayed on the vehicle informa-
tion display:
.No key warning
. Low fuel warning
. Low washer fluid warning
. Parking brake release warning
. Door/liftgate open warning
. Front radar obstruction warning (if so
equipped)
. Headlight warning
. Loose fuel cap warning
. Check tire pressure warning
. Back-up Collision Intervention (BCI) not
available warning (if so equipped)
. Back-up Collision Intervention (BCI) mal-
function warning (if so equipped)
. Forward Emergency Braking (FEB) system
warning (if so equipped) .
Extended storage fuse warning (if so
equipped)
See “Vehicle information display” (P.2-20) .
Seat belt warning light and chime
The light and chime remind you to fasten seat
belts. The light illuminates whenever the ignition
switch is placed in the ON position, and will
remain illuminated until the driver’s seat belt is
fastened. At the same time, the chime will sound
for about 6 seconds unless the driver’s seat belt
is securely fastened.
The seat belt warning light for the front
passenger will illuminate if the seat belt is not
fastened when the front passenger’s seat is
occupied. For approximately 5 seconds after the
ignition switch is placed in the ON position, the
system does not activate the warning light for
the front passenger.
See “Seat belts” (P.1-18) for precautions on
seat belt usage.
Supplemental air bag warning light
After placing the ignition switch in the ON
position, the supplemental air bag warning light
will illuminate. The supplemental air bag warning
light will turn off after about 7 seconds if the air
bag and/or pretensioner systems are opera-
tional.
Page 113 of 614
2-24Instruments and controls
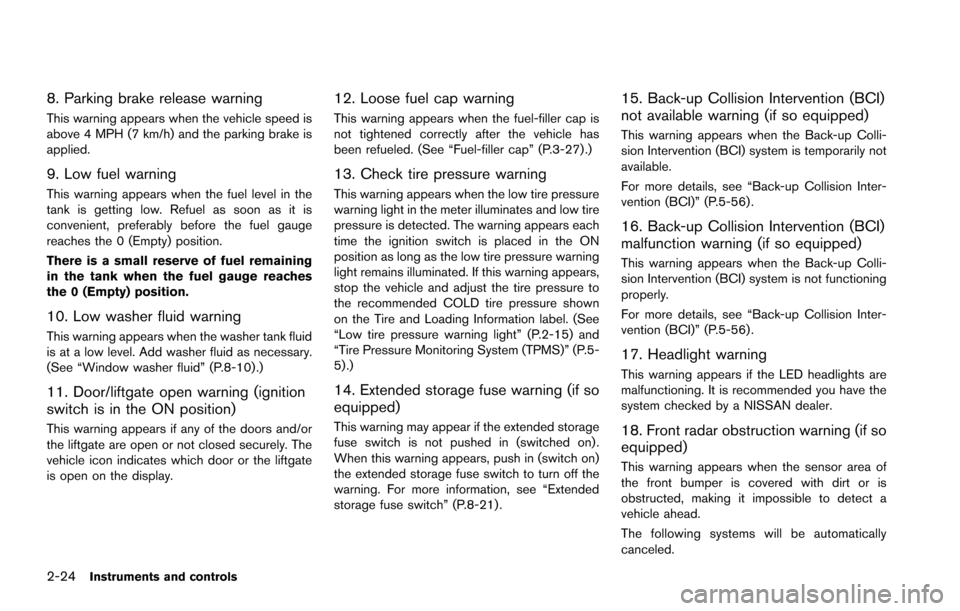
8. Parking brake release warning
This warning appears when the vehicle speed is
above 4 MPH (7 km/h) and the parking brake is
applied.
9. Low fuel warning
This warning appears when the fuel level in the
tank is getting low. Refuel as soon as it is
convenient, preferably before the fuel gauge
reaches the 0 (Empty) position.
There is a small reserve of fuel remaining
in the tank when the fuel gauge reaches
the 0 (Empty) position.
10. Low washer fluid warning
This warning appears when the washer tank fluid
is at a low level. Add washer fluid as necessary.
(See “Window washer fluid” (P.8-10).)
11. Door/liftgate open warning (ignition
switch is in the ON position)
This warning appears if any of the doors and/or
the liftgate are open or not closed securely. The
vehicle icon indicates which door or the liftgate
is open on the display.
12. Loose fuel cap warning
This warning appears when the fuel-filler cap is
not tightened correctly after the vehicle has
been refueled. (See “Fuel-filler cap” (P.3-27) .)
13. Check tire pressure warning
This warning appears when the low tire pressure
warning light in the meter illuminates and low tire
pressure is detected. The warning appears each
time the ignition switch is placed in the ON
position as long as the low tire pressure warning
light remains illuminated. If this warning appears,
stop the vehicle and adjust the tire pressure to
the recommended COLD tire pressure shown
on the Tire and Loading Information label. (See
“Low tire pressure warning light” (P.2-15) and
“Tire Pressure Monitoring System (TPMS)” (P.5-
5) .)
14. Extended storage fuse warning (if so
equipped)
This warning may appear if the extended storage
fuse switch is not pushed in (switched on) .
When this warning appears, push in (switch on)
the extended storage fuse switch to turn off the
warning. For more information, see “Extended
storage fuse switch” (P.8-21) .
15. Back-up Collision Intervention (BCI)
not available warning (if so equipped)
This warning appears when the Back-up Colli-
sion Intervention (BCI) system is temporarily not
available.
For more details, see “Back-up Collision Inter-
vention (BCI)” (P.5-56) .
16. Back-up Collision Intervention (BCI)
malfunction warning (if so equipped)
This warning appears when the Back-up Colli-
sion Intervention (BCI) system is not functioning
properly.
For more details, see “Back-up Collision Inter-
vention (BCI)” (P.5-56) .
17. Headlight warning
This warning appears if the LED headlights are
malfunctioning. It is recommended you have the
system checked by a NISSAN dealer.
18. Front radar obstruction warning (if so
equipped)
This warning appears when the sensor area of
the front bumper is covered with dirt or is
obstructed, making it impossible to detect a
vehicle ahead.
The following systems will be automatically
canceled.
Page 119 of 614
2-30Instruments and controls
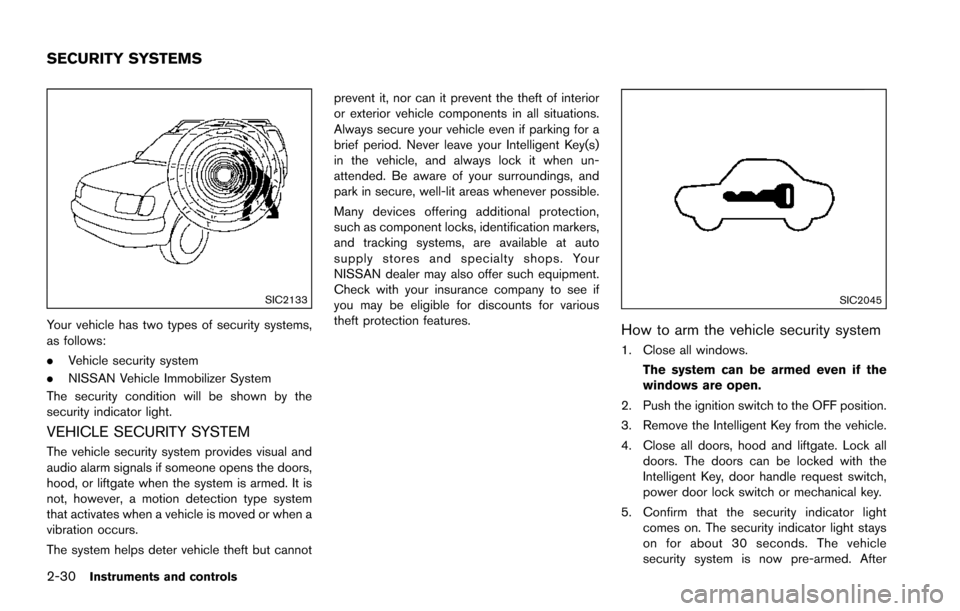
SIC2133
Your vehicle has two types of security systems,
as follows:
.Vehicle security system
. NISSAN Vehicle Immobilizer System
The security condition will be shown by the
security indicator light.
VEHICLE SECURITY SYSTEM
The vehicle security system provides visual and
audio alarm signals if someone opens the doors,
hood, or liftgate when the system is armed. It is
not, however, a motion detection type system
that activates when a vehicle is moved or when a
vibration occurs.
The system helps deter vehicle theft but cannot prevent it, nor can it prevent the theft of interior
or exterior vehicle components in all situations.
Always secure your vehicle even if parking for a
brief period. Never leave your Intelligent Key(s)
in the vehicle, and always lock it when un-
attended. Be aware of your surroundings, and
park in secure, well-lit areas whenever possible.
Many devices offering additional protection,
such as component locks, identification markers,
and tracking systems, are available at auto
supply stores and specialty shops. Your
NISSAN dealer may also offer such equipment.
Check with your insurance company to see if
you may be eligible for discounts for various
theft protection features.
SIC2045
How to arm the vehicle security system
1. Close all windows.
The system can be armed even if the
windows are open.
2. Push the ignition switch to the OFF position.
3. Remove the Intelligent Key from the vehicle.
4. Close all doors, hood and liftgate. Lock all doors. The doors can be locked with the
Intelligent Key, door handle request switch,
power door lock switch or mechanical key.
5. Confirm that the security indicator light comes on. The security indicator light stays
on for about 30 seconds. The vehicle
security system is now pre-armed. After
SECURITY SYSTEMS
Page 120 of 614
about 30 seconds the vehicle security
system automatically shifts into the armed
phase. The security light begins to flash
once every approximately 3 seconds. If,
during this 30-second pre-arm time period,
the door is unlocked, or the ignition switch is
pushed to ACC or ON, the system will not
arm.
Even when the driver and/or passengers
are in the vehicle, the system will activate
with all doors, hood, and liftgate locked
with the ignition switch in the LOCK
position. When pushing the ignition switch
to the ACC or ON position, the system will
be released.
Vehicle security system activation
The vehicle security system will give the follow-
ing alarm:
. The headlights blink and the horn sounds
intermittently.
. The alarm automatically turns off after
approximately 50 seconds. However, the
alarm reactivates if the vehicle is tampered
with again.
The alarm is activated by:
. Unlocking the door or opening the liftgate
without using the button on the Intelligent
Key, the door handle request switch or the mechanical key. (Even if the door is opened
by releasing the door inside lock knob, the
alarm will activate.)
. Opening the hood.
How to stop an activated alarm
The alarm will stop when a door is unlocked by
pushing the unlock button on the Intelligent Key,
the door handle request switch or using the
mechanical key, or when the ignition switch is
pushed to the ACC or ON position.
If the system does not operate as de-
scribed above, it is recommended you have
it checked by a NISSAN dealer.
NISSAN VEHICLE IMMOBILIZER SYS-
TEM
The NISSAN Vehicle Immobilizer System will not
allow the engine to start without the use of the
registered Intelligent Key. Never leave these
keys in the vehicle.
FCC Notice:
For USA:
This device complies with Part 15 of the
FCC Rules. Operation is subject to the
following two conditions: (1) This device
may not cause harmful interference, and
(2) this device must accept any interfer-
ence received, including interference that may cause undesired operation.
NOTE:
Changes or modifications not expressly
approved by the party responsible for
compliance could void the user’s authority
to operate the equipment.
For Canada:
This device complies with Industry Canada
licence-exempt RSS standard(s) . Opera-
tion is subject to the following two condi-
tions: (1) this device may not cause
interference, and (2) this device must
accept any interference, including interfer-
ence that may cause undesired operation
of the device.
Instruments and controls2-31
Page 147 of 614
2-58Instruments and controls
JVE0219X
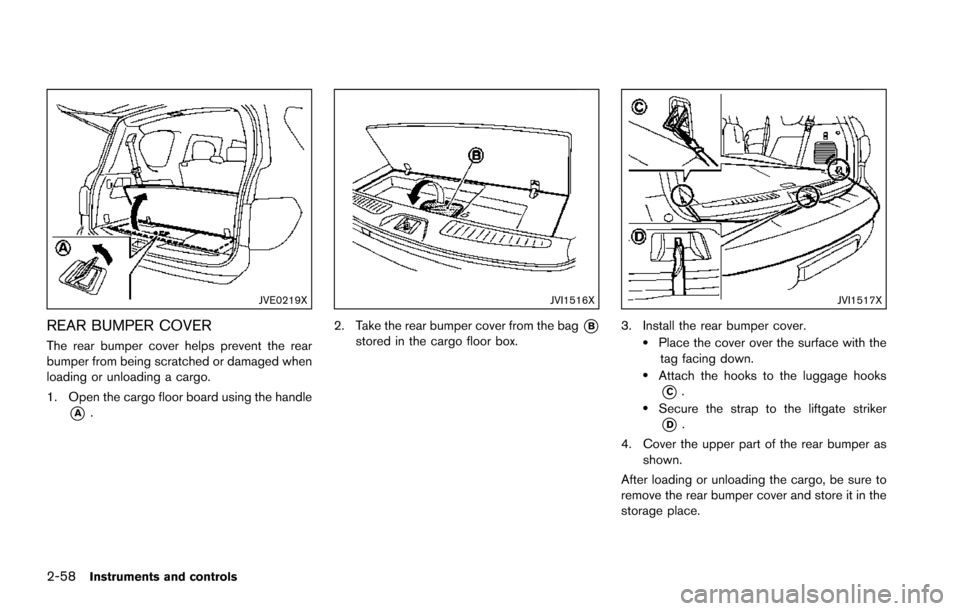
REAR BUMPER COVER
The rear bumper cover helps prevent the rear
bumper from being scratched or damaged when
loading or unloading a cargo.
1. Open the cargo floor board using the handle
*A.
JVI1516X
2. Take the rear bumper cover from the bag*Bstored in the cargo floor box.
JVI1517X
3. Install the rear bumper cover..Place the cover over the surface with thetag facing down.
.Attach the hooks to the luggage hooks
*C..Secure the strap to the liftgate striker
*D.
4. Cover the upper part of the rear bumper as shown.
After loading or unloading the cargo, be sure to
remove the rear bumper cover and store it in the
storage place.