2017 NISSAN 370Z ROADSTER phone
[x] Cancel search: phonePage 3 of 28
NEW SYSTEM FEATURES
RearView Monitor (if so equipped).....................................................2
Opening the Sof t Top (Roadster models)
..............................................2
USB (Universal Serial Bus) Connection Port/AUX Jack and iPod® Interface
...........2
NavTraffic and NavWeather (if so equipped)
...........................................3
ESSENTIAL INFORMATION
Tire Pressure Monitoring System (TPMS) ..............................................4
Loose Fuel Cap
........................................................................\
.5
Fuel-filler Door
.......................................................................\
..5
Clock Set/Adjustment
.................................................................6
Engine Oil Temperature Gauge
........................................................7
Automatic Power Windows . . . . . . . . . . . . . . . . . . . . . . . . . . . . . . . . . . . .\
. . . . . . . . . . . . . . . . . . . . . . . . 7
FIRST DRIVE FEATURES
Nissan Intelligent Key® System ........................................................8
Rear Hatch/Trunk Lid Release
.........................................................9
Sof t Top Operation (Roadster models)
................................................9
Power Seat Adjustments (if so equipped)
.............................................9
Manual Seat Adjustments (if so equipped)
...........................................10
Power Outside Mirror Control Switch
.................................................10
Starting/Stopping the Engine
.........................................................11
Headlight Control Switch
..............................................................11
Wiper and Washer Switch
.............................................................12
Heater and Air Conditioner (automatic)
..............................................13
FM/AM/SiriusXM® Satellite Radio with CD/DVD Player (if so equipped)
..............14
Cruise Control
........................................................................\
.15
SYSTEM GUIDE
Trip Computer .......................................................................\
.16
Bluetooth® Hands-free Phone System
...............................................17
• System Operating Tips ...........................................................17
Bluetooth® System without Navigation (if so equipped)
.............................18
Bluetooth® System with Navigation (if so equipped)
.................................19
Bluetooth® Streaming Audio with Navigation (if so equipped)
.......................21
Navigation System (if so equipped)
...................................................22
HomeLink® Universal Transceiver (if so equipped)
....................................23
TABLE OF CONTENTS
Please see your Owner’s Manual for important safety information and system
operation limitations.
• A cellular telephone should not be used for any purpose while driving so full attention may be given to vehicle operation.
• Always wear your seat belt.
• Supplemental air bags do not replace proper seat belt usage.
• Children 12 and under should always ride in the rear seat properly secured in child restraints or seat belts according to their age and weight.
• Do not drink and drive.
For more information, refer to the “Safety — Seats, seat belts and supplemental restraint system
(section 1)”, the “Center display, heater, air conditioner, audio, phone and voice recognition systems
(section 4)” and the “Starting and driving (section 5)” of your Owner’s Manual.
Additional information about your vehicle is also available in your Owner’s Manual,
Navigation System Owner’s Manual and at www.NissanUSA.com.
Page 4 of 28
2
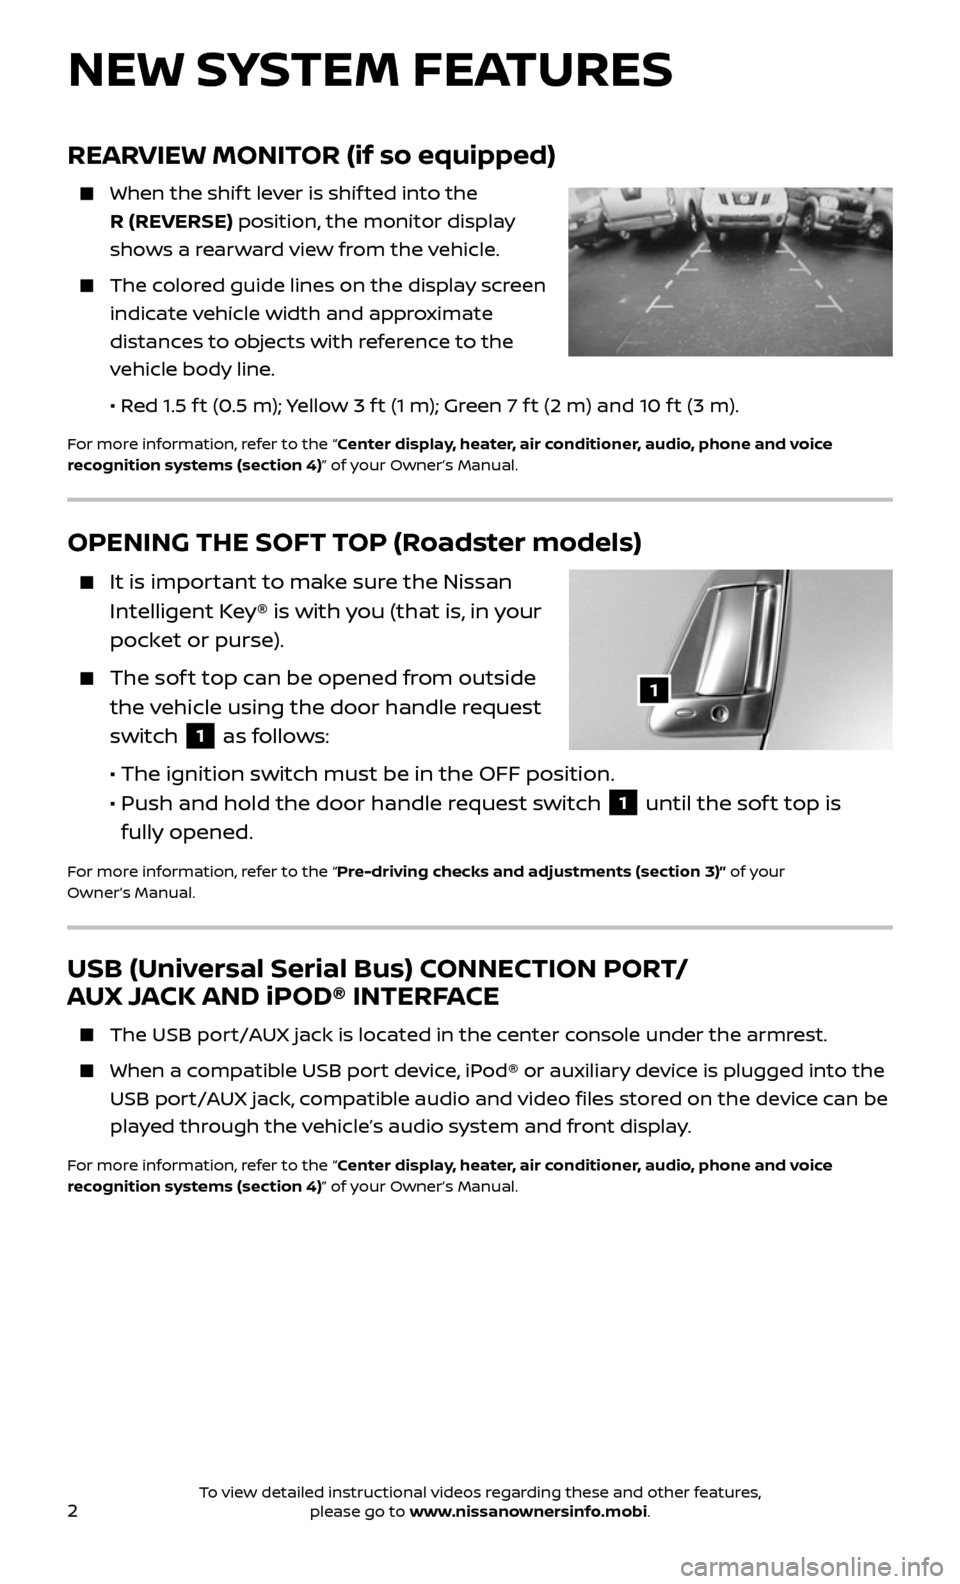
OPENING THE SOFT TOP (Roadster models)
It is important to make sure the Nissan
Intelligent Key® is with you (that is, in your
pocket or purse).
The soft top can be opened from outside
the vehicle using the door handle request
switch
1 as follows:
• The ignition switch must be in the OFF position.
•
Push and hold the door hand le request switch 1 until the sof t top is
fully opened.
For more information, refer to the “Pre-driving checks and adjustments (section 3)” of your
Owner’s Manual.
1
NEW SYSTEM FEATURES
REARVIEW MONITOR (if so equipped)
When the shif t lever is shif ted into the
R (REVERSE) position, the monitor display
shows a rearward view from the vehicle.
The colored guide lines on the display screen
indicate vehicle width and approximate
distances to objects with reference to the
vehicle body line.
• Red 1.5 f t (0.5 m); Yellow 3 f t (1 m); Green 7 f t (2 m) and 10 f t (3 m).
For more information, refer to the “Center display, heater, air conditioner, audio, phone and voice
recognition systems (section 4)” of your Owner’s Manual.
USB (Universal Serial Bus) CONNECTION PORT/
AUX JACK AND iPOD® INTERFACE
The USB por t/AUX jack is located in the center console under the armrest.
When a compatible USB port device, iPod® or auxiliary device is plugged into the
USB port/AUX jack, compatible audio and video files stored on the device can be
played through the vehicle’s audio system and front display.
For more information, refer to the “Center display, heater, air conditioner, audio, phone and voice
recognition systems (section 4)” of your Owner’s Manual.
To view detailed instructional videos regarding these and other features, please go to www.nissanownersinfo.mobi.
Page 8 of 28
6
ESSENTIAL INFORMATION
54
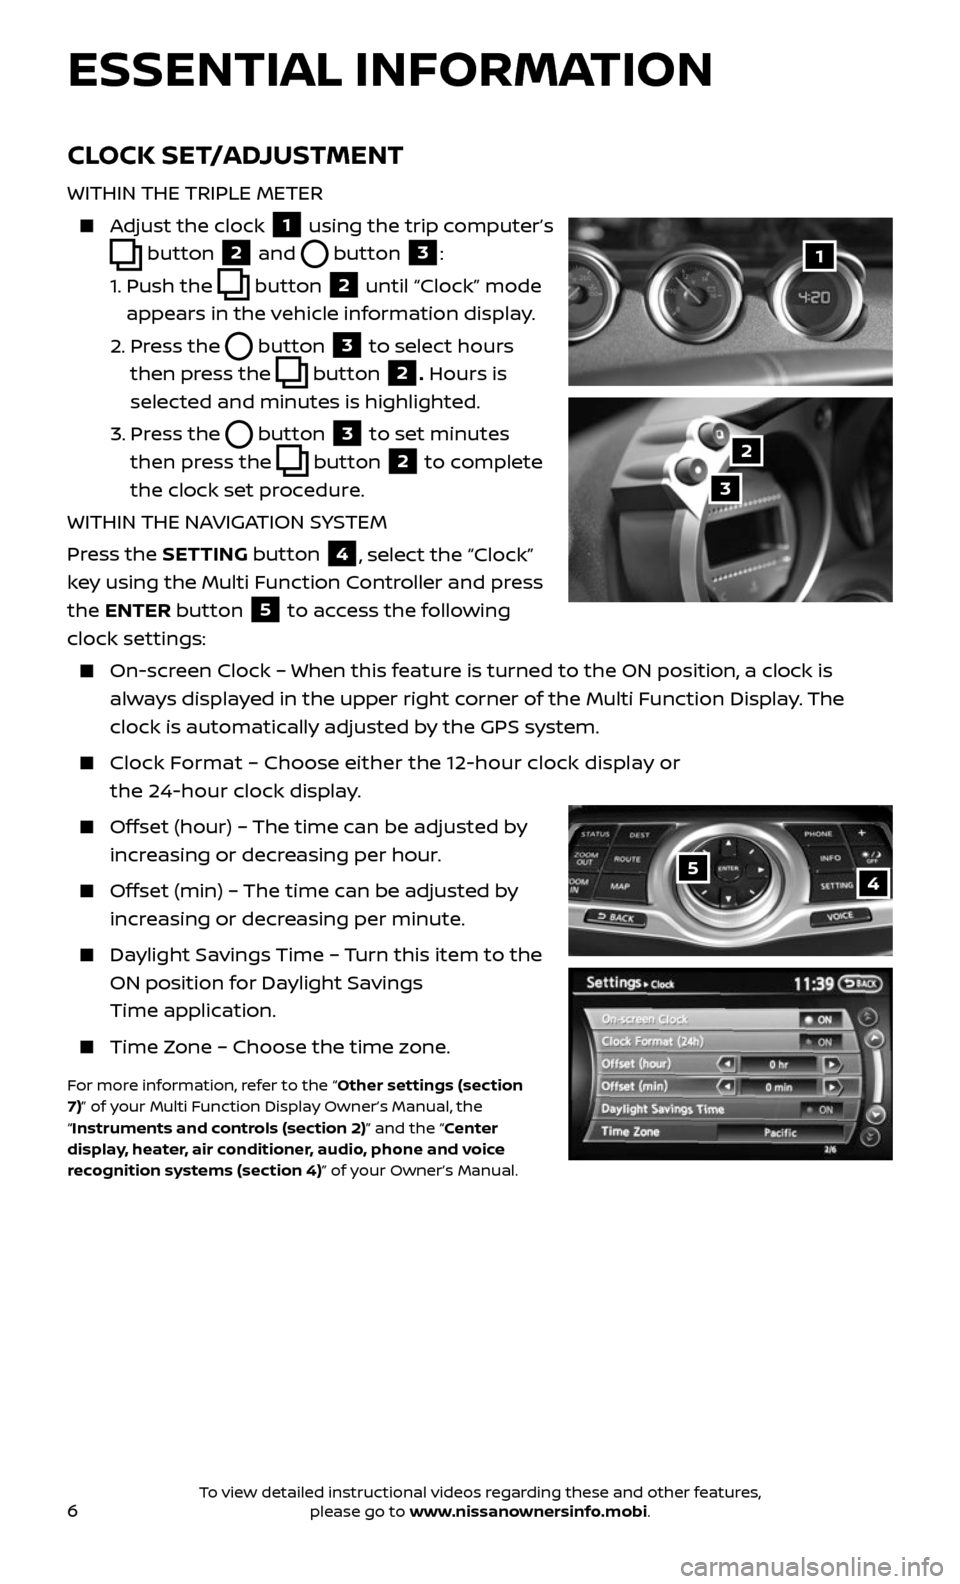
CLOCK SET/ADJUSTMENT
WITHIN THE TRIPLE METER
Adjust the clock 1 using the trip computer’s
button 2 and button 3:
1. Push the button 2 until “Clock” mode
appears in the vehicle information display.
2. Press the button 3 to select hours
then press the
button 2. Hours is
selected and minutes is highlighted.
3. Press the button 3 to set minutes
then press the
button 2 to complete
the clock set procedure.
WITHIN THE NAVIGATION SYSTEM
Press the SETTING button
4, select the “Clock”
key using the Multi Function Controller and press
the ENTER button
5 to access the following
clock settings:
On-screen Clock – When this feature is turned to the ON position, a clock is
always displayed in the upper right corner of the Multi Function Display. The
clock is automatically adjusted by the GPS system.
Clock Format – Choose either the 12-hour clock display or
the 24-hour clock display.
Offset (hour) – The time can be adjusted by
increasing or decreasing per hour.
Offset (min) – The time can be adjusted by
increasing or decreasing per minute.
Daylight Savings Time – Turn this item to the
ON position for Daylight Savings
Time application.
Time Zone – Choose the time zone.
For more information, refer to the “Other settings (section
7)” of your Multi Function Display Owner’s Manual, the
“Instruments and controls (section 2)” and the “Center
display, heater, air conditioner, audio, phone and voice
recognition systems (section 4)” of your Owner’s Manual.
1
2
3
To view detailed instructional videos regarding these and other features, please go to www.nissanownersinfo.mobi.
Page 16 of 28
14
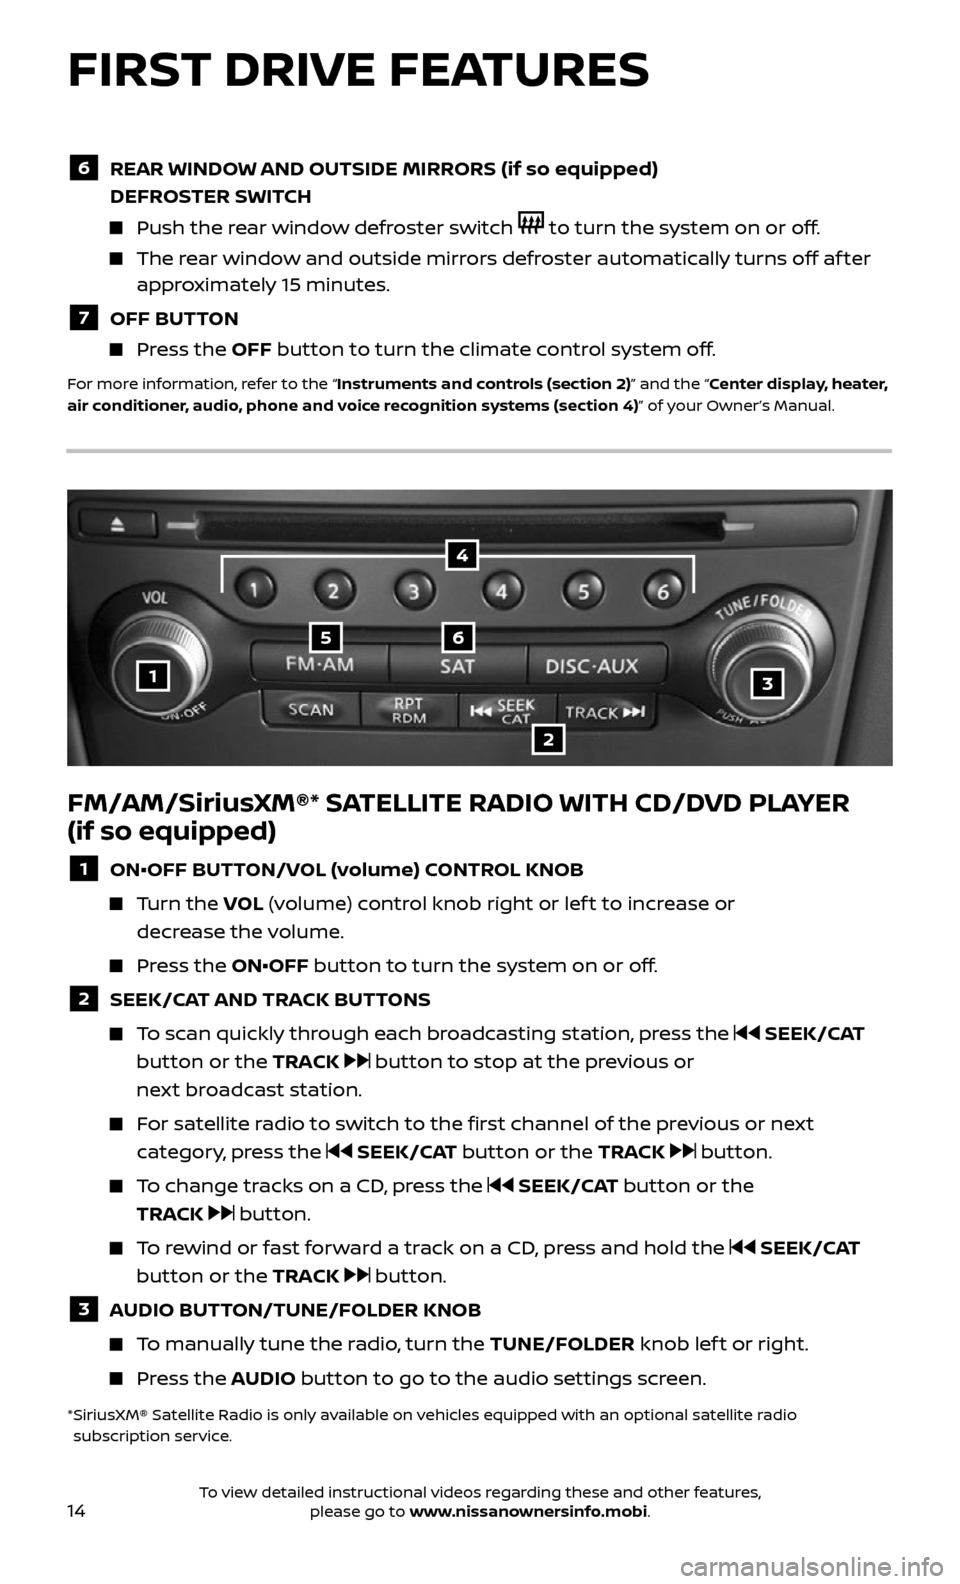
FM/AM/SiriusXM®* SATELLITE RADIO WITH CD/DVD PLAYER
(if so equipped)
1 ON•OFF BUTTON/VOL (volume) CONTROL KNOB
Turn the VOL (volume) control knob right or lef t to increase or
decrease the volume.
Press the ON•OFF button to turn the system on or off.
2 SEEK/CAT AND TRACK BUTTONS
To scan quickly through each broadcasting station, press the SEEK/CAT
button or the TRACK
button to stop at the previous or
next broadcast station.
For satellite radio to switch to the first channel of the previous or next
category, press the SEEK/CAT button or the TRACK button.
To change tracks on a CD, press the SEEK/CAT button or the
TRACK
button.
To rewind or fast forward a track on a CD, press and hold the SEEK/CAT
button or the TRACK
button.
3 AUDIO BUTTON/TUNE/FOLDER KNOB
To manually tune the radio, turn the TUNE/FOLDER knob lef t or right.
Press the AUDIO button to go to the audio settings screen.
* SiriusXM® Satel lite Radio is only available on vehicles equipped with an optional satellite radio subscription service.
1
56
2
3
4
FIRST DRIVE FEATURES
6 REAR WINDOW AND OUTSIDE MIRRORS (if so equipped)
DEFROSTER SWITCH
Push the rear window defroster switch to turn the system on or off.
The rear window and outside mirrors defroster automatically turns off af ter approximately 15 minutes.
7 OFF BUTTON
Press the OFF button to turn the climate control system off.
For more information, refer to the “Instruments and controls (section 2)” and the “Center display, heater,
air conditioner, audio, phone and voice recognition systems (section 4)” of your Owner’s Manual.
To view detailed instructional videos regarding these and other features, please go to www.nissanownersinfo.mobi.
Page 17 of 28
15
CRUISE CONTROL
The cruise control system enables you to set a constant cruising speed once the
vehicle has reached 25 mph (40 km/h).
The system wil l automatically maintain the set speed until you tap the brake
pedal, accelerate, cancel or turn the system off.
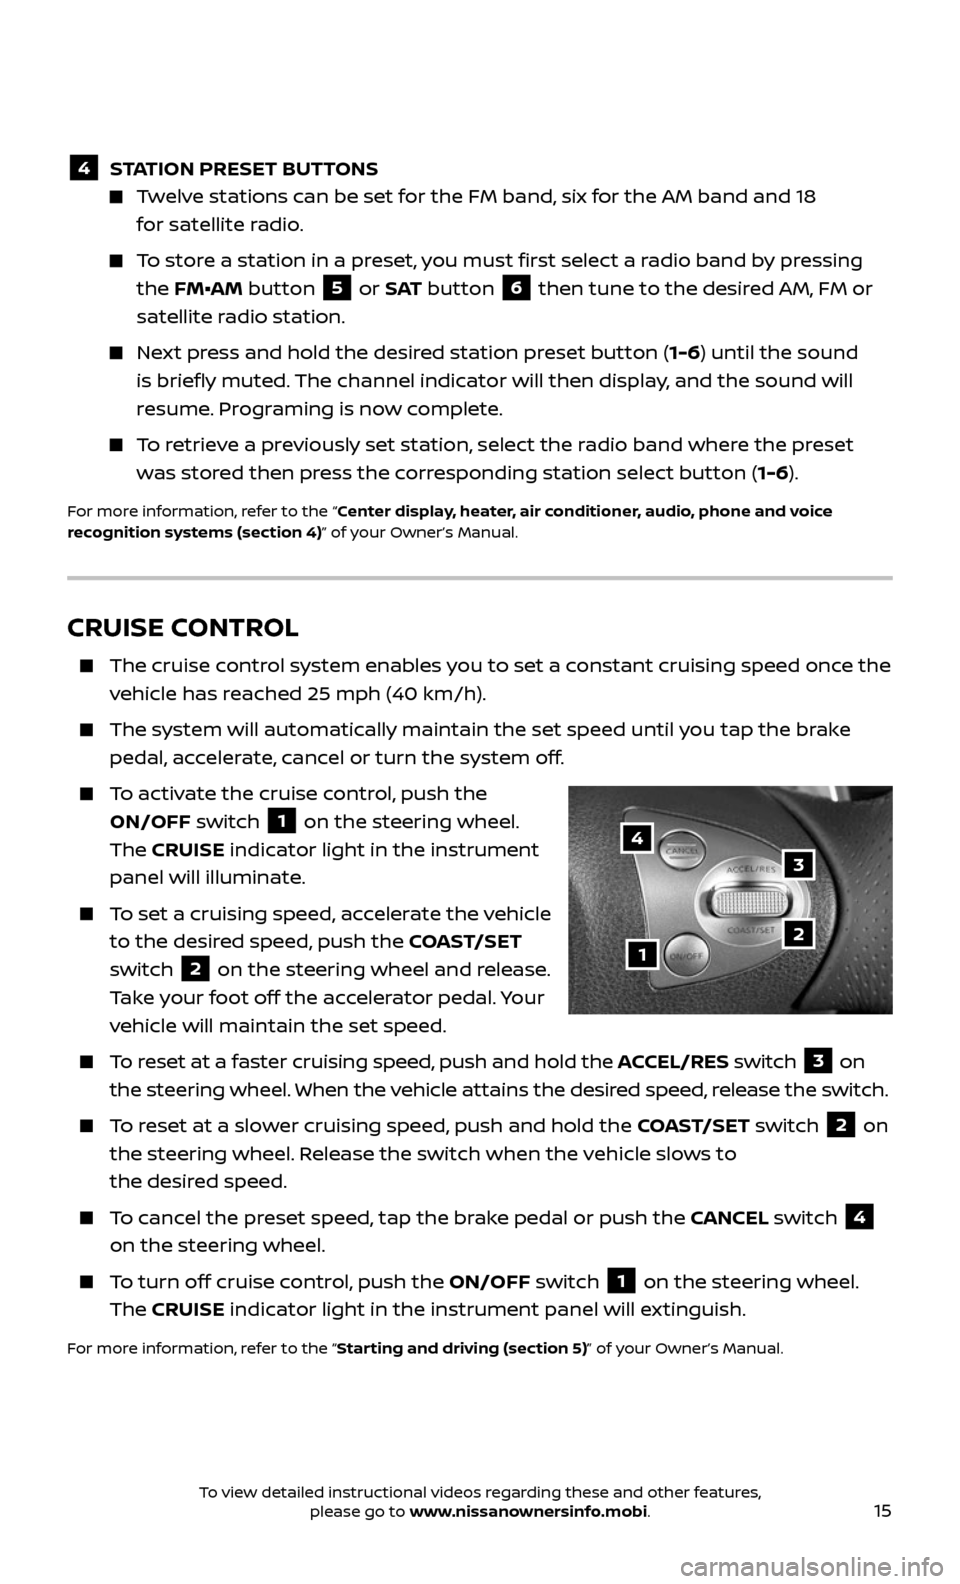
To activate the cruise control, push the
ON/OFF switch
1 on the steering wheel.
The CRUISE indicator light in the instrument
panel will illuminate.
To set a cruising speed, accelerate the vehicle
to the desired speed, push the COAST/SET
switch
2 on the steering wheel and release.
Take your foot off the accelerator pedal. Your
vehicle will maintain the set speed.
To reset at a faster cruising speed, push and hold the ACCEL/RES switch 3 on
the steering wheel. When the vehicle attains the desired speed, release the switch.
To reset at a slower cruising speed, push and hold the COAST/SET switch 2 on
the steering wheel. Release the switch when the vehicle slows to
the desired speed.
To cancel the preset speed, tap the brake pedal or push the CANCEL switch 4
on the steering wheel.
To turn off cruise control, push the ON/OFF switch 1 on the steering wheel.
The CRUISE indicator light in the instrument panel will extinguish.
For more information, refer to the “Starting and driving (section 5)” of your Owner’s Manual.
1
3
2
4
4 STATION PRESET BUTTONS
Twelve stations can be set for the FM band, six for the AM band and 18
for satellite radio.
To store a station in a preset, you must first select a radio band by pressing
the FM•AM button 5 or S AT button 6 then tune to the desired AM, FM or
satellite radio station.
Next press and hold the desired station preset button (1-6) until the sound
is briefly muted. The channel indicator will then display, and the sound will
resume. Programing is now complete.
To retrieve a previously set station, select the radio band where the preset
was stored then press the corresponding station select button ( 1-6).
For more information, refer to the “Center display, heater, air conditioner, audio, phone and voice
recognition systems (section 4)” of your Owner’s Manual.
To view detailed instructional videos regarding these and other features, please go to www.nissanownersinfo.mobi.
Page 19 of 28
17
Bluetooth®
Controls
Microphone
BLUETOOTH® HANDS-FREE PHONE SYSTEM1
A cellular telephone should not be used while
driving so full attention may be given to
vehicle operation2.
SYSTEM OPERATING TIPS
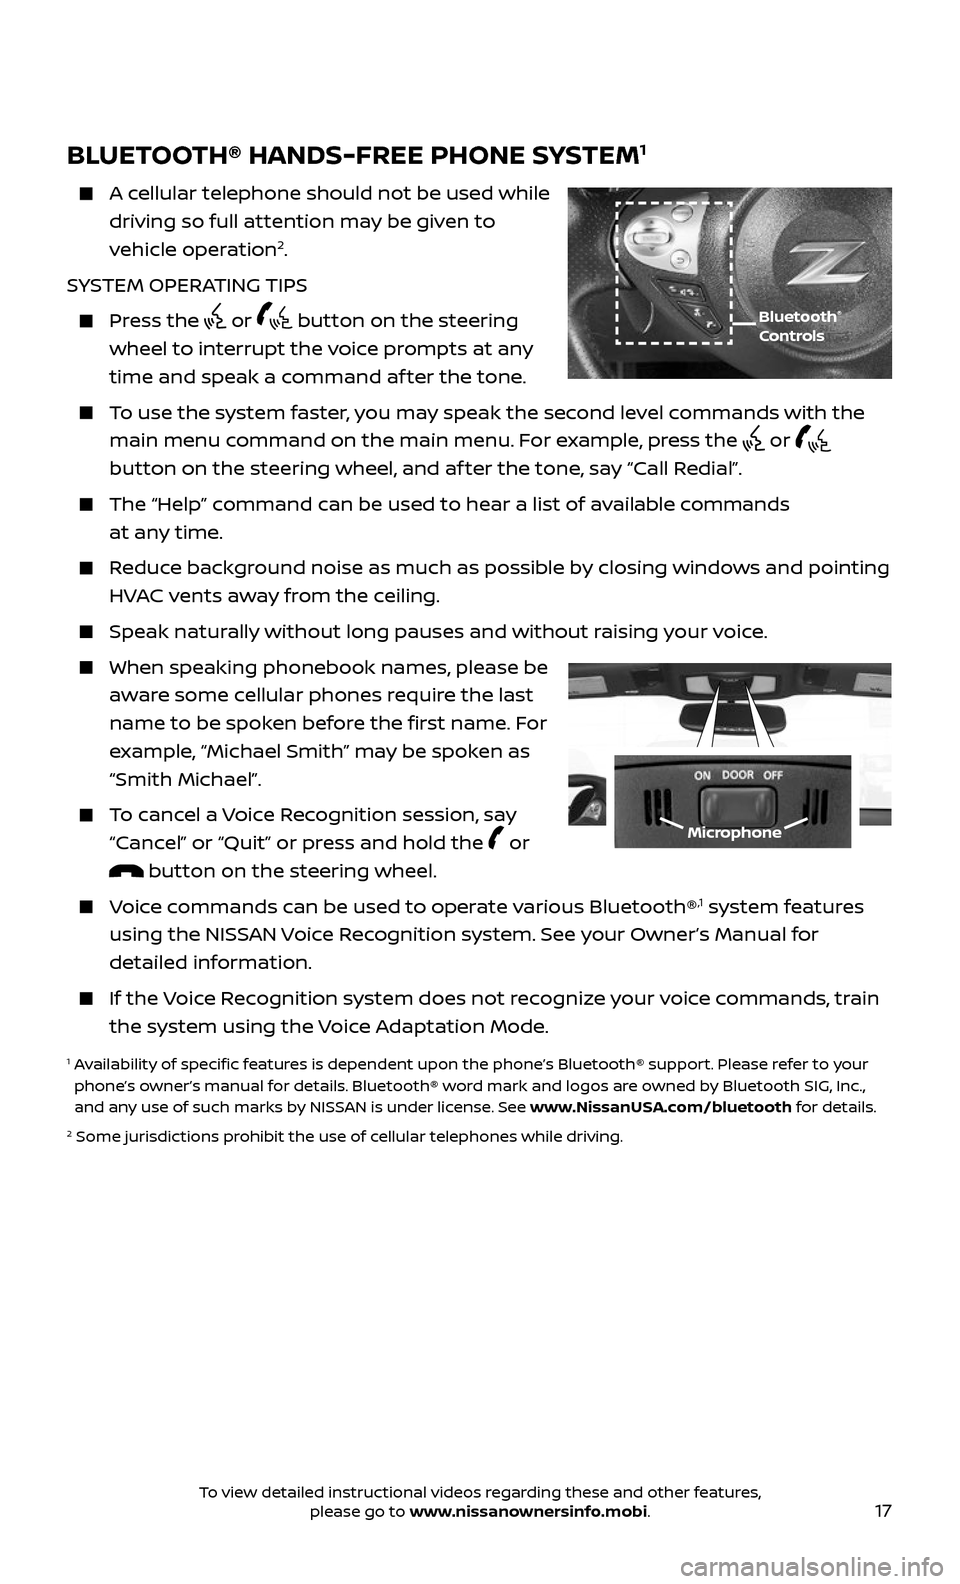
Press the or button on the steering
wheel to interrupt the voice prompts at any
time and speak a command af ter the tone.
To use the system faster, you may speak the second level commands with the
main menu command on the main menu. For example, press the or
button on the steering wheel, and af ter the tone, say “Call Redial”.
The “Help” c ommand can be used to hear a list of available commands
at any time.
Reduce background noise as much as possible by closing windows and pointing
HVAC vents away from the ceiling.
Speak naturally without long pauses and without raising your voice.
When spe aking phonebook names, please be
aware some cellular phones require the last
name to be spoken before the first name. For
example, “Michael Smith” may be spoken as
“Smith Michael”.
To cancel a Voice Recognition session, say
“Cancel” or “Quit” or press and hold the or
button on the steering wheel.
Voice commands can be used to operate various Bluetooth®,1 system features
using the NISSAN Voice Recognition system. See your Owner’s Manual for
detailed information.
If the Voice Recognition system does not recognize your voice commands, train
the system using the Voice Adaptation Mode.
1 Availability of specific features is dependent upon the phone’s Bluetooth® support. Please refer to your phone’s owner’s manual for details. Bluetooth® word mark and logos are owned by Bluetooth SIG, Inc.,
and any use of such marks by NISSAN is under license. See www.NissanUSA.com/bluetooth for details.
2 Some jurisdic tions prohibit the use of cellular telephones while driving.
To view detailed instructional videos regarding these and other features, please go to www.nissanownersinfo.mobi.
Page 20 of 28
18
SYSTEM GUIDE
BLUETOOTH® SYSTEM WITHOUT NAVIGATION1,2
(if so equipped)
CONNECTING PROCEDURE
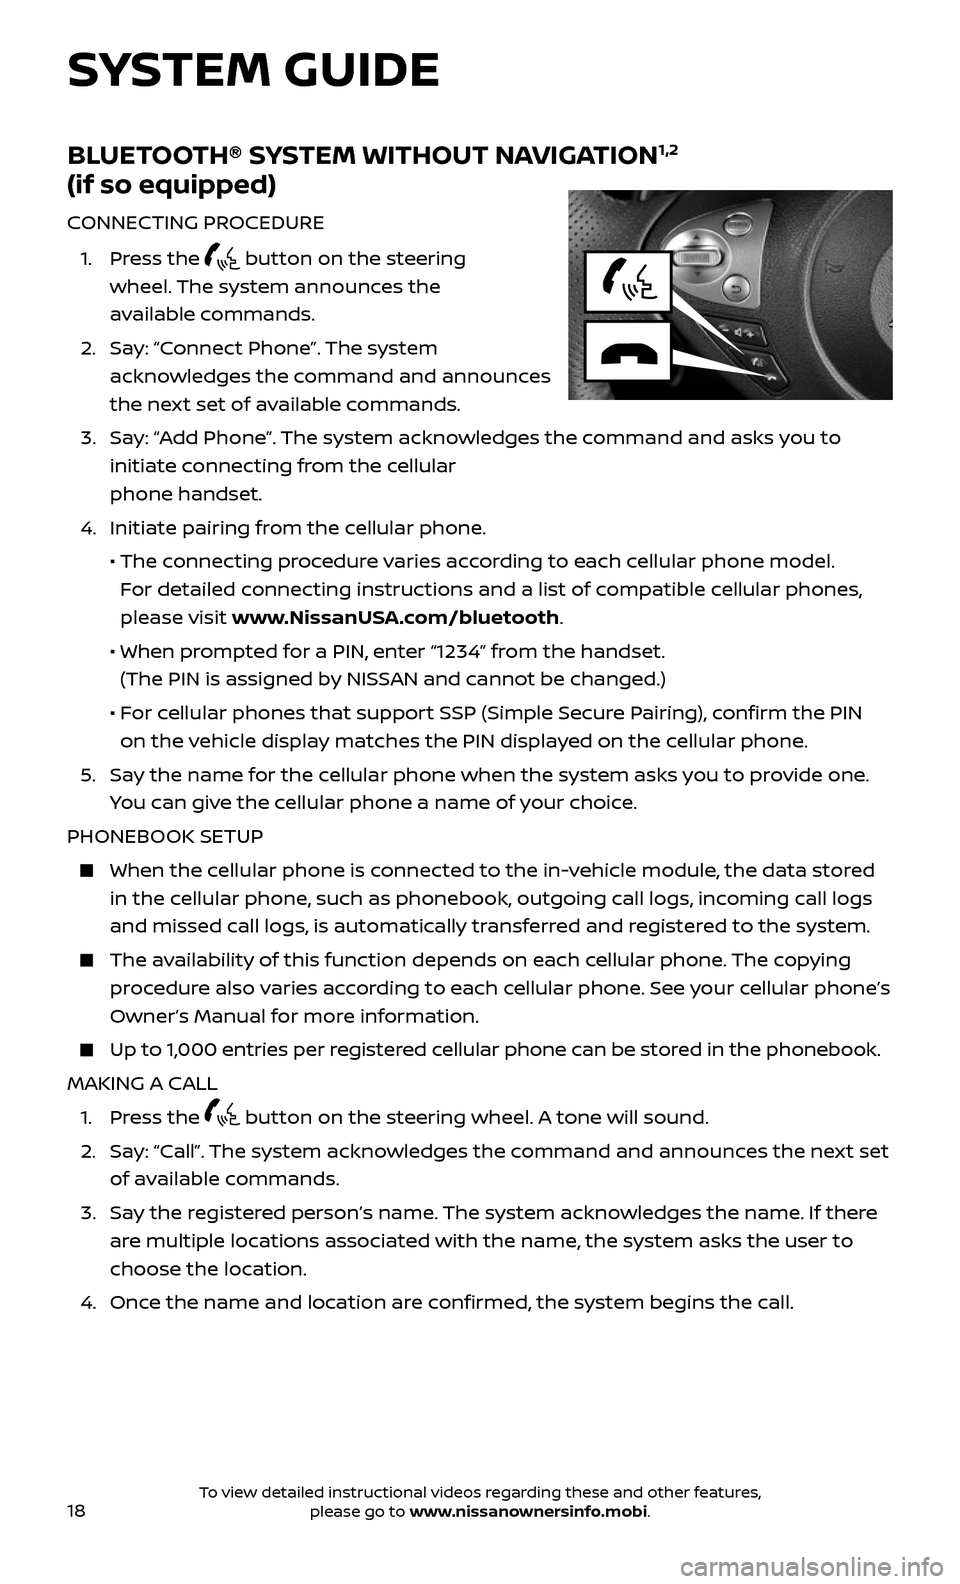
1. Press the button on the steering
wheel. The system announces the
available commands.
2. Say: “Connect Phone”. The system
acknowledges the command and announces
the next set of available commands.
3. Say: “Add Phone”. The system acknowledges the command and asks you to
initiate connecting from the cellular
phone handset.
4. Initiate pairing fr om the cellular phone.
• The connecting procedure varies according to each cellular phone model.
For detailed connecting instructions and a list of compatible cellular phones,
please visit www.NissanUSA.com/bluetooth.
• When pr ompted for a PIN, enter “1234” from the handset.
(The PIN is assigned by NISSAN and cannot be changed.)
• For cellular phones that support SSP (Simple Secure Pairing), confirm the PIN
on the vehicle display matches the PIN displayed on the cellular phone.
5. Say the name for the cellular phone when the system asks you to provide one.
You can give the cellular phone a name of your choice.
PHONEBOOK SETUP
When the c ellular phone is connected to the in-vehicle module, the data stored
in the cellular phone, such as phonebook, outgoing call logs, incoming call logs
and missed call logs, is automatically transferred and registered to the system.
The availability of this function depends on each cellular phone. The copying
procedure also varies according to each cellular phone. See your cellular phone’s
Owner’s Manual for more information.
Up to 1,000 entries per registered cellular phone can be stored in the phonebook.
MAKING A CALL
1. Press the button on the steering wheel. A tone will sound.
2. Say: “Call”. The system acknowledges the command and announces the next set
of available commands.
3. Say the registered person’s name. The system acknowledges the name. If there
are multiple locations associated with the name, the system asks the user to
choose the location.
4. Once the name and location are confirmed, the system begins the call.
To view detailed instructional videos regarding these and other features, please go to www.nissanownersinfo.mobi.
Page 21 of 28
19
RECEIVING/ENDING A CALL
To accept the call, press the button on the steering wheel.
To reject the call, press the button on the steering wheel.
To hang up, press the button on the steering wheel.
1 Some jurisdictions prohibit the use of cellular telephones while driving.
2 Availability of specific features is dependent upon the phone’s Bluetooth® support. Please refer to your phone’s owner’s manual for details. Bluetooth® word mark and logos are owned by Bluetooth SIG, Inc.,
and any use of such marks by NISSAN is under license. See www.NissanUSA.com/bluetooth for details.
Compatible smartphone required. Text rates and/or data usage may apply.
To view detailed instructional videos regarding these and other features, please go to
www.nissanownersinfo.mobi.
BLUETOOTH® SYSTEM WITH NAVIGATION1,2 (if so equipped)
CONNECTING PROCEDURE
The vehicle must be stationary when connecting the cellular phone.
Bluetooth®,2 Streaming Audio allows you to use a compatible Bluetooth®,2 device
to play audio files. Your compatible Bluetooth®,2 device can be connected to the
vehicle’s audio system, allowing audio files to play through the vehicle’s speakers.
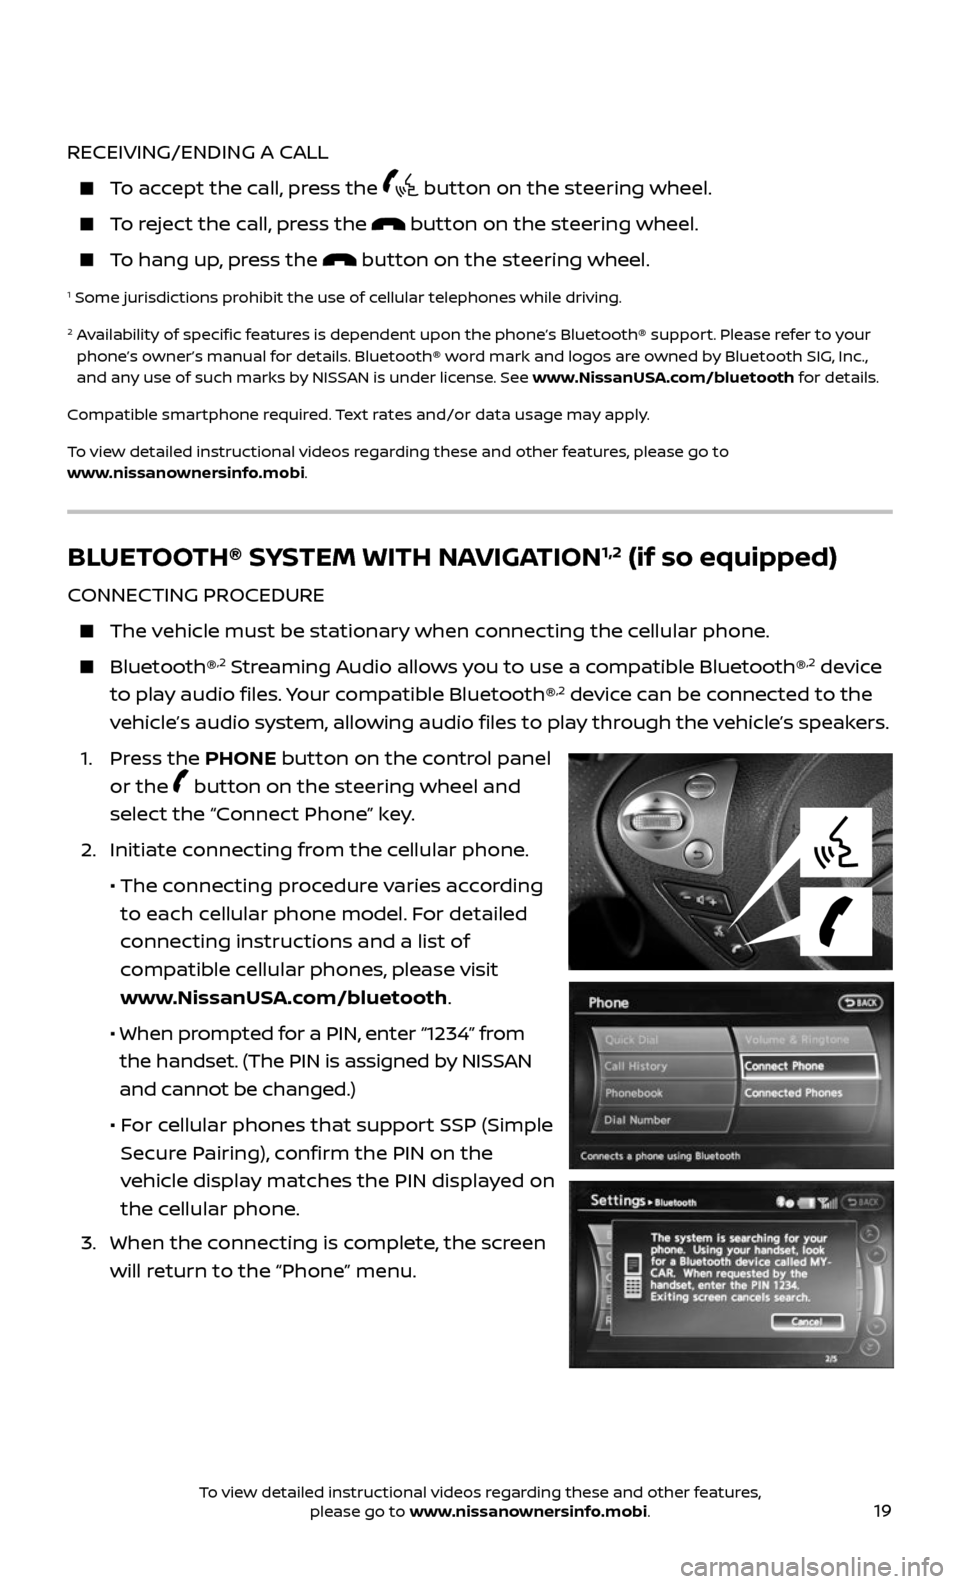
1. Press the PHONE button on the control panel
or the
button on the steering wheel and
select the “Connect Phone” key.
2. Initiate c onnecting from the cellular phone.
• The connecting procedure varies according
to each cellular phone model. For detailed
connecting instructions and a list of
compatible cellular phones, please visit
www.NissanUSA.com/bluetooth.
• When pr ompted for a PIN, enter “1234” from
the handset. (The PIN is assigned by NISSAN
and cannot be changed.)
• For cellular phones that support SSP (Simple
Secure Pairing), confirm the PIN on the
vehicle display matches the PIN displayed on
the cellular phone.
3. When the c onnecting is complete, the screen
will return to the “Phone” menu.
To view detailed instructional videos regarding these and other features, please go to www.nissanownersinfo.mobi.