2017 NISSAN 370Z ROADSTER air condition
[x] Cancel search: air conditionPage 2 of 28
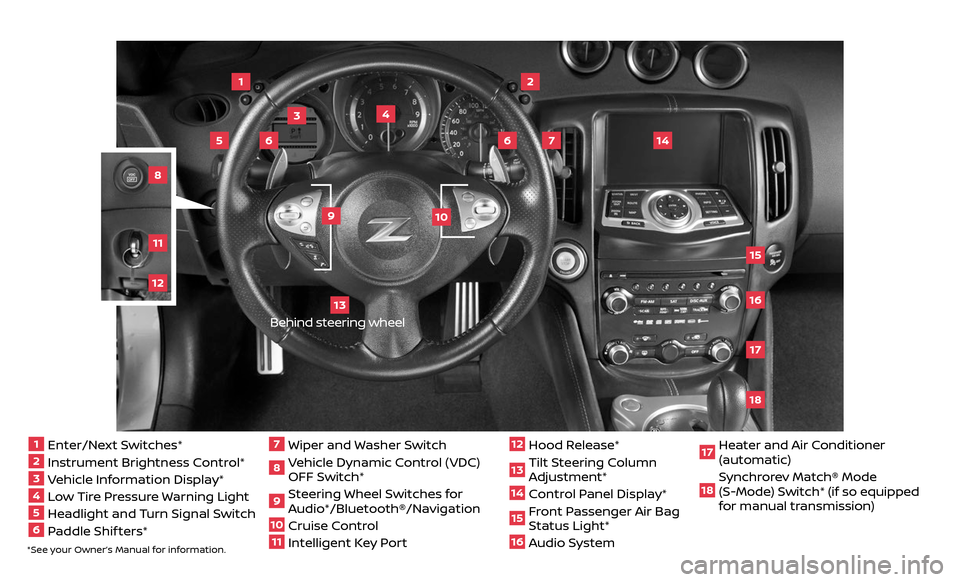
*See your Owner’s Manual for information.1 Enter/Next Switches*2 Instrument Brightness Control*3 Vehicle Information Display*4 Low Tire Pressure Warning Light5 Headlight and Turn Signal Switch6 Paddle Shif ters*
7 Wiper and Washer Switch8 Vehicle Dynamic Control (VDC)
OFF Switch*
9 Steering Wheel Switches for
Audio*/Bluetooth®/Navigation
10 Cruise Control
11 Intelligent Key Port
12 Hood Release*
13 Tilt Steering Column
Adjustment*
14 Control Panel Display* 15 Front Passenger Air Bag
Status Light*
16 Audio System2
3
1
4
6
6
15
5
13
16
14
9
7
10
1718
81211
Behind steering wheel
17 Heater and Air Conditioner (automatic)
18 Synchrorev Match® Mode
(S-Mode) Switch* (if so equipped
for manual transmission)
Page 3 of 28
NEW SYSTEM FEATURES
RearView Monitor (if so equipped).....................................................2
Opening the Sof t Top (Roadster models)
..............................................2
USB (Universal Serial Bus) Connection Port/AUX Jack and iPod® Interface
...........2
NavTraffic and NavWeather (if so equipped)
...........................................3
ESSENTIAL INFORMATION
Tire Pressure Monitoring System (TPMS) ..............................................4
Loose Fuel Cap
........................................................................\
.5
Fuel-filler Door
.......................................................................\
..5
Clock Set/Adjustment
.................................................................6
Engine Oil Temperature Gauge
........................................................7
Automatic Power Windows . . . . . . . . . . . . . . . . . . . . . . . . . . . . . . . . . . . .\
. . . . . . . . . . . . . . . . . . . . . . . . 7
FIRST DRIVE FEATURES
Nissan Intelligent Key® System ........................................................8
Rear Hatch/Trunk Lid Release
.........................................................9
Sof t Top Operation (Roadster models)
................................................9
Power Seat Adjustments (if so equipped)
.............................................9
Manual Seat Adjustments (if so equipped)
...........................................10
Power Outside Mirror Control Switch
.................................................10
Starting/Stopping the Engine
.........................................................11
Headlight Control Switch
..............................................................11
Wiper and Washer Switch
.............................................................12
Heater and Air Conditioner (automatic)
..............................................13
FM/AM/SiriusXM® Satellite Radio with CD/DVD Player (if so equipped)
..............14
Cruise Control
........................................................................\
.15
SYSTEM GUIDE
Trip Computer .......................................................................\
.16
Bluetooth® Hands-free Phone System
...............................................17
• System Operating Tips ...........................................................17
Bluetooth® System without Navigation (if so equipped)
.............................18
Bluetooth® System with Navigation (if so equipped)
.................................19
Bluetooth® Streaming Audio with Navigation (if so equipped)
.......................21
Navigation System (if so equipped)
...................................................22
HomeLink® Universal Transceiver (if so equipped)
....................................23
TABLE OF CONTENTS
Please see your Owner’s Manual for important safety information and system
operation limitations.
• A cellular telephone should not be used for any purpose while driving so full attention may be given to vehicle operation.
• Always wear your seat belt.
• Supplemental air bags do not replace proper seat belt usage.
• Children 12 and under should always ride in the rear seat properly secured in child restraints or seat belts according to their age and weight.
• Do not drink and drive.
For more information, refer to the “Safety — Seats, seat belts and supplemental restraint system
(section 1)”, the “Center display, heater, air conditioner, audio, phone and voice recognition systems
(section 4)” and the “Starting and driving (section 5)” of your Owner’s Manual.
Additional information about your vehicle is also available in your Owner’s Manual,
Navigation System Owner’s Manual and at www.NissanUSA.com.
Page 4 of 28
2
OPENING THE SOFT TOP (Roadster models)
It is important to make sure the Nissan
Intelligent Key® is with you (that is, in your
pocket or purse).
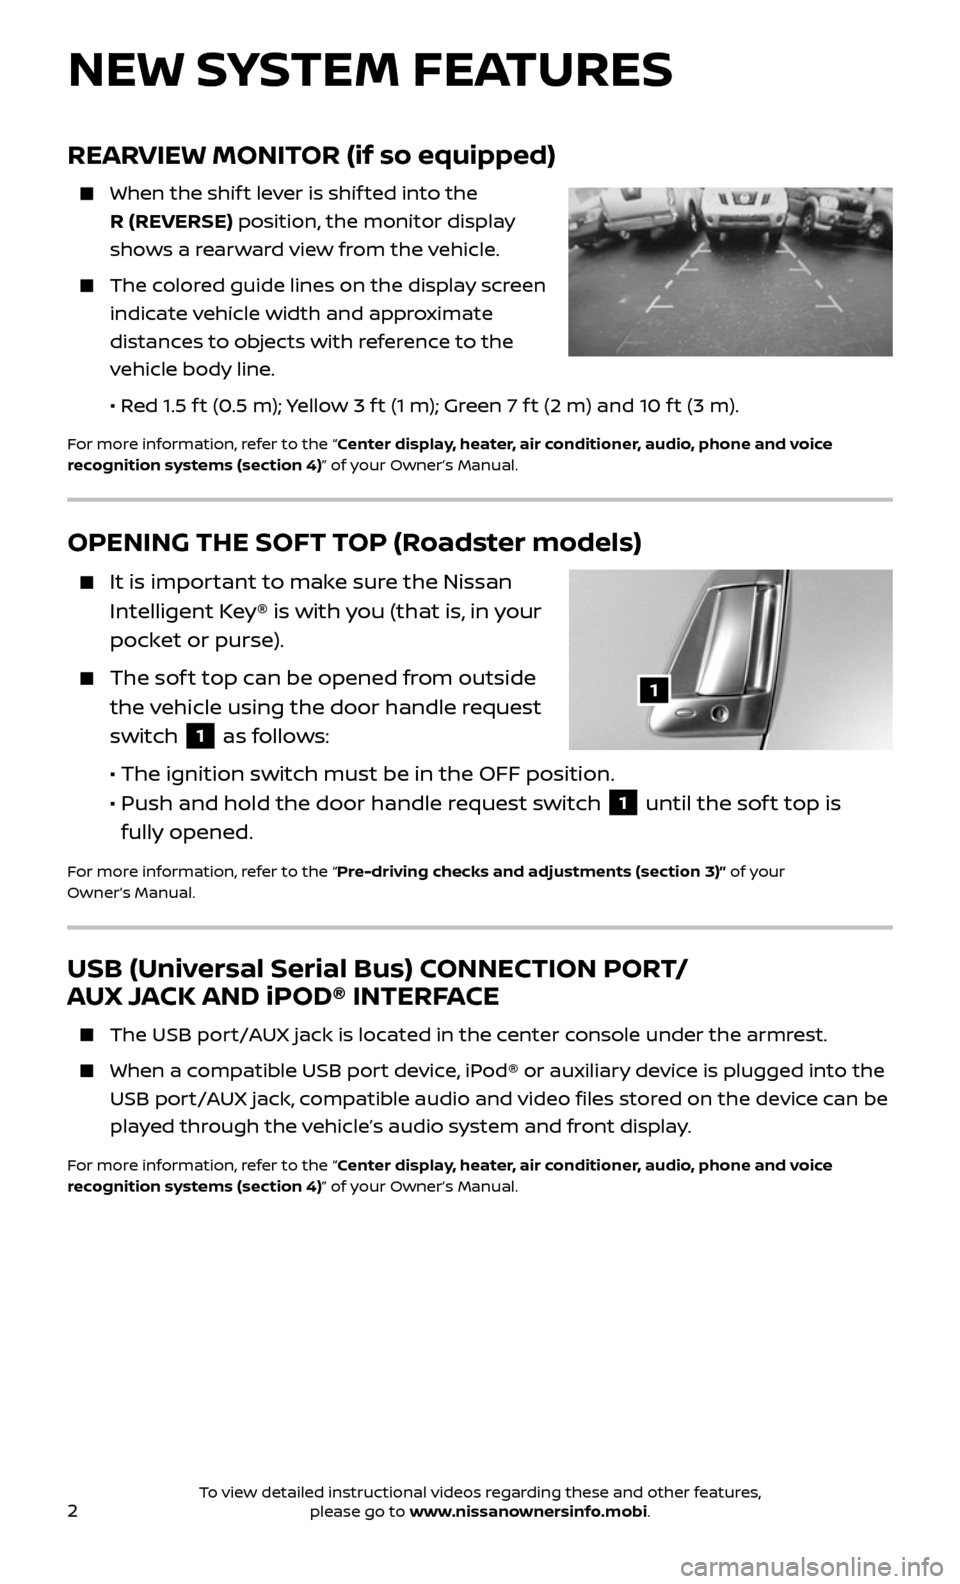
The soft top can be opened from outside
the vehicle using the door handle request
switch
1 as follows:
• The ignition switch must be in the OFF position.
•
Push and hold the door hand le request switch 1 until the sof t top is
fully opened.
For more information, refer to the “Pre-driving checks and adjustments (section 3)” of your
Owner’s Manual.
1
NEW SYSTEM FEATURES
REARVIEW MONITOR (if so equipped)
When the shif t lever is shif ted into the
R (REVERSE) position, the monitor display
shows a rearward view from the vehicle.
The colored guide lines on the display screen
indicate vehicle width and approximate
distances to objects with reference to the
vehicle body line.
• Red 1.5 f t (0.5 m); Yellow 3 f t (1 m); Green 7 f t (2 m) and 10 f t (3 m).
For more information, refer to the “Center display, heater, air conditioner, audio, phone and voice
recognition systems (section 4)” of your Owner’s Manual.
USB (Universal Serial Bus) CONNECTION PORT/
AUX JACK AND iPOD® INTERFACE
The USB por t/AUX jack is located in the center console under the armrest.
When a compatible USB port device, iPod® or auxiliary device is plugged into the
USB port/AUX jack, compatible audio and video files stored on the device can be
played through the vehicle’s audio system and front display.
For more information, refer to the “Center display, heater, air conditioner, audio, phone and voice
recognition systems (section 4)” of your Owner’s Manual.
To view detailed instructional videos regarding these and other features, please go to www.nissanownersinfo.mobi.
Page 8 of 28
6
ESSENTIAL INFORMATION
54
CLOCK SET/ADJUSTMENT
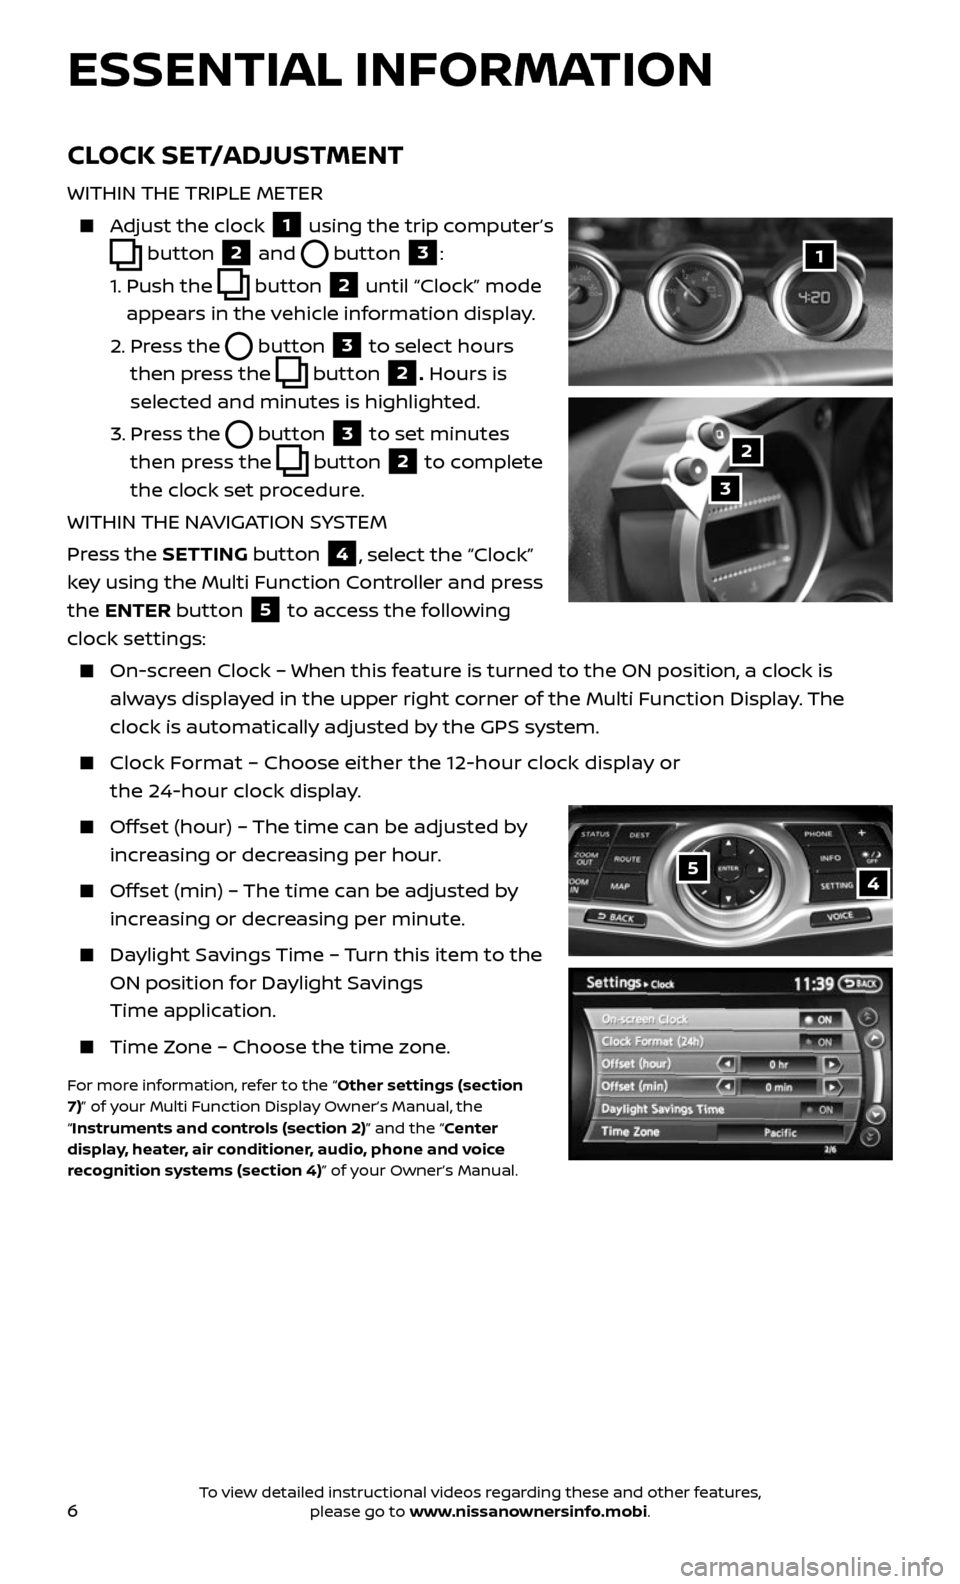
WITHIN THE TRIPLE METER
Adjust the clock 1 using the trip computer’s
button 2 and button 3:
1. Push the button 2 until “Clock” mode
appears in the vehicle information display.
2. Press the button 3 to select hours
then press the
button 2. Hours is
selected and minutes is highlighted.
3. Press the button 3 to set minutes
then press the
button 2 to complete
the clock set procedure.
WITHIN THE NAVIGATION SYSTEM
Press the SETTING button
4, select the “Clock”
key using the Multi Function Controller and press
the ENTER button
5 to access the following
clock settings:
On-screen Clock – When this feature is turned to the ON position, a clock is
always displayed in the upper right corner of the Multi Function Display. The
clock is automatically adjusted by the GPS system.
Clock Format – Choose either the 12-hour clock display or
the 24-hour clock display.
Offset (hour) – The time can be adjusted by
increasing or decreasing per hour.
Offset (min) – The time can be adjusted by
increasing or decreasing per minute.
Daylight Savings Time – Turn this item to the
ON position for Daylight Savings
Time application.
Time Zone – Choose the time zone.
For more information, refer to the “Other settings (section
7)” of your Multi Function Display Owner’s Manual, the
“Instruments and controls (section 2)” and the “Center
display, heater, air conditioner, audio, phone and voice
recognition systems (section 4)” of your Owner’s Manual.
1
2
3
To view detailed instructional videos regarding these and other features, please go to www.nissanownersinfo.mobi.
Page 15 of 28
13
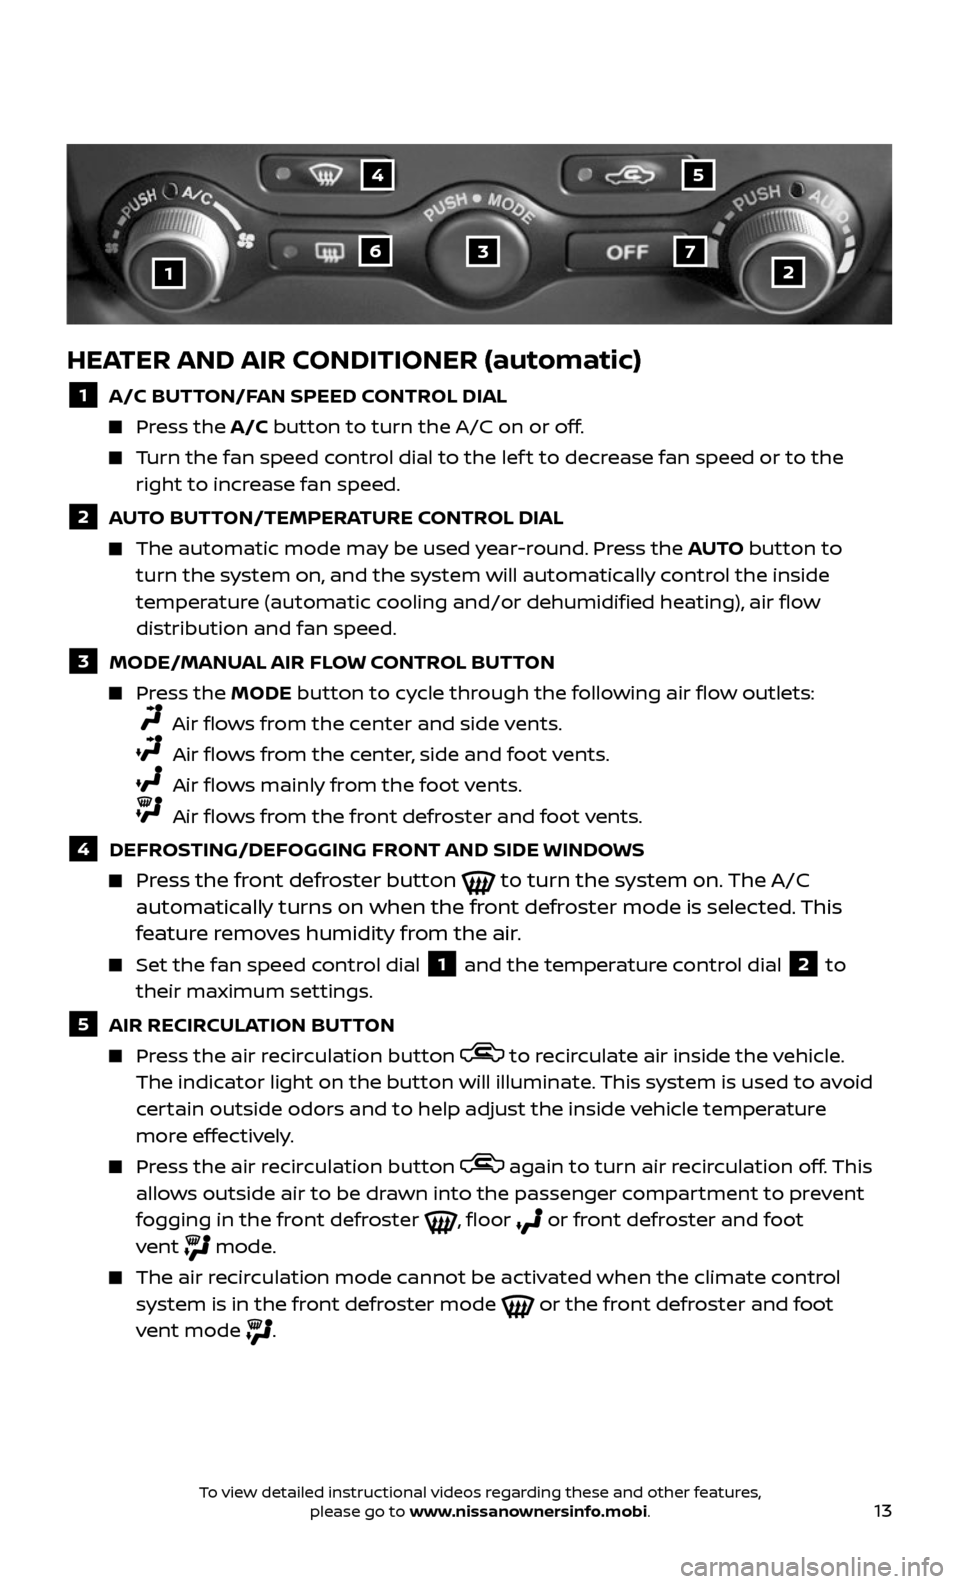
HEATER AND AIR CONDITIONER (automatic)
1 A/C BUTTON/FAN SPEED CONTROL DIAL
Press the A/C button to turn the A/C on or off.
Turn the fan speed control dial to the lef t to decrease fan speed or to the right to increase fan speed.
2 AUTO BUTTON/TEMPERATURE CONTROL DIAL
The automatic mode may be used year-round. Press the AUTO button to
turn the system on, and the system will automatically control the inside
temperature (automatic cooling and/or dehumidified heating), air flow
distribution and fan speed.
3 MODE/MANUAL AIR FLOW CONTROL BUTTON
Press the MODE button to cycle through the following air flow outlets:
Air flows from the center and side vents.
Air flows from the center, side and foot vents.
Air flows mainly from the foot vents.
Air flows from the front defroster and foot vents.
4 DEFROSTING/DEFOGGING FRONT AND SIDE WINDOWS
Press the front defroster button to turn the system on. The A/C
automatically turns on when the front defroster mode is selected. This
feature removes humidity from the air.
Set the fan speed c ontrol dial 1 and the temperature control dial 2 to
their maximum settings.
5 AIR RECIRCULATION BUTTON
Press the air recirculation button to recirculate air inside the vehicle. The indicator light on the button will illuminate. This system is used to avoid
certain outside odors and to help adjust the inside vehicle temperature
more effectively.
Press the air recirculation button again to turn air recirculation off. This allows outside air to be drawn into the passenger compartment to prevent
fogging in the front defroster , floor or front defroster and foot
vent mode.
The air recirculation mode cannot be activated when the climate control system is in the front defroster mode or the front defroster and foot
vent mode .
1
4
637
5
2
To view detailed instructional videos regarding these and other features, please go to www.nissanownersinfo.mobi.
Page 16 of 28
14
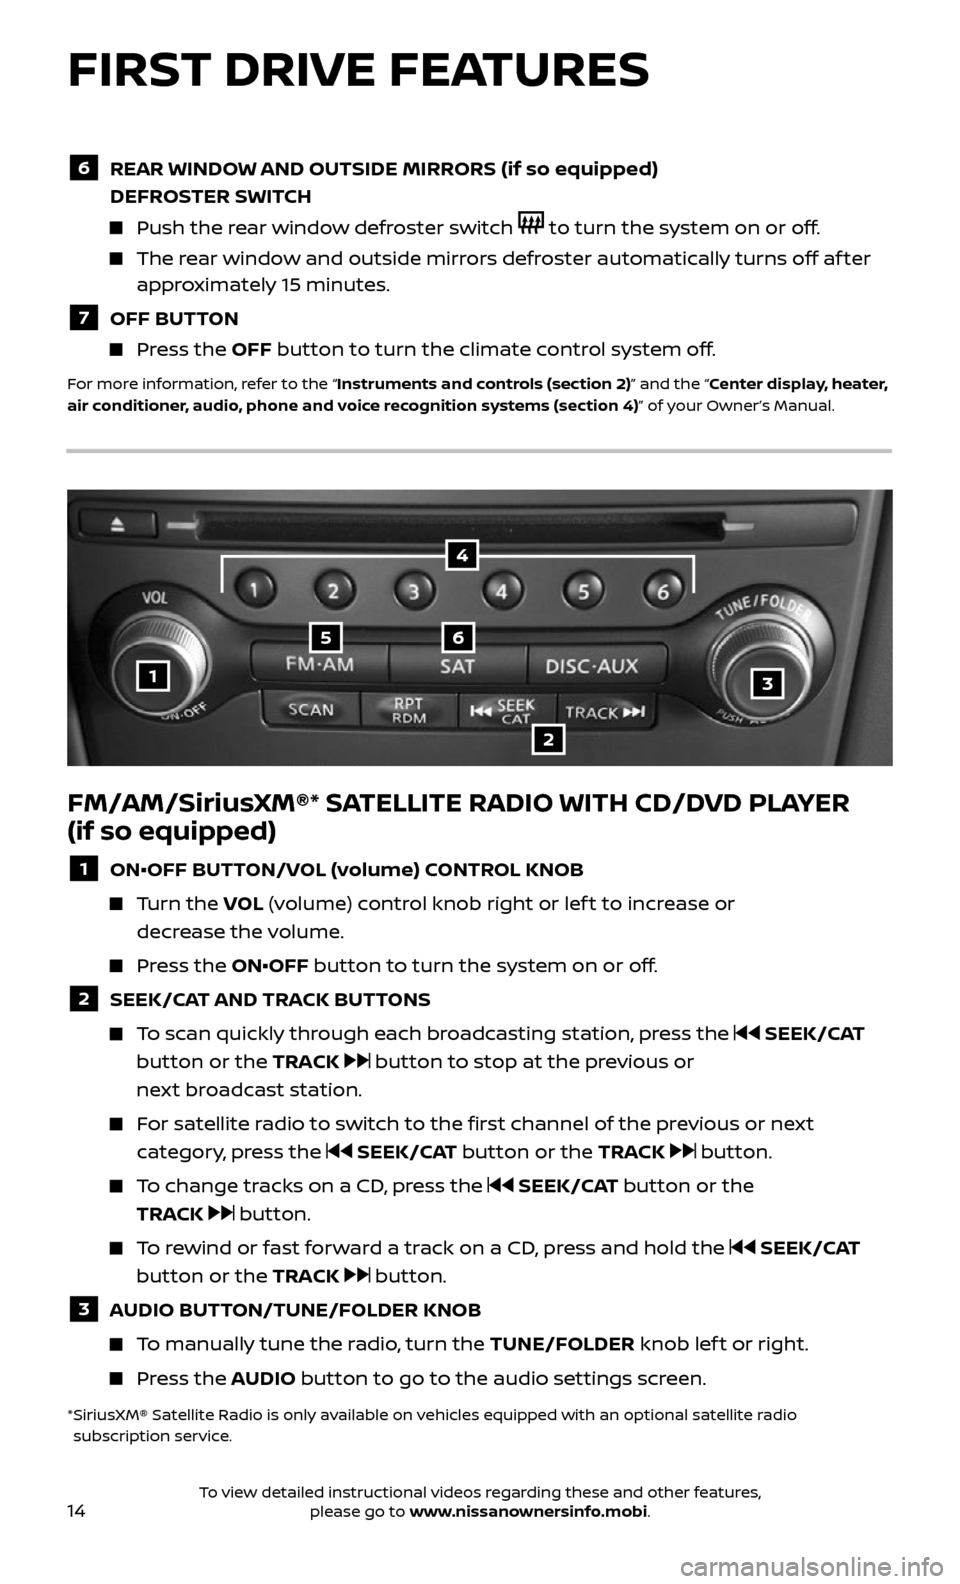
FM/AM/SiriusXM®* SATELLITE RADIO WITH CD/DVD PLAYER
(if so equipped)
1 ON•OFF BUTTON/VOL (volume) CONTROL KNOB
Turn the VOL (volume) control knob right or lef t to increase or
decrease the volume.
Press the ON•OFF button to turn the system on or off.
2 SEEK/CAT AND TRACK BUTTONS
To scan quickly through each broadcasting station, press the SEEK/CAT
button or the TRACK
button to stop at the previous or
next broadcast station.
For satellite radio to switch to the first channel of the previous or next
category, press the SEEK/CAT button or the TRACK button.
To change tracks on a CD, press the SEEK/CAT button or the
TRACK
button.
To rewind or fast forward a track on a CD, press and hold the SEEK/CAT
button or the TRACK
button.
3 AUDIO BUTTON/TUNE/FOLDER KNOB
To manually tune the radio, turn the TUNE/FOLDER knob lef t or right.
Press the AUDIO button to go to the audio settings screen.
* SiriusXM® Satel lite Radio is only available on vehicles equipped with an optional satellite radio subscription service.
1
56
2
3
4
FIRST DRIVE FEATURES
6 REAR WINDOW AND OUTSIDE MIRRORS (if so equipped)
DEFROSTER SWITCH
Push the rear window defroster switch to turn the system on or off.
The rear window and outside mirrors defroster automatically turns off af ter approximately 15 minutes.
7 OFF BUTTON
Press the OFF button to turn the climate control system off.
For more information, refer to the “Instruments and controls (section 2)” and the “Center display, heater,
air conditioner, audio, phone and voice recognition systems (section 4)” of your Owner’s Manual.
To view detailed instructional videos regarding these and other features, please go to www.nissanownersinfo.mobi.
Page 17 of 28
15
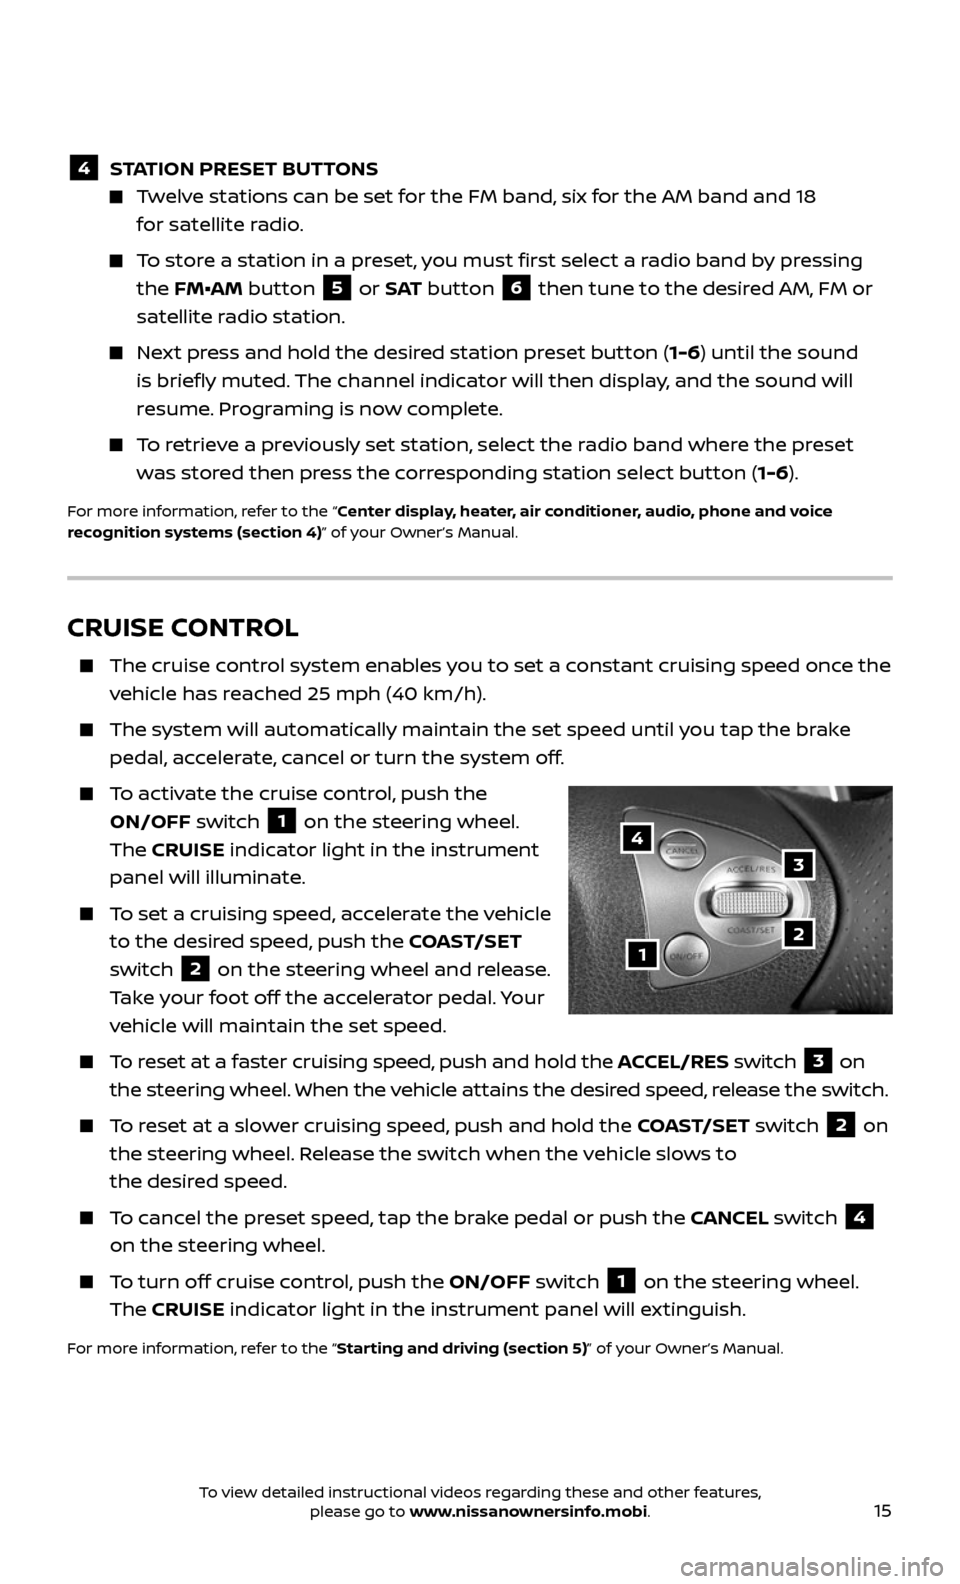
CRUISE CONTROL
The cruise control system enables you to set a constant cruising speed once the
vehicle has reached 25 mph (40 km/h).
The system wil l automatically maintain the set speed until you tap the brake
pedal, accelerate, cancel or turn the system off.
To activate the cruise control, push the
ON/OFF switch
1 on the steering wheel.
The CRUISE indicator light in the instrument
panel will illuminate.
To set a cruising speed, accelerate the vehicle
to the desired speed, push the COAST/SET
switch
2 on the steering wheel and release.
Take your foot off the accelerator pedal. Your
vehicle will maintain the set speed.
To reset at a faster cruising speed, push and hold the ACCEL/RES switch 3 on
the steering wheel. When the vehicle attains the desired speed, release the switch.
To reset at a slower cruising speed, push and hold the COAST/SET switch 2 on
the steering wheel. Release the switch when the vehicle slows to
the desired speed.
To cancel the preset speed, tap the brake pedal or push the CANCEL switch 4
on the steering wheel.
To turn off cruise control, push the ON/OFF switch 1 on the steering wheel.
The CRUISE indicator light in the instrument panel will extinguish.
For more information, refer to the “Starting and driving (section 5)” of your Owner’s Manual.
1
3
2
4
4 STATION PRESET BUTTONS
Twelve stations can be set for the FM band, six for the AM band and 18
for satellite radio.
To store a station in a preset, you must first select a radio band by pressing
the FM•AM button 5 or S AT button 6 then tune to the desired AM, FM or
satellite radio station.
Next press and hold the desired station preset button (1-6) until the sound
is briefly muted. The channel indicator will then display, and the sound will
resume. Programing is now complete.
To retrieve a previously set station, select the radio band where the preset
was stored then press the corresponding station select button ( 1-6).
For more information, refer to the “Center display, heater, air conditioner, audio, phone and voice
recognition systems (section 4)” of your Owner’s Manual.
To view detailed instructional videos regarding these and other features, please go to www.nissanownersinfo.mobi.
Page 23 of 28
21
BLUETOOTH® STREAMING AUDIO WITH NAVIGATION1,2
(if so equipped)
If you have a compatible Bluetooth®,2 device with streaming audio (A2DP
and AVRCP profiles), you can set up the wireless connection between your
Bluetooth®
,2 device and your vehicle’s audio system. This connection allows you
to listen to audio from the Bluetooth®,2 device using your vehicle’s speakers.
A cellular telephone should not be used while driving so full attention may be
given to vehicle operation.1
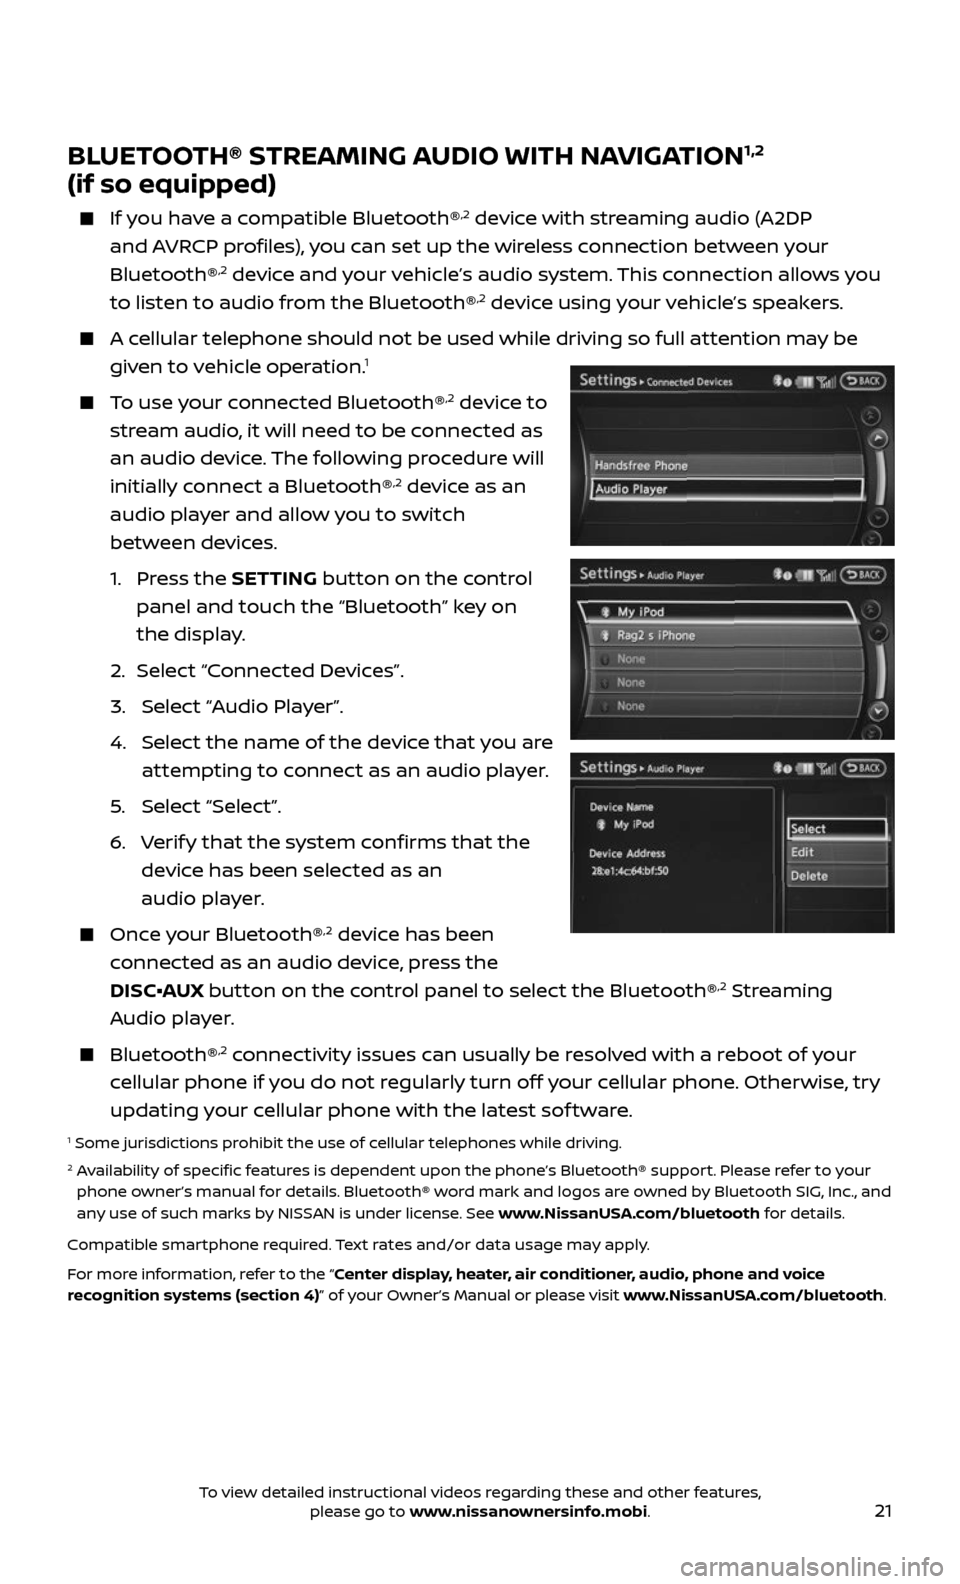
To use your connected Bluetooth®,2 device to
stream audio, it will need to be connected as
an audio device. The following procedure will
initially connect a Bluetooth®
,2 device as an
audio player and allow you to switch
between devices.
1. Press the SETTING button on the control
panel and touch the “Bluetooth” key on
the display.
2. Selec t “Connected Devices”.
3. Selec t “Audio Player”.
4. Selec t the name of the device that you are
attempting to connect as an audio player.
5. Select “Select”.
6. Verify that the system confirms that the
device has been selected as an
audio player.
Once your Bluetooth®,2 device has been
connected as an audio device, press the
DISC•AUX button on the control panel to select the Bluetooth®
,2 Streaming
Audio player.
Bluetooth®,2 connectivity issues can usually be resolved with a reboot of your
cellular phone if you do not regularly turn off your cellular phone. Otherwise, try
updating your cellular phone with the latest sof tware.
1 Some jurisdictions prohibit the use of cellular telephones while driving.2 Availability of specific features is dependent upon the phone’s Bluetooth® support. Please refer to your phone owner’s manual for details. Bluetooth® word mark and logos are owned by Bluetooth SIG, Inc., and
any use of such marks by NISSAN is under license. See www.NissanUSA.com/bluetooth for details.
Compatible smartphone required. Text rates and/or data usage may apply.
For more information, refer to the “Center display, heater, air conditioner, audio, phone and voice
recognition systems (section 4)” of your Owner’s Manual or please visit www.NissanUSA.com/bluetooth.
To view detailed instructional videos regarding these and other features, please go to www.nissanownersinfo.mobi.