Page 9 of 28

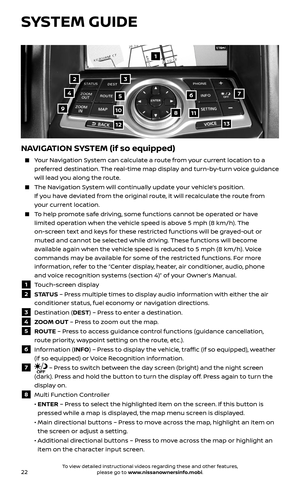
7
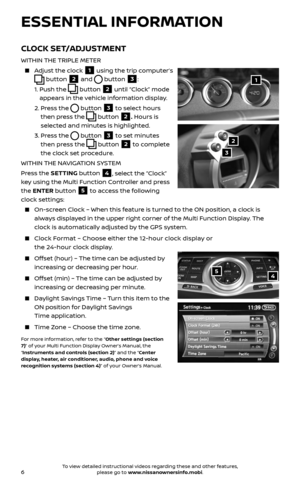
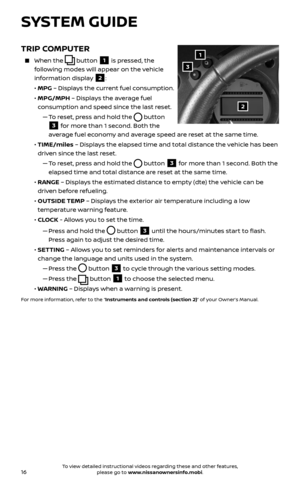
ENGINE OIL TEMPERATURE GAUGE
Performance driving patterns or extended
driving at elevated ambient temperatures
may result in increased engine oil
temperature during operation.
During normal v ehicle operation, oil
temperatures will be below 280°F (138°C).
If the engine oil temperature gauge
1 indicates 280°F (138°C) or above while
driving, reduce engine speed (rpm) and drive at a reduced vehicle speed.
When the engine oil temper ature is high, the engine protection mode, which
helps reduce the chance of engine damage, may activate and automatically
decrease engine power.
For more information, refer to the “Instruments and controls (section 2)”, the “Do-it-yourself (section 8)”
and the “Technical and consumer information (section 10)” of your Owner’s Manual.
1
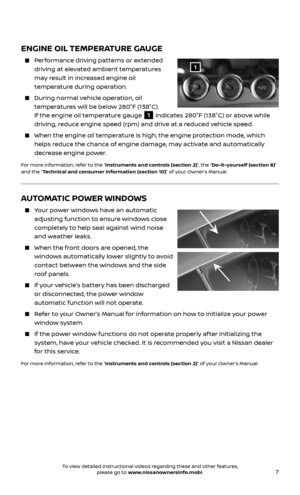
AUTOMATIC POWER WINDOWS
Your power windows have an automatic
adjusting function to ensure windows close
completely to help seal against wind noise
and weather leaks.
When the front doors are opened, the
windows automatically lower slightly to avoid
contact between the windows and the side
roof panels.
If your vehicle’s battery has been discharged
or disconnected, the power window
automatic function will not operate.
Refer to your Owner’s Manual for information on how to initialize your power
window system.
If the power window functions do not operate properly af ter initializing the
system, have your vehicle checked. It is recommended you visit a Nissan dealer
for this service.
For more information, refer to the “Instruments and controls (section 2)” of your Owner’s Manual.
To view detailed instructional videos regarding these and other features, please go to www.nissanownersinfo.mobi.
Page 10 of 28

8
FIRST DRIVE FEATURES
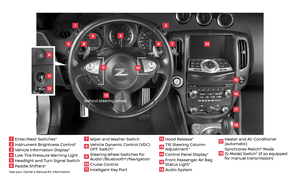
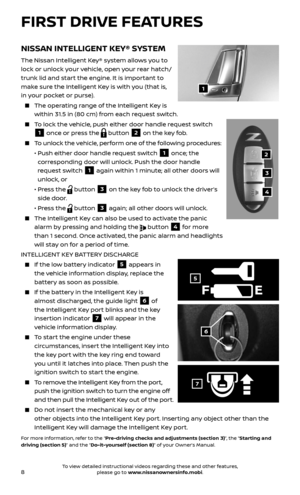
NISSAN INTELLIGENT KEY® SYSTEM
The Nissan Intelligent Key® system allows you to
lock or unlock your vehicle, open your rear hatch/
trunk lid and start the engine. It is important to
make sure the Intelligent Key is with you (that is,
in your pocket or purse).
The operating range of the Intelligent Key is
within 31.5 in (80 cm) from each request switch.
To lock the vehicle, push either door handle request switch
1 once or press the button 2 on the key fob.
To unlock the vehicle, perform one of the following procedures:
• Push either door hand le request switch 1 once; the
corresponding door will unlock. Push the door handle
request switch
1 again within 1 minute; all other doors will
unlock, or
• Press the button 3 on the key fob to unlock the driver’s
side door.
• Press the button 3 again; all other doors will unlock.
The Intel ligent Key can also be used to activate the panic
alarm by pressing and holding the button 4 for more
than 1 second. Once activated, the panic alarm and headlights
will stay on for a period of time.
INTELLIGENT KEY BATTERY DISCHARGE
If the low battery indicator 5 appears in
the vehicle information display, replace the
battery as soon as possible.
If the bat tery in the Intelligent Key is
almost discharged, the guide light 6 of
the Intelligent Key port blinks and the key
insertion indicator
7 will appear in the
vehicle information display.
To start the engine under these
circumstances, insert the Intelligent Key into
the key port with the key ring end toward
you until it latches into place. Then push the
ignition switch to start the engine.
To remove the Intelligent Key from the port,
push the ignition switch to turn the engine off
and then pull the Intelligent Key out of the port.
Do not inser t the mechanical key or any
other objects into the Intelligent Key port. Inserting any object other than the
Intelligent Key will damage the Intelligent Key port.
For more information, refer to the “Pre-driving checks and adjustments (section 3)”, the “Starting and
driving (section 5)” and the “Do-it-yourself (section 8)” of your Owner’s Manual.
F
5
7
2
3
4
1
6
To view detailed instructional videos regarding these and other features, please go to www.nissanownersinfo.mobi.
Page 11 of 28
.
Unlock the r ear hatch/trunk lid by pushing
the requ")
9
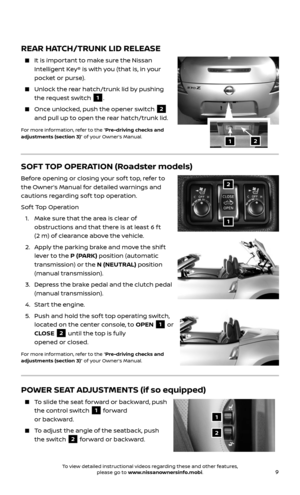
REAR HATCH/TRUNK LID RELEASE
It is important to make sure the Nissan
Intelligent Key® is with you (that is, in your
pocket or purse).
Unlock the r ear hatch/trunk lid by pushing
the request switch 1.
Once unlocked, push the opener switch 2
and pull up to open the rear hatch/trunk lid.
For more information, refer to the “Pre-driving checks and
adjustments (section 3)” of your Owner’s Manual.
12
SOFT TOP OPERATION (Roadster models)
Before opening or closing your sof t top, refer to
the Owner’s Manual for detailed warnings and
cautions regarding sof t top operation.
Sof t Top Operation
1. Make sure that the area is clear of
obstructions and that there is at least 6 f t
(2 m) of clearance above the vehicle.
2. Apply the parking brake and move the shif t
lever to the P (PARK) position (automatic
transmission) or the N (NEUTRAL) position
(manual transmission).
3. Depress the brake pedal and the clutch pedal
(manual transmission).
4. Start the engine.
5. Push and hold the sof t top operating switch,
located on the center console, to OPEN 1 or
CLOSE
2 until the top is fully
opened or closed.
For more information, refer to the “Pre-driving checks and
adjustments (section 3)” of your Owner’s Manual.
1
2
POWER SEAT ADJUSTMENTS (if so equipped)
To slide the seat forward or backward, push
the control switch 1 forward
or backward.
To adjust the angle of the seatback, push
the switch 2 forward or backward.
1
2
To view detailed instructional videos regarding these and other features, please go to www.nissanownersinfo.mobi.
Page 12 of 28

To adjust the angle and height of the seat
cushion to the desired position, turn
either dial
3.
MANUAL LUMBAR SUPPORT
(if so equi")
10
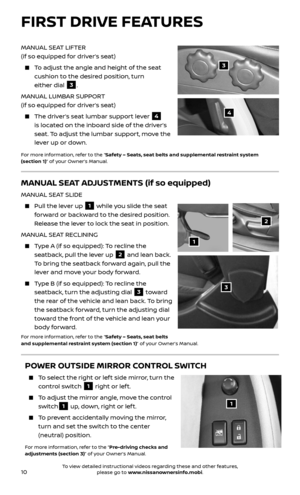
MANUAL SEAT LIFTER
(if so equipped for driver’s seat)
To adjust the angle and height of the seat
cushion to the desired position, turn
either dial
3.
MANUAL LUMBAR SUPPORT
(if so equipped for driver’s seat)
The driver’s seat lumbar support lever 4
is located on the inboard side of the driver’s
seat. To adjust the lumbar support, move the
lever up or down.
For more information, refer to the “Safety – Seats, seat belts and supplemental restraint system
(section 1)” of your Owner’s Manual.
3
4
POWER OUTSIDE MIRROR CONTROL SWITCH
To select the right or lef t side mirror, turn the
control switch 1 right or lef t.
To adjust the mirror angle, move the control
switch1 up, down, right or lef t.
To prevent accidentally moving the mirror,
turn and set the switch to the center
(neutral) position.
For more information, refer to the “Pre-driving checks and
adjustments (section 3)” of your Owner’s Manual.
1
FIRST DRIVE FEATURES
MANUAL SEAT ADJUSTMENTS (if so equipped)
MANUAL SEAT SLIDE
Pull the lever up 1 while you slide the seat
forward or backward to the desired position.
Release the lever to lock the seat in position.
MANUAL SEAT RECLINING
Type A (if so equipped): To recline the
seatback, pull the lever up
2 and lean back.
To bring the seatback forward again, pull the
lever and move your body forward.
Type B (if so equipped): To recline the
seatback, turn the adjusting dial 3 toward
the rear of the vehicle and lean back. To bring
the seatback forward, turn the adjusting dial
toward the front of the vehicle and lean your
body forward.
For more information, refer to the “Safety – Seats, seat belts
and supplemental restraint system (section 1)” of your Owner’s Manual.
3
1
2
To view detailed instructional videos regarding these and other features, please go to www.nissanownersinfo.mobi.
Page 13 of 28

11
3
1
2
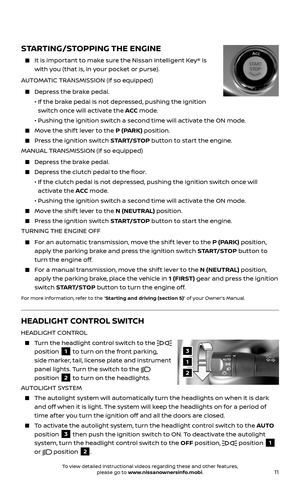
HEADLIGHT CONTROL SWITCH
HEADLIGHT CONTROL
Turn the headlight control switch to the
position 1 to turn on the front parking,
side marker, tail, license plate and instrument
panel lights. Turn the switch to the
position 2 to turn on the headlights.
AUTOLIGHT SYSTEM
The autolight system wil l automatically turn the headlights on when it is dark
and off when it is light. The system will keep the headlights on for a period of
time af ter you turn the ignition off and all the doors are closed.
To activate the autolight system, turn the headlight control switch to the AUTO
position
3 then push the ignition switch to ON. To deactivate the autolight
system, turn the headlight control switch to the OFF position,
position 1
or
position 2.
STARTING/STOPPING THE ENGINE
It is impor tant to make sure the Nissan Intelligent Key® is
with you (that is, in your pocket or purse).
AUTOMATIC TRANSMISSION (if so equipped)
Depress the brake pedal.
• If the br ake pedal is not depressed, pushing the ignition
switch once will activate the ACC mode.
• Pushing the ignition switch a sec ond time will activate the ON mode.
Move the shif t lever to the P (PARK) position.
Press the ignition switch START/STOP button to start the engine.
MANUAL TRANSMISSION (if so equipped)
Depress the brake pedal.
Depress the clutch pedal to the floor.
• If the clutch pedal is not depr essed, pushing the ignition switch once will
activate the ACC mode.
• Pushing the ignition switch a sec ond time will activate the ON mode.
Move the shif t lever to the N (NEUTRAL) position.
Press the ignition switch START/STOP button to start the engine.
TURNING THE ENGINE OFF
For an automatic transmission, move the shif t lever to the P (PARK) position,
apply the parking brake and press the ignition switch START/STOP button to
turn the engine off.
For a manual transmission, move the shif t lever to the N (NEUTRAL) position,
apply the parking brake, place the vehicle in 1 (FIRST) gear and press the ignition
switch START/STOP button to turn the engine off.
For more information, refer to the “Starting and driving (section 5)” of your Owner’s Manual.
To view detailed instructional videos regarding these and other features, please go to www.nissanownersinfo.mobi.
Page 14 of 28
, push the headlight control
switch forward
4 to select the high beam
function. The blue indicator light
will
i")
12
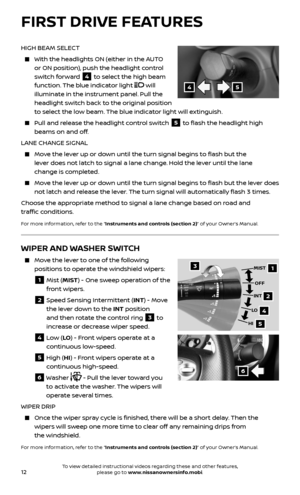
HIGH BEAM SELECT
With the headlights ON (either in the AUTO
or ON position), push the headlight control
switch forward
4 to select the high beam
function. The blue indicator light
will
illuminate in the instrument panel. Pull the
headlight switch back to the original position
to select the low beam. The blue indicator light will extinguish.
Pull and release the headlight control switch 5 to flash the headlight high
beams on and off.
LANE CHANGE SIGNAL
Move the lever up or down until the turn signal begins to flash but the
lever does not latch to signal a lane change. Hold the lever until the lane
change is completed.
Move the lever up or down until the turn signal begins to flash but the lever does
not latch and release the lever. The turn signal will automatically flash 3 times.
Choose the appropriate method to signal a lane change based on road and
traffic conditions.
For more information, refer to the “Instruments and controls (section 2)” of your Owner’s Manual.
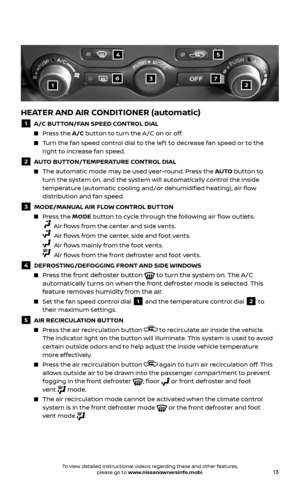
WIPER AND WASHER SWITCH
Move the lever to one of the following
positions to operate the windshield wipers:
1 Mist (MIST) - One sweep operation of the
front wipers.
2 Speed Sensing Intermit tent (INT) - Move
the lever down to the INT position
and then rotate the control ring
3 to
increase or decrease wiper speed.
4 Low (LO ) - Front wipers operate at a
continuous low-speed.
5 High (HI) - Front wipers operate at a
continuous high-speed.
6 Washer - Pull the lever toward you
to activate the washer. The wipers will
operate several times.
WIPER DRIP
Once the wiper spray cycle is finished, there will be a short delay. Then the
wipers will sweep one more time to clear off any remaining drips from
the windshield.
For more information, refer to the “Instruments and controls (section 2)” of your Owner’s Manual.
31
2
4
5
MIST
OFF
INT
LO
HI
6
45
FIRST DRIVE FEATURES
To view detailed instructional videos regarding these and other features, please go to www.nissanownersinfo.mobi.
Page 15 of 28

1 A/C BUTTON/FAN SPEED CONTROL DIAL
Press the A/C button to turn the A/C on or off.
Turn the fan speed control dial to the lef t to decrease fan s")
13
HEATER AND AIR CONDITIONER (automatic)
1 A/C BUTTON/FAN SPEED CONTROL DIAL
Press the A/C button to turn the A/C on or off.
Turn the fan speed control dial to the lef t to decrease fan speed or to the right to increase fan speed.
2 AUTO BUTTON/TEMPERATURE CONTROL DIAL
The automatic mode may be used year-round. Press the AUTO button to
turn the system on, and the system will automatically control the inside
temperature (automatic cooling and/or dehumidified heating), air flow
distribution and fan speed.
3 MODE/MANUAL AIR FLOW CONTROL BUTTON
Press the MODE button to cycle through the following air flow outlets:
Air flows from the center and side vents.
Air flows from the center, side and foot vents.
Air flows mainly from the foot vents.
Air flows from the front defroster and foot vents.
4 DEFROSTING/DEFOGGING FRONT AND SIDE WINDOWS
Press the front defroster button to turn the system on. The A/C
automatically turns on when the front defroster mode is selected. This
feature removes humidity from the air.
Set the fan speed c ontrol dial 1 and the temperature control dial 2 to
their maximum settings.
5 AIR RECIRCULATION BUTTON
Press the air recirculation button to recirculate air inside the vehicle. The indicator light on the button will illuminate. This system is used to avoid
certain outside odors and to help adjust the inside vehicle temperature
more effectively.
Press the air recirculation button again to turn air recirculation off. This allows outside air to be drawn into the passenger compartment to prevent
fogging in the front defroster , floor or front defroster and foot
vent mode.
The air recirculation mode cannot be activated when the climate control system is in the front defroster mode or the front defroster and foot
vent mode .
1
4
637
5
2
To view detailed instructional videos regarding these and other features, please go to www.nissanownersinfo.mobi.
Page 16 of 28

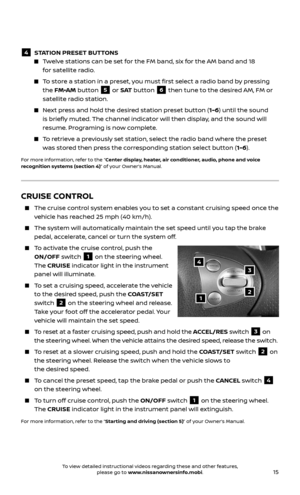
1 ON•OFF BUTTON/VOL (volume) CONTROL KNOB
Turn the VOL (volume) control knob right or lef t to increase or
decrease")
14
FM/AM/SiriusXM®* SATELLITE RADIO WITH CD/DVD PLAYER
(if so equipped)
1 ON•OFF BUTTON/VOL (volume) CONTROL KNOB
Turn the VOL (volume) control knob right or lef t to increase or
decrease the volume.
Press the ON•OFF button to turn the system on or off.
2 SEEK/CAT AND TRACK BUTTONS
To scan quickly through each broadcasting station, press the SEEK/CAT
button or the TRACK
button to stop at the previous or
next broadcast station.
For satellite radio to switch to the first channel of the previous or next
category, press the SEEK/CAT button or the TRACK button.
To change tracks on a CD, press the SEEK/CAT button or the
TRACK
button.
To rewind or fast forward a track on a CD, press and hold the SEEK/CAT
button or the TRACK
button.
3 AUDIO BUTTON/TUNE/FOLDER KNOB
To manually tune the radio, turn the TUNE/FOLDER knob lef t or right.
Press the AUDIO button to go to the audio settings screen.
* SiriusXM® Satel lite Radio is only available on vehicles equipped with an optional satellite radio subscription service.
1
56
2
3
4
FIRST DRIVE FEATURES
6 REAR WINDOW AND OUTSIDE MIRRORS (if so equipped)
DEFROSTER SWITCH
Push the rear window defroster switch to turn the system on or off.
The rear window and outside mirrors defroster automatically turns off af ter approximately 15 minutes.
7 OFF BUTTON
Press the OFF button to turn the climate control system off.
For more information, refer to the “Instruments and controls (section 2)” and the “Center display, heater,
air conditioner, audio, phone and voice recognition systems (section 4)” of your Owner’s Manual.
To view detailed instructional videos regarding these and other features, please go to www.nissanownersinfo.mobi.