2017 MITSUBISHI OUTLANDER SPORT stop start
[x] Cancel search: stop startPage 293 of 399
Operation Keys 7-36 Comfort controls
7
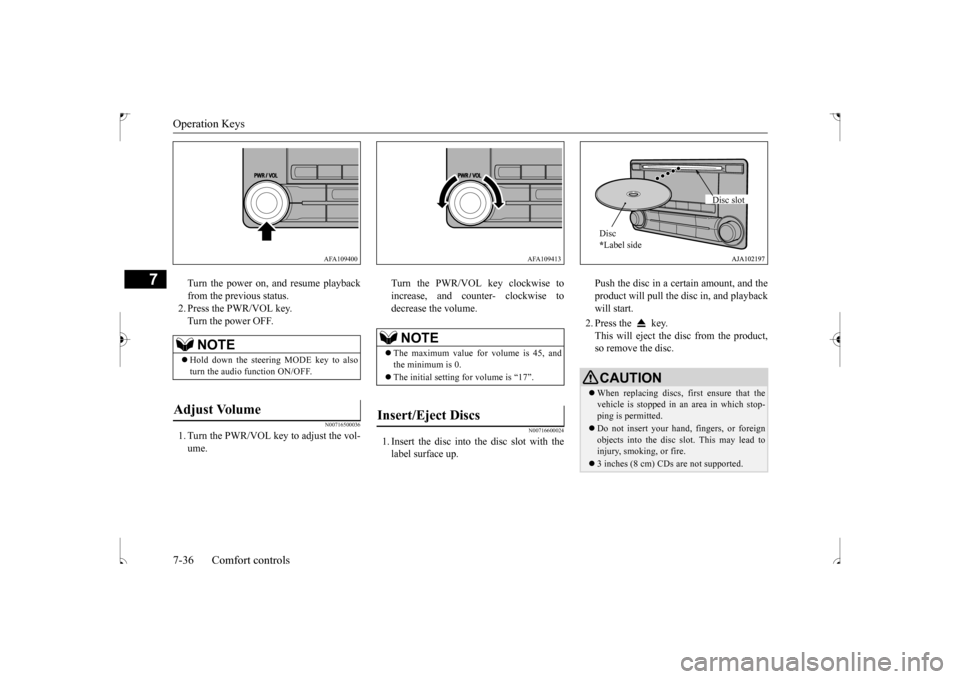
Turn the power on, and resume playback from the previous status. 2. Press the PWR/VOL key.Turn the power OFF.
N00716500036
1. Turn the PWR/VOL key to adjust the vol-ume.
Turn the PWR/VOL key clockwise to increase, and counter- clockwise to decrease the volume.
N00716600024
1. Insert the disc into the disc slot with the label surface up.
Push the disc in a certain amount, and the product will pull the disc in, and playback will start. 2. Press the key. This will eject the disc from the product, so remove the disc.
NOTE
Hold down the steering MODE key to also turn the audio function ON/OFF.
Adjust Volume
AFA109400
NOTE
The maximum value for volume is 45, and the minimum is 0. The initial setting for volume is “17”.
Insert/Eject Discs
AFA109413
CAUTIONWhen replacing discs, first ensure that the vehicle is stopped in an area in which stop- ping is permitted. Do not insert your hand, fingers, or foreign objects into the disc slot. This may lead to injury, smoking, or fire. 3 inches (8 cm) CDs are not supported.Disc * Label side
Disc slot
BK0239500US.bo
ok 36 ページ 2016年5月13日 金曜日 午前8時53分
Page 296 of 399

Listen to Radio
Comfort controls 7-39
7
Turn the /SEL key to the frequency to lis- ten to. Collective search for stations that can be received.
Press the SCAN key. When a station is received, this is played for 5 seconds, then the product searches for the next station. Register the broadcast station in advance, and select this at a later time. 1. Tune in to the frequency to register. 2. Hold down any of the keys from the 1RPT key to the 6 key. A “Beep” sounds, and the preset key is registered.
During RBDS broadcast reception, select CAT (category content), and automaticallyscan for stations. 1. During FM reception, press the CAT key. This switches to the CAT selection mode. 2. Press the CAT key to select CAT. 3. Press the key or key. The CAT (category content) indicator willflash, and station selection will automati- cally start. When a station is r
eceived, the frequency
is displayed.
During RBDS broadcast reception, select CAT (category content) to perform a collec- tive search for stations. 1. During FM reception, press the CAT key.
NOTE
Bands switch in the order AM, FM1, FM2, SIR1
*, SIR2
*, SIR3
*, and SIR4
*.
If no signal is received, bands will not be switched to SIR2, SIR3, or SIR4.
* : When a satellite tuner is connectedManual/Seek Station Selection
/SEL key (counter-clockwise)
Reduces the frequency being received.
/SEL key (clockwise)
Increases the frequency being received.
key
(hold down)
Release the button to start seek station selection, and when a station is received, scanning stops.
key
(hold down)Scan Station Selection
NOTE
Press this button again while receiving the station to cancel scan searching.
Preset Memory
NOTE
The preset memory can register a maximum of 6 stations for each band. If a preset key that already has a station reg- istered is selected, the new station will be registered. Pressing the preset key will select the previ- ously registered frequency.
CAT Search
NOTE
This receives the station detected first. 10 seconds after reception, CAT search mode will be cancelled. To receive a different station, press the key or key again.
CAT Scan
BK0239500US.bo
ok 39 ページ 2016年5月13日 金曜日 午前8時53分
Page 302 of 399

Listen to an iPod
Comfort controls 7-45
7
Press the MEDIA key to set the iPod as the source. The selected source is indicated on the dis- play. Press the key or key to select the track. This enables selection of the next or previous track. Hold down the 3 key or the 4 key. Fast forward/rewind is possible.
Repeat playback and shuffle playback are possible. Press the 1RPT key. Repeat playback of th
e track currently being
played. Press the 2RDM key. Play tracks in the category currently being played in a random order. Hold down the 2RDM key.
Set up the device in order that no unsafe actions, such as plugging in the connection cable are taken while driving. When inserting and removing the iPod/iPhone, for safety’s sake first stop the vehicle. Depending on the status of the iPod/iPhone, it may take some time until the device is rec- ognized, or playback starts. Buttons on the product will not operate while the iPod/iPhone is connected. iPod/iPhone specifications and settings may mean that a connection is not possible, orresult in differences in operation or display. Depending on audio data in the iPod/iPhone, track information may not be displayed cor- rectly. Depending on the status of the vehicle and device, the iPod/iPhone may not play back after starting the engine. Data containing copyright information may not play back. It is recommended that the iPod/iPhone equalizer settings be set to flat. Operate the iPod/iPhone while connected to this product. If the iPod/iPhone is connected via Bluetooth as a Bluetooth-capable audio device, then do not connect the iPod/iPhone using an iPod cable. Connection using both methods willresult in erroneous operation.NOTE
If an iPod/iPhone does not operate correctly, then remove the iPod/iPhone from the prod- uct, reset, then reconnect.
Play iPod Select the Track (File) Fast Forward or Rewind
NOTE
Switch Playback Mode Repeat Playback (RPT)
NOTE
Pressing again will cancel.
Shuffle Playback (RDM)
NOTE
Pressing again will cancel.
Album Shuffle Playback
BK0239500US.bo
ok 45 ページ 2016年5月13日 金曜日 午前8時53分
Page 304 of 399

Listen to Audio Files on a USB Device
Comfort controls 7-47
7
Press the MEDIA key to set USB as the source. The selected source is indicated on the dis- play. Press the key or key to select the track. This enables selection of the next or previous track.
Hold down the 3 key or the 4 key. Fast forward/rewind is possible. Repeat playback, random playback, and scan playback are possible. Press the 1RPT key. Repeat playback of th
e track currently being
played. Hold down the 1RPT key.
When connecting a USB device, use a con- nection cable. Failure to use a connection cable when connecting may place undue load on, or damage the USB connector. Set up the device in order that no unsafe actions, such as plugging in the connection cable are taken while driving. When inserting and removing the USB device, for safety’s sake first stop the vehi-cle. Do not insert non audio devices into the USB port. Damage to the device or equipment may result. Depending on the status of the USB device, it may take some time until the device is rec- ognized, or playback starts. Depending on USB devices, buttons on the product will not operate while the USBdevice is connected. USB device specifications and settings may mean that connection is not possible, or result in differences in operation or display. Depending on the audio data in the USB device, track information may not be dis- played correctly. Depending on the status of the vehicle and device, the iPod/iPhone may not play back after starting the engine. Data containing copyright information may not play back. This product can play back MP3, WMA, and AAC format audio files.NOTE
Depending on the type of USB device, usage may not be possible, or functions that can be used may be restricted. The recommended file system for USB memory is FAT32. The maximum supported capacity for USB memory is 32GB. Operate the USB device containing recorded audio files while connected to this product.
Play Back of Audio Files on a USB Device Select the Track (File)
NOTE
Fast Forward or Rewind Switch Playback Mode Repeat Playback (RPT)
NOTE
Pressing again will cancel. Selecting a file will cancel this. However, it will not be cancelled in vehicles with a Bluetooth
® 2.0 interface.
Folder Repeat Playback
BK0239500US.bo
ok 47 ページ 2016年5月13日 金曜日 午前8時53分
Page 309 of 399
Listen to Bluetooth Audio (if so equipped) 7-52 Comfort controls
7
7. The system exits the voice recognition mode and starts playback.
N00717500033
This product can play back tracks on com-mercially-available Bluetooth-capable audio devices.
Regarding how to connect your Bluetooth device, refer to “Connecting the Bluetooth
®
2.0 interface and Bluetooth device” on page 5-144. Operation methods below describe situations once connection has been completed. 1. Press the MEDIA key to set Bluetooth Audio as the source. The selected source is indicated on the display. 2. Press the 5 key. Bluetooth Audio play- back starts.
NOTE
If the confirmation function is active, the voice guide confirms if the genre is correct. If the genre is correct, say “Yes”. If not, say “No”. After the voice guide says “Genre not found, please try again,” the system returnsto step 2. Refer to “Confirmation function setting” on page 5-141.
Listen to Bluetooth Audio
(if
so equipped)
CAUTION Never hold these devices in your hand to operate while driving, as this is dangerous. Do not leave the Bluetooth audio device unattended in the vehicle. Depending on how the devices are handled, audio files being damaged or lost, therefore it is recommended that data be backed up.
NOTE
Depending on the type of Bluetooth-capable audio devices, usage may not be possible, or functions that can be used may be restricted. Confirm together with the user manuals for the commercially-available Bluetooth-capa- ble audio devices. Depending on the type of Bluetooth-capable audio devices, volume levels may differ. There is the danger of loud volumes, so priorto use, it is recommended that you turn the volume down. “Adjust Volume” (P.7-36)
Depending on the status of the Bluetooth audio device, it may take some time until thedevice is recognized, or playback starts. Bluetooth audio device specifications and settings may mean that connection is not possible, or result in differences in operation or display. Depending on audio data in the Bluetooth audio device, track information may not bedisplayed correctly. Depending on the status of the vehicle and device, the iPod/iPhone may not play back after starting the engine.
Connect a Bluetooth-capable Audio Device
NOTE
If the iPod/iPhone is connected via Bluetooth as a Bluetooth-capable audio device, then donot connect the iPod/iPhone using an iPod cable. Connection using both methods will result in erroneous operation.
Play Bluetooth Audio
NOTE
Hold down the 5 key to pause. Press the 6 key to stop.
BK0239500US.bo
ok 52 ページ 2016年5月13日 金曜日 午前8時53分
Page 323 of 399
If the vehicle breaks down 8-2 For emergencies
8
N00836300187
If your vehicle breaks down on the road, move to the shoulder and turn on the hazardwarning flashers. If there is no shoulder, or the shoulder is not safe, drive in the right lane slowly, with the hazard lights flashing, untilyou come to a safe stopping place. Keep the flashers flashing. If the engine stops, there will be no power assist to the steering and brakes, making these difficult to use. The brake booster will not work, so the brakes will not grip well. The brake pedalwill be harder to press than usual. Since there is no power steering assist, the steering wheel will be hard to turn.
Get help from your passengers, bystanders, etc. to push the vehicl
e and move it to a safe
zone.
N00836401824
If the engine cannot be started because the battery is weak or dead, you can start it withthe battery from another vehicle using jumper cables. 1. Take off any metal jewelry such as watch bands or bracelets that might make an accidental electrical contact.2. Position the vehicles close enough together so that the jumper cables can reach, but be sure the vehicles aren’ttouching each other.
3. You could be injured if the vehicles move. Set the parking brake firmly oneach vehicle. Put an automatic transaxle or CVT in “P” (PARK) or a manual trans- axle in “N” (Neutral).4. Turn the ignition switch to the “OFF”position or put the operation mode in OFF. 5. Make sure your battery electrolyte is at the proper level.(Refer to “Battery” on page 9-11.)
If the vehicle breaks down If the engine stops/fails When the engine fails at the intersection
Jump-starting the engine
WA R N I N G When using jumper cables to start a vehi- cle, follow the procedures and be very cau- tious.CAUTION Do not try to start your vehicle by pushing or towing. Vehicles with automatic transaxles cannot be started this way. Also, there is more risk of an accident when a vehicle isbeing pushed or towed.
CAUTION Check the other vehicle. It must have a 12- volt battery. If the other system isn’t 12-volt, both systems can be damaged.WA R N I N G Perform step 4 on both vehicles before- hand. Make sure that the cables or your clothes cannot be ca
ught by the fan or
drive belt. Personal injury could result.NOTE
Turn off all lights, heater, and other electrical loads. This will avoid sparks and help save both batteries.
BK0239500US.bo
ok 2 ページ 2016年5月13日 金曜日 午前8時53分
Page 325 of 399
Engine overheating 8-4 For emergencies
8
If you drive your vehicle with a low battery charge after the engine has been started by using jumper cables, the engine may misfire. This can cause the anti-lock braking systemwarning light to blink on and off. This is only due to the low battery voltage. It is not a problem with the brake system. If this hap-pens, fully charge the battery and ensure the charging system is operating properly.
N00836500352
When the engine is overheating, the informa-tion screen in the multi-information display
will be interrupted and the engine coolant temperature warning display will appear. Also “ ” blink. If this happens: 1. Stop the vehicle in a safe place. Turn on the hazard warning flashers.2. With the engine still running, carefully raise the engine hood to vent the engine compartment.3. Check that the cooling fan is running. Ifthe fan is not turning, stop the engine immediately and contact an authorized Mitsubishi Motors dealer or a repair facil-ity of your choice for assistance. 4. If you see steam or spray coming from under the hood, turn off the engine. 5. If you do not see steam or spray comingfrom under the hood, leave the engine on until the bar graph for the engine coolant temperature warning display on the multi-information display goes down. When it is in the middle of the normal zone, you can start driving again. If the bar graphstays in the red zone, turn off the engine.
6. When you do not see any more steam or spray, open the hood. Look for obvious leaks, such as a split radiator hose. Be careful as components will be hot. Anyleak source must be repaired. 7. If there is no obvious leak source, check the coolant level in the engine coolantreserve tank. If there is none, or if it is too low, slowly add coolant. 8. If the engine coolant reserve tank needscoolant, you will probably also need to add coolant to the radiator. Do not loosen or remove the radiator cap until the enginehas cooled down.
Electrolyte (battery acid) is made of corro- sive diluted sulfuric acid. If electrolyte comes in contact with your hands, eyes, clothes, or the painted surface of your vehicle, thoroughly flush with water. Ifelectrolyte gets in your eyes, flush them immediately and thoroughly with water, and get prompt medical attention. Always wear protective clothing and gog- gles when working near the battery. Keep the battery out of the reach of chil- dren.
As your vehicle has anti-lock brakes Engine overheating
WA R N I N G
WA R N I N G To avoid personal injury, keep hands, hair, jewelry and clothes away from the cooling fan. The cooling fan can start atany time.
WA R N I N G Before raising the engine hood, check to see if there is steam or spray coming from under the hood. Steam or spray coming from an overheated engine could seriously scald you.Do not open the hood until there is no steam or spray.
BK0239500US.bo
ok 4 ページ 2016年5月13日 金曜日 午前8時53分
Page 329 of 399
How to change a tire 8-8 For emergencies
8
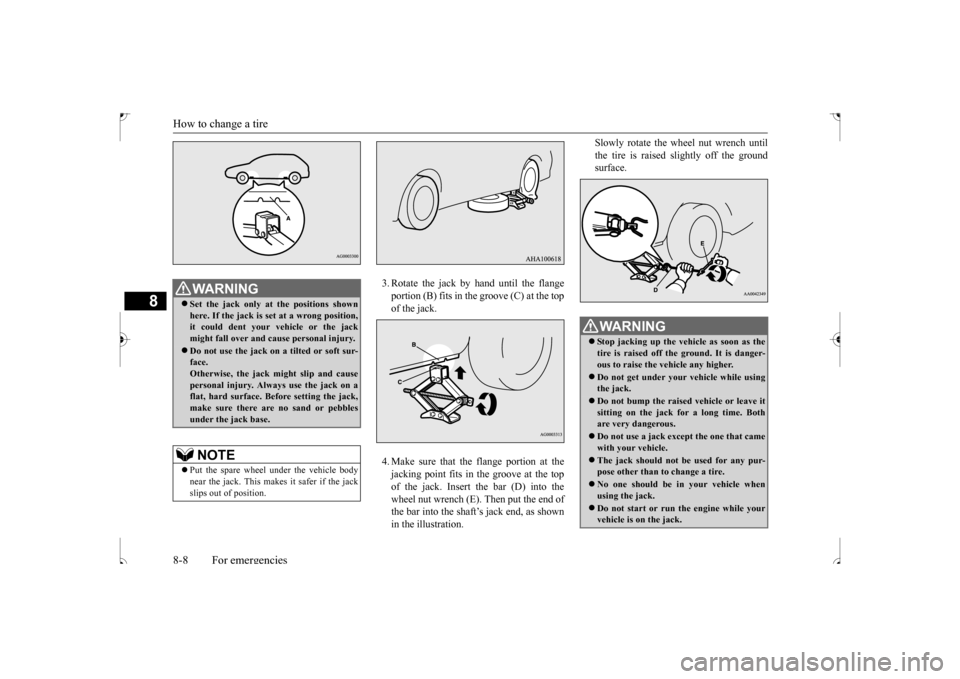
3. Rotate the jack by hand until the flange portion (B) fits in the groove (C) at the top of the jack. 4. Make sure that the flange portion at the jacking point fits in the groove at the topof the jack. Insert the bar (D) into thewheel nut wrench (E). Then put the end of the bar into the shaft’s jack end, as shown in the illustration.
Slowly rotate the wheel nut wrench until the tire is raised slightly off the ground surface.
WA R N I N G Set the jack only at the positions shown here. If the jack is set at a wrong position, it could dent your vehicle or the jackmight fall over and cause personal injury. Do not use the jack on a tilted or soft sur- face. Otherwise, the jack might slip and cause personal injury. Always use the jack on aflat, hard surface. Before setting the jack, make sure there are no sand or pebbles under the jack base.NOTE
Put the spare wheel under the vehicle body near the jack. This makes it safer if the jack slips out of position.
WA R N I N G Stop jacking up the vehicle as soon as the tire is raised off the ground. It is danger- ous to raise the vehicle any higher. Do not get under your vehicle while using the jack. Do not bump the raised vehicle or leave it sitting on the jack for a long time. Bothare very dangerous. Do not use a jack except the one that came with your vehicle. The jack should not be used for any pur- pose other than to change a tire. No one should be in your vehicle when using the jack. Do not start or run the engine while your vehicle is on the jack.
BK0239500US.bo
ok 8 ページ 2016年5月13日 金曜日 午前8時53分