2017 MITSUBISHI OUTLANDER SPORT transmission
[x] Cancel search: transmissionPage 231 of 399
HomeLink® Wireless Control System (if so equipped) 5-168 Features and controls
5
N00584800034
Canadian radio-frequency laws require trans- mitter signals to “time-out” (or quit) after several seconds of transmission - which may not be long enough for HomeLink
® to pick
up the signal during programming. Similar tothis Canadian law, some U.S. gate operators are designed to “time-out” in the same man- ner.The indicator LED on the hand-held transmit- ter will go off when the device times out indi- cating that it has finished transmitting.If you live in Canada or
you are having diffi-
culties programming a gate operator or garage door opener by using the “Program-ming” procedures, replace “Programming a new HomeLink
®” step 3 with the following:
3. Press and release - every 2 seconds (“cycle”) your hand-held transmitter until the HomeLink
® indicator light changes from
slowly flashing orange to either rapidly flash-ing green (rolling code) or continuously lit green (fixed code). Now you may release the hand-held transmitter button.Proceed with “Programming a new Home- Link
®” step 4 to complete.
N00584900035
The HomeLink
® has the capability of receiv-
ing garage door status from compatible garage door opener systems. Check your garage door opener manual for the available feature and HomeLink
® compatibility. Also
for a listing of compatible systems contact HomeLink
® at: www.homelink.com
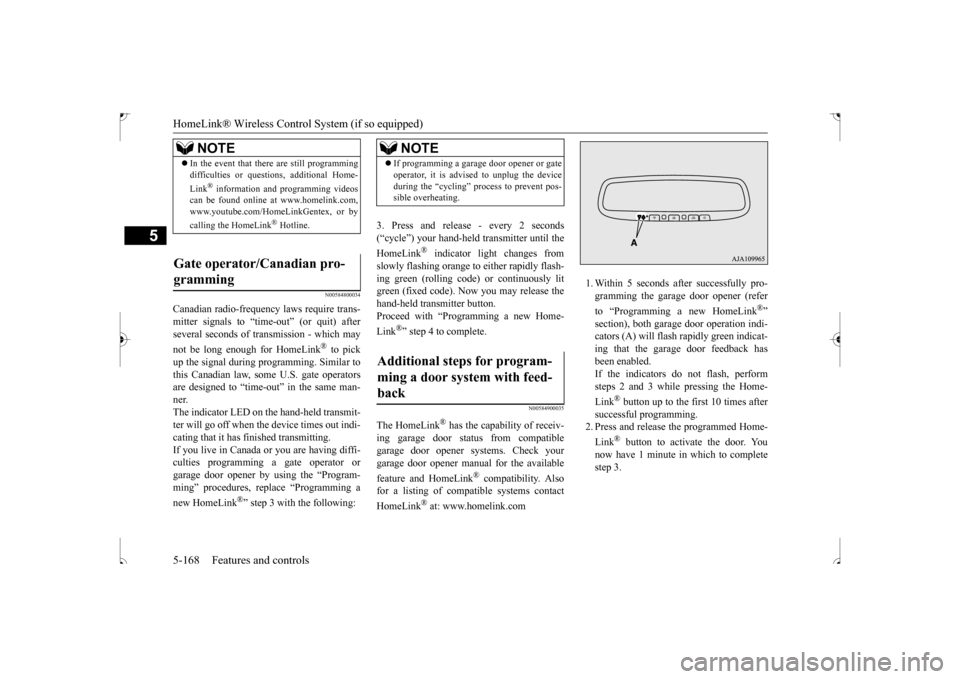
1. Within 5 seconds after successfully pro- gramming the garage door opener (refer to “Programming a new HomeLink
®”
section), both garage door operation indi- cators (A) will flash rapidly green indicat- ing that the garage door feedback hasbeen enabled. If the indicators do not flash, perform steps 2 and 3 while pressing the Home- Link
® button up to the first 10 times after
successful programming. 2. Press and release the programmed Home- Link
® button to activate the door. You
now have 1 minute in which to complete step 3.
NOTE
In the event that there are still programming difficulties or questions, additional Home- Link
® information and programming videos
can be found online at www.homelink.com, www.youtube.com/HomeLinkGentex, or by calling the HomeLink
® Hotline.
Gate operator/Canadian pro- gramming
NOTE
If programming a garage door opener or gate operator, it is advised to unplug the device during the “cycling” process to prevent pos- sible overheating.
Additional steps for program- ming a door system with feed-back
BK0239500US.book
168 ページ 2016年5月13日 金曜日 午前8時53分
Page 249 of 399
Parking 6-6 Driving safety
6
On snowy roads, ice can form on the braking system, making the brakes less effective.While driving in such
conditions, pay close
attention to preceding and following vehicles and to the condition of
the road surface. From
time to time, lightly depress the brake pedal and check how effective the brakes are. It is important to take advantage of the engine braking by downshifting while driving on steep downhill roads in order to prevent the brakes from overheating.
N00629600304
When parking on a hill, set the parking brake,and turn the front wheels toward the curb on adownhill, or away from the curb on an uphill. If necessary, apply chocks to wheels.
Place the gearshift lever into the “R” (Reverse) position when parking on a down- hill slope, into the 1st position when parkingon an uphill slope. Be sure that the parking brake is firmly set when parked and that the selector lever is in the “P” (PARK) position. When parking on a hill, it is important to setthe parking brake before moving the selector lever to the “P” (PARK) position. This pre- vents loading the parking brake against thetransaxle. When this happens, it is difficult to move the selector lever out of the “P” (PARK) position. Never leave the engi
ne running while you
take a short sleep or rest. Also, never leave the engine running in a closed or poorly ven- tilated place.
Your front bumper can be damaged if you scrape it over curbs or parking stop blocks.Be careful when traveling up or down steep slopes where your bumper can scrape the road. More effort could be required to turn the steering wheel. Refer to “Electric power steering system (EPS)” on page 5-69.
When driving in cold weather When driving downhill Parking Parking on a hill
For vehicles equipped with man- ual transaxle For vehicles equipped with contin- uously variable transmission (CVT) Parking with the engine run- ning
WA R N I N G Leaving the engine running risks injury or death from accidentally moving the gear- shift lever (manual transaxle) or the selec- tor lever (CVT) or from the accumulation of toxic exhaust fumes in the passengercompartment.
Where you park
WA R N I N G Do not park your vehicle in areas where combustible materials such as dry grass or leaves can come in contact with a hotexhaust, since a fire could occur.
Do not keep the steering wheel fully turned for a long time
BK0239500US.bo
ok 6 ページ 2016年5月13日 金曜日 午前8時53分
Page 261 of 399

Manual air conditioning-T
ype 1 (if so equipped)
7-4 Comfort controls
7
N00730301370
N00730500258 N00736500175
When the ignition switch or the operation mode is in ON, select the blower speed by turning the blower speed selection dial.Turning the dial clockwise will increase the blower speed; turning the dial counterclock- wise will decrease it. When the dial is set tothe “OFF” position, all fan-driven airflow will stop.
N00736600222
Turn the temperature control dial clockwise to make the air warmer. Turn it counterclock-wise to make the air cooler.
Manual air conditioning- Ty p e 1
(if so equipped)
CAUTION The engine speed may increase when the air conditioning is operating.With an increased engine speed, a continu- ously variable transmission (CVT) vehicle will creep to a greater degree than with alower engine speed. Fully depress the brake pedal to prevent the vehicle from creeping.
Control panel
A- Temperature control dial B- Air selection switch C- Blower speed selection dialD- Air conditioning switch E- Mode selection dial F-
Electric rear window defogger switch
P.5-136
Blower speed selection dial
Temperature control dial
BK0239500US.bo
ok 4 ページ 2016年5月13日 金曜日 午前8時53分
Page 266 of 399
Manual air conditioning-Type 2 (if so equipped)
Comfort controls 7-9
7
1. Set the mode selection dial to the “ ” position. 2. Select your desired blower speed by turn- ing the blower speed selection dial.3. Select your desired temperature by turn- ing the temperature control dial.
1. Set the mode selection dial to the “ ” position.2. Set your blower to the maximum speed. 3. Set the temperature to the highest posi- tion.
N00730301383 N00730500261
For quick defrosting
NOTE
While the mode selection dial is set between “ ” and “ ” position, the air condition- ing compressor will run automatically. The outside air position will also be automati-cally selected. (In this case, the air condition- ing indicator will not change.) While the between “ ” and “ ” position is selected, you cannot turn the air condition- ing off or select the recirculation position. This prevents the windows from fogging up. To defog quickly, direct
the air flow from the
side vents toward the door windows. When defrosting, do not set the temperature control dial near the “MAX A/C” cool posi-tion. This would blow cool air on the win- dow glass and fog it up.
Manual air conditioning- Ty p e 2
(if so equipped)
CAUTION The engine speed may increase when the air conditioning is operating.With an increased engine speed, a continu- ously variable transmission (CVT) vehicle will creep to a greater degree than with alower engine speed. Fully depress the brake pedal to prevent the vehicle from creeping.
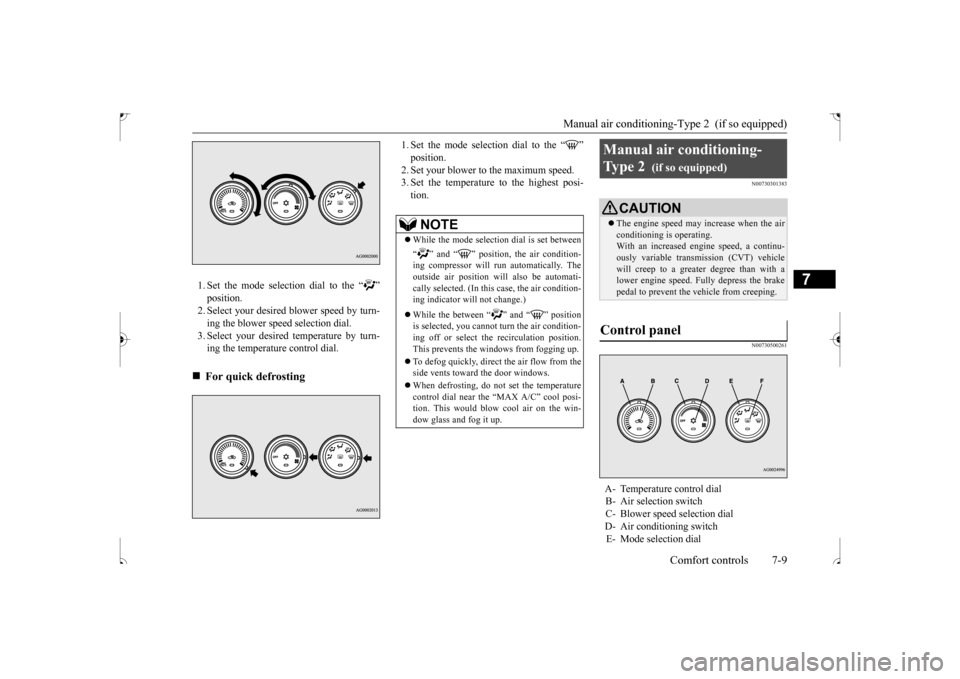
Control panel
A- Temperature control dial B- Air selection switch C- Blower speed selection dial D- Air conditioning switchE- Mode selection dial
BK0239500US.bo
ok 9 ページ 2016年5月13日 金曜日 午前8時53分
Page 271 of 399
Automatic air conditioning
-Type1 (if so equipped)
7-14 Comfort controls
7
1. Set the mode selection dial to the “ ” position.2. Select your desired blower speed by turn- ing the blower speed selection dial. 3. Select your desired temperature by turn-ing the temperature control dial. 1. Set the mode selection dial to the “ ” position. 2. Set your blower to the maximum speed. 3. Set the temperature to the highest posi-tion.
N00731501366
N00711801608
For quick defrosting
NOTE
While the mode selection dial is set to the “ ” position, the air conditioning com- pressor will run automatically. The outside air position will also be automaticallyselected. While the “ ” position is selected, you cannot turn the air conditioning off or selectthe recirculation position. This prevents the windows from fogging up. To defog quickly, direct
the air flow from the
side vents toward the door windows. When defrosting, do not set the temperature control dial near the maximum cool position. This would blow cool air on the windowglass and fog it up.
Automatic air conditioning- Ty p e 1
(if so equipped)
CAUTION The engine speed may increase when the air conditioning is operating. With an increased engine speed, a continu-ously variable transmission (CVT) vehicle will creep to a greater degree than with a lower engine speed. Fully depress the brake pedal to prevent the vehicle from creeping.
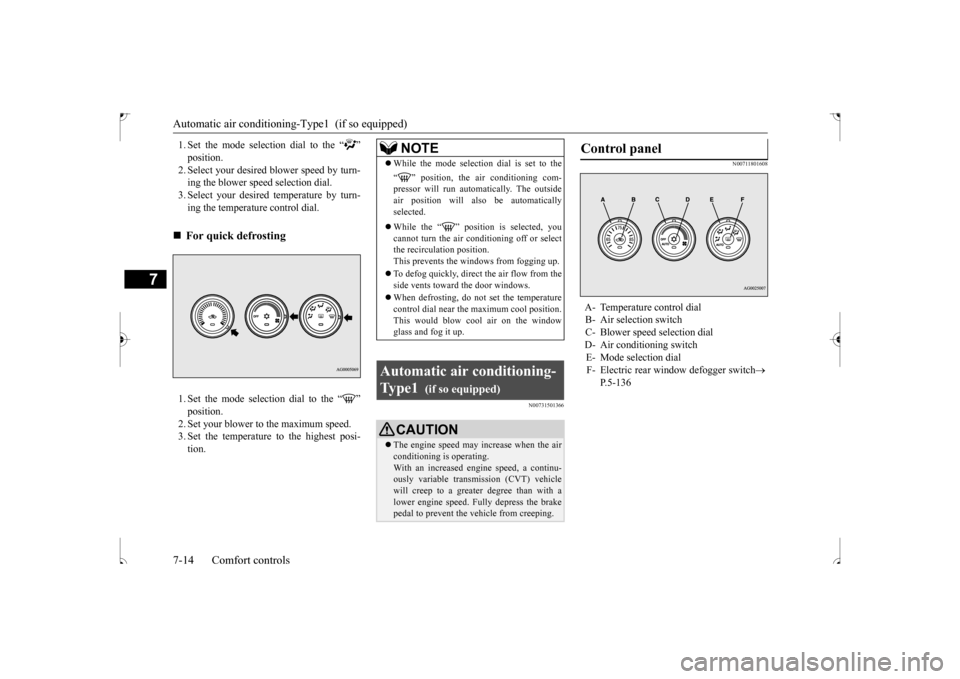
Control panel
A- Temperature control dial B- Air selection switch C- Blower speed selection dialD- Air conditioning switch E- Mode selection dial F- Electric rear window defogger switch
P.5-136
BK0239500US.bo
ok 14 ページ 2016年5月13日 金曜日 午前8時53分
Page 276 of 399

Automatic air conditioning-Type2 (if so equipped)
Comfort controls 7-19
7
Use this setting to keep the windshield and door windows clear of mist, and to keep the leg area heated (when driving in rain or snow). 1. Set the mode selection dial to the “ ” position. 2. Select your desired blower speed by turn-ing the blower speed selection dial. 3. Select your desired temperature by turn- ing the temperature control dial.
1. Set the mode selection dial to the “ ” position.2. Set your blower to the maximum speed. 3. Set the temperature to the highest posi- tion.
N00731501379
For ordinary defrosting
For quick defrosting NOTE
While the mode selection dial is set between “ ” and “ ” position, the air condition- ing compressor will run automatically. Theoutside air position will also be selected automatically. If the mode selection dial is set between “ ” and “ ” you cannot turn the air con- ditioning off or select the recirculation posi- tion. This prevents the windows from fogging up. To defog quickly, direct
the air flow from the
side vents toward the door windows.
When defrosting, do not set the temperature control dial to the maximum cool position. This will blow cool air on the window glass and fog it up.
Automatic air conditioning- Ty p e 2
(if so equipped)
CAUTION The engine speed may increase when the air conditioning is operating. With an increased engine speed, a continu- ously variable transmission (CVT) vehiclewill creep to a greater degree than with a lower engine speed. Fully depress the brake pedal to prevent the vehicle from creeping.NOTE
BK0239500US.bo
ok 19 ページ 2016年5月13日 金曜日 午前8時53分
Page 320 of 399
General information about your radio
Comfort controls 7-63
7
N00733901511
Your vehicle’s radio receives both AM and FM stations. The quality of your reception is affected bydistance, obstacles, and signal interference. This radio complies with Part 15 of Federal Communications Commission (FCC) Rules (for vehicles sold in U.S.A.). Operation issubject to the following conditions: The device may not cause harmful inter- ference. This device must accept any interference received, including interference that may cause undesirable operation.
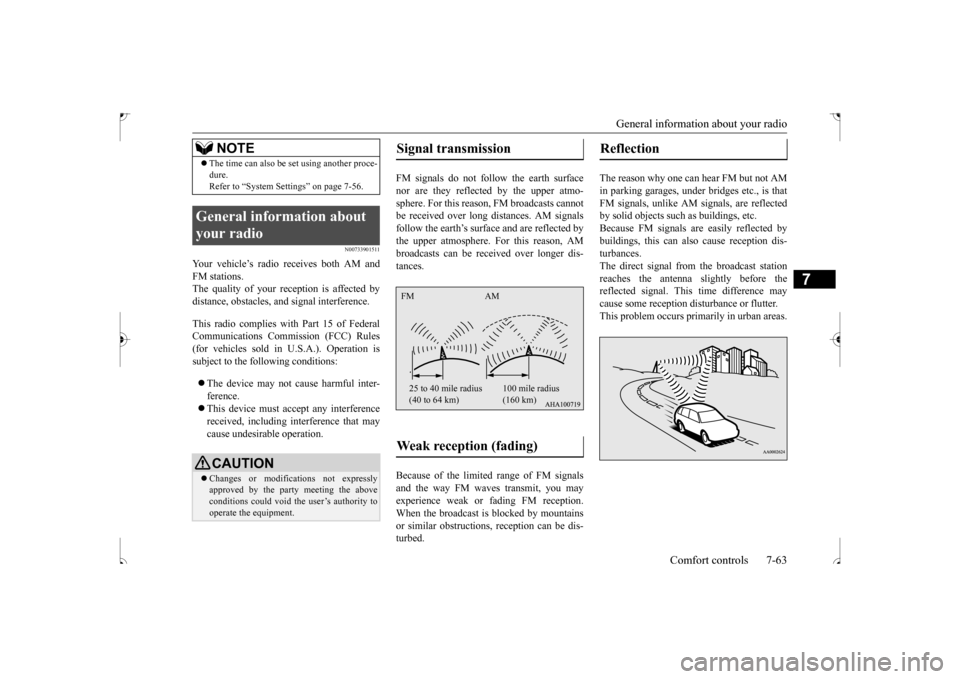
FM signals do not follow the earth surface nor are they reflected by the upper atmo-sphere. For this reason, FM broadcasts cannot be received over long distances. AM signals follow the earth’s surface and are reflected bythe upper atmosphere. For this reason, AM broadcasts can be received over longer dis- tances. Because of the limited range of FM signals and the way FM waves transmit, you may experience weak or fading FM reception.When the broadcast is blocked by mountains or similar obstructions, reception can be dis- turbed.
The reason why one can hear FM but not AM in parking garages, under bridges etc., is thatFM signals, unlike AM signals, are reflected by solid objects such as buildings, etc. Because FM signals are easily reflected bybuildings, this can also cause reception dis- turbances. The direct signal from
the broadcast station
reaches the antenna slightly before thereflected signal. This time difference may cause some reception disturbance or flutter. This problem occurs primarily in urban areas.
The time can also be set using another proce- dure. Refer to “System Settings” on page 7-56.
General information about your radio
CAUTION Changes or modifications not expressly approved by the party meeting the above conditions could void the user’s authority to operate the equipment.NOTE
Signal transmission Weak reception (fading) FM AM 25 to 40 mile radius (40 to 64 km)
100 mile radius (160 km)
Reflection
BK0239500US.bo
ok 63 ページ 2016年5月13日 金曜日 午前8時53分
Page 327 of 399
How to change a tire 8-6 For emergencies
8
N00836901832
Before changing a tire, first stop your vehicle in a safe, flat location. 1. Park the vehicle on level and stable ground. 2. Set the parking brake firmly.3. On vehicles equipped with manual trans- axle, stop the engine and move the gear- shift lever to the “R” (Reverse) position.On vehicles equipped with continuously variable transmission (CVT), move the selector lever to the “P” (PARK) position,and stop the engine. 4. Turn on the hazard flashers and set up a warning triangle, flashing signal light,etc., at an adequate distance from the vehicle, and have all your passengers leave the vehicle.
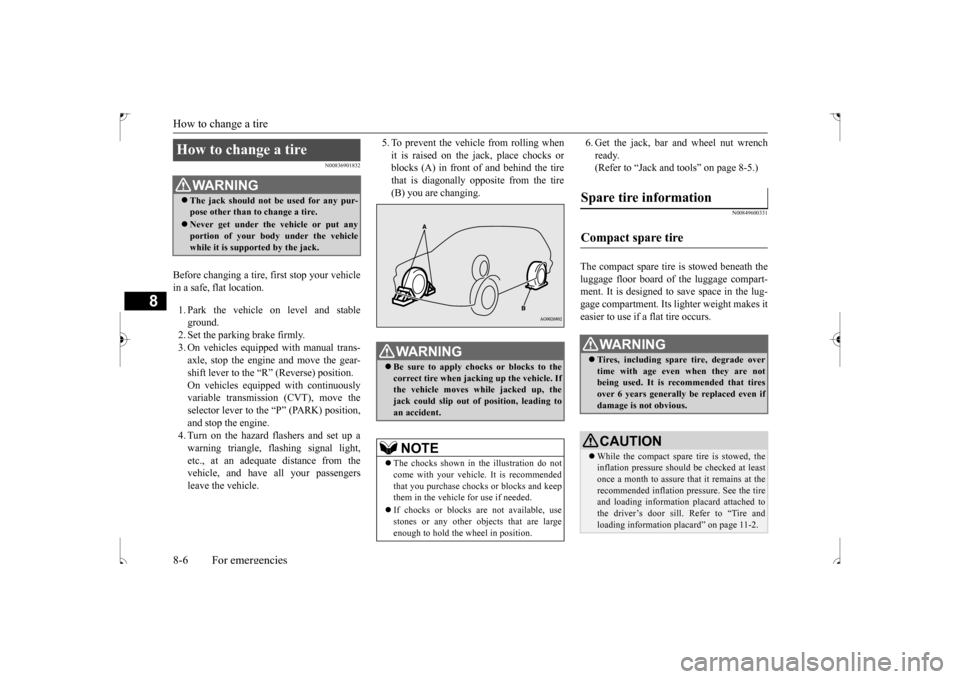
5. To prevent the vehicle from rolling when it is raised on the jack, place chocks or blocks (A) in front of and behind the tire that is diagonally opposite from the tire(B) you are changing.
6. Get the jack, bar and wheel nut wrench ready. (Refer to “Jack and tools” on page 8-5.)
N00849600331
The compact spare tire is stowed beneath the luggage floor board of the luggage compart- ment. It is designed to save space in the lug- gage compartment. Its lighter weight makes iteasier to use if a flat tire occurs.
How to change a tire
WA R N I N G The jack should not be used for any pur- pose other than to change a tire. Never get under the vehicle or put any portion of your body under the vehicle while it is supported by the jack.
WA R N I N G Be sure to apply chocks or blocks to the correct tire when jacking up the vehicle. Ifthe vehicle moves while jacked up, the jack could slip out of position, leading to an accident.NOTE
The chocks shown in the illustration do not come with your vehicle. It is recommended that you purchase chocks or blocks and keepthem in the vehicle for use if needed. If chocks or blocks are not available, use stones or any other objects that are large enough to hold the wheel in position.
Spare tire information Compact spare tire
WA R N I N G Tires, including spare tire, degrade over time with age even when they are not being used. It is recommended that tires over 6 years generally be replaced even ifdamage is not obvious.CAUTION While the compact spare tire is stowed, the inflation pressure should be checked at least once a month to assure that it remains at the recommended inflation pressure. See the tireand loading information placard attached to the driver’s door sill. Refer to “Tire and loading information placard” on page 11-2.
BK0239500US.bo
ok 6 ページ 2016年5月13日 金曜日 午前8時53分