2017 MITSUBISHI OUTLANDER SPORT battery
[x] Cancel search: batteryPage 110 of 399
Starting the engine
Features and controls 5-47
5
Allows operation of electrical accessories with the engine off. The engine runs and all accessories can be used. Engages the starter. Release the key when the engine starts.It will auto
matically back to the
“ON” position.
N00539601114
After about 30 minutes has elapsed with theignition switch in the “ACC” position, the function automatically cuts out the power for the audio system and other electric devicesthat can be operated with that position. When the ignition switch is turned from the “ACC” position, the power is supplied againto those devices.
N00550900197
1. Set the selector lever to the “P” (PARK) position {continuously variable transmis- sion (CVT)}.2. Turn the key to the “OFF” position and remove it.
N00512601832
[For vehicles equipped with the Free-handAdvanced Security Transmitter (F.A.S.T.- key)]
ACC ON START
NOTE
Your vehicle is equipped with an electronic immobilizer. To start the engine, the ID code which the transponder inside the key sendsmust match the one registered to the immobi- lizer computer. (Refer to “Electronic immo- bilizer” on page 5-23.)
ACC power auto-cutout func- tion
NOTE
It is possible to modify functions as follows: • The time until the power cuts out can be changed to about 60 minutes. • The ACC power auto-cutout function can be deactivated. For details, we recommend you to consult an authorized Mitsubishi Motors dealer.
To remove the key
CAUTION If the engine is stopped while driving, the brake servomechanism will cease to function and braking efficiency will deteriorate. Also, the power steering system will not functionand it will require greater manual effort to operate the steering. Do not leave the key in the “ON” position for a long time when the engine is not running, doing so will cause the battery to be dis-charged. Do not turn the key to the “START” position when the engine is running, doing so could damage the starter motor.
Starting the engine
BK0239500US.bo
ok 47 ページ 2016年5月13日 金曜日 午前8時53分
Page 111 of 399
Starting the engine 5-48 Features and controls
5
For information on operation for vehicles equipped with the Free-hand Advanced Secu- rity Transmitter (F.A.S.T.-key), refer to “Free-hand Advanced Security Transmitter(F.A.S.T.-key): Starting and stopping the engine” on page 5-20. [Except for vehicles equipped with the Free-hand Advanced Security Transmitter(F.A.S.T.-key)] Do not operate the starter motor continu- ously for longer than
15 seconds as this
could run the battery down or damage thestarter motor. If the engine does not start, turn the ignition switch back to the “OFF” position, wait a few seconds, and then tryagain. Trying repeatedly with the engine or starter motor still turning will damage the starter mechanism. If the engine will not start because the bat- tery is weak or discharged, refer to “Jump-starting the engine” (on page 8-2)for instructions.
A longer warm up period will only con- sume extra fuel. The
engine is warmed up
enough for driving when the bar graph of engine coolant temperature display startsto move. Refer to “Interrupt display screen (With ignition switch or operation mode in ON)” on page 5-95.
This model is equipped with an electronically controlled fuel injection system. This is a sys- tem that automatically controls fuel injection.
There is usually no need to depress the accel- erator pedal when starting the engine. The starter should not be run for more than 15 seconds at a time.To prevent battery drain, wait a few seconds between attempts to restart the engine. 1. Make sure all occupants are properly seated with seat belts fastened.2. Insert the ignition key. 3. Make sure the parking brake is applied. 4. Press and hold the brake pedal downfirmly with your right foot.5. Press and hold the clutch pedal all the way down (manual transaxle). 6. On vehicles equipped with manual trans-axle, place the gearshift lever in the “N” (Neutral) position. On vehicles equipped with continuouslyvariable transmission (CVT), make sure the selector lever is in the “P” (PARK) position.
Tips for starting
WA R N I N G Never run the engine in a closed or poorly ventilated area any longer than is neededto move your vehicle out of the area. Car- bon monoxide gas, which is odorless and extremely poisonous, could build up andcause serious injury or death.CAUTION Do not push-start the vehicle.Do not run the engine
at high rpms or drive
at high speeds until the engine has had achance to warm up. Release the ignition switch as soon as the engine starts. Otherwise, the starter motor will be damaged.
Starting the engine
NOTE
On vehicles equipped with CVT, the starter will not operate unless the selector lever is in the “P” (PARK) or “N” (NEUTRAL) posi- tion.For safety reasons, start the engine in the “P” (PARK) position so that the wheels are locked.
BK0239500US.bo
ok 48 ページ 2016年5月13日 金曜日 午前8時53分
Page 115 of 399
Continuously variable transmis
sion (CVT) (if so equipped)
5-52 Features and controls
5
The CVT selects an optimum ratio automati- cally when the selector lever is in the “D”(DRIVE) position, depending on the speed ofthe vehicle and the position of the accelerator pedal. The selector lever (A) has 2 gates; the maingate (B) and the manual gate (C).
N00563300036
When the selector lever cannot be shiftedfrom the “P” (PARK) position to anotherposition while the brake pedal is pressed and held down with the ignition switch or the operation mode in ON, the battery may be flator the shift-lock mechanism may be malfunc- tioning. Immediately have your vehicle checked by anauthorized Mitsubishi Motors dealer or a repair facility of your choice.
NOTE
The selector lever cannot be moved from “P” (PARK) to another position if the ignition switch is set to the “OFF” or “ACC” posi- tion, or if the key has been removed, or if the brake pedal is not pressed and held down.NOTE
There are 4 selector lever positions in the main gate. For information on manual gate operation, please refer to “Sports mode” on page 5-55.
Set the selector lever in the gate to operate while the brake pedal is depressed. Set the selector lever in the gate to operate.
WA R N I N G Always press the brake pedal when shift- ing the selector lever into a selector posi- tion from the “N” (NEUTRAL) position.When beginning to driv
e, do not shift the
selector lever from the “N” (NEUTRAL) position while pressing the acceleratorpedal. This will cause the vehicle to “jump” forward or backward.
NOTE
To prevent mistakes in operating the lever, make sure you stop briefly at each position. After operating, check the position in the multi-information display. If the brake pedal is not depressed and held, the shift-lock device activates to prevent the selector lever from being moved from the“P” (PARK) position. For a shift indicated by in the illustra- tion, depress the brake pedal before moving the selector lever. If
you attempt to move the
selector lever before depressing the brake pedal, the selector lever may be immovable.
When the selector lever cannot be shifted from the “P” (PARK) posi- tion
BK0239500US.bo
ok 52 ページ 2016年5月13日 金曜日 午前8時53分
Page 137 of 399
Cruise control (if so equipped) 5-74 Features and controls
5
N00518401409
1. With the ignition switch in “ON” position or the operation mode is in ON, press theCRUISE CONTROL ON/OFF switch (A) to turn on the cruise control. The “CRUISE” indicator light in the metercluster will come on.
2. Accelerate or decelerate to your desired speed, then push down and release the SET - switch (B) when the “CRUISE”indicator light is illuminated. The vehicle will then maintain the desired speed.
N00518501367
There are 2 ways to increase the set speed. Push up and hold the RES + switch (C) while driving at the set speed, and your speed will then gradually increase. When you reach your desired speed, releasethe switch. Your new cruising speed is now set.
To activate
NOTE
If the cruise control is on when the following operation is performed, cruise control will be on automatically the next time you start the engine. The “CRUISE” indicator light will also be on.[Except for vehicles equipped with the F. A . S . T. - k e y ] Turn the ignition switch to the “OFF” or“ACC” position. [Vehicles equipped with the F.A.S.T.-key] Put the operation mode in OFF or ACC. If the battery voltage is insufficient, the memory data for the cruise control may beerased. As a result, the “CRUISE” indicator light may not come on when you restart theengine. If this happens, press the CRUISE CON- TROL ON/OFF switch once again to turn onthe cruise control.
NOTE
When you release the SET - switch, the vehi- cle speed will be set.
To increase the set speed RES + switch
BK0239500US.bo
ok 74 ページ 2016年5月13日 金曜日 午前8時53分
Page 143 of 399
Tire pressure monitoring system 5-80 Features and controls
5
TPMS malfunctions may occur for a variety of reasons, including the installation of replacement or alternate tires or wheels on the vehicle that prevent the TPMS from function-ing properly. Always check the TPMS mal- function telltale after replacing one or more tires or wheels on your vehicle to ensure thatthe replacement or alternate tires and wheels allow the TPMS to continue to function prop- erly.
N00532801524
1. If the tire pressure monitoring systemwarning light illuminates, avoiding hardbraking, sharp steering maneuvers and high speeds. You should stop and adjust the tires to the proper inflation pressure assoon as possible. Adjust the spare tire at the same time. Refer to “Tires” on page 9-14.
2. If the tire pressure monitoring system warning light remains illuminated after you have been driving for about 20 min- utes after you adjust the tire inflation pres-sure, one or more of the tires may have a puncture. Inspect the tire and if it has a puncture, have it repaired by an autho-rized Mitsubishi Motors dealer as soon as possible.
The tire pressure monitoring system may not work normally in the following circum- stances: A wireless facility or device using the same frequency is near the vehicle. Snow or ice is stuck inside the fenders and/or on the wheels. The tire inflation pressure sensor’s battery is dead.
If the warning light/display illu- minates while driving
NOTE
In addition, the warning display is displayed on the information screen in the multi-infor- mation display. When inspecting or adjusting the tire pres- sure, do not apply excessive force to the valve stem to avoid breakage.
After inspecting or adjusting the tire pres- sure, always reinstall the valve cap on the valve stem. Without the valve cap, dirt or moisture could get into the valve, resulting in damage to thetire inflation pressure sensor. Do not use metal valve caps, which may cause a metal reaction, resulting in corrosion and damage of the tire inflation pressure sen- sors. Once adjustments have been made, the warn- ing light will go off after a few minutes ofdriving.WA R N I N G If the warning light/display illuminates while you are driving, avoid hard braking, sharp steering maneuvers and high speeds.Driving with an under-inflated tire adversely affects vehicle performance and can result in an accident.NOTE
CAUTION If a tire has a puncture, replace that tire with the spare tire. Driving on a punctured tire could lead to an accident. The warning light/display may not illuminate immediately in the event of a tire blowout or rapid leak.NOTE
To avoid the risk of damage to the tire infla- tion pressure sensors, have any punctured tire repaired by an authorized Mitsubishi Motors dealer. If the tire repair is not done byan authorized Mitsubishi Motors dealer, it is not covered by your warranty. Do not use an aerosol puncture-repair spray on any tire. Such a spray could damage the tire inflationpressure sensors. Have any puncture repaired by an authorized Mitsubishi Motors dealer.
BK0239500US.bo
ok 80 ページ 2016年5月13日 金曜日 午前8時53分
Page 152 of 399
Multi-information display
Features and controls 5-89
5
N00555500042
Shows the distance and number of months until the next periodic inspection. Refer to “Service reminder” on page 5-97.
N00559600201
When there is information to be announced, such as a key reminder, the buzzer sounds andswitches to the warning display screen. Refer
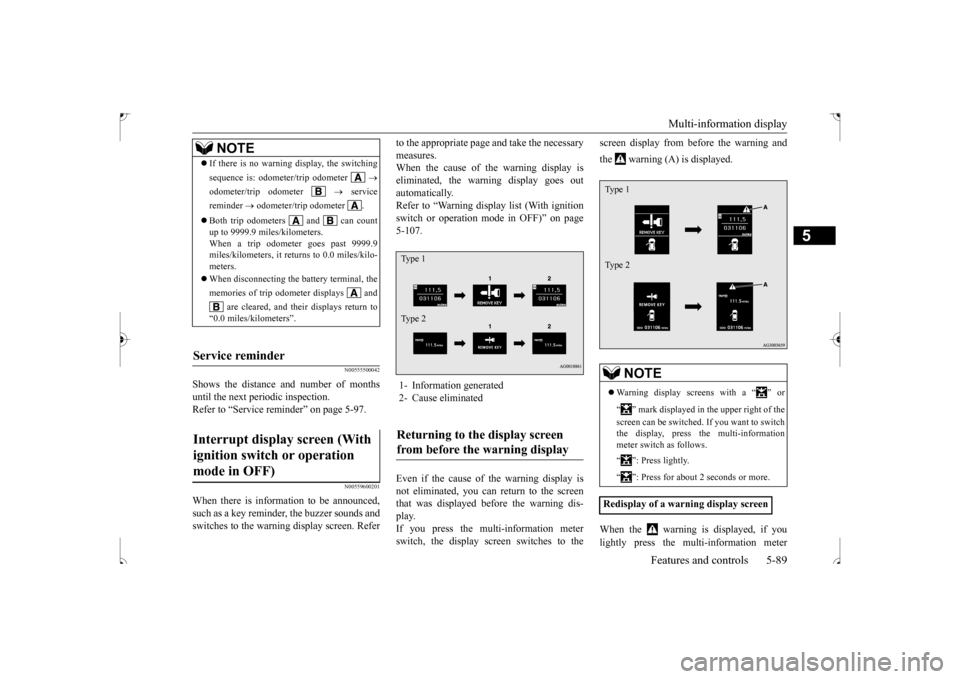
to the appropriate page and take the necessary measures. When the cause of the warning display is eliminated, the warning display goes outautomatically. Refer to “Warning display list (With ignition switch or operation mode in OFF)” on page5-107. Even if the cause of the warning display is not eliminated, you can return to the screen that was displayed before the warning dis- play.If you press the multi-information meter switch, the display screen switches to the
screen display from before the warning and the warning (A) is displayed. When the warning is displayed, if you lightly press the multi-information meter
NOTE
If there is no warning display, the switching sequence is: odometer/trip odometer
odometer/trip odometer
service
reminder
odometer/trip odometer .
Both trip odometers and can count up to 9999.9 miles/kilometers. When a trip odometer goes past 9999.9 miles/kilometers, it returns to 0.0 miles/kilo-meters. When disconnecting the battery terminal, the memories of trip odometer displays and
are cleared, and their displays return to
“0.0 miles/kilometers”.
Service reminder Interrupt display screen (With ignition switch or operation mode in OFF)
1- Information generated 2- Cause eliminatedReturning to the display screen from before the warning display Ty p e 1 Ty p e 2
NOTE
Warning display screens with a “ ” or “ ” mark displayed in the upper right of the screen can be switched. If you want to switch the display, press the multi-information meter switch as follows. “ ”: Press lightly. “ ”: Press for about 2 seconds or more.
Redisplay of a warning display screenType 1 Type 2
BK0239500US.bo
ok 89 ページ 2016年5月13日 金曜日 午前8時53分
Page 157 of 399

Multi-information display 5-94 Features and controls
5
This displays the average fuel consumption from the last reset to the present. There are 2 types of mode settings as follows. For details on how to change the average fuelconsumption display setting, refer to “Chang- ing the function settings (With ignition switch or operation mode in ON)” on page 5-99. The “ ” mark in the momentary fuel gauge shows the average fuel consumption. (Type 2)
When the average fuel consumption is being displayed, if you hold down the multi-information meter switch, these cal- culations will be reset to zero. When the following operation is per- formed, the mode setting changes auto- matically from manual to auto. [Except for vehicles equipped with the F.A.S.T.-key] Turn the ignition switch to the “ON” posi- tion from the “ACC” or “OFF” position. [For vehicles equipped with the F.A.S.T.- key]Change the operation mode to ON from ACC or OFF. When the average fuel consumption is being displayed, if you hold down themulti-information meter switch, these cal- culations will be reset to zero. When the engine switch or the operation mode is in the following conditions, the average fuel consumption display will automatically reset. [Except for vehicles equipped with the F.A.S.T.-key]
The ignition switch has been set to the “ACC” or “OFF” position for about 4 hours or more. [For vehicles equipped with the F.A.S.T.- key]The operation mode has been set to ACC or OFF for about 4 hours or more.
“---” is displayed when the average speed cannot be measured. The initial (default) setting is “Auto reset mode”. The display setting can be changed to the preferred units (mph or km/h).Refer to “Changing the function settings (With ignition switch or operation mode in ON)” on page 5-99. Disconnecting the battery cable will erase from memory the manual reset mode or autoreset mode setting for the average speed dis- play.
Average fuel consumption display
NOTE
Manual reset mode Auto reset mode
NOTE
The average speed display and the average fuel consumption display can be reset sepa- rately in both auto reset mode and manual reset mode. “---” is displayed when the average fuel con- sumption cannot be measured. The initial (default) setting is “Auto reset mode”. Average fuel consumption may vary depend on the driving conditions (road conditions,how you drive, etc.) The actual fuel con- sumption may differ from the fuel consump- tion displayed, so treat the fuel consumptiondisplayed as just a rough guideline. Disconnecting the battery cable will erase from memory the manual reset mode or auto reset mode setting for the average fuel con- sumption display. The display setting can be changed to the preferred units {mpg(US), mpg(UK), L/100km or km/L}. Refer to “Changing the function settings(With ignition switch or operation mode in ON)” on page 5-99.
BK0239500US.bo
ok 94 ページ 2016年5月13日 金曜日 午前8時53分
Page 164 of 399
Multi-information display
Features and controls 5-101
5
When the average fuel consumption and average speed are being displayed, if you hold down the multi-information meter switch, these calculations will be reset tozero. When the engine switch or the operation mode is in the following conditions, theaverage fuel consumption display and the average speed display will automatically reset. [Except for vehicles equipped with the F. A . S . T. - k e y ]The ignition switch has been set to the “ACC” or “OFF” position for about 4 hours or more. [For vehicles equipped with the F.A.S.T.- key] The operation mode has been in ACC or OFF for about 4 hours or more.
N00557100143
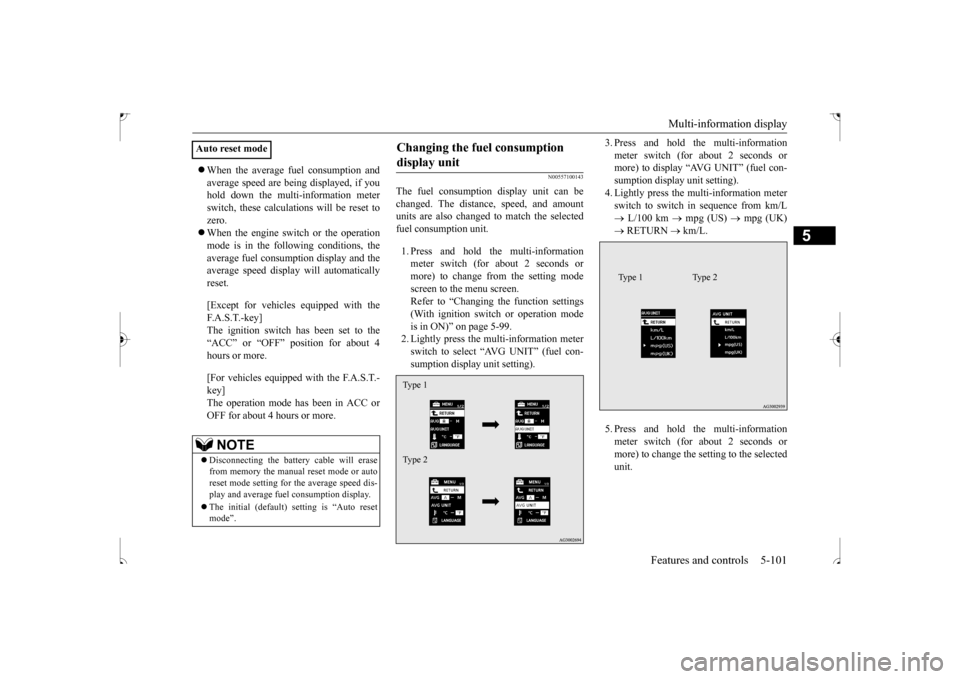
The fuel consumption display unit can be changed. The distance, speed, and amount units are also changed to match the selectedfuel consumption unit. 1. Press and hold the multi-information meter switch (for about 2 seconds or more) to change from the setting modescreen to the menu screen.Refer to “Changing the function settings (With ignition switch or operation mode is in ON)” on page 5-99.2. Lightly press the multi-information meter switch to select “AVG UNIT” (fuel con- sumption display unit setting).
3. Press and hold the multi-information meter switch (for about 2 seconds or more) to display “AVG UNIT” (fuel con- sumption display unit setting).4. Lightly press the multi-information meter switch to switch in sequence from km/L L/100 km
mpg (US)
mpg (UK)
RETURN
km/L.
5. Press and hold the multi-information meter switch (for about 2 seconds or more) to change the setting to the selected unit.
Auto reset mode
NOTE
Disconnecting the battery cable will erase from memory the manual reset mode or autoreset mode setting for the average speed dis- play and average fuel consumption display. The initial (default) setting is “Auto reset mode”.
Changing the fuel consumption display unit Type 1 Type 2
Type 1 Type 2
BK0239500US.book
101 ページ 2016年5月13日 金曜日 午前8時53分