2017 MITSUBISHI OUTLANDER SPORT rear view mirror
[x] Cancel search: rear view mirrorPage 96 of 399
Inside liftgate release
Features and controls 5-33
5
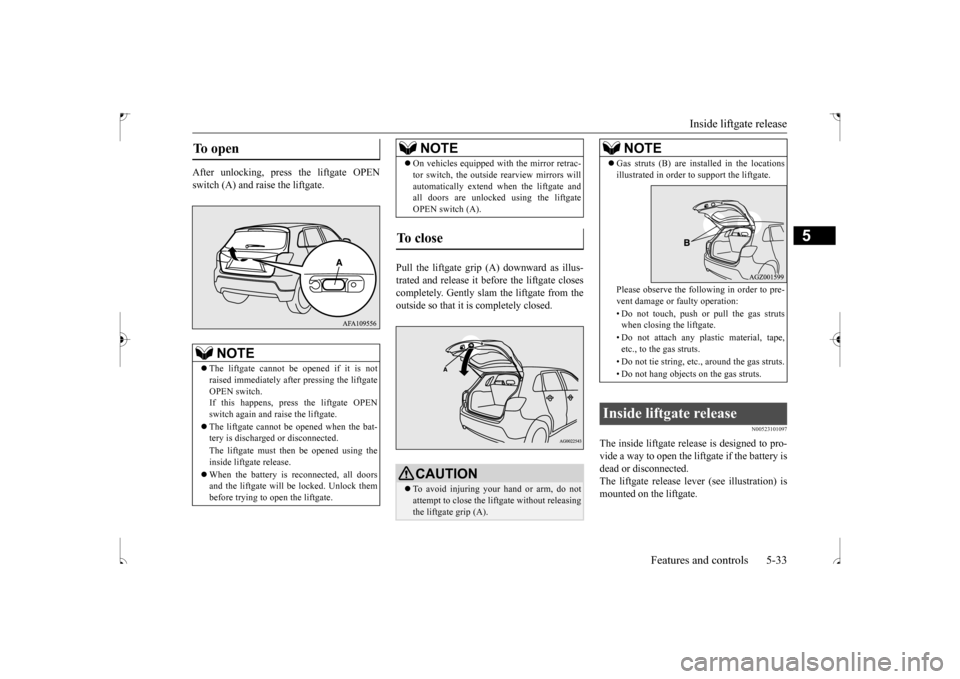
After unlocking, press the liftgate OPEN switch (A) and raise the liftgate.
Pull the liftgate grip
(A) downward as illus-
trated and release it before the liftgate closescompletely. Gently slam the liftgate from the outside so that it is completely closed.
N00523101097
The inside liftgate release is designed to pro- vide a way to open the liftgate if the battery isdead or disconnected. The liftgate release lever (see illustration) is mounted on the liftgate.
To open
NOTE
The liftgate cannot be opened if it is not raised immediately after pressing the liftgateOPEN switch. If this happens, press the liftgate OPEN switch again and raise the liftgate. The liftgate cannot be opened when the bat- tery is discharged or disconnected. The liftgate must then be opened using the inside liftgate release. When the battery is reconnected, all doors and the liftgate will be locked. Unlock thembefore trying to open the liftgate.
On vehicles equipped with the mirror retrac- tor switch, the outside rearview mirrors will automatically extend when the liftgate and all doors are unlocked using the liftgate OPEN switch (A).
To close
CAUTION To avoid injuring your hand or arm, do not attempt to close the liftgate without releasing the liftgate grip (A).NOTE
NOTE
Gas struts (B) are installed in the locations illustrated in order to support the liftgate. Please observe the following in order to pre- vent damage or faulty operation: • Do not touch, push or pull the gas struts when closing the liftgate. • Do not attach any plastic material, tape, etc., to the gas struts. • Do not tie string, etc., around the gas struts. • Do not hang objects on the gas struts.
Inside liftgate release
BK0239500US.bo
ok 33 ページ 2016年5月13日 金曜日 午前8時53分
Page 105 of 399
Inside rearview mirror 5-42 Features and controls
5
N00511601369
Adjust the inside rear
view mirror only after
making any seat adjustme
nts so as to have a
clear view to the rear of the vehicle.
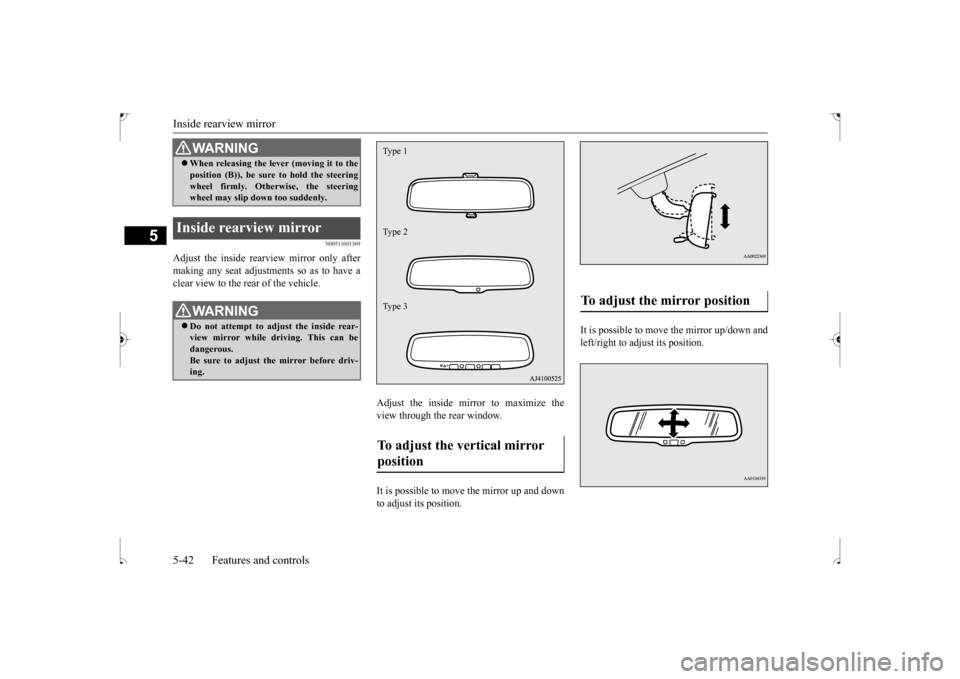
Adjust the inside mirror to maximize the view through the rear window. It is possible to move
the mirror up and down
to adjust its position.
It is possible to move the mirror up/down and left/right to adjust its position.
When releasing the lever (moving it to the position (B)), be sure to hold the steering wheel firmly. Otherwise, the steering wheel may slip down too suddenly.
Inside rearview mirror
WA R N I N G Do not attempt to adjust the inside rear- view mirror while driving. This can bedangerous. Be sure to adjust the mirror before driv- ing.WA R N I N G
To adjust the vertical mirror position Type 1 Type 2 Type 3
To adjust the mirror position
BK0239500US.bo
ok 42 ページ 2016年5月13日 金曜日 午前8時53分
Page 106 of 399
Inside rearview mirror
Features and controls 5-43
5
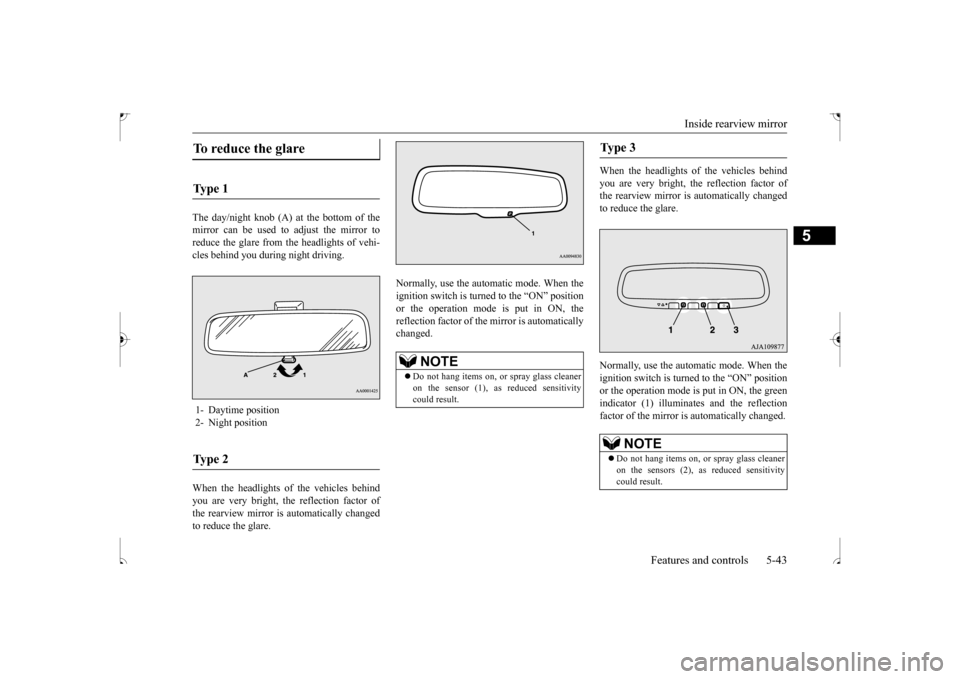
The day/night knob (A) at the bottom of the mirror can be used to adjust the mirror toreduce the glare from the headlights of vehi- cles behind you during night driving. When the headlights of the vehicles behind you are very bright, the reflection factor ofthe rearview mirror is automatically changed to reduce the glare.
Normally, use the automatic mode. When the ignition switch is turned to the “ON” position or the operation mode is put in ON, thereflection factor of the mirror is automatically changed.
When the headlights of the vehicles behind you are very bright, the reflection factor of the rearview mirror is automatically changedto reduce the glare. Normally, use the automatic mode. When the ignition switch is turned to the “ON” position or the operation mode is put in ON, the greenindicator (1) illuminates and the reflectionfactor of the mirror is automatically changed.
To reduce the glare Ty p e 1 1- Daytime position2- Night positionTy p e 2
NOTE
Do not hang items on, or spray glass cleaner on the sensor (1), as reduced sensitivity could result.
Ty p e 3
NOTE
Do not hang items on, or spray glass cleaner on the sensors (2), as reduced sensitivity could result.
BK0239500US.bo
ok 43 ページ 2016年5月13日 金曜日 午前8時53分
Page 107 of 399
Outside rearview mirrors 5-44 Features and controls
5
N00512200206
Adjust the outside rearview mirrors only after making any seat adjustme
nts so as to have a
clear view to the rear of the vehicle.
N00549101170
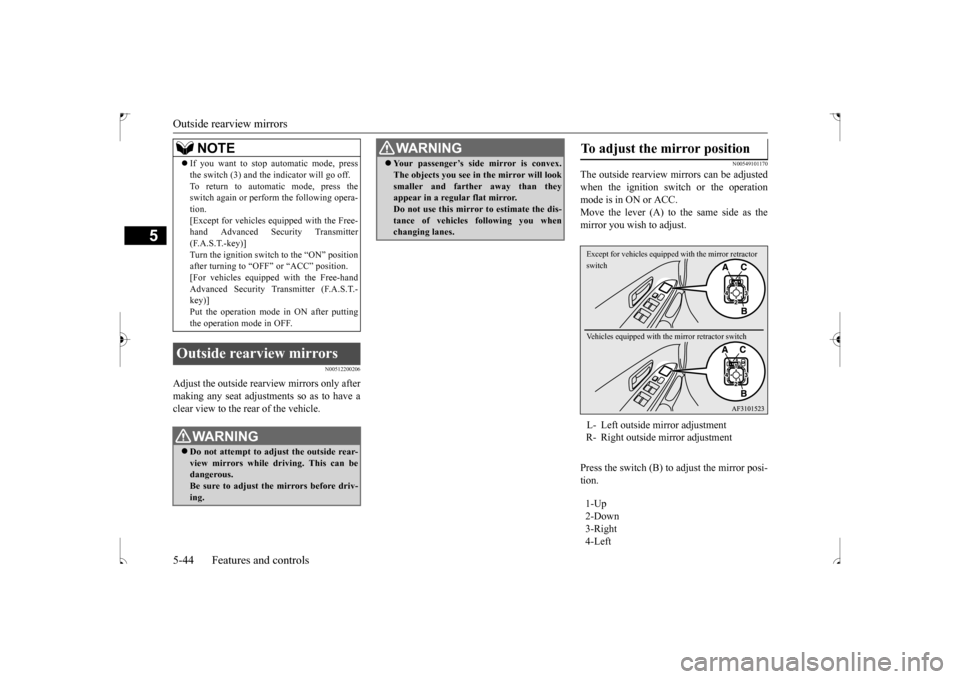
The outside rearview mirrors can be adjustedwhen the ignition switch or the operationmode is in ON or ACC. Move the lever (A) to the same side as the mirror you wish to adjust. Press the switch (B) to adjust the mirror posi- tion.
If you want to stop automatic mode, press the switch (3) and the indicator will go off. To return to automatic mode, press the switch again or perform the following opera- tion.[Except for vehicles equipped with the Free- hand Advanced Security Transmitter (F.A.S.T.-key)]Turn the ignition switch to the “ON” position after turning to “OFF” or “ACC” position. [For vehicles equipped with the Free-handAdvanced Security Transmitter (F.A.S.T.- key)] Put the operation mode in ON after puttingthe operation mode in OFF.
Outside rearview mirrors
WA R N I N G Do not attempt to adjust the outside rear- view mirrors while driving. This can bedangerous. Be sure to adjust the mirrors before driv- ing.NOTE
Your passenger’s side mirror is convex. The objects you see in the mirror will look smaller and farther away than they appear in a regular flat mirror. Do not use this mirror to estimate the dis-tance of vehicles following you when changing lanes.WA R N I N G
To adjust the mirror position L- Left outside mirror adjustment R- Right outside mirror adjustment 1-Up 2-Down3-Right4-LeftExcept for vehicles equipped
with the mirror retractor
switch Vehicles equipped with th
e mirror retractor switch
BK0239500US.bo
ok 44 ページ 2016年5月13日 金曜日 午前8時53分
Page 108 of 399
Outside rearview mirrors
Features and controls 5-45
5
N00549201155
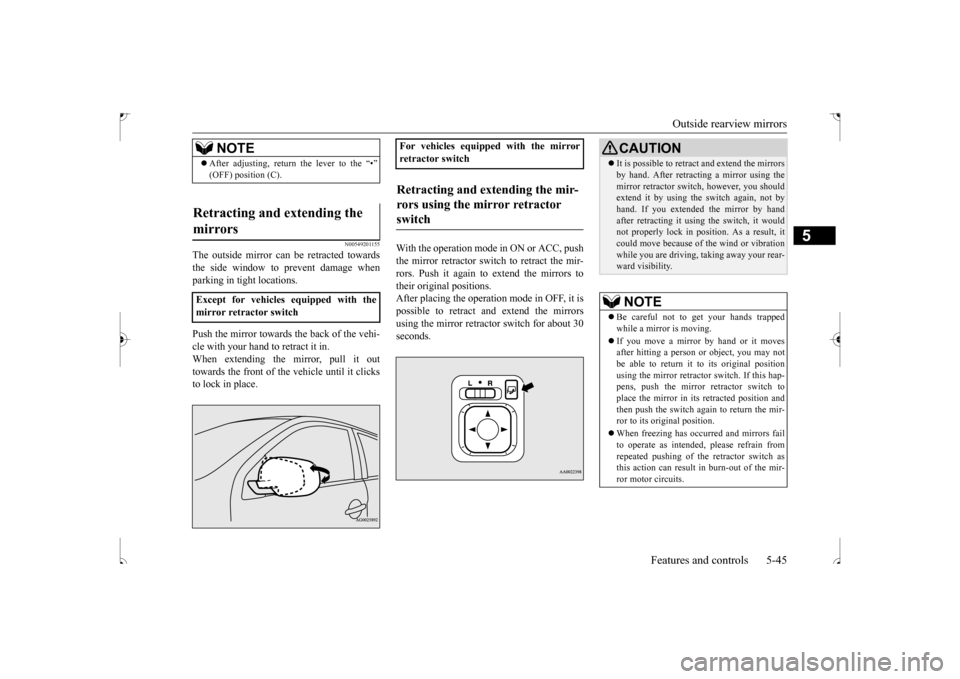
The outside mirror can be retracted towards the side window to prevent damage whenparking in tight locations. Push the mirror towards the back of the vehi- cle with your hand to retract it in. When extending the mirror, pull it outtowards the front of the vehicle until it clicks to lock in place.
With the operation mode in ON or ACC, push the mirror retractor switch to retract the mir-rors. Push it again to extend the mirrors totheir original positions. After placing the operation mode in OFF, it is possible to retract and extend the mirrorsusing the mirror retractor switch for about 30 seconds.
NOTE
After adjusting, return the lever to the “•” (OFF) position (C).
Retracting and extending the mirrors Except for vehicles equipped with the mirror retractor switch
For vehicles equipped with the mirror retractor switchRetracting and extending the mir- rors using the mirror retractor switch
CAUTION It is possible to retract and extend the mirrors by hand. After retracting a mirror using the mirror retractor switch, however, you should extend it by using the switch again, not by hand. If you extended the mirror by handafter retracting it using the switch, it would not properly lock in position. As a result, it could move because of the wind or vibrationwhile you are driving, taking away your rear- ward visibility.NOTE
Be careful not to get your hands trapped while a mirror is moving. If you move a mirror
by hand or it moves
after hitting a person or object, you may not be able to return it to its original position using the mirror retractor
switch. If this hap-
pens, push the mirror retractor switch to place the mirror in its retracted position and then push the switch again to return the mir-ror to its original position. When freezing has occurred and mirrors fail to operate as intended, please refrain from repeated pushing of the retractor switch as this action can result in burn-out of the mir- ror motor circuits.
BK0239500US.bo
ok 45 ページ 2016年5月13日 金曜日 午前8時53分
Page 109 of 399
Ignition switch 5-46 Features and controls
5
On vehicles equipped with the F.A.S.T.-key, the mirrors automatically retract or extendwhen the doors are locked or unlocked using the remote control transmitter buttons or the F. A . S . T- k e y.Refer to “Keyless entry system” on page 5-25or “To operate using the F.A.S.T.-key” on page 5-14.
N00549300191
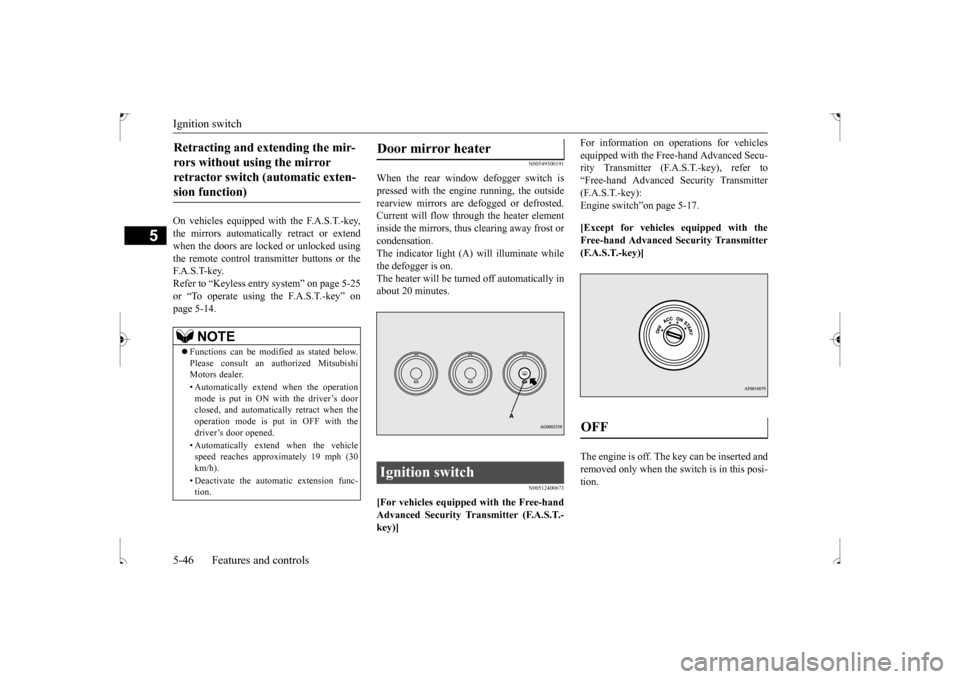
When the rear window defogger switch is pressed with the engine running, the outsiderearview mirrors are defogged or defrosted. Current will flow through the heater element inside the mirrors, thus clearing away frost orcondensation. The indicator light (A) will illuminate while the defogger is on.The heater will be turned off automatically inabout 20 minutes.
N00512400673
[For vehicles equipped with the Free-handAdvanced Security Transmitter (F.A.S.T.- key)]
For information on operations for vehicles equipped with the Free-hand Advanced Secu- rity Transmitter (F.A.S.T.-key), refer to “Free-hand Advanced Security Transmitter(F.A.S.T.-key): Engine switch”on page 5-17. [Except for vehicles equipped with the Free-hand Advanced Security Transmitter(F.A.S.T.-key)] The engine is off. The key can be inserted and removed only when the switch is in this posi-tion.
Retracting and extending the mir- rors without using the mirror retractor switch (automatic exten- sion function)
NOTE
Functions can be modified as stated below. Please consult an authorized MitsubishiMotors dealer. • Automatically extend when the operation mode is put in ON with the driver’s door closed, and automatically retract when the operation mode is put in OFF with thedriver’s door opened. • Automatically extend when the vehicle speed reaches approximately 19 mph (30 km/h). • Deactivate the automatic extension func- tion.
Door mirror heater Ignition switch
OFF
BK0239500US.bo
ok 46 ページ 2016年5月13日 金曜日 午前8時53分
Page 199 of 399
Electric rear window defogger switch 5-136 Features and controls
5
N00523700373
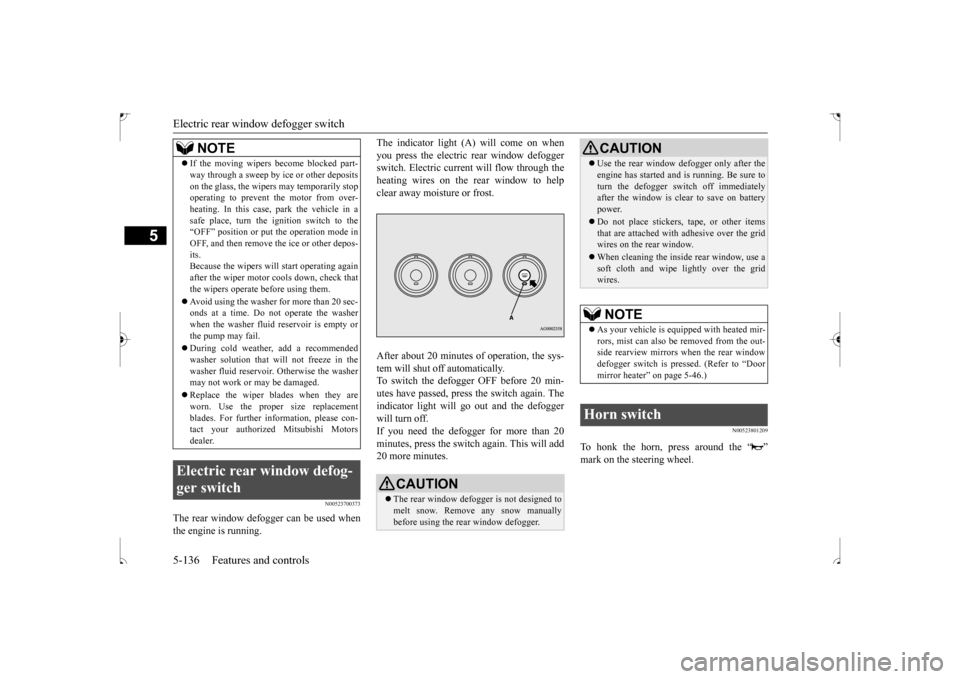
The rear window defogger can be used when the engine is running.
The indicator light (A) will come on when you press the electric rear window defogger switch. Electric current will flow through the heating wires on the rear window to helpclear away moisture or frost. After about 20 minutes of operation, the sys- tem will shut off automatically.To switch the defogger OFF before 20 min-utes have passed, press the switch again. The indicator light will go out and the defogger will turn off.If you need the defogger for more than 20 minutes, press the switch again. This will add 20 more minutes.
N00523801209
To honk the horn, press around the “ ”mark on the steering wheel.
If the moving wipers become blocked part- way through a sweep by ice or other deposits on the glass, the wipers may temporarily stop operating to prevent the motor from over- heating. In this case, park the vehicle in asafe place, turn the ignition switch to the “OFF” position or put the operation mode in OFF, and then remove the ice or other depos-its. Because the wipers will start operating again after the wiper motor cools down, check thatthe wipers operate before using them. Avoid using the washer for more than 20 sec- onds at a time. Do not operate the washer when the washer fluid reservoir is empty or the pump may fail. During cold weather, add a recommended washer solution that will not freeze in thewasher fluid reservoir. Otherwise the washer may not work or may be damaged. Replace the wiper blades when they are worn. Use the proper size replacement blades. For further information, please con-tact your authorized Mitsubishi Motors dealer.
Electric rear window defog- ger switch
NOTE
CAUTION The rear window defogger is not designed to melt snow. Remove any snow manually before using the rear window defogger.
Use the rear window defogger only after the engine has started and is running. Be sure to turn the defogger switch off immediately after the window is clear to save on battery power. Do not place stickers, tape, or other items that are attached with adhesive over the gridwires on the rear window. When cleaning the inside rear window, use a soft cloth and wipe lightly over the grid wires.NOTE
As your vehicle is equipped with heated mir- rors, mist can also be removed from the out-side rearview mirrors when the rear window defogger switch is pressed. (Refer to “Door mirror heater” on page 5-46.)
Horn switch
CAUTION
BK0239500US.book
136 ページ 2016年5月13日 金曜日 午前8時53分
Page 363 of 399
Fuses 9-26 Vehicle care and maintenance
9
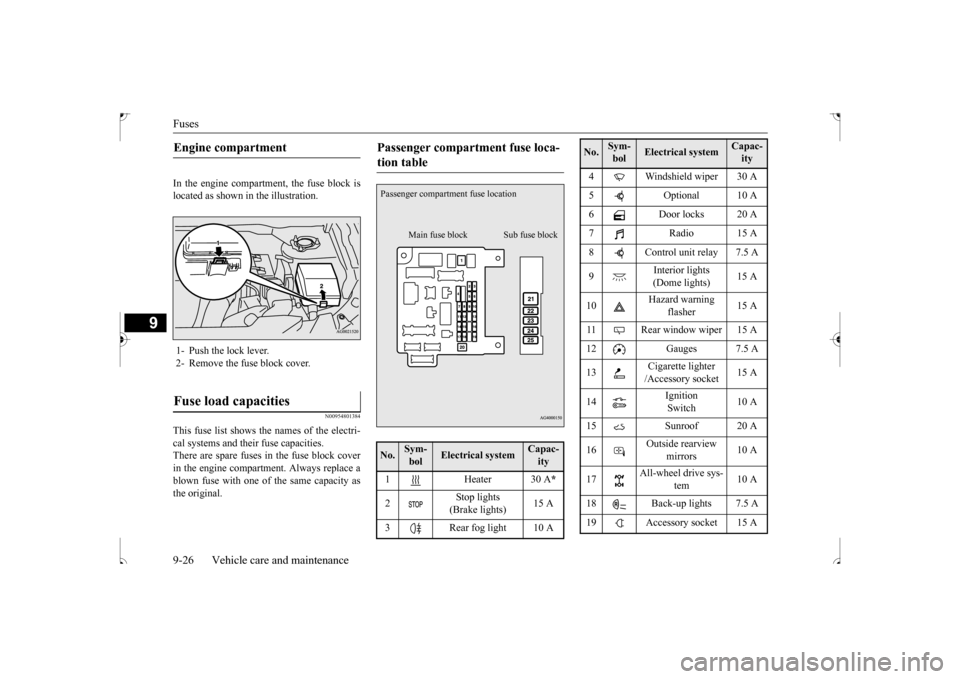
In the engine compartment, the fuse block is located as shown in the illustration.
N00954801384
This fuse list shows the names of the electri-cal systems and their fuse capacities. There are spare fuses in the fuse block cover in the engine compartment. Always replace ablown fuse with one of the same capacity as the original.Engine compartment 1- Push the lock lever. 2- Remove the fuse block cover.Fuse load capacities
Passenger compartment fuse loca- tion table No.
Sym- bol
Electrical system
Capac-ity
1 Heater 30 A
*
2
Stop lights (Brake lights)
15 A
3 Rear fog light 10 APassenger compartment fuse location
Main fuse block Sub fuse block
4 Windshield wiper 30 A 5 Optional 10 A 6 Door locks 20 A 7 Radio 15 A8 Control unit relay 7.5 A 9
Interior lights (Dome lights)
15 A
10
Hazard warning
flasher
15 A
11 Rear window wiper 15 A 12 Gauges 7.5 A 13
Cigarette lighter /Accessory socket
15 A
14
Ignition Switch
10 A
15 Sunroof 20 A16
Outside rearview
mirrors
10 A
17
All-wheel drive sys-
tem
10 A
18 Back-up lights 7.5 A 19 Accessory socket 15 ANo.
Sym- bol
Electrical system
Capac-ity
BK0239500US.bo
ok 26 ページ 2016年5月13日 金曜日 午前8時53分