2017 MITSUBISHI OUTLANDER PHEV fog light
[x] Cancel search: fog lightPage 200 of 548

When the operation mode of the power
switch is put in ON, if the brake fluid is low,
this warning is displayed.
The warning lamp in the instrument cluster also illuminates.CAUTIONl If this warning stays illuminated and does
not go out while driving, there is a danger of ineffective braking. In this case, immediate-
ly park your vehicle in a safe place and we recommend you to have it checked.
l If the brake warning display is displayed and
the brake warning lamp and the ABS warn- ing lamp are illuminated at the same time,
the braking force distribution function will
not operate, so the vehicle may be destabi- lised during sudden braking. Avoid sudden
braking and high-speed driving, stop the ve-
hicle in a safe place, and we recommend you to have it checked.
l The vehicle should be brought to a halt in
the following manner when brake perform-
ance has deteriorated.
• Depress the brake pedal harder than usual.
Even if the brake pedal moves down to
the very end of its possible stroke, keep it pressed down hard.CAUTION• Should the brakes fail, use the regenera-
tive brake to reduce your speed and keep
pulling the Electric parking brake switch.
Refer to “Electric parking brake” on page
7-03
Depress the brake pedal to operate the
stop lamp to alert the vehicles behind you.Oil pressure warning display
E00524901309
If the engine oil pressure drops while the
Plug-in Hybrid EV System is operating, thewarning display is displayed on the informa-
tion screen in the multi information display.
CAUTIONl If the vehicle is driven while the engine oil
is low, or the oil level is normal but the warning is displayed, the engine may burn
out and be damaged.
l If the warning is displayed while the Plug-in
Hybrid EV System is operating, immediately
park your vehicle in a safe place and check
the engine oil level.CAUTIONl If the warning is displayed while the engine
oil level is normal, have it inspected.Combination headlamps
and dipper switch E00506004224
Headlamps
NOTElDo not leave the lights on for a long time
while the Plug-in Hybrid EV System is sta-tionary (not operating). A run-down auxili- ary battery could result.
l When it rains, or when the vehicle has been
washed, the inside of the lens sometimes be-
comes foggy, but this does not indicate a
functional problem.
When the lamp is switched on, the heat will remove the fog. However, if water gathers
inside the lamp, we recommend you to have it checked.
Combination headlamps and dipper switch
6-53OGGE17E1Instruments and controls6
Page 201 of 548
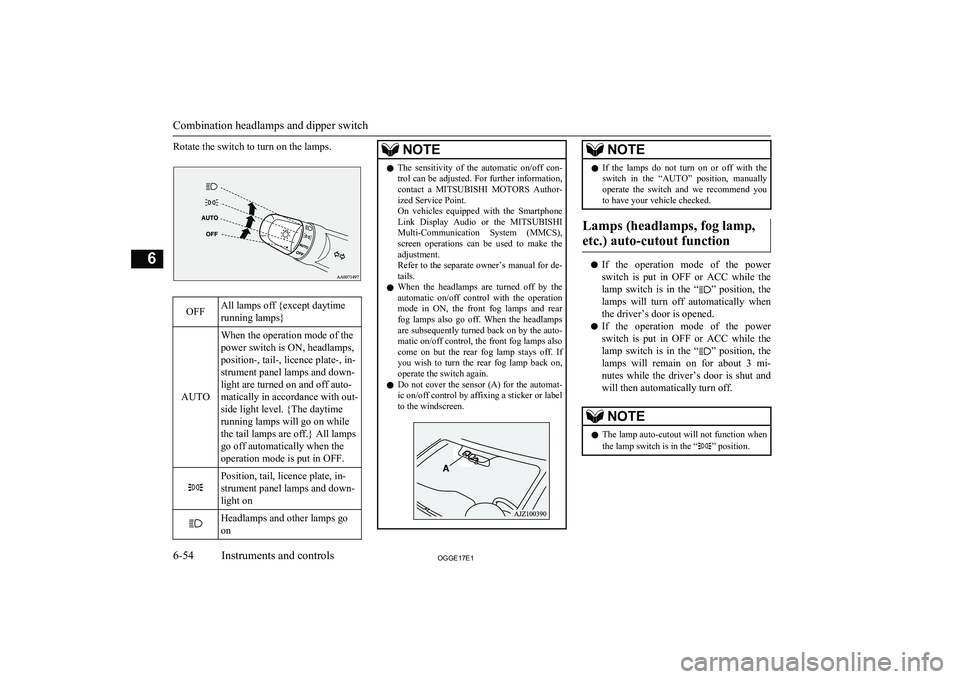
Rotate the switch to turn on the lamps.OFFAll lamps off {except daytime
running lamps}
AUTO
When the operation mode of the
power switch is ON, headlamps,
position-, tail-, licence plate-, in-
strument panel lamps and down-
light are turned on and off auto-
matically in accordance with out-
side light level. {The daytime
running lamps will go on while
the tail lamps are off.} All lamps
go off automatically when the
operation mode is put in OFF.Position, tail, licence plate, in-
strument panel lamps and down-
light onHeadlamps and other lamps go
onNOTEl The sensitivity of the automatic on/off con-
trol can be adjusted. For further information,contact a MITSUBISHI MOTORS Author-
ized Service Point.
On vehicles equipped with the Smartphone
Link Display Audio or the MITSUBISHI
Multi-Communication System (MMCS), screen operations can be used to make theadjustment.
Refer to the separate owner’s manual for de-
tails.
l When the headlamps are turned off by the
automatic on/off control with the operation
mode in ON, the front fog lamps and rear
fog lamps also go off. When the headlamps are subsequently turned back on by the auto-
matic on/off control, the front fog lamps also come on but the rear fog lamp stays off. If
you wish to turn the rear fog lamp back on,
operate the switch again.
l Do not cover the sensor (A) for the automat-
ic on/off control by affixing a sticker or label
to the windscreen.NOTEl If the lamps do not turn on or off with the
switch in the “AUTO” position, manually
operate the switch and we recommend you
to have your vehicle checked.
Lamps (headlamps, fog lamp,
etc.) auto-cutout function
l If the operation mode of the power
switch is put in OFF or ACC while the
lamp switch is in the “
” position, the
lamps will turn off automatically when the driver’s door is opened.
l If the operation mode of the power
switch is put in OFF or ACC while the
lamp switch is in the “
” position, the
lamps will remain on for about 3 mi-
nutes while the driver’s door is shut and will then automatically turn off.
NOTEl The lamp auto-cutout will not function when
the lamp switch is in the “” position.
Combination headlamps and dipper switch
6-54OGGE17E1Instruments and controls6
Page 205 of 548

NOTElThe headlamps may remain at low beam (or
be switched from high-beam to low beam)
when a reflective object (e.g. street lamp,
traffic signal, noticeboard and signboard) re- flects light.
l Any of the following factors may influence
the headlamp beam switching timing:
• How brightly the exterior lamps of a vehi-
cle in front or oncoming vehicle illumi-
nate.
• Movement or direction of a vehicle in
front or oncoming vehicle.
• Only right or left exterior lamp of a vehi-
cle in front or oncoming vehicle is illumi-
nating.
• A vehicle in front or oncoming vehicle is
a motorcycle.
• Road conditions (gradient, bends and road
surface).
• The number of occupants and luggage
load.
l The automatic high-beam system recognises
environmental conditions by sensing a lightsource ahead of your vehicle. Therefore, you
may feel like something is not quite right
when the headlamp beams are switched au- tomatically.
l The system may not detect a light vehicle
such as a bicycle.
l The system may not detect an ambient
brightness precisely. This causes the traffic to be dazzled by high-beam or the low beam
to be maintained. In such cases, you should switch the headlamp beams manually.NOTE• In bad weather (heavy rain, fog, snow or
sandstorm).
• The windscreen is dirty or fogged up.
• The windscreen is cracked or broken.
• The sensor is deformed or dirty.
• A light that is similar to the headlamps or
tail lamps is shining around your vehicle.
• A vehicle in front or oncoming vehicle is
driven without lights, the exterior lamps are dirty or discoloured, or the directionof the headlamp beams is adjusted im- properly.
• It becomes dark and bright suddenly and
continuously around your vehicle.
• Your vehicle is driven on uneven surfa-
ces.
• Your vehicle is driven on a winding road.
• A reflective object such as a noticeboard
or a mirror reflects a light ahead of yourvehicle.
• When lamps of the vehicle in front or
headlamps of an oncoming vehicle blend
into the other lamps.
• The rear end of a vehicle in front (such as
a container truck) reflect a strong light.
• Your vehicle’s headlamp is broken or
dirty.
• Your vehicle is inclined due to a flat tyre
or towing.
• The warning display appears.
(Refer to “System problem warning” on
page 6-58.)
l Observe the precautions below to maintain
good usage conditions:NOTE• Do not attempt to disassemble the sensor.
• Do not affix a sticker or label on the
windscreen near the sensor.
• Avoid overload.
• Do not modify your vehicle.
• When the windscreen is replaced, use the
MITSUBISHI MOTORS GENUINE
parts.System problem warning
E00551700034
If a problem occurs with the system, the fol-
lowing warning display will appear to the
type of the problem.
The automatic high-beam system deacti-
vates due to a fault
If a failure is detected in the system, the fol- lowing warning display will appear and the
automatic high-beam system will automati-
cally be turned off.
If the warning display remains even after the operation mode of the power switch is put in OFF and then turned back to ON, please con-
tact a MITSUBISHI MOTORS Authorized
Service Point.
[When the automatic high-beam system is malfunctioning]
Combination headlamps and dipper switch
6-58OGGE17E1Instruments and controls6
Page 307 of 548

LDW deactivation due to fault
E00638800114
The alarm shown below is displayed if theLDW goes into a non-initialized state due to
a fault.
If this happens, please contact a MITSUBISHI MOTORS Authorized Service
Point for inspection of the system.
NOTEl If the sensor or its surrounding area reaches
an extremely high temperature when parking the vehicle under a blazing sun, the “LDW
SERVICE REQUIRED” message may ap-
pear.
If the message remains even after the tem- perature of the sensor or its surrounding areahas been in range, please contact a
MITSUBISHI MOTORS Authorized Serv-
ice Point.CAUTIONl LDW has its performance limitations. Do
not over-rely on the system.
l LDW is not designed to lessen risks associ-
ated with not looking ahead carefully (atten-
tion drawn to something on the side, absent-
mindedness, etc.) or poor visibility caused
by bad weather etc. Keep steering your vehi-
cle correctly and drive safely.
l The system may not operate correctly in the
following conditions. If required, set the LDW switch to “OFF.”
• When driving on a road whose lane mark-
ings (white or yellow) are worn out or smeared with dirt to an extent not recog-
nizable by the system.
• When lane markings are vague, typically
during a drive in the rain, snow, fog or dark area, or when running against the sun.CAUTION• When the vehicle is moving in a place
where lane markings are interrupted, such
as a toll booth entrance and motorway junction.
• When running on a road portion with in-
completely removed old lane markings, shadows, lingering snow, truck-like pud-
dles mistakable for lane markings (espe- cially after the rain when road surface is reflecting light) or similar confusing fac-
tors.
• When running in a lane other than the
cruising lane and passing lane.
• When running beside a closed lane sec-
tion or in a provisional lane in a traffic work zone.
• When running in an extremely narrow
lane.
• When the following distance between
your vehicle and a vehicle in front be- comes extremely reduced (especially
when a marking is hidden by a vehicle in front this is running too close to the mark- ing).
• When entering a junction or other point of
road where lanes are laid out complicated-
ly.
• When passing a road section where the
number of lanes increases/decreases or multiple lanes are crossing each other.
• When the lane is marked by double or
otherwise special lines.
• When driving on a winding or rough road.
Lane Departure Warning (LDW)*
7-88OGGE17E1Starting and driving7
Page 478 of 548

No.Sym-bolElectrical sys- temCa-
paci- ties1Electric window control30 A *12Rear window
demister30 A *13Heater30 A4Windscreen
wipers30 A5Door locks20 A6Rear fog lamp10 A *27Accessory sock-
et15 A8Rear windowwiper15 A9Sunroof20 A10Ignition switch10 A11Option10 A12Hazard warning flasher15 A*1: Fusible link
*2 : Even if your vehicle is equipped with the
rear fog lamp, the fuse of the rear fog lamp
may not be installed on your vehicle.
No.Sym- bolElectrical sys- temCa-
paci- ties134-wheel drive system10 A14Stop lamps
(Brake lamps)15 A15Instruments10 A16SRS airbag7.5 A17Radio15 A18Control unit re- lay7.5 A19Interior lamps
(Room lamps)15 A20Reversing lamps (Backup lamps)7.5 A21Heated door mirror7.5 A22Outside rear-view mirrors10 A*1 : Fusible link
*2 : Even if your vehicle is equipped with the
rear fog lamp, the fuse of the rear fog lamp
may not be installed on your vehicle.
No.Sym- bolElectrical sys- temCa-
paci- ties
23
Cigarette lighter/Accessory sock- et
15 A24
Charge7.5 AHeated steeringwheel15 A25Power seat
(Driver seat)30 A *126Heated seat30 A27Power seat
(Passenger seat)30 A *1*1
: Fusible link
*2 : Even if your vehicle is equipped with the
rear fog lamp, the fuse of the rear fog lamp
may not be installed on your vehicle.
l Some fuses may not be installed on your
vehicle, depending on the vehicle model
or specifications.
l The table above shows the main equip-
ment corresponding to each fuse.
Fuses
11-19OGGE17E1Maintenance11
Page 484 of 548
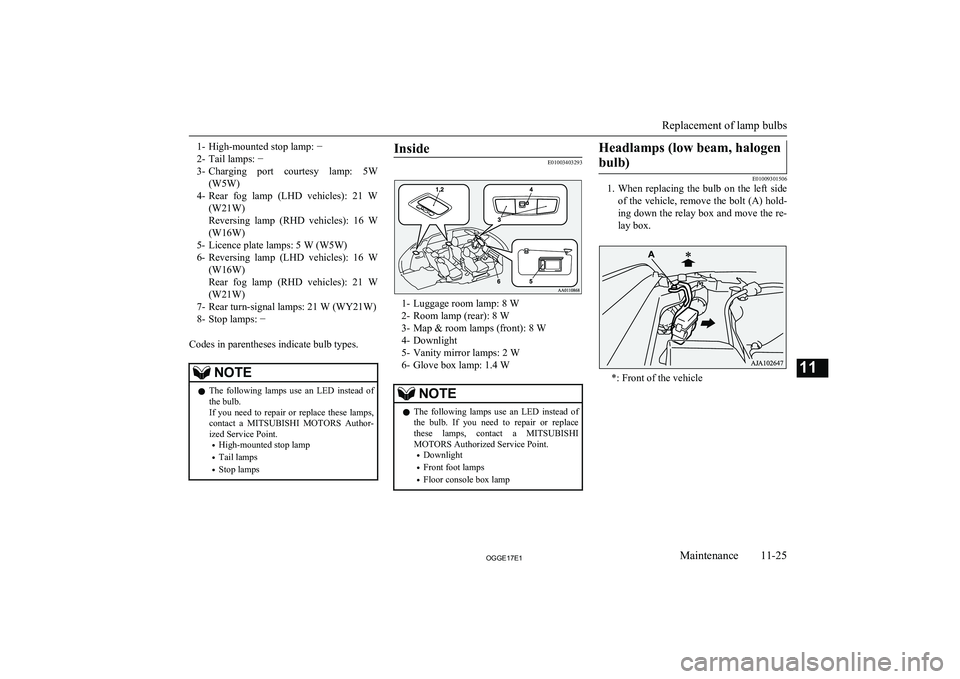
1- High-mounted stop lamp: −
2- Tail lamps: −
3- Charging port courtesy lamp: 5W
(W5W)
4- Rear fog lamp (LHD vehicles): 21 W
(W21W)
Reversing lamp (RHD vehicles): 16 W
(W16W)
5- Licence plate lamps: 5 W (W5W)
6- Reversing lamp (LHD vehicles): 16 W
(W16W)
Rear fog lamp (RHD vehicles): 21 W (W21W)
7- Rear turn-signal lamps: 21 W (WY21W)
8- Stop lamps: −
Codes in parentheses indicate bulb types.NOTEl The following lamps use an LED instead of
the bulb.
If you need to repair or replace these lamps,
contact a MITSUBISHI MOTORS Author-
ized Service Point.
• High-mounted stop lamp
• Tail lamps
• Stop lampsInside
E01003403293
1- Luggage room lamp: 8 W
2- Room lamp (rear): 8 W
3- Map & room lamps (front): 8 W
4- Downlight
5- Vanity mirror lamps: 2 W
6- Glove box lamp: 1.4 W
NOTEl The following lamps use an LED instead of
the bulb. If you need to repair or replacethese lamps, contact a MITSUBISHI
MOTORS Authorized Service Point.
• Downlight
• Front foot lamps
• Floor console box lampHeadlamps (low beam, halogen
bulb)
E01009301506
1. When replacing the bulb on the left side
of the vehicle, remove the bolt (A) hold-ing down the relay box and move the re-
lay box.
*: Front of the vehicle
Replacement of lamp bulbs
11-25OGGE17E1Maintenance11