Page 485 of 521
Replacement of light bulbs 9-32 Vehicle care and maintenance
9
N00943000132
The bulb should only be replaced with a new bulb with the same rating and type. The typeand rating are listed on the base of the bulb.
N00950302072
NOTE
If you are unsure of how to carry out the work as required, it is recommended thatthese procedures be ca
rried out by an autho-
rized Mitsubishi Motors
dealer or a repair
facility of your choice. Be careful not to scratch the vehicle body when removing a light and lens. When it rains, or wh
en the vehicle has been
washed, the inside of the lens sometimes becomes temporarily foggy. This is the samephenomenon as when window glass mists up on a humid day, and does not indicate a func- tional problem.When the light is switched on, the heat will remove the fog. However, if water gathers inside the light, please
have it checked by an
authorized Mitsubishi Motors dealer or a repair facility of your choice.
Bulb capacity
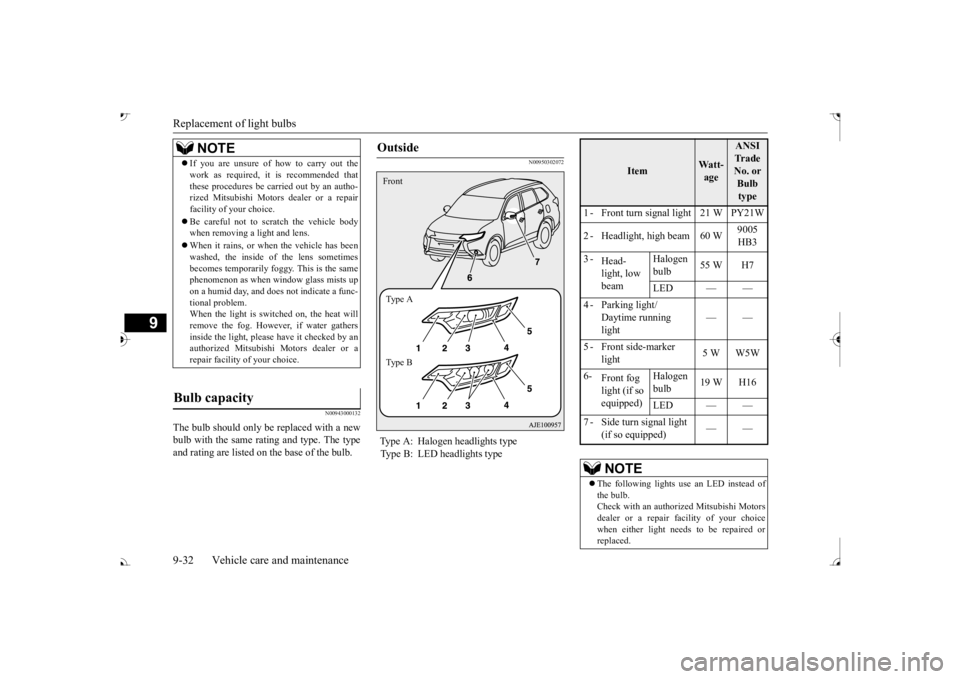
Outside Type A: Halogen headlights type Type B: LED headlights typeFront Ty p e A Ty p e B
Item
Wa t t-age
ANSI Tr a d e No. or Bulb type
1 - Front turn signal light 21 W PY21W 2 - Headlight, high beam 60 W
9005 HB3
3 -
Head- light, low beam
Halogen bulb
55 W H7
LED — —
Daytime running light
——
5 - Front side-marker
light
5 W W5W
6-
Front fog light (if so equipped)
Halogen bulb
19 W H16
LED — —
(if so equipped)
The following lights use an LED instead of the bulb. Check with an authorized Mitsubishi Motors dealer or a repair fa
cility of your choice
when either light need
s to be repaired or
replaced.
BK0239700US.book 32 ページ 2016年6月16日 木曜日 午前10時58分
Page 486 of 521
Replacement of light bulbs
Vehicle care and maintenance 9-33
9
N00950401731
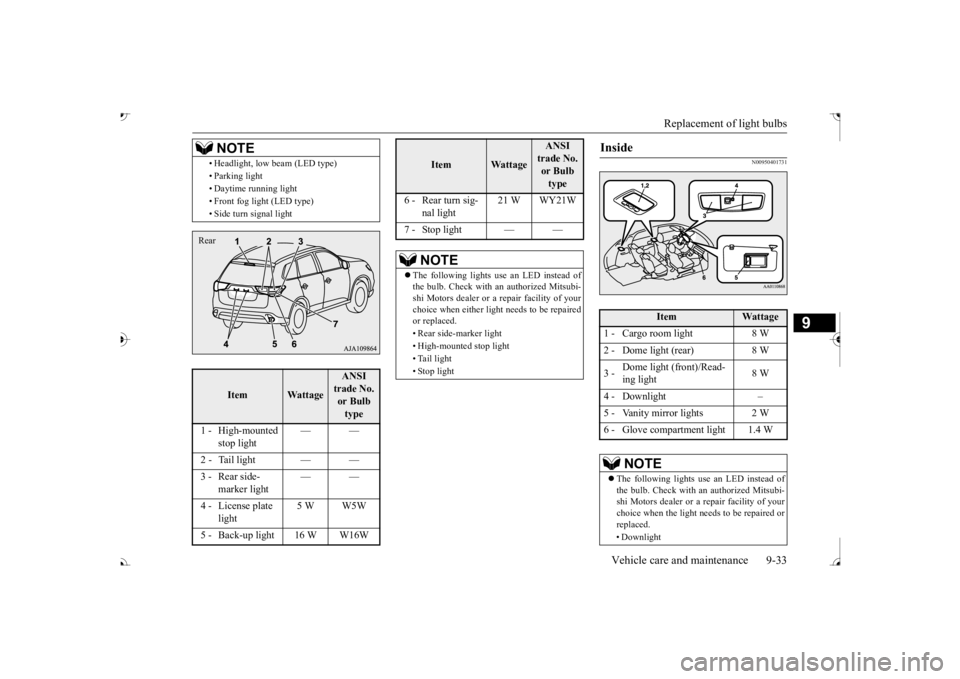
• Headlight, low be
am (LED type)
• Parking light • Daytime running light • Front fog light (LED type) • Side turn signal light
Item
Wattage
ANSI trade No. or Bulb type
1 - High-mounted
stop light
——
2 - Tail light — —
marker light
——
4 - License plate
light
5 W W5W
5 - Back-up light 16 W W16W
NOTE
Rear
6 - Rear turn sig-
nal light
21 W WY21W
7 - Stop light — — The following lights use an LED instead of the bulb. Check with an authorized Mitsubi- shi Motors dealer or a
repair facility of your
choice when either light
needs to be repaired
or replaced. • Rear side-marker light• High-mounted stop light • Tail light • Stop light
Item
Wattage
ANSI trade No. or Bulb type
Inside
Item
Wattage
1 - Cargo room light 8 W 2 - Dome light (rear) 8 W 3 -
Dome light (front)/Read- ing light
8 W
4 - Downlight – 6 - Glove compartment light 1.4 W
NOTE
The following lights us
e an LED instead of
the bulb. Check with an authorized Mitsubi- shi Motors dealer or a repair facility of yourchoice when the light needs to be repaired or replaced. • Downlight
BK0239700US.book 33 ページ 2016年6月16日 木曜日 午前10時58分
Page 487 of 521

Replacement of light bulbs 9-34 Vehicle care and maintenance
9
N00901801216
1. When replacing the bulb on the left side of the vehicle, remove the bolts (A) hold- ing down the relay box and the sub fuseblock, and then move them toward the rear of the vehicle. (if so equipped)
2. Turn the cap (B) counterclockwise to remove it. 3. Turn the socket (C) counterclockwise to remove it, and then pull the bulb out of the socket.
4. To install the bulb, perform the removal steps in reverse.
N00900301171
• Front foot lights • Floor console box light
Headlights (low beam, halogen bulb type) *- Front of the vehicle
NOTE
*- Front of the vehicle
NOTE
When installing the bulb, align the tab (D) with the notch (E) of the socket.
Headlights (low beam, LED type)
NOTE
The headlights use an LED instead of the bulb.Check with an authorized Mitsubishi Motors dealer or a repair fa
cility of your choice
when the light needs to be repaired orreplaced.
BK0239700US.book 34 ページ 2016年6月16日 木曜日 午前10時58分
Page 488 of 521
Replacement of light bulbs
Vehicle care and maintenance 9-35
9
N00901901132
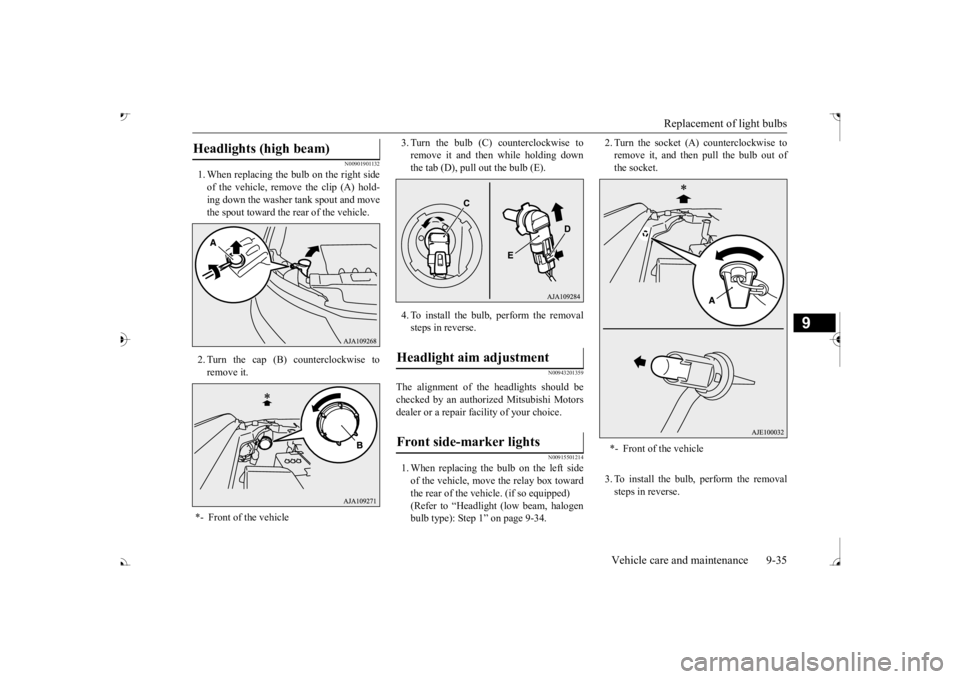
1. When replacing the bulb on the right side of the vehicle, rem
ove the clip (A) hold-
ing down the washer tank spout and movethe spout toward the rear of the vehicle. 2. Turn the cap (B) counterclockwise to remove it.
3. Turn the bulb (C) counterclockwise to remove it and then while holding downthe tab (D), pull out the bulb (E). 4. To install the bulb, perform the removal steps in reverse.
N00943201359
The alignment of th
e headlights should be
checked by an authorized Mitsubishi Motors dealer or a repair facility of your choice.
N00915501214
1. When replacing the bulb on the left sideof the vehicle, move the relay box towardthe rear of the vehi
cle. (if so equipped)
(Refer to “Headlight
(low beam, halogen
bulb type): Step 1” on page 9-34.
2. Turn the socket (A
) counterclockwise to
remove it, and then pull the bulb out ofthe socket. 3. To install the bulb, perform the removal steps in reverse.
Headlights (high beam) *- Front of the vehicle
Headlight aim adjustment Front side-marker lights
*- Front of the vehicle
BK0239700US.book 35 ページ 2016年6月16日 木曜日 午前10時58分
Page 489 of 521
Replacement of light bulbs 9-36 Vehicle care and maintenance
9
N00917301724 N00943401423
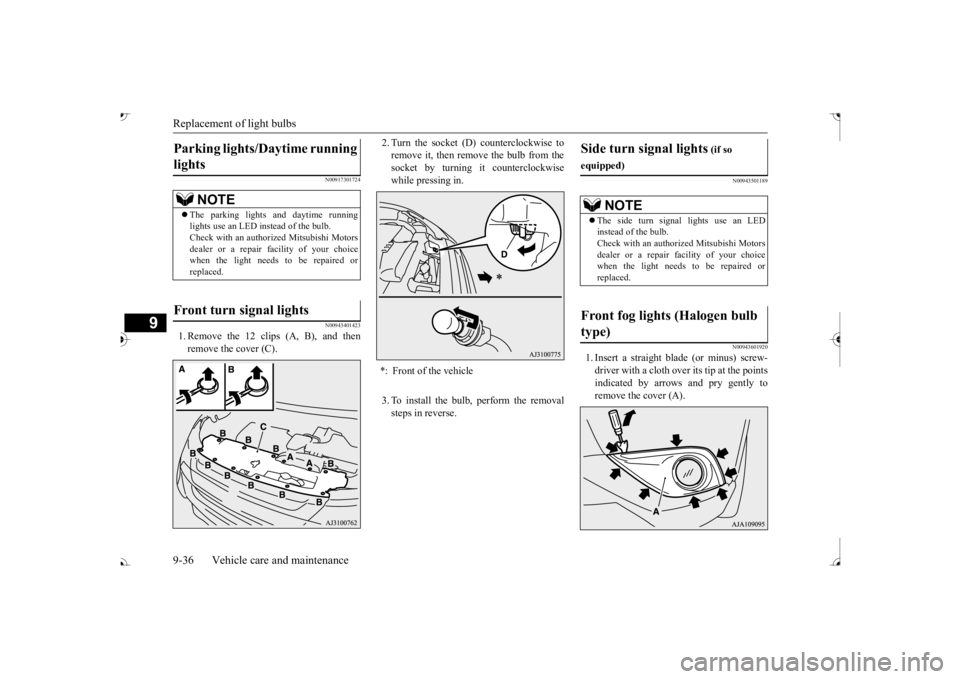
1. Remove the 12 clips (A, B), and then remove the cover (C).
2. Turn the socket (D
) counterclockwise to
remove it, then remove the bulb from thesocket by turning it counterclockwise while pressing in. 3. To install the bulb, perform the removal steps in reverse.
N00943501189 N00943601920
1. Insert a straight
blade (or minus) screw-
driver with a cloth over its tip at the points indicated by arrows and pry gently to remove the cover (A).
Parking lights/Daytime running lights
NOTE
The parking lights and daytime running lights use an LED in
stead of the bulb.
Check with an authorized Mitsubishi Motorsdealer or a repair fa
cility of your choice
when the light needs to be repaired or replaced.
Front turn signal lights
*: Front of the vehicle
Side turn signal lights
(if so
equipped)
NOTE
The side turn signal lights use an LED instead of the bulb. Check with an authorized Mitsubishi Motors dealer or a repair fa
cility of your choice
when the light needs to be repaired or replaced.
Front fog lights (Halogen bulb type)
BK0239700US.book 36 ページ 2016年6月16日 木曜日 午前10時58分
Page 490 of 521
Replacement of light bulbs
Vehicle care and maintenance 9-37
9
2. Remove the 3 screws
(B) and remove the
light unit.
3. While holding down the tab (D), pull out the socket (E). 4. Turn the bulb (F) counterclockwise to remove it. 5. To install the bulb, perform the removal steps in reverse.
N00943601933 N00943701598
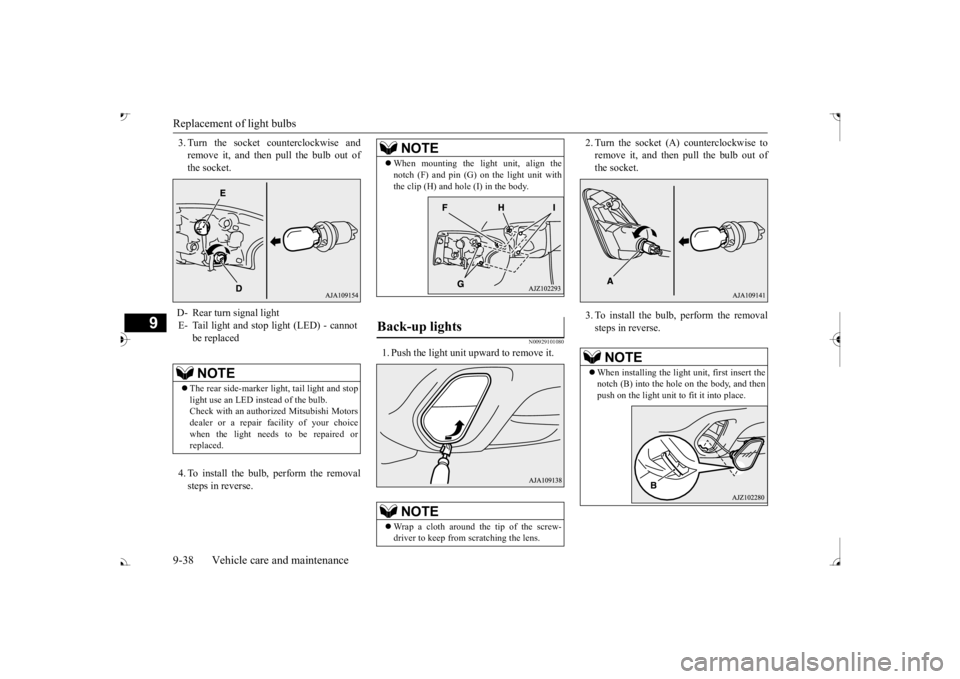
1. Open the liftgate. 2. Remove the screws (A), and then move the light unit toward the rear of the vehi- cle to unfix the notch (B) and pins (C).
NOTE
When unfastening the screws or the fog light, be careful not to move the beam posi- tion adjustment screw (C).
Front fog lights (LED type)
NOTE
The fog lights use an
LED instead of the
bulb.Check with an authorized Mitsubishi Motors dealer or a repair fa
cility of your choice
when the light needs to be repaired orreplaced.
Rear combination lights
BK0239700US.book 37 ページ 2016年6月16日 木曜日 午前10時58分
Page 491 of 521
Replacement of light bulbs 9-38 Vehicle care and maintenance
9
3. Turn the socket counterclockwise and remove it, and then pull the bulb out ofthe socket. 4. To install the bulb, perform the removal steps in reverse.
N00929101080
1. Push the light unit upward to remove it.
2. Turn the socket (A) counterclockwise to remove it, and then pull the bulb out ofthe socket. 3. To install the bulb, perform the removal steps in reverse.
D- Rear turn signal light E- Tail light and stop light (LED) - cannot
be replacedNOTE
The rear side-marker li
ght, tail light and stop
light use an LED instead of the bulb. Check with an authorized Mitsubishi Motorsdealer or a repair fa
cility of your choice
when the light needs to be repaired or replaced.
NOTE
When mounting the light unit, align the notch (F) and pin (G) on the light unit withthe clip (H) and hole (I) in the body.
Back-up lights
NOTE
Wrap a cloth around the tip of the screw- driver to keep from scratching the lens.
NOTE
When installing the light unit, first insert the notch (B) into the hole on the body, and thenpush on the light unit to fit it into place.
BK0239700US.book 38 ページ 2016年6月16日 木曜日 午前10時58分
Page 492 of 521
Vehicle care precautions
Vehicle care and maintenance 9-39
9
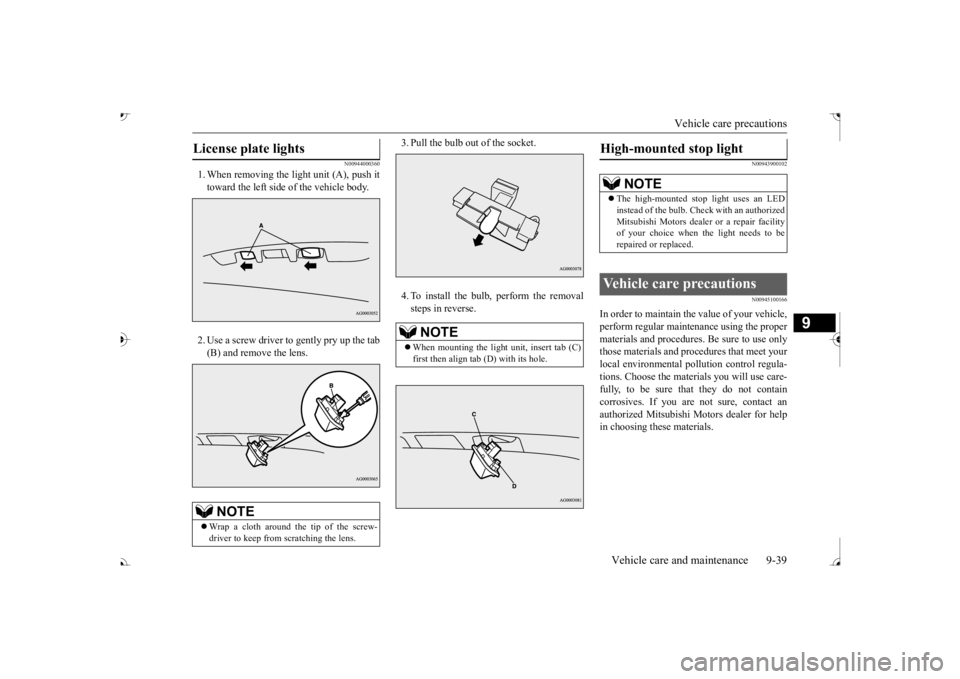
N00944000360
1. When removing the light unit (A), push it toward the left side of the vehicle body. 2. Use a screw driver to gently pry up the tab (B) and remove the lens.
3. Pull the bulb out of the socket. 4. To install the bulb, perform the removal steps in reverse.
N00943900102 N00945100166
In order to maintain the value of your vehicle, perform regular mainte
nance using the proper
materials and procedures
. Be sure to use only
those materials and proc
edures that meet your
local environmental pollution control regula- tions. Choose the materials you will use care-fully, to be sure that they do not contain corrosives. If you are
not sure, contact an
authorized Mitsubishi Motors dealer for helpin choosing these materials.
License plate lights
NOTE
Wrap a cloth around the tip of the screw- driver to keep from scratching the lens.
NOTE
When mounting the light unit, insert tab (C) first then align tab (D) with its hole.
High-mounted stop light
NOTE
The high-mounted stop light uses an LED instead of the bulb. Check with an authorizedMitsubishi Motors dealer or a repair facility of your choice when the light needs to be repaired or replaced.
Vehicle care precautions
BK0239700US.book 39 ページ 2016年6月16日 木曜日 午前10時58分