2017 MITSUBISHI OUTLANDER III ECU
[x] Cancel search: ECUPage 45 of 521
Making a flat seat 4-16 Seat and restraint systems
4
N00409800021
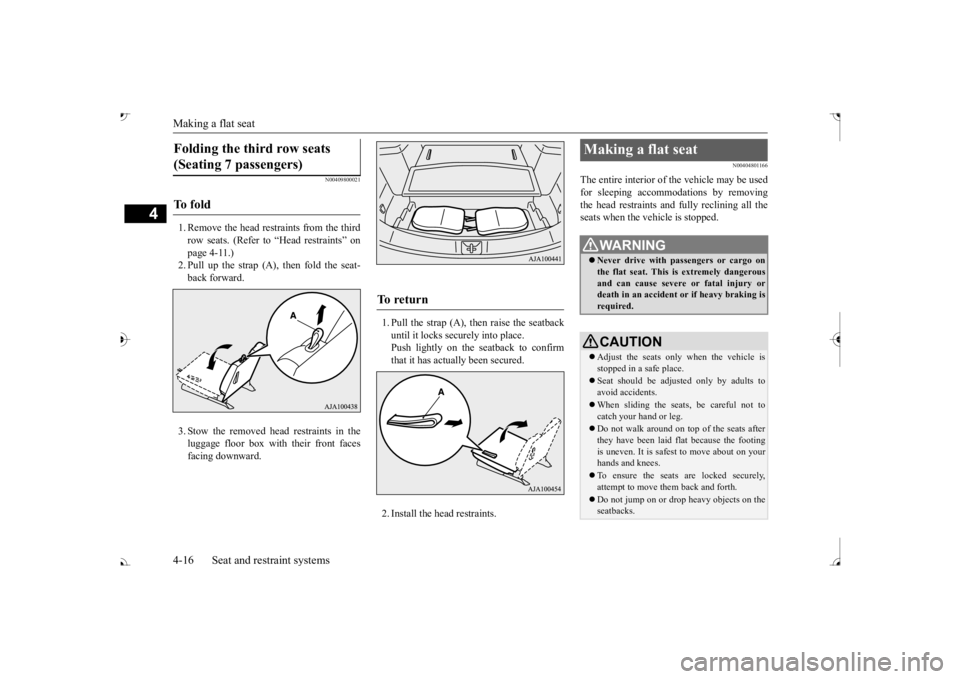
1. Remove the head restraints from the third row seats. (Refer to “Head restraints” on page 4-11.)2. Pull up the strap (A), then fold the seat- back forward. 3. Stow the removed head restraints in the luggage floor box with their front faces facing downward.
1. Pull the strap (A), then raise the seatback until it locks securely into place.Push lightly on the seatback to confirm that it has actually been secured. 2. Install the head restraints.
N00404801166
The entire interior of the vehicle may be used for sleeping accommoda
tions by removing
the head restraints and fully reclining all theseats when the vehicle is stopped.
Folding the third row seats (Seating 7 passengers) To f o l d
To r e t u r n
Making a flat seat
WA R N I N G Never drive with passengers or cargo on the flat seat. This is extremely dangerousand can cause severe or fatal injury or death in an accident
or if heavy braking is
required.CAUTION Adjust the seats only when the vehicle is stopped in a safe place. Seat should be adjusted only by adults to avoid accidents. When sliding the seat
s, be careful not to
catch your hand or leg. Do not walk around on top of the seats after they have been laid flat because the footingis uneven. It is safest to move about on your hands and knees. To ensure the seats are locked securely, attempt to move them back and forth. Do not jump on or drop heavy objects on the seatbacks.
BK0239700US.book 16 ページ 2016年6月16日 木曜日 午前10時58分
Page 48 of 521

Seat belts
Seat and restraint systems 4-19
4
N00406201513
All seats are equipped with a seat belt which uses one combined lap-and-shoulder belt with an emergency locking retractor. This system is designed to provide both com- fort and safety. It perm
its full extension and
automatic retraction of the belts during nor- mal vehicle operation.
A sensing device
inside the belt retractor is designed to lock the retractor in the event of a sudden change inthe vehicle’s motion.
1. Occupants should always
sit back in their
seats with their backs against the uprightseatback. To reduce
the risk of serious
injury or death during deployment of the airbag, adjust the driver’s seat as far backas possible while maintaining a position that still enables you to fully apply the pedals, easily control the steering wheel,and safely operate the vehicle. The front passenger seat should also be moved as far back as possible. Refer to “Supple- mental Restraint System (SRS) - airbag” on page 4-34. Also refer to “To adjust theseat forward or backward” on page 4-5.
2. Before using the center seat belt for sec- ond row, make sure that the detachable anchor is securely
latched and the seat
belt is not twisted. For details, refer topage 4-21.
Seat belt instructions
NOTE
For instructions on installing a child restraint system using a seat belt
, refer to “Installing a
child restraint system
using the seat belt” on
page 4-32.
WA R N I N G To reduce the risk of serious injury or death in the event of
an accident or sud-
den stop, all seatbacks should be kept inthe upright position while the vehicle is in motion. Seat belt performance during an accident can be adversely affect
ed if the seatbacks
are reclined. The more a seatback isreclined, the more likely seat belt perfor- mance will be advers
ely affected. If the
seat belt is not prop
erly positioned against
the body during an accident, there is increased risk you will slide under the belt and receive serious
injury or death.
BK0239700US.book 19 ページ 2016年6月16日 木曜日 午前10時58分
Page 49 of 521
Seat belts 4-20 Seat and restraint systems
4
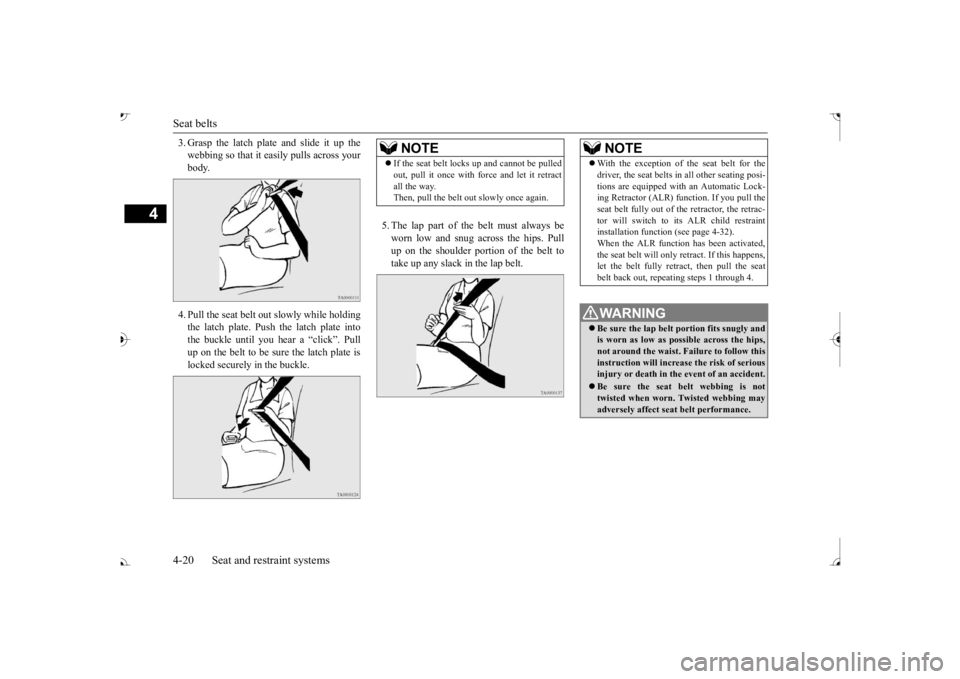
3. Grasp the latch plate and slide it up the webbing so that it ea
sily pulls across your
body. 4. Pull the seat belt out slowly while holding the latch plate. Push the latch plate intothe buckle until you hear a “click”. Pull up on the belt to be su
re the latch plate is
locked securely in the buckle.
5. The lap part of the belt must always be worn low and snug across the hips. Pullup on the shoulder portion of the belt to take up any slack
in the lap belt.
NOTE
If the seat belt lock
s up and cannot be pulled
out, pull it once with fo
rce and let it retract
all the way. Then, pull the belt out
slowly once again.
NOTE
With the exception of the seat belt for the driver, the seat belts in
all other seating posi-
tions are equipped with an Automatic Lock-ing Retractor (ALR) function. If you pull the seat belt fully out of th
e retractor, the retrac-
tor will switch to its ALR child restraintinstallation function (see page 4-32). When the ALR function has been activated, the seat belt will only re
tract. If this happens,
let the belt fully retract, then pull the seat belt back out, repeating steps 1 through 4.WA R N I N G Be sure the lap belt portion fits snugly and is worn as low as possible across the hips,not around the waist. Failure to follow this instruction will increase the risk of serious injury or death in the
event of an accident.
Be sure the seat belt webbing is not twisted when worn. Twisted webbing mayadversely affect seat belt performance.
BK0239700US.book 20 ページ 2016年6月16日 木曜日 午前10時58分
Page 52 of 521
Seat belts
Seat and restraint systems 4-23
4
N00418401394
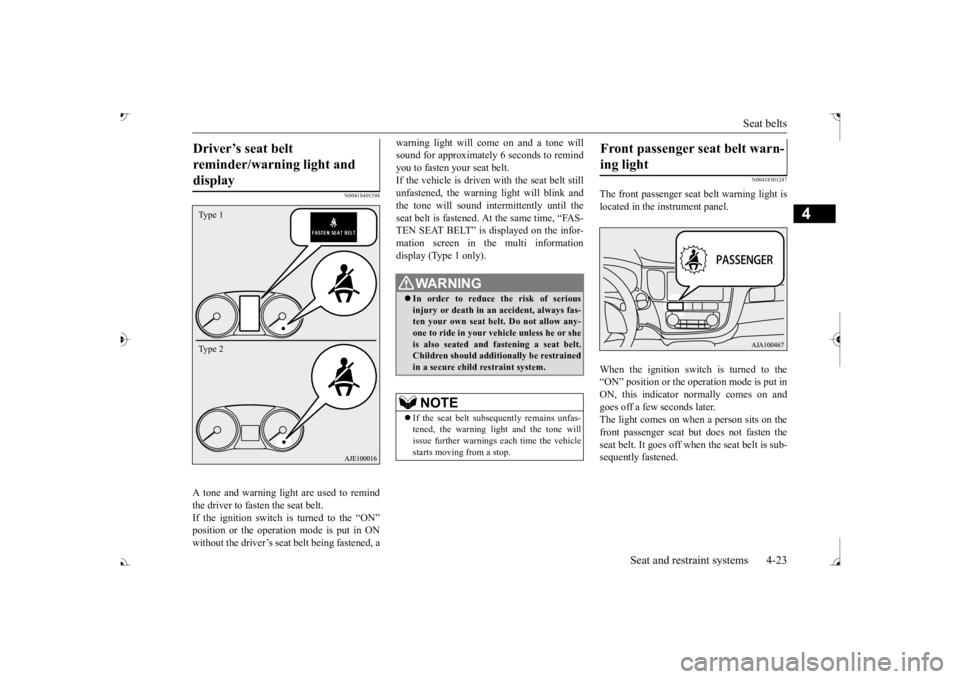
A tone and warning light are used to remind the driver to fasten the seat belt. If the ignition switch is turned to the “ON”without the driver’s seat belt being fastened, a
warning light will co
me on and a tone will
sound for approximately
6 seconds to remind
you to fasten your seat belt. If the vehicle is driven with the seat belt still unfastened, the warning light will blink andthe tone will sound inte
rmittently until the
seat belt is fastened. At the same time, “FAS- TEN SEAT BELT” is displayed on the infor-mation screen in the multi information display (Type 1 only).
N00418301247
The front passenger seat
belt warning light is
located in the instrument panel. When the ignition switch is turned to the “ON” position or the operation mode is put in ON, this indicator
normally comes on and
goes off a few seconds later.The light comes on when a person sits on the front passenger seat bu
t does not fasten the
seat belt. It goes off when the seat belt is sub-sequently fastened.
Driver’s seat belt reminder/warning light and display Type 1 Type 2
WA R N I N G In order to reduce the risk of serious injury or death in an
accident, always fas-
ten your own seat belt
. Do not allow any-
one to ride in your ve
hicle unless he or she
is also seated and fastening a seat belt. Children should additi
onally be restrained
in a secure child restraint system.NOTE
If the seat belt subse
quently remains unfas-
tened, the warning li
ght and the tone will
issue further warnings
each time the vehicle
starts moving from a stop.
Front passenger seat belt warn- ing light
BK0239700US.book 23 ページ 2016年6月16日 木曜日 午前10時58分
Page 53 of 521
Seat belts 4-24 Seat and restraint systems
4
N00406301354
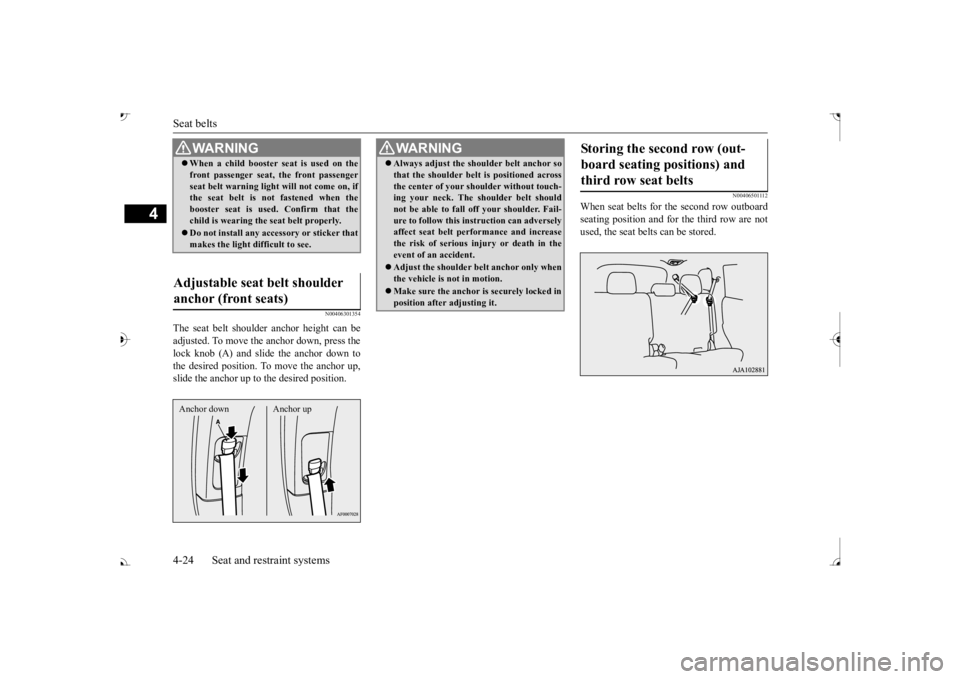
The seat belt shoulder
anchor height can be
adjusted. To move the anchor down, press thelock knob (A) and slide the anchor down to the desired position. To move the anchor up, slide the anchor up to the desired position.
N00406501112
When seat belts for the second row outboardseating position and for the third row are not used, the seat belts can be stored.
WA R N I N G When a child booster se
at is used on the
front passenger seat, the front passengerseat belt warning ligh
t will not come on, if
the seat belt is not fastened when the booster seat is used
. Confirm that the
child is wearing the
seat belt properly.
Do not install any acce
ssory or sticker that
makes the light difficult to see.
Adjustable seat belt shoulder anchor (front seats) Anchor down Anchor up
WA R N I N G Always adjust the shou
lder belt anchor so
that the shoulder belt
is positioned across
the center of your shoulder without touch-ing your neck. The sh
oulder belt should
not be able to fall off your shoulder. Fail- ure to follow this instruction can adverselyaffect seat belt performance and increase the risk of serious in
jury or death in the
event of an accident. Adjust the shoulder be
lt anchor only when
the vehicle is not in motion. Make sure the anchor is securely locked in position after adjusting it.
Storing the second row (out- board seating positions) and third row seat belts
BK0239700US.book 24 ページ 2016年6月16日 木曜日 午前10時58分
Page 59 of 521
Child restraint systems 4-30 Seat and restraint systems
4
N00418801167
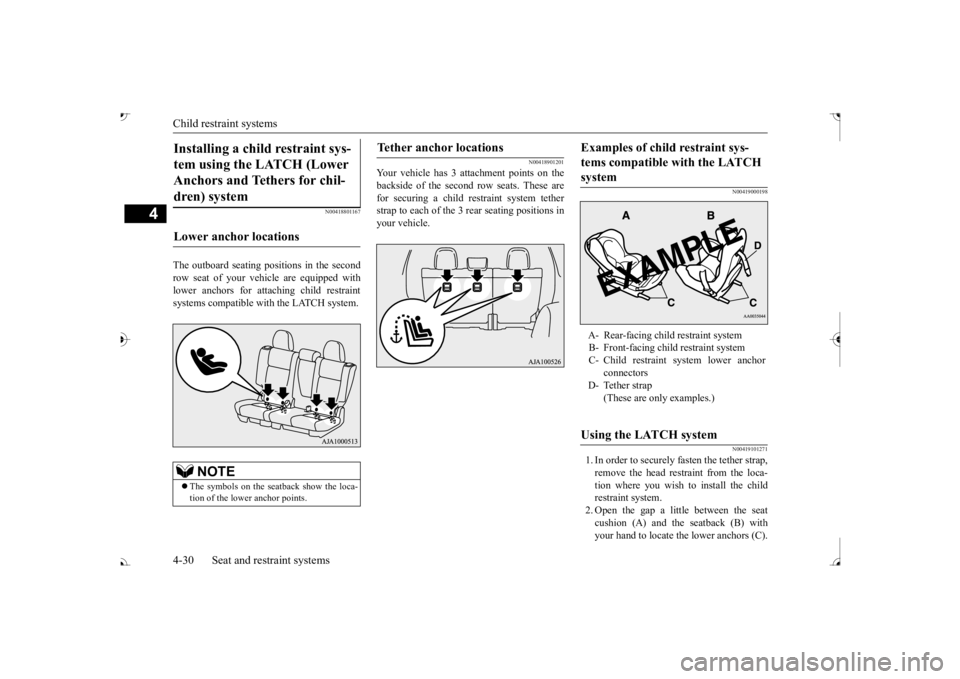
The outboard seating pos
itions in the second
row seat of your vehicle are equipped with lower anchors for attaching child restraint systems compatible with the LATCH system.
N00418901201
Your vehicle has 3 at
tachment points on the
backside of the second
row seats. These are
for securing a child restraint system tetherstrap to each of the 3 rear seating positions in your vehicle.
N00419000198 N00419101271
1. In order to securely
fasten the tether strap,
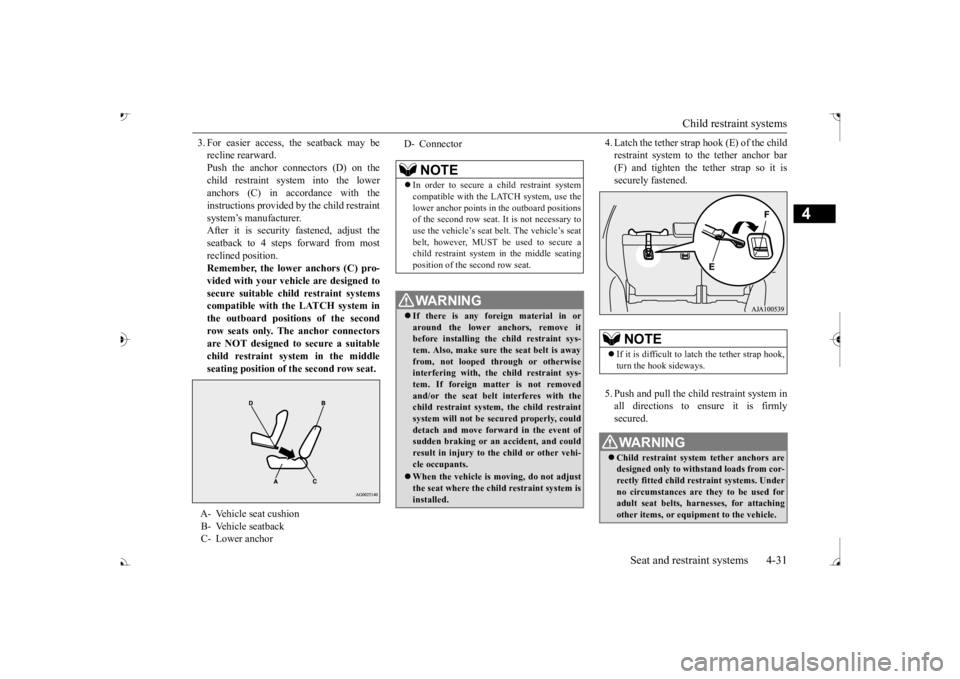
remove the head restraint from the loca- tion where you wish to install the child restraint system.2. Open the gap a little between the seat cushion (A) and the seatback (B) with your hand to locate the lower anchors (C).
Installing a child restraint sys- tem using the LATCH (Lower Anchors and Tethers for chil- dren) system Lower anchor locations
NOTE
The symbols on the seatback show the loca- tion of the lower anchor points.
Tether anchor locations
Examples of child restraint sys- tems compatible with the LATCH system A- Rear-facing child restraint system B- Front-facing child restraint system C- Child restraint system lower anchor
connectors
D- Tether strap
(These are only examples.)
Using the LATCH system
BK0239700US.book 30 ページ 2016年6月16日 木曜日 午前10時58分
Page 60 of 521
Child restraint systems
Seat and restraint systems 4-31
4
3. For easier access, the seatback may be recline rearward.Push the anchor connectors (D) on the child restraint system into the lower anchors (C) in accordance with theinstructions provided by the child restraint system’s manufacturer. After it is security fastened, adjust theseatback to 4 steps forward from most reclined position. Remember, the lower anchors (C) pro- vided with your vehi
cle are designed to
secure suitable child restraint systemscompatible with the LATCH system in the outboard positions of the second row seats only. The anchor connectorsare NOT designed to secure a suitable child restraint system in the middle seating position of the second row seat.
4. Latch the tether strap hook (E) of the child restraint system to the tether anchor bar(F) and tighten the tether strap so it is securely fastened. 5. Push and pull the chil
d restraint system in
all directions to ensure it is firmlysecured.
A- Vehicle seat cushion B- Vehicle seatback C- Lower anchor
D- Connector
NOTE
In order to secure a child restraint system compatible with the LATCH system, use thelower anchor points in the outboard positions of the second row seat. It is not necessary to use the vehicle’s seat
belt. The vehicle’s seat
belt, however, MUST be
used to secure a
child restraint system in the middle seating position of the second row seat.WA R N I N G If there is any foreign material in or around the lower an
chors, remove it
before installing the child restraint sys- tem. Also, make sure the seat belt is awayfrom, not looped through or otherwise interfering with, the child restraint sys- tem. If foreign matter is not removedand/or the seat belt
interferes with the
child restraint system, the child restraint system will not be secured properly, coulddetach and move forw
ard in the event of
sudden braking or an
accident, and could
result in injury to the child or other vehi-cle occupants. When the vehicle is
moving, do not adjust
the seat where the child restraint system isinstalled.
NOTE
If it is difficult to
latch the tether strap hook,
turn the hook sideways.WA R N I N G Child restraint system tether anchors are designed only to with
stand loads from cor-
rectly fitted child restraint systems. Underno circumstances are they to be used for adult seat belts, harnesses, for attaching other items, or equipment to the vehicle.
BK0239700US.book 31 ページ 2016年6月16日 木曜日 午前10時58分
Page 61 of 521
Child restraint systems 4-32 Seat and restraint systems
4
N00407301494
With the exception of the driver, the seat belt in all other seating pos
itions can be converted
from normal Emergency Locking Retractor(ELR) mode, to Automatic Locking Retractor (ALR) mode. This mean
s that when you pull
the seat belt fully out of the retractor, the retractor will switch to its ALR child restraint installation function.
Always use the ALR
child restraint instal
lation function when you
install a child restraint system using the seat belt.Children 12 years old and under should always be restrained in the rear seat, when- ever possible, although
the front passenger
seat belt can also be
converted to ALR mode.
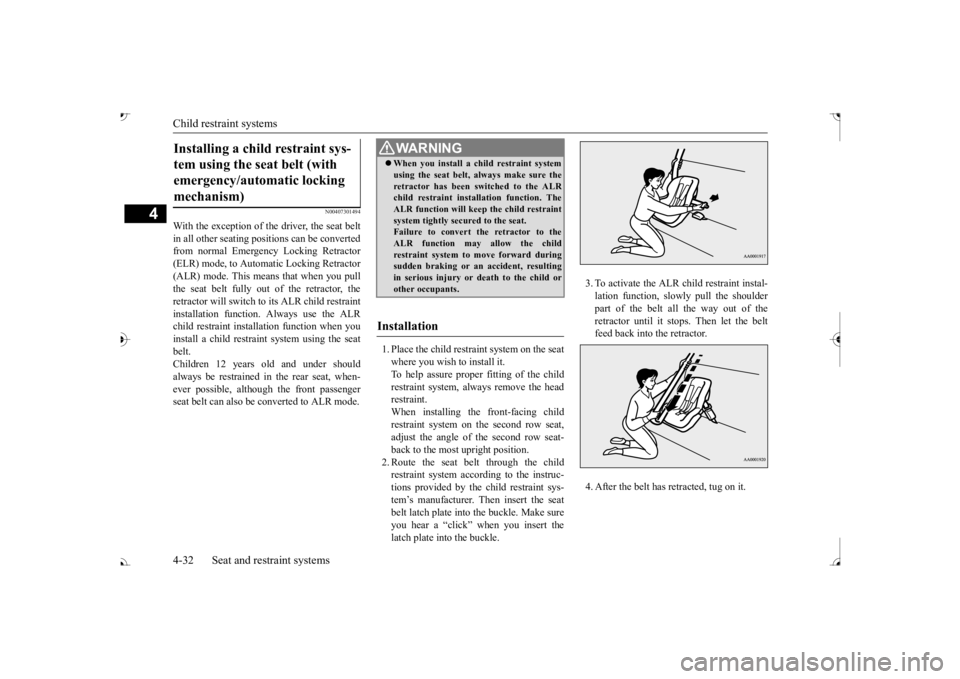
1. Place the child restraint system on the seat where you wish to install it. To help assure proper fitting of the child restraint system, alwa
ys remove the head
restraint. When installing the front-facing child restraint system on
the second row seat,
adjust the angle of the second row seat- back to the most upright position. 2. Route the seat belt through the childrestraint system acco
rding to the instruc-
tions provided by the child restraint sys- tem’s manufacturer. Then insert the seatbelt latch plate into
the buckle. Make sure
you hear a “click” when you insert the latch plate into the buckle.
3. To activate the ALR child restraint instal- lation function, slow
ly pull the shoulder
part of the belt all the way out of the retractor until it stops. Then let the belt feed back into the retractor. 4. After the belt has retracted, tug on it.
Installing a child restraint sys- tem using the seat belt (with emergency/auto
matic locking
mechanism)
WA R N I N G When you install a child restraint system using the seat belt, al
ways make sure the
retractor has been switched to the ALRchild restraint installation function. The ALR function will keep the child restraint system tightly secured to the seat.Failure to convert the retractor to the ALR function may allow the child restraint system to move forward duringsudden braking
or an accide
nt, resulting
in serious injury or
death to the child or
other occupants.
Installation
BK0239700US.book 32 ページ 2016年6月16日 木曜日 午前10時58分