2017 MITSUBISHI OUTLANDER III ignition
[x] Cancel search: ignitionPage 320 of 521
Heated steering wheel switch (if so equipped)
Features and controls 5-239
5
N00589100032
The heated steering wh
eel contains internal
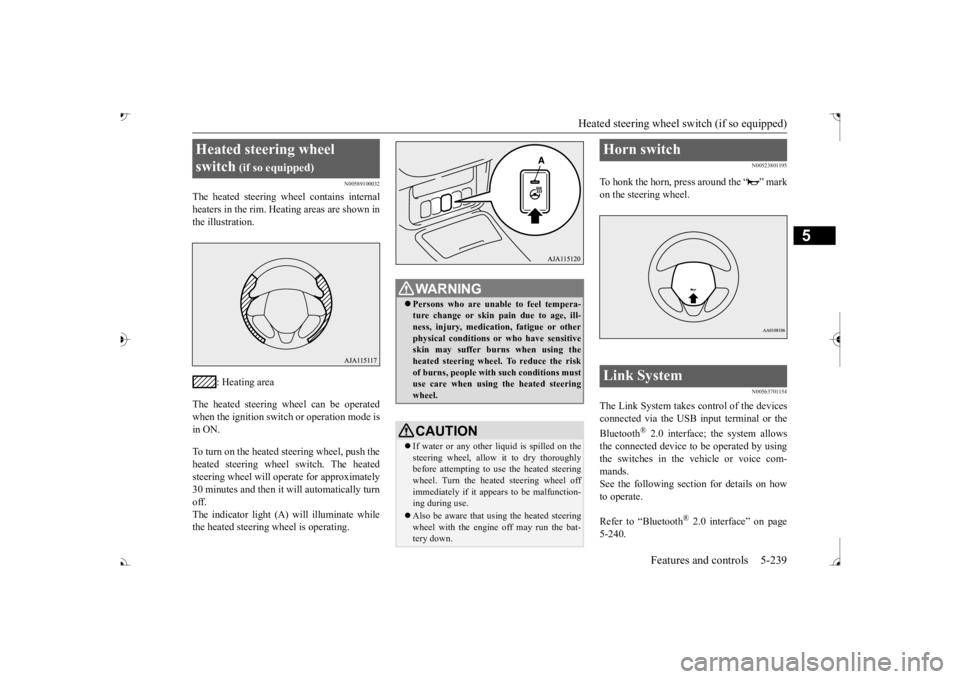
heaters in the rim. Heating areas are shown in the illustration.
: Heating area
The heated steering wheel can be operated when the ignition switch or operation mode is in ON. To turn on the heated steering wheel, push the heated steering wheel switch. The heated steering wheel will ope
rate for approximately
30 minutes and then it
will automatically turn
off. The indicator light (A) will illuminate while the heated steering wheel is operating.
N00523801195
To honk the horn, press around the “ ” markon the steering wheel.
N00563701154
The Link System takes control of the devicesconnected via the USB input terminal or the Bluetooth
® 2.0 interface; the system allows
the connected device to be operated by using the switches in the vehicle or voice com-mands. See the following section for details on how to operate. Refer to “Bluetooth
® 2.0 interface” on page
5-240.
Heated steering wheel switch
(if so equipped)
Persons who are unable
to feel tempera-
ture change or skin
pain due to age, ill-
ness, injury, medicati
on, fatigue or other
physical conditions or
who have sensitive
skin may suffer burns when using theheated steering wheel. To reduce the risk of burns, people with such conditions must use care when using the heated steeringwheel.CAUTION If water or any other li
quid is spilled on the
steering wheel, allow it to dry thoroughly before attempting to use the heated steering wheel. Turn the heated steering wheel offimmediately if it appe
ars to be malfunction-
ing during use. Also be aware that us
ing the heated steering
wheel with the engine off may run the bat- tery down.
Horn switch Link System
BK0239700US.book 239 ページ 2016年6月16日 木曜日 午前10時58分
Page 321 of 521
Bluetooth® 2.0 interface 5-240 Features and controls
5
Refer to “USB input terminal” on page 5-263. Refer to “Listen to an iPod” on page 7-32.Refer to “Listen to Audio Files on a USB Device” on page 7-34. Refer to “To play iPod/USB memory devicetracks via voice opera
tion” on page 7-37.
Refer to “Listen to Bl
uetooth Audio” on page
7-40. Bluetooth
® is a registered trademark of
BLUETOOTH SIG, INC.
N00563801070
You have acquired a device
that includes soft-
ware licensed to Mits
ubishi Motors Corpora-
tion from Visteon Corporation, and their subsequent 3rd party
suppliers. For a com-
plete list of these 3rd party products and theirend user license agreem
ents, please go to the
following website. http://www.jciblueconnect.com/faq/fulldis-closure.pdf
N00563901345
The Bluetooth
® 2.0 interface allows for mak-
ing/receiving hands-free
calls in the vehicle
using a Bluetooth
® compatible cellular
phone. It also allows the user to play music, saved in a Bluetooth
® music player, from the
vehicle’s speakers. The system is equipped with a voice recogni- tion function, which allows you to makehands-free calls by simple switch operations and voice command
operations using a
defined voice tree. The Bluetooth
® 2.0 interface can be used
when the ignition switch or the operation mode is in ON or ACC. Before you can use the Bluetooth
® 2.0 inter-
face, you must pair the Bluetooth
® device
and Bluetooth
® 2.0 interface. Refer to “Con-
necting the Bluetooth
® 2.0 interface and
Bluetooth
® device” on page 5-247.
Bluetooth
® is a registered trademark of
BLUETOOTH SIG, INC.
Link System End User License Agreement Bluetooth
® 2.0 interface
WA R N I N G Although the Bluetooth
® 2.0 interface
allows you to make ha
nds-free calls, if you
choose to use the cellular phone while driving, you must not allow yourself to bedistracted from the sa
fe operation of your
vehicle. Anything, including cellular phone usage, that distracts you from thesafe operation of your vehicle increases your risk of an accident. Refer to and comply with all state and local laws in your area regarding cellular phone usage wh
ile driving.
NOTE
If the ignition switch
or the operation mode
is left in ACC, the accessory power willautomatically turn off after a certain period of time and you will no
longer be able to use
the Bluetooth
® 2.0 interface. The accessory
power comes on again if
the ignition switch
or the engine switch is operated. Refer to“ACC power auto-cutout function” on page 5-20 and 5-64. The Bluetooth
® 2.0 interface cannot be used
if the Bluetooth
® device has a dead battery
or the device power is turned off. Hands-free calls
will not be possible if your
phone does not have
service available.
BK0239700US.book 240 ページ 2016年6月16日 木曜日 午前10時58分
Page 326 of 521
Bluetooth® 2.0 interface
Features and controls 5-245
5
7. When the registration of the passcode is completed, the voice
guide will say “Pass-
code is enabled” and the system will return to the main menu.
If a passcode has been
set and the security
function is enabled, the voice guide will say “Hands-free system is
locked. State the pass-
code to continue” when the SPEECH button (except for vehicles with Mitsubishi Multi- Communication System) or PICK-UP button(for vehicles with Mitsubishi Multi-Commu- nication System) is pres
sed to enter voice rec-
ognition mode. Say th
e 4-digit passcode
number to enter the passcode. If the entered passcode is wrong, the voice guide will say “<4-digit passcode>, Incorrect
passcode. Please try again.” Enter the correct passcode. Use the following procedure to turn off the security function by di
sabling the passcode.
1. Press the SPEECH button (except for vehicles with Mitsubishi Multi-Commu- nication System) or
PICK-UP button (for
vehicles with Mitsubishi Multi-Commu-nication System). 2. Say “Setup.” 3. Say “Passcode.”4. The voice guide will say “Passcode is enabled. Would you like to disable it?” Answer “Yes.” the passcode and return to the main menu.
5. When the disabling of the passcode is completed, the voice
guide will say “Pass-
code is disabled”
and the system will
return to the main menu.
N00564700011
The Bluetooth
® 2.0 interface can use the
speaker enrollment function to create a voice model for one person per language. This makes it easier for the Bluetooth
® 2.0
interface to recognise
voice commands said
by you. You can turn a voice model registered with the speaker enrollment function on and offwhenever you want.
N00564801181
It takes about 2 to 3 mi
nutes to complete the
speaker enrollment process. To ensure the best results, run through the process while in the driver’s seat, in an envi-ronment that is as quiet as possible (when there is no rain or strong winds and the vehi- cle windows are closed).
Please turn off your
phone while in speaker enrollment to prevent interruption of the process. Use the following procedure for speakerenrollment.
NOTE
Passcode will be requi
red to access the sys-
tem after the next ignition cycle. It is required for a little time after engine stop that the entered
passcode is actually
recorded in the system.If the ignition switch
or the operation mode
is made to ACC or
ON or the engine is
started immediately afte
r engine stop, there
is a case when the entered passcode is not recorded in the system. At this time, please try to enter the passcode again.
Entering the passcode
NOTE
You can reenter the passcode as many times as you want. If you have forgotten your passcode, say “Cancel” to quit the voice input mode and then check with an authorized Mitsubishi Motors dealer.
Disabling the passcode
NOTE
System must be unlocked to disable the pass- code.
Speaker enrollment function Speaker enrollment
BK0239700US.book 245 ページ 2016年6月16日 木曜日 午前10時58分
Page 336 of 521
Bluetooth® 2.0 interface
Features and controls 5-255
5
You can redial the last
number called, based
on the history of dialed calls in the paired cel-lular phone. Use the following procedure to redial. 1. Press the SPEECH button (except for vehicles with Mitsubishi Multi-Commu- nication System) or PICK-UP button (forvehicles with Mitsubishi Multi-Commu- nication System). 2. Say “Redial.”
N00565700018
During a call, press the SPEECH button toenter voice recognitio
n mode, then say
“
a call you need to sim-
ulate the pressing of a phone button as a
response to an automated system, press the SPEECH button and speak “1 2 3 4 poundsend” and the 1234# will be sent via your cel- lular phone.
N00565801045
If an incoming phone call is received whilethe ignition switch or
the operation mode is in
ON or ACC, the audio sy
stem will be auto-
matically turned on and switched to the incoming call, even when the audio systemwas originally off. The voice guide a
nnouncement for the
incoming call will be output from the frontpassenger’s seat speaker. If the CD player or radio was playing when the incoming call was received, the audio sys-tem will mute the sound from the CD player or radio and output onl
y the incoming call.
To receive the call, press the PICK-UP buttonon the steering wheel control switch. When the call is over, the audio system will return to its previous state.
N00565900010
At any time during a ca
ll, you can mute the
vehicle microphone.
Pressing the SPEECH button and then saying “Mute” during a call will turn ON the mutefunction and mute the microphone. Saying “Mute off” in the same way will turn off the mute function and cancel the mute onthe microphone.
N00566600014
The Bluetooth
® 2.0 interface can switch
between hands-free m
ode (hands-free calls)
and private mode (calls
using cellular phone).
If you press the SPEECH button and say“Transfer call” duri
ng a hands-free call, you
can stop the hands-free m
ode and talk in pri-
vate mode. To return to hands-free mode, press the SPEECH button again and say “Transfer call.”The Bluetooth
® 2.0 interface has 2 types of
unique phonebooks that are different from thephonebook stored in the cellular phone. They are the vehicle phonebook and the mobile phonebook.
NOTE
When the confirmation function is on, the system will check if
the name and location of
the receiver are correct. If the name is cor-rect, answer “Yes.”
or location to call,
answer “No.” The system will return to Step3.
RedialingSend function
Receiving calls Mute function
Switching between hands-free mode and private mode Phonebook function
BK0239700US.book 255 ページ 2016年6月16日 木曜日 午前10時58分
Page 344 of 521
USB input terminal
Features and controls 5-263
5
off and on, the user is encouraged to try to correct the interference by
one or more of the
following measures: Reorient or relocate
the receiving antenna.
Increase the sepa
ration between the
equipment and receiver. Connect the equipment into an outlet on a circuit different from that to which the receiver is connected. Consult the dealer or an experienced radio/TV technician for help.
ICES Notice: This Class B digital apparatus complies with Canadian ICES-003.
N00566401136
N00566701142
You can connect your USB memory device or iPod
* to play music files stored in the USB
memory device or iPod.This section explains how to connect and remove a USB memory device or iPod. See the following sect
ion for details on how
to play music files. Refer to “Listen to an iPod” on page 7-32. Refer to “Listen to Audio Files on a USBDevice” on page 7-34. Refer to “To play iPod/USB memory device tracks via voice ope
ration” on page 7-37.
* : “iPod” is a registered trademark of Apple Inc. in the United Stat
es and other countries.
N00566801156
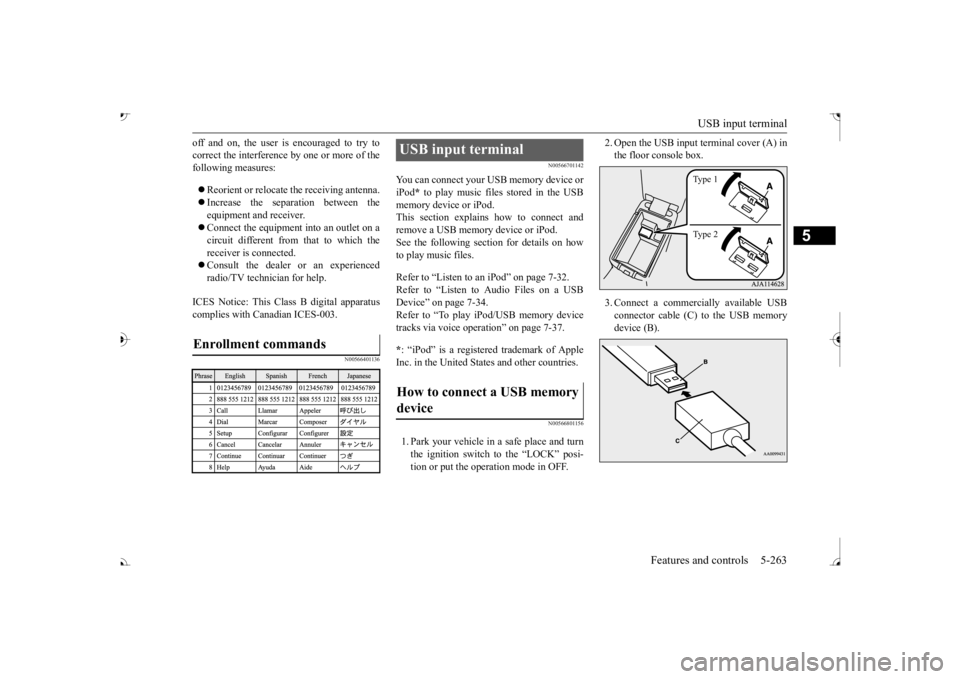
1. Park your vehicle in a safe place and turn the ignition switch to the “LOCK” posi-tion or put the operation mode in OFF.
Enrollment commands
USB input terminal How to connect a USB memory device
2. Open the USB input
terminal cover (A) in
the floor console box. 3. Connect a commercia
lly available USB
connector cable (C) to the USB memory device (B).
Ty p e 1 Ty p e 2
BK0239700US.book 263 ページ 2016年6月16日 木曜日 午前10時58分
Page 345 of 521
USB input terminal 5-264 Features and controls
5
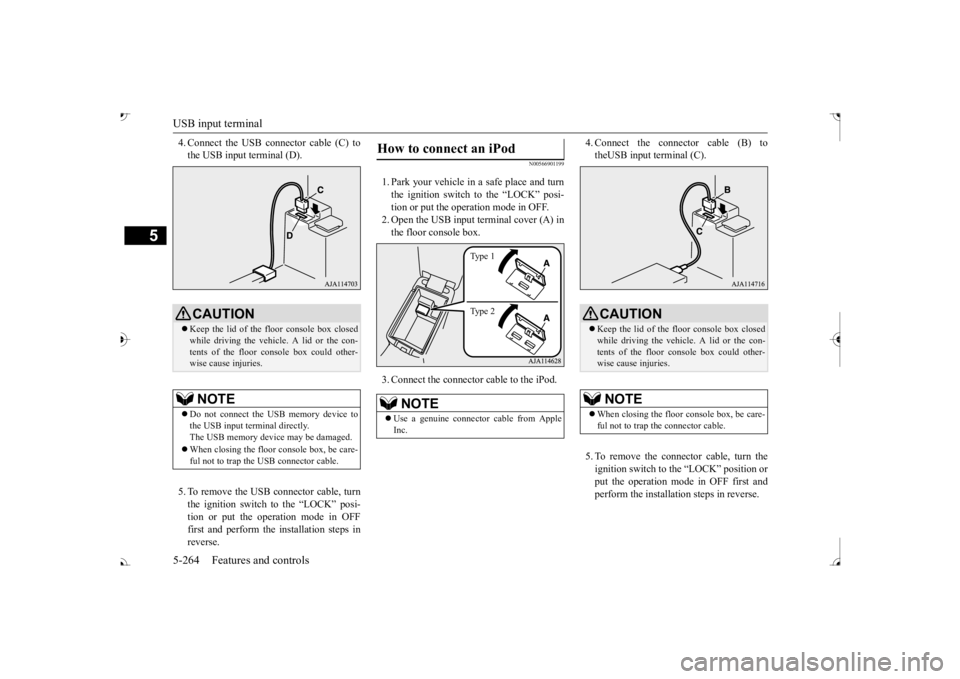
4. Connect the USB connector cable (C) to the USB input terminal (D). 5. To remove the USB connector cable, turn the ignition switch to the “LOCK” posi- tion or put the operation mode in OFFfirst and perform the installation steps in reverse.
N00566901199
1. Park your vehicle in
a safe place and turn
the ignition switch to the “LOCK” posi-tion or put the operation mode in OFF. 2. Open the USB input terminal cover (A) in the floor console box. 3. Connect the connector cable to the iPod.
4. Connect the connector cable (B) to theUSB input terminal (C). 5. To remove the connect
or cable, turn the
ignition switch to the “LOCK” position orput the operation mode in OFF first and perform the installation steps in reverse.
CAUTION Keep the lid of the floor console box closed while driving the vehicle. A lid or the con- tents of the floor console box could other- wise cause injuries.NOTE
Do not connect the US
B memory device to
the USB input term
inal directly.
The USB memory devi
ce may be damaged.
When closing the floor
console box, be care-
ful not to trap the USB connector cable.
How to connect an iPod
NOTE
Use a genuine connector
cable from Apple
Inc.
Ty p e 1 Ty p e 2
CAUTION Keep the lid of the floor console box closed while driving the vehicle. A lid or the con- tents of the floor console box could other- wise cause injuries.NOTE
When closing the floor
console box, be care-
ful not to trap the connector cable.
BK0239700US.book 264 ページ 2016年6月16日 木曜日 午前10時58分
Page 346 of 521
USB input terminal
Features and controls 5-265
5
N00567001083 N00567101130
Devices of the following types can be con- nected. For these connectable
device types, “iPod*,”
“iPod classic*,”
“iPod nano*,” “iPod touch*”
site: [For vehicles sold in U.S.A.] You can access the Mitsubishi Motors NorthAmerica website. [For vehicles sold in
Canada and Mexico]
You can access the Mitsubishi Motors web-site. Please read and agree to the “Warning about Links to the Web Sites of Other Com-
panies”. The websites
mentioned above may
connect you to websites
other than the Mit-
subishi Motors website. http://www.mitsubishi-
motors.com/en/prod-
ucts/index.html * : “iPod,” “iPod classic,” “iPod nano,” “iPod touch,” and “iPhone” marks of Apple Inc. in the United States and other countries.
N00567201056
You can play music files of the followingspecifications that are saved in a USB mem- ory device or other
device supporting mass
storage class. When
you connect your iPod,
playable file specif
ications depend on the
connected iPod.
Types of connectable devices and supported file specifica-tions Device types Model name
Condition
USB memory device
Storage capac- ity of 256 Mbytes or more
Models other than USB memory devices and iPods
Digital audio player support- ing mass stor-age class
NOTE
Depending on the type of the USB memory device or other devi
ce connected, the con-
nected device may not
function properly or
the available functi
ons may be limited.
It is recommended to use an iPod with firm- ware updated to th
e latest version.
You can charge your
iPod by connecting it to
the USB input terminal
when the ignition
switch or the operation mode is in ON or ACC. Do not keep your US
B memory device or
iPod in your vehicle. It is recommended that you back up the files in case of
data damage.
Do not connect to the USB input terminal any device (hard disk
, card reader, memory
reader, etc.) other
than the connectable
devices specified in the previous section. The device and/or data
may be damaged. If
any of these devices
was connected by mis-
take, remove it after turning the ignition switch to the “LOCK” position or putting the operation mode in OFF.
File specifications Item
Condition
File format
MP3, WMA, AAC, WAV
Maximum number of levels (including the root)
Level 8
Number of folders 700 Number of files 65,535
NOTE
BK0239700US.book 265 ページ 2016年6月16日 木曜日 午前10時58分
Page 348 of 521
12 V power outlets
Features and controls 5-267
5
N00525001683
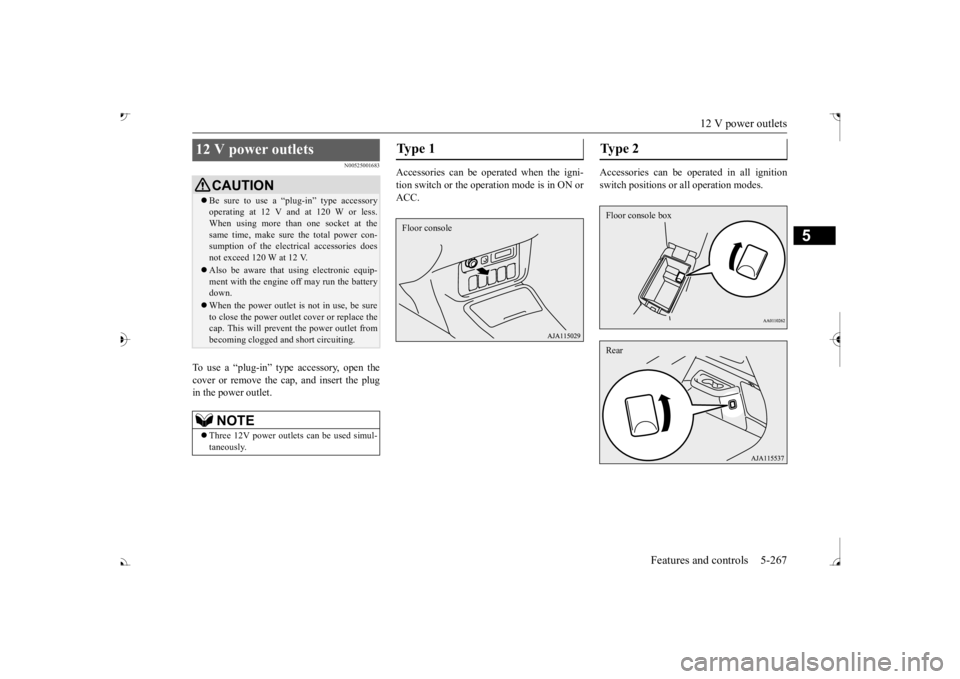
To use a “plug-in” type accessory, open the cover or remove the ca
p, and insert the plug
in the power outlet.
Accessories can be operated when the igni- tion switch or the operation mode is in ON or ACC.
Accessories can be ope
rated in all ignition
switch positions or
all operation modes.
12 V power outlets
CAUTIONBe sure to use a “plug-in” type accessory operating at 12 V and at 120 W or less.When using more than one socket at the same time, make sure the total power con- sumption of the electrical accessories doesnot exceed 120 W at 12 V. Also be aware that
using electronic equip-
ment with the engine
off may run the battery
down. When the power outlet is not in use, be sure to close the power outle
t cover or replace the
cap. This will prevent the power outlet frombecoming clogged and
short circuiting.
NOTE
Three 12V power outlet
s can be used simul-
taneously.
Ty p e 1 Floor console
Type 2 Floor console boxRear
BK0239700US.book 267 ページ 2016年6月16日 木曜日 午前10時58分