2017 MITSUBISHI L200 steering
[x] Cancel search: steeringPage 147 of 426

Selector lever position display
E00603501954
When the ignition switch is turned to the
“ON” position or the operation mode is put in ON, the position of the selector lever is indi-
cated in the multi information display.
Selector lever positions
E00603801843
“P” PARK
This position locks the transmission to pre- vent the vehicle from moving. The engine
can be started in this position.
“R” REVERSE
This position is to back up.
CAUTIONl Never shift into the “P” (PARK) or “R”
(REVERSE) position while the vehicle is in motion to avoid transmission damage.
“N” NEUTRAL
At this position the transmission is disengag-
ed. It is the same as the neutral position on amanual transmission, and should only be used when the vehicle is stationary for an ex-
tended length of time during driving, such as
in a traffic jam.
WARNINGl Never move the selector lever to the “N”
(NEUTRAL) position while driving. A se- rious accident could occur since you could
accidentally move the lever into the “P” (PARK) or “R” (REVERSE) position or
you will lose engine braking.
l On a gradient, the engine should be star-
ted in the “P” (PARK) position, not in the
“N” (NEUTRAL) position.
l To prevent rolling, always keep your foot
on the brake pedal when the vehicle is in “N” (NEUTRAL) position, or when shift- ing into or out of “N” (NEUTRAL) posi-
tion.“D” DRIVE
This position is used for most city and high-
way driving. The transmission will automati-
cally change its gear depending on road and driving conditions.
CAUTIONl To prevent transmission damage, never shift
into the “D” (DRIVE) position from the “R”
(REVERSE) position while the vehicle is in motion.Sport mode
E00603902681
Whether the vehicle is stationary or in mo-
tion, sports mode is selected by gently push-ing the selector lever from the “D” (DRIVE)
position into the manual gate (A).
To return to “D” range operation, gently push
the selector lever back into the main gate (B).
In sports mode, gear shifts can be made rap- idly simply by moving the selector leverbackward and forward. For vehicles equippedwith the shift paddles, shift paddles at the
steering wheel can also be used to perform
gearshift. In contrast to a manual transmis-
sion, the sports mode allows gear shifts with the accelerator pedal depressed.
Automatic transmission Sports Mode 5A/T
6-31OKTE17E1Starting and driving6
Page 150 of 426

When the A/T (automatic trans-mission) fluid temperature warning lamp comes on
E00615301236
The automatic transmission fluid temperature
warning lamp comes on and a buzzer may
sound, when the automatic transmission fluid
temperature becomes abnormally high. Nor- mally the warning lamp comes on when the
ignition switch is turned to the “ON” position or the operation mode is put in ON, and then
will go off after a few seconds.
CAUTIONl If the lamp comes on, reduce the engine
speed and stop the vehicle in a safe area.Then set the selector lever to “P” (PARK)
position and idle the engine until the warn-
ing lamp goes off. When the warning lamp goes off, resume normal driving. If the
warning lamp does not go off, we recom- mend you to have your vehicle inspected.Operation of the A/T
E00604201697
CAUTIONl Before selecting a gear with the engine run-
ning and the vehicle stationary, fully depress
the brake pedal to prevent the vehicle from
creeping.
The vehicle will begin to move as soon as the gear is engaged, especially when the en- gine speed is high, at fast idle or with the airconditioner operating, the brakes should on-
ly be released when you are ready to drive
away.
l Depress the brake pedal with the right foot at
all times.
Using the left foot could cause driver move- ment delay in case of an emergency.
l To prevent sudden acceleration, never race
the engine when shifting from the “P”
(PARK) or “N” (NEUTRAL) position.CAUTIONl Operating the accelerator pedal while the
other foot is resting on the brake pedal will affect braking efficiency and may cause pre-
mature wear of brake pads.
l Use the selector lever in the correct shift po-
sition in accordance with driving conditions.Never coast downhill backward with the se-
lector lever in the {“D” (DRIVE) or sports mode} or coast forward with the selector
lever in the “R” (REVERSE) position.
The engine may stop and the unexpected in- crease in brake pedal effort and steering
wheel weight could lead to an accident.
l Do not race the engine with brake pedal
pressed when the vehicle is stationary.
This can damage the A/T.
Also, when you depress the accelerator ped- al while holding down the brake pedal withthe selector lever in the “P” (PARK), “N”
(NEUTRAL) or “D” (DRIVE) position, the
engine revolutions may not rise as high as when performing the same operation with
the selector lever in the “N” (NEUTRAL)
position.Passing acceleration
E00604501342
To gain extra acceleration in “D” (DRIVE)
position, push the accelerator to the floor.The A/T will automatically downshift.
Automatic transmission Sports Mode 5A/T
6-34OKTE17E1Starting and driving6
Page 154 of 426

CAUTIONlDo not operate the drive mode-selector
while the rear wheels of the vehicle are slip-
ping on snow or ice.2WD/4WD operation indica-
tion lamp and low-range indi- cation lamp
E00641300041
When the ignition switch is in the “ON” posi-
tion or the operation mode is put in ON, the
2WD/4WD operation indication lamp (1) andthe low-range indication lamp (2) shows the
shifting condition. The 2WD/4WD operation
indication lamp comes on at each drive mode-selector position as follows:
“2H” ↔ “4H”Drive mode-selector
positionIndication lamp
2HDrive mode switch-ing in progress4H
: Blink
: Illuminate
: Remain off
NOTEl When the drive mode-selector is set between
2H ↔ 4H, the 2WD/4WD operation indica-tion lamp blinks while the selection is in
process. Take the following precautions
when the indication lamp is blinking.NOTE• Keep the steering wheel in the straight
ahead position while making range selec-
tions. If you attempt to drive forward with the steering wheel turned, gear rattling or
shock may occur and the desired range may not actually be selected.
• When the drive mode-selector is set be-
tween “2H” ↔ “4H” while the vehicle isstopped, the 2WD/4WD operation indica-
tion lamp blinks while the selection is in
process. Drive slowly and normally after confirming that the lamp is switched.
• If the 2WD/4WD operation indication
lamp continues blinking after a “2H” ↔ “4H” selection has been made with thevehicle moving, hold the steering wheel in the straight ahead position and slowly
depress the accelerator pedal several
times.
“4H” ↔ “4L”
Drive mode-se-
lector positionIndication lamp
4HEasy select 4WD*
6-38OKTE17E1Starting and driving6
Page 155 of 426
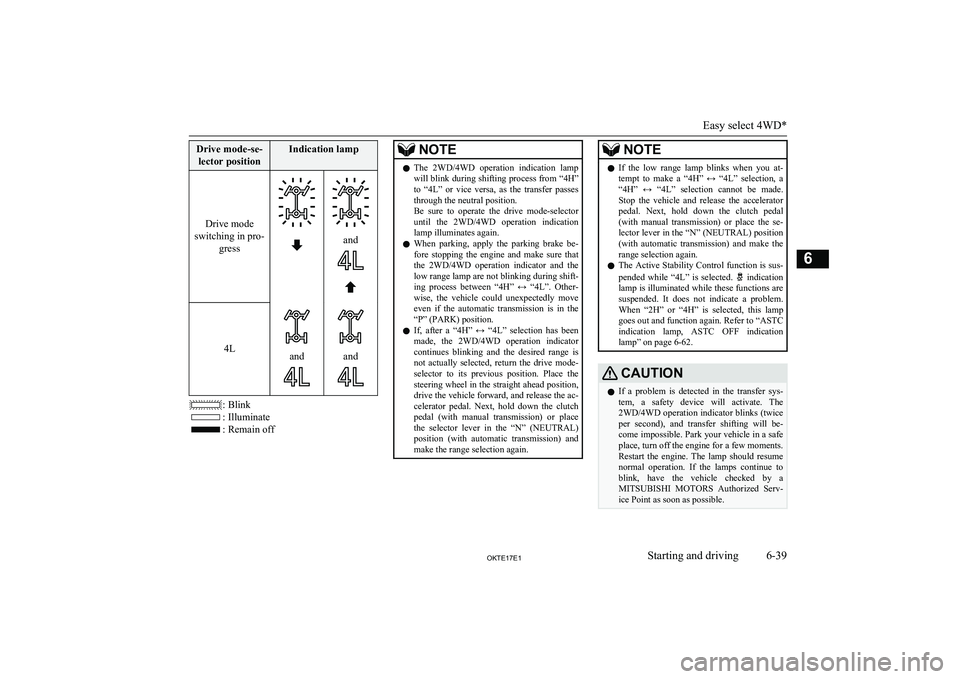
Drive mode-se-lector positionIndication lamp
Drive mode
switching in pro- gress
and
4Landand
: Blink
: Illuminate
: Remain off
NOTElThe 2WD/4WD operation indication lamp
will blink during shifting process from “4H”to “4L” or vice versa, as the transfer passes
through the neutral position.
Be sure to operate the drive mode-selector
until the 2WD/4WD operation indication lamp illuminates again.
l When parking, apply the parking brake be-
fore stopping the engine and make sure that the 2WD/4WD operation indicator and the
low range lamp are not blinking during shift- ing process between “4H” ↔ “4L”. Other- wise, the vehicle could unexpectedly move
even if the automatic transmission is in the “P” (PARK) position.
l If, after a “4H” ↔ “4L” selection has been
made, the 2WD/4WD operation indicator continues blinking and the desired range isnot actually selected, return the drive mode- selector to its previous position. Place the
steering wheel in the straight ahead position, drive the vehicle forward, and release the ac-
celerator pedal. Next, hold down the clutch pedal (with manual transmission) or place
the selector lever in the “N” (NEUTRAL)
position (with automatic transmission) and make the range selection again.NOTEl If the low range lamp blinks when you at-
tempt to make a “4H” ↔ “4L” selection, a
“4H” ↔ “4L” selection cannot be made.
Stop the vehicle and release the accelerator pedal. Next, hold down the clutch pedal(with manual transmission) or place the se-lector lever in the “N” (NEUTRAL) position(with automatic transmission) and make the
range selection again.
l The Active Stability Control function is sus-
pended while “4L” is selected.
indication
lamp is illuminated while these functions are suspended. It does not indicate a problem.
When “2H” or “4H” is selected, this lamp goes out and function again. Refer to “ASTCindication lamp, ASTC OFF indication
lamp” on page 6-62.
CAUTIONl If a problem is detected in the transfer sys-
tem, a safety device will activate. The 2WD/4WD operation indicator blinks (twiceper second), and transfer shifting will be-
come impossible. Park your vehicle in a safe place, turn off the engine for a few moments.Restart the engine. The lamp should resume normal operation. If the lamps continue to
blink, have the vehicle checked by a MITSUBISHI MOTORS Authorized Serv-
ice Point as soon as possible.
Easy select 4WD*
6-39OKTE17E1Starting and driving6
Page 160 of 426

NOTElWhen the drive mode-selector is set between
“2H”, “4H” and “4HLc”, the front wheel
and/or centre differential lock lamps blink
while the selection is in process. Take the following precautions when the indicationlamp is blinking.
• Keep the steering wheel in the straight
ahead position while making range selec- tions. If you attempt to drive forward with
the steering wheel turned, gear rattling or
shock may occur and the desired range may not actually be selected.
• When the drive mode-selector is set be-
tween “2H”, “4H” and “4HLc”, while the
vehicle is stopped, the front wheel and/or centre differential lock lamps blink whilethe selection is in process. Drive slowly and normally after confirming that the
lamp is switched.
• If the front wheel and/or centre differen-
tial lock lamps blinking after a “2H” ↔
“4H” ↔ “4HLc” selection has been made with the vehicle moving, hold the steering wheel in the straight ahead position and
slowly depress the accelerator pedal sev-
eral times.
l The front and the rear wheel lamps will
blink during shifting process from “4HLc”
to “4LLc” or vice versa, as the transfer pass-
es through the neutral position. Be sure to operate the drive mode-selector until the
front and the rear wheel lamps illuminate
again.NOTEl When parking, apply the parking brake be-
fore stopping the engine and make sure that the front and the rear wheel lamps and the low range lamp are not blinking during shift-ing process between “4HLc” ↔ “4LLc”.
Otherwise, the vehicle could unexpectedly move even if the automatic transmission is
in the “P” (PARK) position.
l If, after a “4HLc” ↔ “4LLc” selection has
been made, front and the rear wheel lamps continue blinking and the desired range isnot actually selected, return the drive mode-selector to its previous position. Place the
steering wheel in the straight ahead position, drive the vehicle forward, and release the ac-
celerator pedal. Next, hold down the clutch pedal (with manual transmission) or place
the selector lever in the “N” (NEUTRAL)
position (with automatic transmission) and make the range selection again.
l If the low range lamp blinks when you at-
tempt to make a “4HLc” ↔ “4LLc” selec-
tion, a “4HLc” ↔ “4LLc” selection cannot
be made. Stop the vehicle and release the ac- celerator pedal. Next, hold down the clutch pedal (with manual transmission) or placethe selector lever in the “N” (NEUTRAL)
position (with automatic transmission) and make the range selection again.NOTEl The Active Stability Control function is sus-
pended while “4LLc” is selected. indica-
tion lamp is illuminated while these func-
tions are suspended. It does not indicate a
problem. When “2H” or “4H” or “4HLc” is selected, this lamp goes out and function
again. Refer to “ASTC indication lamp, ASTC OFF indication lamp” on page 6-62.
Super select 4WD II*
6-44OKTE17E1Starting and driving6
Page 163 of 426

NOTElThe indication lamp blinks while the rear
differential lock is being switched between
its activated and deactivated conditions. When the switching operation is complete,
the indication lamp is either illuminated steadily or not illuminated.
l The ASTC and ABS functions are suspen-
ded while the rear differential lock is activa-
ted.
ASTC indication lamp, ASTC OFF indica- tion lamp and ABS warning lamp are illumi- nated while these functions are suspended.
It does not indicate a problem. When the
rear differential lock is disengaged, these lamps go out and function again.
Refer to “ABS warning lamp” on page
6-57, “ASTC indication lamp, ASTC OFF in-
dication lamp” on page 6-62.
l If the indication lamp continues blinking af-
ter the switch has been pressed to deactivate
the rear differential lock, hold the steering
wheel in the straight ahead position then slowly depress and release the accelerator
pedal several times.
l If the indication lamp continues blinking af-
ter the switch has been pressed to activate the rear differential lock, bear in mind thefollowing instructions:
• If the vehicle speed is 12 km/h or higher,
decelerate to a speed of 2.5 km/h or low-er. The indication lamp will illuminate
steadily and the rear differential lock will be activated.NOTE• If the vehicle speed is 12 km/h or lower,
turn the steering wheel from side to side
until the indication lamp illuminates steadily. If the vehicle is stuck in softground, make sure the area around the ve-
hicle is clear then repeatedly attempt to
drive forward and backward. The indica- tion lamp will illuminate steadily and the
rear differential lock will be activated.CAUTIONl If a problem is detected in the rear differen-
tial lock system, a safety device will acti- vate. The rear differential lock indication lamp will blink rapidly (twice per second),
and the rear differential lock will deactivate. Park your vehicle in a safe place, turn off the
engine for a few moments. Restart the en- gine. It is safe to continue driving if the lamps resume normal operation. If the rear differential lock indication lamp blinks whenthe rear differential lock is reactivated, have
the vehicle checked by a MITSUBISHI
MOTORS Authorized Service Point as soon
as possible.Examples of effective use of the
rear differential lock
E00606401127
CAUTIONl Use the rear differential lock only as an
emergency measure when the vehicle is stuck and cannot be freed with the drivemode-selector in “4L” or “4H” position (Easy select 4WD) or in “4LLc” or “4HLc” position (Super select 4WD II). Deactivate
the rear differential lock immediately after
using it.
When one of the wheels has fall-
en in a ditch
Rear differential lock*
6-47OKTE17E1Starting and driving6
Page 164 of 426
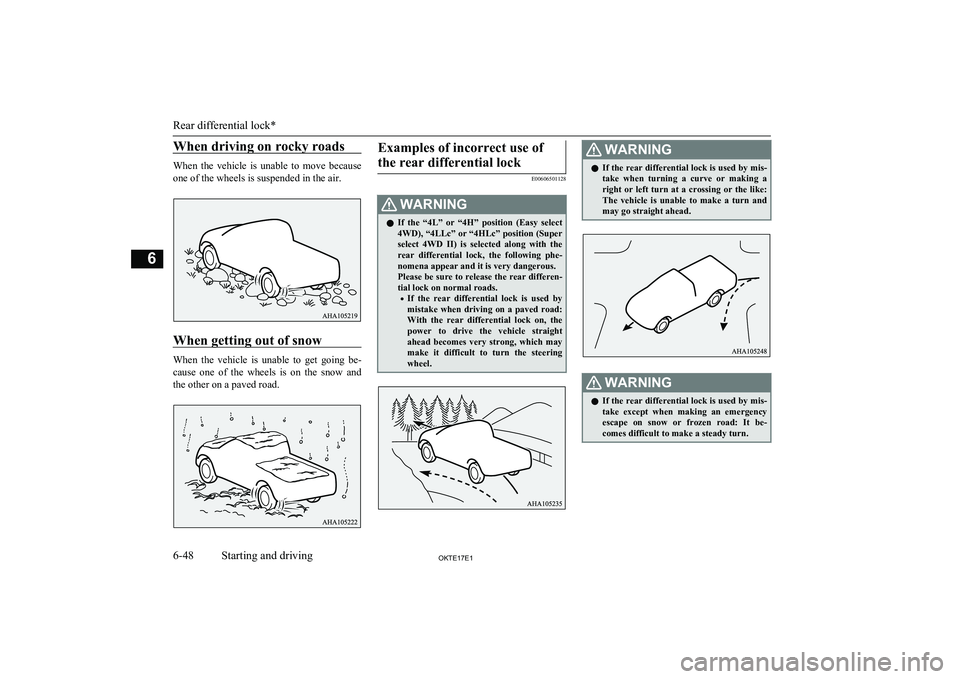
When driving on rocky roads
When the vehicle is unable to move becauseone of the wheels is suspended in the air.
When getting out of snow
When the vehicle is unable to get going be-cause one of the wheels is on the snow and
the other on a paved road.
Examples of incorrect use of
the rear differential lock
E00606501128
WARNINGl If the “4L” or “4H” position (Easy select
4WD), “4LLc” or “4HLc” position (Super
select 4WD II) is selected along with the rear differential lock, the following phe-nomena appear and it is very dangerous.
Please be sure to release the rear differen-
tial lock on normal roads.
• If the rear differential lock is used by
mistake when driving on a paved road:
With the rear differential lock on, the power to drive the vehicle straight
ahead becomes very strong, which may make it difficult to turn the steering
wheel.WARNINGl If the rear differential lock is used by mis-
take when turning a curve or making a
right or left turn at a crossing or the like:
The vehicle is unable to make a turn and may go straight ahead.WARNINGl If the rear differential lock is used by mis-
take except when making an emergencyescape on snow or frozen road: It be-
comes difficult to make a steady turn.
Rear differential lock*
6-48OKTE17E1Starting and driving6
Page 165 of 426

WARNINGlIn the case where the condition of the
road is different for the right tyre to drive
from the left tyre (such as one tyre on a paved road and the other on ice), direc- tion of the vehicle may change abruptly
when engine braking or accelerating.
Do not use the rear differential lock ex-
cept when making an emergency escape on a snow or frozen road, but drive with
4WD.4-wheel drive operation*
E00606602171
By selecting 4-wheel drive, both axles of the
vehicle are rigidly connected with each other. This improves the traction characteristics. When turning sharp corners or moving for-
ward and backward repeatedly, however, the drive line is stressed, which is felt as a brak-
ing effect. A 4-wheel drive vehicle can accel-
erate more quickly and smoothly.
However, note that the braking distance is not shorter than that of a rear-wheel drive ve-hicle.
When using 4-wheel drive on rough roads
(snow, mud, sand, etc.), it is important to op- erate the vehicle correctly.NOTEl The driving posture should be more upright
and closer to the wheel than usual; adjust the
seat to a good position for easy steering and pedal operation. Be sure to wear the seatbelt.
l After driving on rough roads, check each
part of the vehicle and wash it thoroughlywith water. Refer to the “Vehicle care” sec-
tion and “Inspection and maintenance fol-
lowing rough road operation” on page 6-52.Driving on dry paved road and
highway
Select “2H” position (Easy select 4WD),
“2H” or “4H” position (Super select 4WD II) to drive on the dry paved road. Especially on
dry highway, never select the “4H” or “4L”
position (Easy select 4WD), “4HLc” or “4LLc” position (Super select 4WD II).
CAUTIONl Selecting “4H” or “4L” position (Easy select
4WD), “4HLc” or “4LLc” position (Super
select 4WD II) to drive on dry paved road will increase the fuel consumption with pos-sible noise generation and early tyre wear.It may also increase the differential oil tem-
perature, resulting in possible damage to the driving system.
Further, the drive train will be subjected to
excessive loading, possibly leading to oil leakage, component seizure, or other serious faults.
Driving on snowy or icy roads
Set the drive mode-selector to “4H” position
(Easy select 4WD), “4H” or “4HLc” position in accordance with the road conditions (Su-
per select 4WD II) and then gradually de-
press the accelerator pedal for a smooth start. Keep the pressure on the accelerator pedal asconstant as possible, and drive at low speed.
4-wheel drive operation*
6-49OKTE17E1Starting and driving6