2017 MITSUBISHI iMiEV tire pressure
[x] Cancel search: tire pressurePage 192 of 296

Economical driving 6-2 Driving safety
6
N00628500029
For economical driving,
there are some tech-
nical requirements that
have to be met. In
order to achieve longer life of the vehicle andthe most economical
operation, we recom-
mend you to have the vehicle checked at reg- ular intervals according to the “WARRANTYAND MAINTENANCE MANUAL”. Avoid driving with the
accelerator pedal fully
depressed, such as for unnecessarily sudden starts, accelerati
on and deceleration.
Smoothly depress the
accelerator pedal.
Observe the speed limit and keep the speed as constant as possi
ble while driving.
Parking for a long period with the ready indi- cator illuminated will shorten the cruisingrange. At higher the vehicle speed the more main drive lithium-ion battery
is consumed. Avoid
driving at full speed. Even a slight release of the accelerator pedal wi
ll save a significant
amount of main drive lithium-ion battery charge. Check the tire inflation pressures at regular intervals Low tire inflat
ion pressure increases
road resistance. In addi
tion, low tire pressures
adversely affect tire we
ar and driving stabil-
ity. Do not drive with unnecessary articles in the luggage compartment. Too much cooling/heating can affect the cruising range, so maintain an appropriatetemperature to exte
nd the cruising range.
N00628900010
Drunk driving is one of the most frequent causes of accidents.
Your driving ability ca
n be seriously impaired
even with blood alcohol levels far below thelegal minimum. If you
have been drinking,
don’t drive. Ride with a designated non- drinking driver, call a cab or a friend, or usepublic transportation. Drinking coffee or tak- ing a cold shower will not make you sober. Similarly, prescription and nonprescriptiondrugs affect your aler
tness, perception and
reaction time. Consul
t with your doctor or
pharmacist before dr
iving while under the
influence of any of
these medications.
N00628600017
The original equipmen
t floor mat provided
with your vehicle was
specifically designed
for your vehicle. Always properly position the floor mat and assure it does not interfere with operation of the pedals. Always use theretaining clip on the driver’s floorboard to secure the floor mat. When used, this clip will help prevent the floor mat from moving for-ward and possibly interfering with the opera- tion of the pedals. To prevent the floor mat
Economical driving Starting and acceleration Idling Speed
Tire inflation pressure Cargo loads Air conditioning Driving, alcohol and drugs
WA R N I N G NEVER DRINK AND DRIVE. Your perceptions ar
e less accurate, your
reflexes are slower and your judgment is impaired.
Floor mat
BK0220401US.book 2 ページ 2015年6月3日 水曜日 午前7時42分
Page 194 of 296

Safe driving techniques 6-4 Driving safety
6
Move the driver’s seat as far backward as possible, while still
keeping good visibil-
ity, and good control of the steering wheel, brakes, accele
rator, and controls.
Check the instrument panel indicators forany possible problem. Move the front passe
nger seat as far back
as possible. Make sure that infa
nts and small children
are properly restrained in accordance with all laws and regulations.
Check these by selecti
ng the defroster mode,
and set the blower swit
ch on high. You should
be able to feel the air blowing against the windshield. (Refer to “Defrosting or defogging the wind- shield and door windows” on page 7-9.) Check all the tires for heavy tread wear or uneven wear patterns.
Look for stones, nails,
glass, or other objects
stuck in the tread. Look
for any tread cuts or sidewall cracks. Check the wheel nuts for tightness, and the tires for proper pressures. Replace your tires beforethey are heavily worn out.
As your vehicle is equi
pped with a tire pres-
sure monitoring system, there is a risk ofdamage to the tire inflation pressure sensors when the tire is replaced on the rim. Tire replacement should, th
erefore, be performed
only by a certified i-MiEV dealer. Have someone watch while you turn all the exterior lights on and off. Also check the turn signal indicators and
high-beam indicators on
the instrument panel. Check the ground under the vehicle after parking overnight, for wa
ter, oil, or other
leaks. Make sure all the fluid levels are cor- rect.
N00629200124
Even this vehicle’s safety equipment, andyour safest driving, cannot guarantee that youcan avoid an accident or injury. However, if you give extra attention to the following areas, you can better protect yourself andyour passengers:
Drive defensively. Be aware of traffic, road and weather conditions. Leave plentyof stopping distance between your vehicle and the vehicle ahead. Before changing lanes, check your mir- rors and use your turn signal light. While driving, watch the behavior of other drivers, bicyc
lists, and pedestrians.
Always obey applicable
laws and regula-
tions. Be a polite and alert driver. Always leave room for unexpected events, such as sudden braking.
N00629400416
Check the 12V starter battery, including terminals and cables. During extremely cold weather, the 12V starter battery willnot be as strong and
its power level may
drop. Before driving the vehicle, check to see ifthe headlights are as bright as normal. Charge or replace the 12V starter battery if necessary. During extreme coldweather, it is possibl
e that a very low 12V
starter battery could freeze.
Defrosters Tires
Lights Fluid leaks Safe driving techniques
Driving during cold weather
BK0220401US.book 4 ページ 2015年6月3日 水曜日 午前7時42分
Page 197 of 296

Loading information Driving safety 6-7
6
It is important to famil
iarize yourself with the
following terms before loading your vehicle: Vehicle maximum load on the tire: load on an individual tire that is determined bydistributing to each axle its share of the maximum loaded vehicle weight and dividing by two. Vehicle normal load on the tire: load on an individual tire that is determined by dis- tributing to each axle its share of the curbweight, accessory weight, and normal occupant weight and dividing by two. Maximum loaded vehicle weight: the sum of - (a) Curb weight; (b) Accessory weight;(c) Vehicle capacity weight; and (d) Production options weight. Curb weight: the weight of a motor vehi- cle with standard e
quipment including the
maximum capacity of oil, and coolant.
Accessory weight: the combined weight (in excess of those st
andard items which
may be replaced) of automatic transmis- sion, power steering, power brakes, power windows, power seats,
radio, and heater,
to the extent that these items are available as factory- installe
d equipment (whether
installed or not). Vehicle capacity weight: the rated cargo and luggage load plus 150 lbs (68 kg)
*
times the vehicle’s designated seating capacity. Production options weight: the combined weight of those installed regular produc- tion options weighing over 5 lbs (2.3 kg) in excess of those standard items whichthey replace, not prev
iously considered in
curb weight or accessory weight, includ- ing heavy duty brakes,
ride levelers, roof
rack, heavy duty battery, and special trim. Normal occupant weight: 150 lbs (68 kg)
*
times the number of specified occupants.(In your vehicle the number is 2) Occupant distributi
on: distribution of
occupants in a vehicle as specified. (Inyour vehicle the distribution is 2 in front seat)
N00630100370
The tire and loading information placard is located on the driver’s door sill. This placard shows the maximum number of occupants permitted to
ride in your vehicle as
well as “the combined
weight of occupants
and cargo” (C), which
is called the vehicle
capacity weight. This
placard also tells you
the size and recomme
nded inflation pressure
for the original equipment tires on your vehi-cle. For more information, refer to “Tires” on page 9-10.
WA R N I N G Never overload your ve
hicle. Overloading
can damage your vehicl
e, adversely affect
vehicle performance, including handlingand braking, cause tire failure, and result in an accident.
* : 150 lbs (68 kg) is the weight of one per- son as defined by U.S.A. and Canadian regulations.
Tire and loading information placard
BK0220401US.book 7 ページ 2015年6月3日 水曜日 午前7時42分
Page 237 of 296

Tire repair kit
For emergencies 8-5
8
If you drive your vehicle with a low battery charge, after the electric motor unit has beenstarted by using jumper
cables, it can cause
the anti-lock braking sy
stem warning light to
illuminate. This is only due to the low batteryvoltage. It is not a problem with the brake system. If this happens, fully charge the 12V starter battery and ensure the charging system is operating properly.
N00836600366
This vehicle is equipped
with a tire repair kit
which can be used to repair a minor puncture in tread area caused by
a nail, screw or simi-
lar object. A spare tire
is not provided with
this vehicle.
N00837701026
The tire repair kit is
stowed under the rear
seat cushion.
N00837800033
1. Pull forward the seat stoppers (A) underthe rear seat cushion (B). 2. Lift up the seat
cushion and pull it for-
ward to remove it. 3. Remove the screws (C) with a coin or the washer (D) at a position shown in the illustration, and re
move the cover (E).
As your vehicle has anti-lock brakes Tire repair kit
WA R N I N G The tire repair kit may not permanently seal a punctured tire. Using the tire repair
kit may damage the
wheel and/or the tire inflation pressuresensor for the tire. The vehicle must promptly be inspected and repaired by a certified i-MiEV dealer after using the tirerepair kit.
Use only the Mitsubishi genuine tire repair kit. Sealant in other repair kits maynot sufficiently seal the tire puncture.
Tire repair kit storage 1- Tire compressorWA R N I N G
2- Tire repair set: Items #3-#8 shown
above
3- Tire sealant bottle4- Filler hose 5- Valve insert (spare)7- Speed restriction sticker 8- Instruction manual for tire repairTo remove
BK0220401US.book 5 ページ 2015年6月3日 水曜日 午前7時42分
Page 241 of 296

Tire repair kit
For emergencies 8-9
8
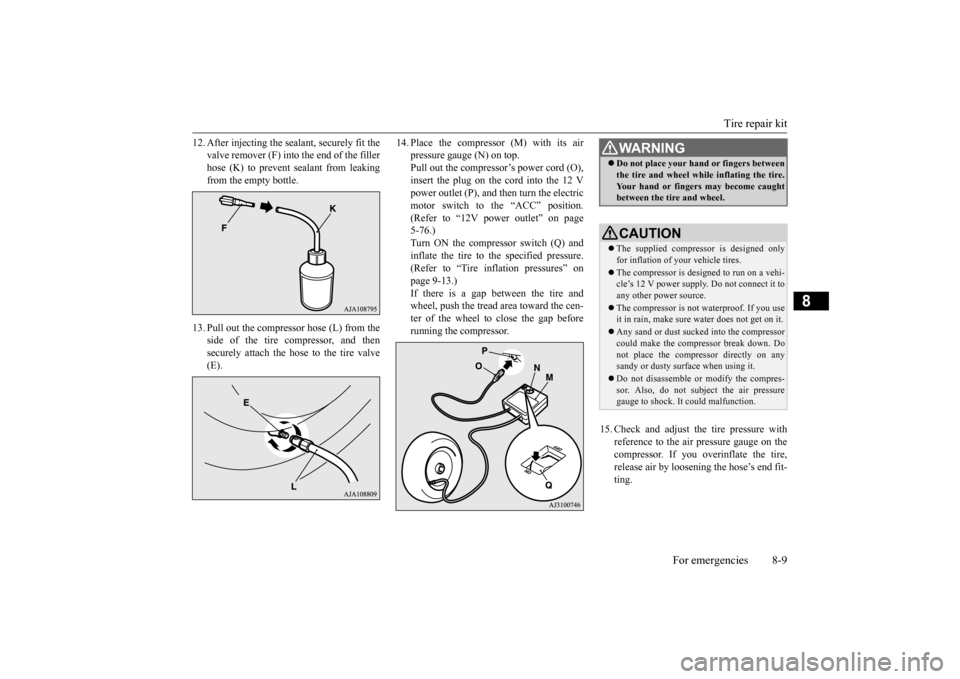
12. After injecting the sealant, securely fit the
valve remover (F) into
the end of the filler
hose (K) to prevent sealant from leaking from the empty bottle.
13. Pull out the compressor hose (L) from the
side of the tire compressor, and thensecurely attach the hose to the tire valve (E).
14. Place the compressor (M) with its air
pressure gauge (N) on top.Pull out the compressor’s power cord (O), insert the plug on the cord into the 12 V power outlet (P), and then turn the electricmotor switch to the “ACC” position. (Refer to “12V power outlet” on page 5-76.)Turn ON the compressor switch (Q) and inflate the tire to the specified pressure. (Refer to “Tire inflation pressures” on page 9-13.) If there is a gap between the tire andwheel, push the tread area toward the cen- ter of the wheel to close the gap before running the compressor.
15. Check and adjust the tire pressure with
reference to the air pressure gauge on the compressor. If you overinflate the tire,release air by loosening the hose’s end fit- ting.WA R N I N G Do not place your hand or fingers between the tire and wheel while inflating the tire.Your hand or fingers may become caughtbetween the tire and wheel.CAUTION The supplied compressor is designed only for inflation of
your vehicle tires.
The compressor is designed to run on a vehi- cle’s 12 V power supply.
Do not connect it to
any other power source. The compressor is not waterproof. If you use it in rain, make sure wa
ter does not get on it.
Any sand or dust sucked into the compressor could make the compressor break down. Donot place the compressor directly on any sandy or dusty surface when using it. Do not disassemble or modify the compres- sor. Also, do not subject the air pressure gauge to shock. It
could malfunction.
BK0220401US.book 9 ページ 2015年6月3日 水曜日 午前7時42分
Page 242 of 296

Tire repair kit 8-10 For emergencies
8
If there is a gap between the tire and wheel because the tire has moved inwardfrom the wheel rim, press the tire tread towards the wheel to close the gap before running the compressor. (With no gaps,the tire pressure will rise.) pull the power cord plug out of the 12 V power outlet.
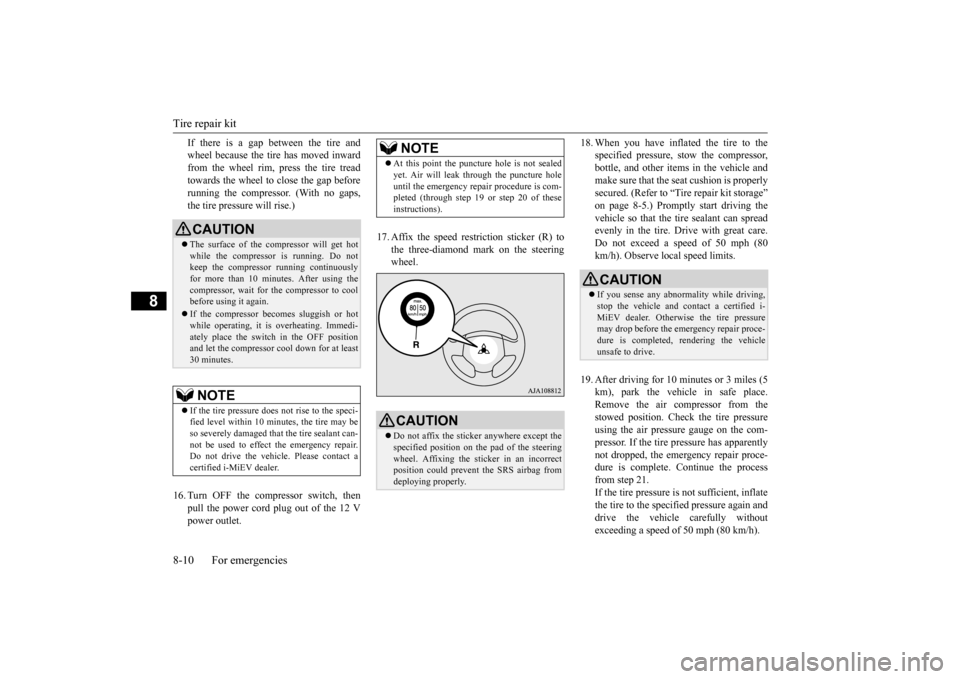
17. Affix the speed restriction sticker (R) to
the three-diamond mark on the steering wheel.
18. When you have inflated the tire to the
specified pressure, stow the compressor,bottle, and other items
in the vehicle and
make sure that the seat cushion is properly secured. (Refer to “Tire repair kit storage” vehicle so that the tire sealant can spread evenly in the tire. Drive with great care.Do not exceed a speed of 50 mph (80 km/h). Observe local speed limits.
19. After driving for 10 minutes or 3 miles (5
km), park the vehi
cle in safe place.
Remove the air compressor from the stowed position. Check the tire pressure using the air pressure gauge on the com-pressor. If the tire pressure has apparently not dropped, the emergency repair proce- dure is complete. Continue the processfrom step 21. If the tire pressure is
not sufficient, inflate
the tire to the specified pressure again anddrive the vehicle carefully without exceeding a speed of 50 mph (80 km/h).
CAUTION The surface of the compressor will get hot while the compressor is running. Do not keep the compressor running continuously for more than 10 minutes. After using thecompressor, wait for the compressor to cool before using it again. If the compressor becomes sluggish or hot while operating, it is
overheating. Immedi-
ately place the switch in the OFF positionand let the compressor cool down for at least 30 minutes.NOTE
If the tire pressure does not rise to the speci- fied level within 10 mi
nutes, the tire may be
so severely damaged that the tire sealant can- not be used to effect the emergency repair. Do not drive the vehicl
e. Please contact a
certified i-MiEV dealer.
NOTE
At this point the punctu
re hole is
not sealed
yet. Air will leak through the puncture holeuntil the emergency repa
ir procedure is com-
pleted (through step 19 or step 20 of these instructions).CAUTION Do not affix the sticke
r anywhere except the
specified position on th
e pad of the steering
wheel. Affixing the sticker in an incorrect position could prevent the SRS airbag fromdeploying properly.
CAUTION If you sense any abnorma
lity while driving,
stop the vehicle and c
ontact a certified i-
MiEV dealer. Otherwise the tire pressure may drop before the emergency repair proce- dure is completed,
rendering the vehicle
unsafe to drive.
BK0220401US.book 10 ページ 2015年6月3日 水曜日 午前7時42分
Page 243 of 296

Towing
For emergencies 8-11
8
Before driving, stow the compressor and make sure that the rear seat cushion isproperly secured.
20. After driving for 10 minutes or 3 miles (5
km) again, check the tire pressure usingthe air pressure gauge on the compressor. If the tire pressure has apparently not dropped, the emergency repair procedureis complete. Before driving, make sure that the compressor is stowed and the seat cushion is properly secured. You muststill not exceed a speed of 50 mph (80 km/h). Observe local speed limits.
21. Immediately drive with great care to a
certified i-MiEV de
aler and have tire
repair/replacement performed.
N00837001931
If you need to tow your
vehicle, contact a cer-
tified i-MiEV dealer or a commercial towtruck service. Transport the vehicle on a flatbed truck or tow the vehicle either with all wheels or the rear wheels (drive wheels) off the ground.
CAUTION If the tire pressure is lower than the mini- mum permitted pressure (18 psi {130 kPa}), the tire cannot successf
ully be repaired with
the tire sealant. Do not drive the vehicle anyfurther. Contact a cert
ified i-MiEV dealer.
NOTE
If the tire pressure has dropped below the specified level when you check it at the endof the repair procedure, do not drive the vehicle any further.
Contact a certified i-
MiEV dealer.
In cold conditions (when the ambient tem- perature is 32 °F {0 °C} or lower), the timeand driving distance ne
cessary until comple-
tion of the repair can
become longer than in
warmer conditions, and the tire pressure may drop below the specified level even after youhave inflated the tire the second time and subsequently driven the vehicle. If this hap- pens, inflate the tire to the specified pressureonce more, drive for about 10 minutes or 3 miles (5 km), then check the tire pressure again. If the tire pressure has again droppedbelow the specified level, stop driving the vehicle and contact
a certified i-MiEV
dealer.NOTE
Please give the empty
sealant bottle to a cer-
tified i-MiEV dealer or
dispose of the sealant
bottle according to re
gulations for the dis-
posal of chemical waste.NOTE
To w i n g If your vehicle needs to be towed Towing with rear wheels off the ground Dolly type Flat bed type
BK0220401US.book 11 ページ 2015年6月3日 水曜日 午前7時42分
Page 245 of 296

Operation under adverse driving conditions
For emergencies 8-13
8
N00837200747
If your vehicle becomes stuck in snow, sand, or mud, it can often be moved by a rocking motion. Rock your vehicle back and forth tofree it. Do not spin the wheels. Constant efforts to free a stuck vehicle can cause transmissionfailure. If your vehicle is still
stuck after several rock-
ing attempts, call for a commercial tow truckservice.
When driving on a road covered with snow or ice, use snow tires. Tire chains cannot be used on your vehicle. Theremay be state or local regulations about using snow tires. Always check the regu- lations in your local area before usingthem. Refer to the section entitled “Snow tires” on page 9-15 and “Tire chains” on page 9-16. Drive slowly. Do not make sudden starts or stops, sharp turns, or slam on the brakes. Allow extra distance between your vehi- cle and the vehicle in front of you, and avoid sudden braking. If a skid occurs when the accelerator pedal is depressed, take your foot off the pedal. Steer gently in the direction of theskid. Your vehicle is equippe
d with an anti-lock
braking system (ABS), hold the brakepedal down firmly and
keep it depressed.
Do not pump the brake pedal which will result in reduced braking performance.
CAUTION If the transmission or the steering system has a problem or damage,
transport the vehicle
on a flatbed truck or to
w the vehicle with the
all wheels off the ground. If the electric motor switch is in the “ON”
lting in an accident.
Make sure the electric motor switch is in the“ACC” position before towing.
Operation under adverse driving conditions If your vehicle becomes stuck in sand, mud or snow
WA R N I N G When trying to rock
your vehicle out of a
stuck position, make sure that there are nopeople nearby. The
rocking motion can
make your vehicle suddenly lurch forward or backward, and inju
re any bystanders.
On wet roads
CAUTIONDo not drive on a flooded road. If you drive on a flooded road, not only the electric motorunit stops but also a fail
ure like electric leak-
age or short circuit may occur. If you inevitably had to run on a floodedroad and the vehicle was exposed to water, be sure to have your vehicle inspected by a certified i-MiEV dealer. When driving in rain, on water-covered roads, or through a car wash, water could getinto the brake discs and make them fail tem- porarily. In such cases, lightly press the brake pedal to see if they are working prop-erly. If they are not, press the pedal lightlyseveral times while driv
ing to dry the brake
pads or linings, then check them again. When driving in rain, a layer of water may form between the tires and the road surface (aquaplaning). This l
oosens your tires’ grip
on the road, making it difficult to steer or brake properly. When driving on a wet road:• Drive your vehicle at a safe speed.
• Do not drive on worn tires.• Always keep the tires at the correct infla- tion pressures.
On snowy or icy roads
CAUTION
BK0220401US.book 13 ページ 2015年6月3日 水曜日 午前7時42分