2017 MITSUBISHI ASX turn signal
[x] Cancel search: turn signalPage 105 of 458
Instruments.......................................................................................... 5-02
Multi-information display................................................................... 5-03 Indication lamp, warning lamp, and information screen display list....................................................................................... 5-26
Indication lamps.................................................................................. 5-44
Warning lamps.................................................................................... 5-45
Information screen display.................................................................. 5-46
Combination headlamps and dipper switch........................................ 5-48
Headlamp levelling............................................................................. 5-53
Turn-signal lever................................................................................. 5-54
Hazard warning flasher switch............................................................5-55 Fog lamp switch.................................................................................. 5-55
Wiper and washer switch.................................................................... 5-56
Rear window demister switch............................................................. 5-62
Horn switch......................................................................................... 5-63Instruments and controls
OGAE17E25
Page 123 of 458

Changing the function settings(when the ignition switch or theoperation mode is ON)
E00522702023
1. Stop the vehicle in a safe place.
Firmly apply the parking brake and put
the gearshift lever into the “N” (Neutral) position ( M/T) or the selector lever into
the “P” (Park) position (A/T or CVT).
2. Lightly press the multi-information me-
ter switch a few times to switch the in-
formation screen to the function setting screen.
Refer to “Information screen (when the
ignition switch or the operation mode is ON)” on page 5-10.
CAUTIONl For safety, stop the vehicle before operating.
While driving, even if you operate the multi- information meter switch, the function set- ting screen is not displayed.
3. Press and hold the multi-information
meter switch for about 2 seconds or more to switch from the setting mode
screen to the menu screen.
Type 1Type 2
NOTEl To return the menu screen to the function
setting screen, press and hold the multi-in-formation meter switch for about 2 seconds
or more.NOTEl If no operations are made within about 15
seconds of the menu screen being displayed,
the display returns to the function setting screen.
4. Select the item to change on the menu
screen and change to the desired setting. Refer to the following items for further
details on the operation methods.
Refer to “Changing the reset mode for
average fuel consumption and average speed” on page 5-20.
Refer to “Changing the fuel consump-
tion display unit” on page 5-21.
Refer to “Changing the temperature unit” on page 5-22.
Refer to “Changing the display lan-
guage” on page 5-22.
Refer to “Operation sound setting” on page 5-23.
Refer to “Changing the time until
“REST REMINDER” is displayed” on
page 5-24.
Refer to “Changing the turn-signal sound” on page 5-25.
Refer to “Changing the momentary fuel
consumption display” on page 5-25.
Refer to “Reset of low tyre pressure warning threshold” on page 6-63
Refer to “Tyre ID set change” on page 6-64
Multi-information display
5-19OGAE17E2Instruments and controls5Type 1 Type 2
Page 129 of 458

Changing the turn-signal sound
E00529101407
It is possible to change the turn-signal sound.
1. Press and hold the multi-information
meter switch for about 2 seconds or more to switch from the setting mode
screen to the menu screen.
Refer to “Changing the function settings (when the ignition switch or the opera-
tion mode is ON)” on page 5-19.
2. Lightly press the multi-information me-
ter switch to select
(changing the
turn-signal sound).
3. Press and hold the multi-information
meter switch for about 2 seconds or more to switch in sequence from 1 (turn- signal sound 1) → 2 (turn-signal sound
2) → 1 (turn-signal sound 1).
The setting changes to the selected turn- signal sound.Changing the momentary fuel
consumption display (Type 2)
E00529200195
It is possible to change the bar graph setting of the momentary fuel consumption display. 1. Press and hold the multi-information
meter switch for about 2 seconds ormore to switch from the setting mode
screen to the menu screen.
Refer to “Changing the function settings (when the ignition switch or the opera-
tion mode is ON)” on page 5-19.
2. Lightly press the multi-information me-
ter switch to select
(changing the
momentary fuel consumption display)
3. Press and hold the multi-information
meter switch for about 2 seconds or more to switch in sequence from ON(with the green bar graph) → OFF (with-
out the green bar graph) → ON (with the green bar graph).
The setting changes to the selected bar
graph setting.
Returning to the factory set-
tings
E00523601888
Many of the function settings can be returned
to their factory settings.
Multi-information display
5-25OGAE17E2Instruments and controls5 Type 1
Type 2
Page 130 of 458

1.Press and hold the multi-information
meter switch for about 2 seconds or more to switch from the setting mode
screen to the menu screen.
Refer to “Changing the function settings (when the ignition switch or the opera-
tion mode is ON)” on page 5-19.
2. Lightly press the multi-information me-
ter switch to select “RESET” (returningto the factory settings).3. When you press and hold the multi-in-
formation meter switch for about 5 sec-
onds or more, the buzzer sounds and all of the function settings are returned to
the factory settings.NOTEl The factory settings are as follows.
• Average fuel consumption and average
speed reset mode: A (Auto reset)
• Fuel consumption display unit: L/100 km
• Temperature unit: °C (Celsius)
• Display language: ENGLISH or RUSSI-
AN
• Cooperative language setting: A
• Operation sounds: ON (Operation sounds
on)
• “REST REMINDER” display: OFF
• Turn-signal sound: Turn-signal sound 1
• Momentary fuel consumption with the
green bar graph (Type 2): ON
l The low tyre pressure warning threshold and
tyre ID set cannot be returned to their facto- ry settings.Indication lamp, warning lamp, and information screen display list
E00523700013
Indication lamp, warning lamp, and information screen display list
5-26OGAE17E2Instruments and controls5Type 1
Type 2
Page 131 of 458

Indication and warning lamp list
E00523802210
1- Position lamp indication lamp® p. 5-44
2- High-beam indication lamp ® p. 5-44
3- Charge warning lamp ® p. 5-46
4- Turn-signal indication lamps/Hazard warning indication lamps ® p. 5-44
5- Front fog lamp indication lamp* ® p. 5-44
6- Rear fog lamp indication lamp ® p. 5-44
7- Anti-lock brake system (ABS) warning lamp ® p. 6-498- Tyre pressure monitoring system warn-
ing lamp* ® p. 6-60
9- Brake warning lamp ® p. 5-45
10- Cruise control indication lamp* ® p. 6-55
11- Seat belt warning lamp ® p. 4-11
12- Supplement Restraint System (SRS) warning lamp ® p. 4-36
13- Check engine warning lamp ® p. 5-45
14- Active Stability Control (ASC) OFF in- dicator* ® p. 6-5315- Active Stability Control (ASC) indica-
tor* ® p. 6-53
16- Auto Stop & Go (AS&G) OFF indica- tion lamp* ® p. 6-22
17- Auto Stop & Go (AS&G) indication lamp* ® p. 6-19
18- Diesel preheat indication lamp (diesel- powered vehicles) ® p. 5-44
19- Information screen display list ® p. 5-28
Indication lamp, warning lamp, and information screen display list
5-27OGAE17E2Instruments and controls5
Page 148 of 458

Indication lampsE00501600100Turn-signal indication lamps/
Hazard warning indication lamps
E00501700361
These indication lamps blink
in the following situations. •When the turn-signal
lever is moved to ac- tivate a turn-signal
lamp.
Refer to “Turn-signal
lever” on page 5-54.
• When the hazard
warning flasher switch is pressed toactivate the hazard
warning lamps.
Refer to “Hazard
warning flasher switch” on page
5-55.
• When the hazard
warning lamps auto- matically activate due
to sudden braking while driving.
Refer to “Emergency
stop signal system*”
on page 6-48.
NOTEl If these indication lamps blink too fast due
to any operation other than sudden braking,
the cause may be a blown lamp bulb or a faulty turn-signal connection.High-beam indication lamp
E00501800173
This indication lamp illumi-
nates when the high-beam is used.
Front fog lamp indication
lamp*
E00501900350
This lamp illuminates while the front fog lamps are on.
Rear fog lamp indication lamp
E00502001326
This lamp illuminates while
the rear fog lamp is on.
Position lamp indication lamp
E00508900173
This indication lamp illumi-
nates while the position lamps are on.
Diesel preheat indication lamp
(diesel-powered vehicles)
E00502300247
This indicates the glow plug
preheat condition.
[Except for vehicles equip-
ped with keyless operation system]
When the ignition switch is
turned to the “ON” position, the lamp illumi-
nates. As the glow plug becomes hot, the lamp goes out and the engine can be started.
[For vehicles equipped with keyless opera- tion system]
When the operation mode is put in ON, the
lamp illuminates and preheating of the glow lamp starts automatically. As the glow plugbecomes hot, the lamp goes out and the en-
gine starts.
Indication lamps
5-44OGAE17E2Instruments and controls5
Page 156 of 458
NOTElThe high-beams can also flash when the
lamp switch is OFF.
l If you turn the lamps off with the headlamps
set to high-beam, the headlamps are auto- matically returned to their low-beam setting
when the lamp switch is next turned to the
“
” position.
Welcome light*
E00528902069
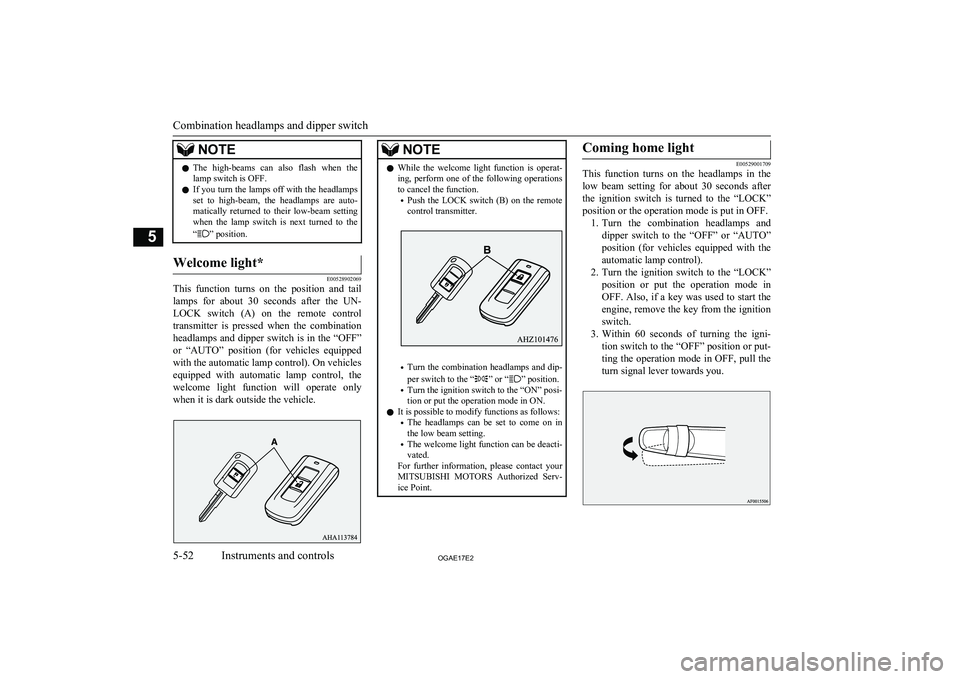
This function turns on the position and tail
lamps for about 30 seconds after the UN- LOCK switch (A) on the remote control
transmitter is pressed when the combination
headlamps and dipper switch is in the “OFF”
or “AUTO” position (for vehicles equipped with the automatic lamp control). On vehicles
equipped with automatic lamp control, the welcome light function will operate only
when it is dark outside the vehicle.
NOTEl While the welcome light function is operat-
ing, perform one of the following operations to cancel the function.
• Push the LOCK switch (B) on the remote
control transmitter.
• Turn the combination headlamps and dip-
per switch to the “” or “” position.
• Turn the ignition switch to the “ON” posi-
tion or put the operation mode in ON.
l It is possible to modify functions as follows:
• The headlamps can be set to come on in
the low beam setting.
• The welcome light function can be deacti-
vated.
For further information, please contact your MITSUBISHI MOTORS Authorized Serv-
ice Point.
Coming home light
E00529001709
This function turns on the headlamps in the
low beam setting for about 30 seconds after the ignition switch is turned to the “LOCK”
position or the operation mode is put in OFF. 1. Turn the combination headlamps and
dipper switch to the “OFF” or “AUTO”
position (for vehicles equipped with the
automatic lamp control).
2. Turn the ignition switch to the “LOCK”
position or put the operation mode in
OFF. Also, if a key was used to start the engine, remove the key from the ignition switch.
3. Within 60 seconds of turning the igni-
tion switch to the “OFF” position or put- ting the operation mode in OFF, pull the
turn signal lever towards you.
Combination headlamps and dipper switch
5-52OGAE17E2Instruments and controls5
Page 157 of 458

4.The headlamps will come on in the low
beam setting for about 30 seconds. After
the headlamps go off, the headlamps can be turned on again in the low beam set-
ting for about 30 seconds by pulling the turn signal lever towards you within 60seconds of turning the ignition switch to
the “LOCK” position or putting the op-
eration mode in OFF.
To turn on the headlamps again after 60 seconds of turning the ignition switch to the “LOCK” position or putting the op-
eration mode in OFF, repeat the process
from step 1.NOTEl While the coming home light function is op-
erating, perform one of the following opera-
tions to cancel the function.
• Pull the lever towards you.
• Turn the combination headlamps and dip-
per switch to the “
” or “” position.
• Turn the ignition switch to the “ON” posi-
tion or put the operation mode in ON.
l It is possible to modify functions as follows:
• The time that the headlamps remain on
can be changed.
• The coming home light function can be
deactivated.
For further information, please contact your MITSUBISHI MOTORS Authorized Serv-
ice Point.
Headlamp levelling
E00517400031Headlamp levelling switch (ex-
cept for vehicles with dischargeheadlamps)
E00517501677
The angle of the headlamp beam varies de-
pending on the load carried by the vehicle.
The headlamp levelling switch can be used to adjust the headlamp illumination distance
(when the lower beam is illuminated) so that the headlamps’ glare does not distract other
drivers.
Set the switch according to the following ta- ble.
CAUTIONl Always perform adjustments before driving.
Do not attempt to adjust while driving, as it could cause an accident.Vehicle conditionSwitch position“0”“0”“1”“2”“3”
●:1 person
:Full luggage loading
Headlamp levelling
5-53OGAE17E2Instruments and controls5