Page 177 of 202

Option 1: selecting the area in the infor-
mation chart
XTo selectLocationin the information chart:
turn and press the controller.
XTo select the current vehicle position:
select Current Position
in the menu.
The multimedia system receives weather data
for the current vehicle position from the near-
est weather station and automatically dis-
plays the data.
Requirement for "Near destination": a route to a
destination has been calculated (
Ypage 59).
The menu item is otherwise grayed out.
XTo select the vicinity of the destination:
select Near
Destination: turn and press the
controller.
XTo select a winter sports area: selectAt
Ski Areafrom the menu: turn the controller
and press to confirm.
XSelect a state.
XSelect a winter sports area from the menu.
The weather data and other information is
displayed for the winter sports area that has
been selected. The data is supplied by the
nearest weather station.
The information chart shows the following infor-
mation (if available):
Rski slopes/ski lifts
Rsnowboarding and nighttime opening
Rsnow conditions (e.g. snow depth)
Rtemperature
The status of a facility is indicated as follows:
Rgreen check mark - open
Rred cross - closed
Rquestion mark - not known
Example: city list with character bar
Entry limitation: searching for a location using
the character bar is not possible while driving.
XTo search for a location: selectSearch
Areas: turn and press the controller.
XSelect Other StatesorCurrent State(ABC).
Depending on the selection, the list of states
or cities will appear with the character bar.
You can limit the search using the character
bar.
XTo select state/province or city: enter the
first few letters by turning and pressing the
controller.
XTo switch to the list without the character bar:
slide 5the controller or select ¬.
XTo delete an entry: select 2in the char-
acter bar and press the controller.
Pressing briefly deletes the last letter
entered.
Pressing and holding longer deletes the entire entry.
XTo select the state/province or city from the
list: turn and press the controller.
After selecting a state (or province) the list of
locations appears.
After selecting a location, the information
chart displays the weather forecast for the
Weather forecasts175
SIRIUS Weather
Page 178 of 202
.
XMove the weather map so that the crosshai")
selected location. The data is supplied by the
nearest weather station.
Option 2: selecting the area in the
weather map
XCall up the weather map (Ypage 176).
XMove the weather map so that the crosshair is
over the desired area (Ypage 176).
XPress the controller.
The information chart shows the weather
forecast for the selected area. The data is
supplied by the nearest weather station.
Memory functions
Storing the area in the weather memory
You can save locations that are called up fre-
quently in ten preset positions (0, 1-9) in the
weather memory.
XIn the weather memory: select the area for
the weather forecast (Ypage 174).
The selected location appears at the top in the status bar.
XTo select Locationin the information chart:
turn and press the controller.
XSelect Preset.
XSelect a preset using the controller.
XPress and hold the controller until you hear a
tone.
The area is entered on the selected preset.
XTo store quickly: in the daily forecast
(Ypage 173) press and hold a number key,
e.g. l, until the preset position number is
shown in the status bar in front of the area
name.
iYou can also use this function in the five-day
forecast (Ypage 173), and in the detailed
information view (Ypage 174).
Selecting an area from the weather
memory
XDirectly from the weather memory: select
Location
from the information chart: turn
and press the controller.
XSelect Preset.
XSelect the memory position which contains
the location you require.
The weather data for the selected area is dis-
played.
XQuick select: if a location is stored in the
weather memory, for example when the cur-
rent forecast display is active, briefly press a
number key, e.g. l.
The weather data for the selected area is dis-
played.
Weather map
Calling up the weather map
XTo select Mapin the information chart: turn
and press the controller.
The weather map is shown on a 500-mi (500-
km) scale. The crosshair highlights the
weather station that supplies the current
weather data.
Moving the weather map
XSlide 4 or1 the controller.
The weather map moves in the corresponding
direction under the crosshair.
Changing the scale
XTurn the controller.
The scale bar appears.
XTurn until the desired scale is set.
Showing/hiding the menu in the
weather map
XTo show: press the controller.
XTo hide:slide5the controller.
176Weather forecasts
SIRIUS Weather
Page 179 of 202
.
XTo show the menu: press the controller.
XTo selectWeather Table: press the control-
ler")
Selecting a weather station in the map
XMove the weather map and crosshair to the
desired position (Ypage 176).
XTo show the menu: press the controller.
XTo selectWeather Table: press the control-
ler.
The multimedia system receives weather data
for the selected position from the nearest
weather station and displays the data as a
current-day forecast.
Switching layers on the map on/off
You can switch on different layers, for example
to display the rain radar, weather fronts and the
course of tropical storms on the map.
XDisplay the menu on the weather map
(Ypage 176).
XTo select View: turn and press the controller.
XSelect a layer.
Switch the display on Oor off ª.
Explanation of the layers on the
weather map
RMenu item Radar Map
Displays the precipitation radar as a color
area in all map scales. For an explanation of
the colors, see the legend (
Ypage 179).
RMenu itemStorm Characteristics
Displays the characteristics of a storm in all
map scales:
-tornadic storm:
storm cell with strong winds (super cell),
from which a tornado can develop. Torna-
does are also known as twisters.
-cyclone: storm cells from which a tornadic storm
can develop
-hailstorm
-the likelihood of a hailstorm
RStorm watch areas
Shows areas for which storm advisories have
been issued (red areas). It is shown in map
scales 50 mi (50 km), 200 mi (200 km) and
500 mi (500 km).
RMenu item Atmospheric Pressure
Shows the position of high and low-pressure
areas (H, L), weather fronts and isobars It is
shown in map scales 200 mi (200 km) and
500 mi (500 km).
RMenu itemTropical Storm Tracking
shows the direction and speed of propagation
of a tropical storm as a track in all map scales.
Information on times and strength is also
given.
RMenu itemWinds
Shows the wind direction and wind speed in
map scale of 5 mi (5 km).
Sample displays of weather data in the
map
XTo display the precipitation radar: activate
the Radar Map
display level (Ypage 177).
The precipitation radar is displayed if weather
data is available.
iYou can call up the legend for the precipita-
tion radar (Ypage 179).
The transparency of the precipitation radar
display level can be adjusted in five stages.
XTo display the storm characteristics: acti-
vate the Storm Characteristics
display
level (Ypage 177).
If weather data is available, the weather map
will then display the storm characteristics.
Weather forecasts177
SIRIUS Weather
Page 180 of 202
.
The following information on a storm cell is
displayed (if available):
Rcharacteristics of the storm cell
Rdate and time of observation (time stamp)")
You can call up the legend for storms
(Ypage 179).
The following information on a storm cell is
displayed (if available):
Rcharacteristics of the storm cell
Rdate and time of observation (time stamp)
Rdirectional movement speed and path
Propagation speed: the speed at which the
storm cell is advancing.
XTo display the weather fronts: activate the
Atmospheric Pressure
display level
(Ypage 177).
If weather data is available, the weather map
will then display the weather fronts.
The example shows the position of high and
low-pressure areas (H, L), weather fronts and
isobars. Isobars are lines that show where the
air pressure is the same.
Legend: weather fronts
Weather
frontExplanation
Cold front
(blue line with
blue triangles)If a cold front moves in, the
weather remains changeable
and there are often rain
showers and thunderstorms. The air temperature decrea-
ses.
Warm front
(red line with
red semi-cir-
cles)A warm front may cause
more prolonged steady rain,
more cloud cover and a slow
rise in temperature.
Weather
frontExplanation
Stationary
front
(red and blue
line with red
semi-circles
and blue trian-
gles)The weather front moves
minimally. The weather
remains changeable in this
area.
Occlusion
(purple line
with purple
semi-circles
and triangles)When the faster cold front
catches up and joins the
warm front ahead of it, an
occluded front is formed. The
weather remains changeable
and rainy within an occlu-
sion.
XTo display the track of a storm: activate the
Tropical Storm Tracking
display level
(Ypage 177).
If weather data is available, the weather map
will then display storm tracking information.
Example: in the middle of the map you can see
the current position of the tropical low-pres-
sure area (cyclone). To the right of this a solid
line shows the previous path with positions
and times. The forecast for the direction of
propagation is shown by a dotted line with
positions and times.
178Weather forecasts
SIRIUS Weather
Page 181 of 202
.
The following information is shown (if available):
Rname of the tropical storm and category
Rtime stamp
Rdirectional")
You can find out more information about cyclo-
nes in the Storm Guide (Ypage 180).
The following information is shown (if available):
Rname of the tropical storm and category
Rtime stamp
Rdirectional movement speed and path
Rmaximum wind speed
Propagation speed: the speed at which the
storm cell of a tropical cyclone is advancing.
A tropical storm is categorized according to
where it originated.
Region of origincategory
Atlantic, North
and South Pacific
OceansName of tropical low-
pressure system (Trop‐
ical Low Press.Sys.)
Atlantic, North
and South Pacific
OceansName of tropical storm
(Tropical Storm)
Atlantic, North
and South Pacific
OceansName of tropical storm
(Hurricane Category
3)
Displays hurricane cate-
gories 1 through 5
Northwestern
Pacific OceanName of tropical storm
(Tropical Low
Press. Sys.)
Northwestern
Pacific OceanName of tropical storm
(Tropical Cyclone)
Northwestern
Pacific OceanName of tropical storm
(Typhoon)
Northwestern
Pacific OceanName of tropical storm
(Super-Typhoon)
You can also see the time stamp for the weather
data on map scales of 50 miles and smaller.
The weather map shows wind directions and
wind speeds.
Legend (precipitation radar and storms)
XDisplay the menu on the weather map
(Ypage 176).
XTo selectView: turn and press the controller.
XSelectLegend.
iThe symbol for a tornadic storm is also valid
for a cyclone (mesocyclone).
Precipita-
tion typeColor scale
RainEleven shades from light to
heavy (light green to red)
MixedShades from light to heavy
(light purple to purple)
SnowShades from light to heavy
(light turquoise to turquoise)
Time stamp
The time stamp shows when the weather data
was created by the weather station.
A time stamp corresponds to the time at the
vehicle's current position. The changeover from
summer time to standard time is performed
automatically.
XDisplay the menu on the weather map
(Ypage 176).
XTo select View: turn and press the controller.
XSelectTime Stamp.
Changing to the information chart
XDisplay the menu on the weather map
(Ypage 176).
XTo select WeatherTable: turn and press the
controller.
Weather forecasts179
SIRIUS Weather
Page 182 of 202

Storm Watch Box
Storm watch areas for which there are storm
advisories are displayed as red areas on the
weather map.
XTo activate/deactivate the storm watch
area display on the map:display the menu
on the weather map (
Ypage 176).
XTo select View: turn and press the controller.
The list of display levels appears.
XSelect Storm Watch.
XSelectShow Symbols for Storm AreasOn Map.
Storm watch areas are displayed Oor are
not displayed ªon the map.
XTo activate/deactivate the automatic dis-
play of storm advisories: selectDisplay
Storm Watch Automatically.
Storm advisories are automatically displayed
O or not displayed ªon the map.
XTo set the radius for storm advisories:
select 5 Miles
,50 Milesor 200 Miles.
Storm Guide
XTo display the storm guide: display the
menu on the weather map (Ypage 176).
XTo select Guide: turn and press the controller.
A menu appears. The current storm is high-
lighted. There is information about the storm
in the status bar.
XTo select Next: turn and press the controller.
The next storm is marked.
XSelect Previous.
The previous storm is highlighted.
XTo display storm details: selectDetails.
You see detailed information about the selec-
ted storm.
180Weather forecasts
SIRIUS Weather
Page 183 of 202

Your multimediasyste mequipment
These operatin ginstruction sdescribe all th e
standar dan doptional equipment of your multi-
media system, as available at th etime of going
to press. Country-specifi cdifference sare pos -
sible. Bear in min dthat your vehicle may no t
feature all function sdescribed here. Thi salso
applies to safety-relevan tsystems an dfunc-
tions.
Read th einformation on qualifie dspecialis t
workshop sin th evehicle Operator's Manual.
Overview
Important safet ynotes
GWARNING
The CD/DVD drive is aclass 1lase rproduct.
If you ope nth ehousin gof th eCD/DVD drive,
there is aris kof exposure to invisible lase r
radiation .Thi slase rradiation could damage
your retina. There is aris kof injury.
Never ope nth ehousing. Always hav emain -
tenanc ean drepair wor kcarrie dout at aquali -
fie dspecialis tworkshop .
GWARNING
If objects suc has headphones/headset sor
external audio/video sources are no tsecure d
in th epassenger compartment, they can be
flun garound an dhit vehicle occupants .There
is aris kof injury, fo rexample in th eevent of
sudden braking or asudden change in direc -
tion .
Always stow these items or similar objects
carefully so that they canno tbe flung around ,
fo rexample in alockable vehicle stowag e
compartment.
Equipment
Observ ethat arange of Rear Seat Entertain -
men tSystems are available fo rMercedes-Ben z
vehicles .In this Operator's Manual, th eRear
Seat Entertainmen tSyste mCode 86 4is used
fo rillustration purposes. If you hav e adifferen t
Rear Seat Entertainmen tSyste min your vehicle,
please refer to th emanufacturer's operatin g
instructions.
Component s
The Rear Seat Entertainmen tSyste mincludes :
Rtwoscreens fo rth erea rbehin dth efront-seat
head restraints
Rtw oremot econtrols
Rasingle drive (rear-compartmen tdrive)
RAU Xjack son bot hrea rscreens (AUX display)
RAU Xjack son th erea rdrive (AUX drive)
Rheadphone sfo reac hrea rscree n
Rtwoset sof cordless headphone s
Rear-compartment screens
:AUXjack s(AUX display)
;Display
Overview181
Rear Seat Entertainment System
Z
Page 184 of 202
 can be found in the rear-compartment drive (Ypage 183).
Remote control
Overview
:Switches the screen on or off
;Switches the button illumination on/off
=Selects the scre")
The same AUX jacks (AUX drive) can be found in the rear-compartment drive (Ypage 183).
Remote control
Overview
:Switches the screen on or off
;Switches the button illumination on/off
=Selects the screen for the remote control
?Selects a menu item
AConfirms a selection or setting
BSwitches the mute function on/off
CAdjusts the volume
DSkips, fast-forward and fast-rewind
ESelects a track; direct entry
FExits a menu (back)
iTwo remote controls are supplied for the US
and Canadian markets.
Selecting the screen for the remote con-
trol
You can use the remote control to operate either
of the two rear screens. To do so, the appropri-
ate rear screen must be selected.
XTo select the left-hand screen: turn thumb-
wheel =until LREAR (Ypage 182) is high-
lighted in the window.
XTo select the right-hand screen: turn
thumbwheel =until REAR Ris highlighted in
the window.
Switching the screen on/off
The switched-on rear compartment screens
switch off after 30 minutes if:
Rthe SmartKey in the ignition lock is in position 0 or 1(see vehicle Operator's Manual)
Rthe SmartKey is not inserted
Before the screens switch off, they show a mes-
sage to this effect.
You can switch the screens back on. However,
this will discharge the starter battery.
XPoint the remote control at the rear-compart- ment screen which has been selected for
remote operation.
XPress button :on the remote control
(Ypage 182).
The rear screen switches on or off.
Switching the button lighting on/off
XPress button ;on the remote control
(Ypage 182).
Depending on the previous status, the button
lighting is switched on or off.
iIf you do not use the remote control for
about 15 seconds, the button lighting
switches off automatically.
Switching the sound on or off
XPress button Bon the remote control
(Ypage 182).
The sound is switched on/off.
Selecting a menu/menu item and con-
firming your selection
XSelect a menu item using the =;
9: buttons on the remote control and
press the 9button to confirm.
182Overview
Rear Seat Entertainment System
 1
1 2
2 3
3 4
4 5
5 6
6 7
7 8
8 9
9 10
10 11
11 12
12 13
13 14
14 15
15 16
16 17
17 18
18 19
19 20
20 21
21 22
22 23
23 24
24 25
25 26
26 27
27 28
28 29
29 30
30 31
31 32
32 33
33 34
34 35
35 36
36 37
37 38
38 39
39 40
40 41
41 42
42 43
43 44
44 45
45 46
46 47
47 48
48 49
49 50
50 51
51 52
52 53
53 54
54 55
55 56
56 57
57 58
58 59
59 60
60 61
61 62
62 63
63 64
64 65
65 66
66 67
67 68
68 69
69 70
70 71
71 72
72 73
73 74
74 75
75 76
76 77
77 78
78 79
79 80
80 81
81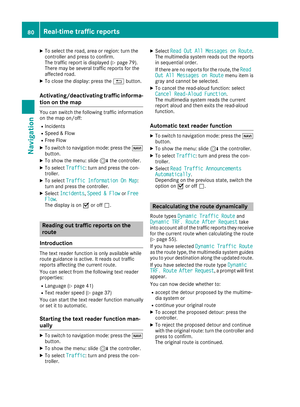 82
82 83
83 84
84 85
85 86
86 87
87 88
88 89
89 90
90 91
91 92
92 93
93 94
94 95
95 96
96 97
97 98
98 99
99 100
100 101
101 102
102 103
103 104
104 105
105 106
106 107
107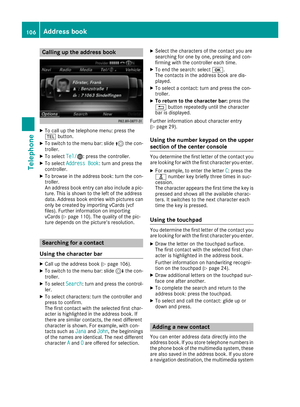 108
108 109
109 110
110 111
111 112
112 113
113 114
114 115
115 116
116 117
117 118
118 119
119 120
120 121
121 122
122 123
123 124
124 125
125 126
126 127
127 128
128 129
129 130
130 131
131 132
132 133
133 134
134 135
135 136
136 137
137 138
138 139
139 140
140 141
141 142
142 143
143 144
144 145
145 146
146 147
147 148
148 149
149 150
150 151
151 152
152 153
153 154
154 155
155 156
156 157
157 158
158 159
159 160
160 161
161 162
162 163
163 164
164 165
165 166
166 167
167 168
168 169
169 170
170 171
171 172
172 173
173 174
174 175
175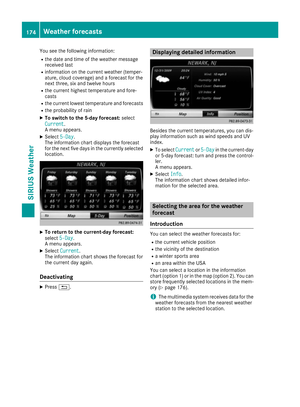 176
176 177
177 178
178 179
179 180
180 181
181 182
182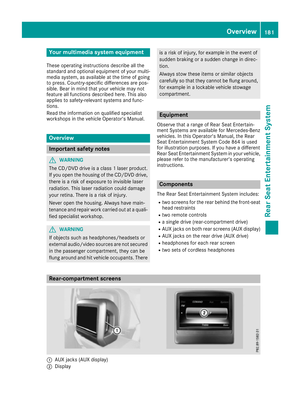 183
183 184
184 185
185 186
186 187
187 188
188 189
189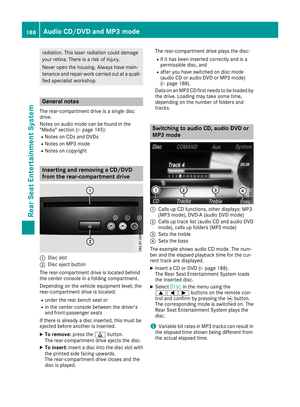 190
190 191
191 192
192 193
193 194
194 195
195 196
196 197
197 198
198 199
199 200
200 201
201