2017 MERCEDES-BENZ S CLASS garage door opener
[x] Cancel search: garage door openerPage 13 of 382

Display message ............................ 228
Function/notes ................................ 71
General notes .................................. 71
Important safety information ........... 71
Trailer stabilization ........................... 72
Warning lamp ................................. 261
ETS/4ETS (Electronic Traction Sys-
tem) ...................................................... 71
Exhaust
see Exhaust pipe
Exhaust check ................................... 165
Exhaust pipe
Cleaning ......................................... 323
Exhaustive discharging (high-volt-
age battery) ....................................... 334
Exterior lighting
Cleaning ......................................... 322
Setting options .............................. 124
see Lights
Exterior mirrors
Adjusting ....................................... 117
Dipping (automatic) ....................... 118
Folding in/out (automatically) ....... 118
Folding in/out (electrically) ........... 118
Out of position (troubleshooting) ... 118
Setting ........................................... 118
Storing settings (memory func-
tion) ............................................... 120
Storing the parking position .......... 119
External audio source
Connecting .................................... 279
Eyeglasses compartment ................. 282
F
Favorites
Overview ........................................ 273
Features ............................................. 290
Filling capacities (Technical data) ... 371
Flat tire
Changing a wheel/mounting the
spare wheel ................................... 362
MOExtended tires .......................... 328
Preparing the vehicle ..................... 327
TIREFIT kit ...................................... 329
Floormats ........................................... 310
Folding table ...................................... 284 Frequencies
Mobile phone ................................. 369
Two-way radio ................................ 369
Fuel
Additives ........................................ 373
Consumption statistics .................. 215
Displaying the current consump-
tion ................................................ 214
Displaying the range ...................... 214
Driving tips .................................... 165
Fuel gauge ....................................... 35
Grade (gasoline) ............................ 372
Important safety notes .................. 372
Problem (malfunction) ................... 161
Refueling ........................................ 159
Tank content/reserve fuel ............. 372
Fuel level
Calling up the range (on-board
computer) ...................................... 214
Fuel tank
Capacity ........................................ 372
Problem (malfunction) ................... 161
Fuses
Allocation chart ............................. 340
Before changing ............................. 341
Dashboard fuse box ....................... 341
Fuse box in the engine compart-
ment .............................................. 341
Fuse box in the front-passenger
footwell .......................................... 341
Fuse box in the trunk ..................... 342
Important safety notes .................. 340
G
Garage door opener
Clearing the memory ..................... 310
General notes ................................ 307
Important safety notes .................. 308
Opening/closing the garage doo r. .3 10
Problems when programming ....... .3 09
Programming (button in the rear-
view mirror) ................................... 308
Synchronizing the rolling code ....... 309
Gasoline ............................................. 372
Gear indicator (on-board com-
puter, Mercedes-AMG vehicles) ....... 226
Genuine parts ...................................... 26Index 11
Page 19 of 382

Q QR code
Mercedes-Benz Guide App ................. 1
Rescue card .................................... .3 1
Qualified specialist workshop ........... 30
Quick access for telephone
Sending DTMF tones ..................... .2 72
R Radiator cover ................................... 313
Radio
Selecting a station ......................... 217
Radio mode
see also Digital Operator's Man-
ual ................................................. .2 69
Radio-wave reception/transmis-
sion in the vehicle
Declaration of conformity ................ 29
Rain closing feature
Panorama sliding sunroof ................ 96
Reading lamp ..................................... 127
Rear compartment
Activating/deactivating climate
control .......................................... .1 35
Setting the air distribution ............. 138
Setting the air vents ..................... .1 43
Setting the airflow ......................... 138
Setting the temperature ................ 137
Stowage compartment .................. 283
Rear Seat Entertainment System
AUX jacks ...................................... 280
AUX jacks CD/DVD drive .............. 279
Rear seats
Adjusting ....................................... 102
Adjusting a rear reclining seat ....... 102
Overview .......................................... 41
Setting the reclined position .......... 103
Rear view camera
Cleaning instructions ..................... 323
Displays in the COMAND display ... 191
Function/notes ............................. 190
Rear window blind ............................ 293
Rear window defroster
Problem (malfunction) ................... 140
Switching on/off ........................... 139 Rear-view mirror
Anti-glare (manual) ........................ 117
Dipping (automatic) ....................... 118
Refrigerant (air-conditioning sys-
tem)
Important safety notes .................. 375
Refueling
Fuel gauge ....................................... 35
Important safety notes .................. 159
see Fuel
Remote control
Garage door opener ....................... 307
Programming (garage door
opener) .......................................... 308
Replacing bulbs
General notes ................................ 128
Reporting safety defects .................... 30
Rescue card ......................................... 31
Reserve (fuel tank)
see Fuel
Reserve fuel
Display mes sage ............................ 244
Warni ng lamp ................................. 264
Residual heat (climate control) ........ 140
Restraint system
Display message ............................ 237
Introduction ..................................... 42
Warning lamp ................................. 263
Warning lamp (function) ................... 43
Reversing feature
Panorama sliding sunroof ................ 95
Roller sunblinds ............................... 96
Side windows ................................... 91
Trunk lid ........................................... 85
ROAD SURFACE SCAN ....................... 181
Roadside Assistance (breakdown) .... 28
Roller sunblind
Panorama roof with power tilt/
sliding panel ..................................... 96
Rear side windows ......................... 293
Rear window .................................. 293
Roller sunblind of the panorama
roof with power tilt/sliding panel
Operating (front roller sunblind) ....... 96
Operating (rear roller sunblind) ........ 97
Roof carrier ........................................ 289 Index 17
Page 309 of 382

Information on Roadside Assistance
( Y
page 28).
Downloading routes Downloading routes allows you to transfer and
save predefined routes in the navigation sys-
tem.
A route can be prepared and sent by either a
customer service representative or under "Own-
ers Online" at http://www.mbusa.com.
Each route can include up to four way points.
Once a route has been received by the naviga-
tion system, you will see the Do you want to
start route guidance? Destination
Received destination has been saved
in "Previous destinations". message on
the multimedia system display.
The route is saved. X
To start route guidance: select Yes .
An overview of the route is shown in the dis-
play.
If you select No , the saved route can be called
up later in the navigation menu. X
Select Start .
Route guidance starts.
Downloaded and saved routes can be called up
again.
Speed alert You can define the upper speed limit, which
must not be exceeded by the vehicle.
If this selected speed is exceeded by the vehicle,
a message will be sent to the Customer Assis-
tance Center. The Customer Assistance Center
then forwards this information to you.
You can select the way in which you receive this
information beforehand. Possible options
include text message, e-mail or an automated
call.
The data you receive contains the following
information: R
the location where the speed limit was excee-
ded R
the time at which the speed limit was excee-
ded R
the selected speed limit which was exceeded Geo fencing Geo fencing allows you to select areas which the
vehicle should not enter or leave. You will be
informed if the vehicle crosses the boundaries
of the selected areas. You can select the way in
which you receive this information beforehand.
Possible options include text message, e-mail or
an automated call.
The area can be determined as either a circle or
a polygon with a maximum of ten corners. You
can specify up to ten areas simultaneously. Dif-
ferent settings are possible for each area.
These settings can be called up under "Owners
Online" at http://www.mbusa.com.
Alternatively, you can trigger an Info call and
notify the customer service representative that
you wish to activate geo-fencing.
Currently inactive areas can be activated by text
message.
Triggering the vehicle alarm With this function, you can trigger the vehicle's
panic alarm via text message. An alarm sounds
and the exterior lighting flashes. Depending on
the setting, the panic alarm lasts five or ten sec-
onds. Afterwards, the alarm switches off.
Garage door opener
General notes The HomeLink ®
garage door opener integrated
in the rear-view mirror allows you to operate up
to three different door and gate systems.
Use the integrated garage door opener only on
garage doors that: R
have safety stop and reverse features and R
meet current U.S. federal safety standards
Once programed, the integrated garage door
opener in the rear-view mirror will assume the
function of the garage door system's remote
control. Please also read the operating instruc-
tions for the garage door system.
When programming a garage door opener, park
the vehicle outside the garage. Do not run the
engine while programming.
Certain garage door drives are incompatible
with the integrated garage door opener. If you
have difficulty programing the integrated garage Features 307
Stowage and features Z
Page 310 of 382

door opener, contact an authorized Mercedes-
Benz Center.
Alternatively, you can call the following tele-
phone assistance services: R
USA: Mercedes-Benz Customer Assistance
Center at 1-800-FOR-MERCedes R
Canada: Customer Service at
1-800-387-0100 R
HomeLink ®
hotline 1-800-355-3515 (free of
charge)
More information on HomeLink ®
and/or com-
patible products is also available online at
http://www.homelink.co m.
Notes on the declaration of conformity
( Y
page 29).
USA: FCC ID: CB2HMIHL4
Canada: IC: 279B-HMIHL4
Important safety notes
G WARNING
When you operate or program the garage door
with the integrated garage door opener, per-
sons in the range of movement of the garage
door can become trapped or struck by the
garage door. There is a risk of injury.
When using the integrated garage door
opener, always make sure that nobody is
within the range of movement of the garage
door.
G WARNING
Combustion engines emit poisonous exhaust
gases such as carbon monoxide. Inhaling
these exhaust gases leads to poisoning. There
is a risk of fatal injury. Therefore never leave
the engine running in enclosed spaces with-
out sufficient ventilation.
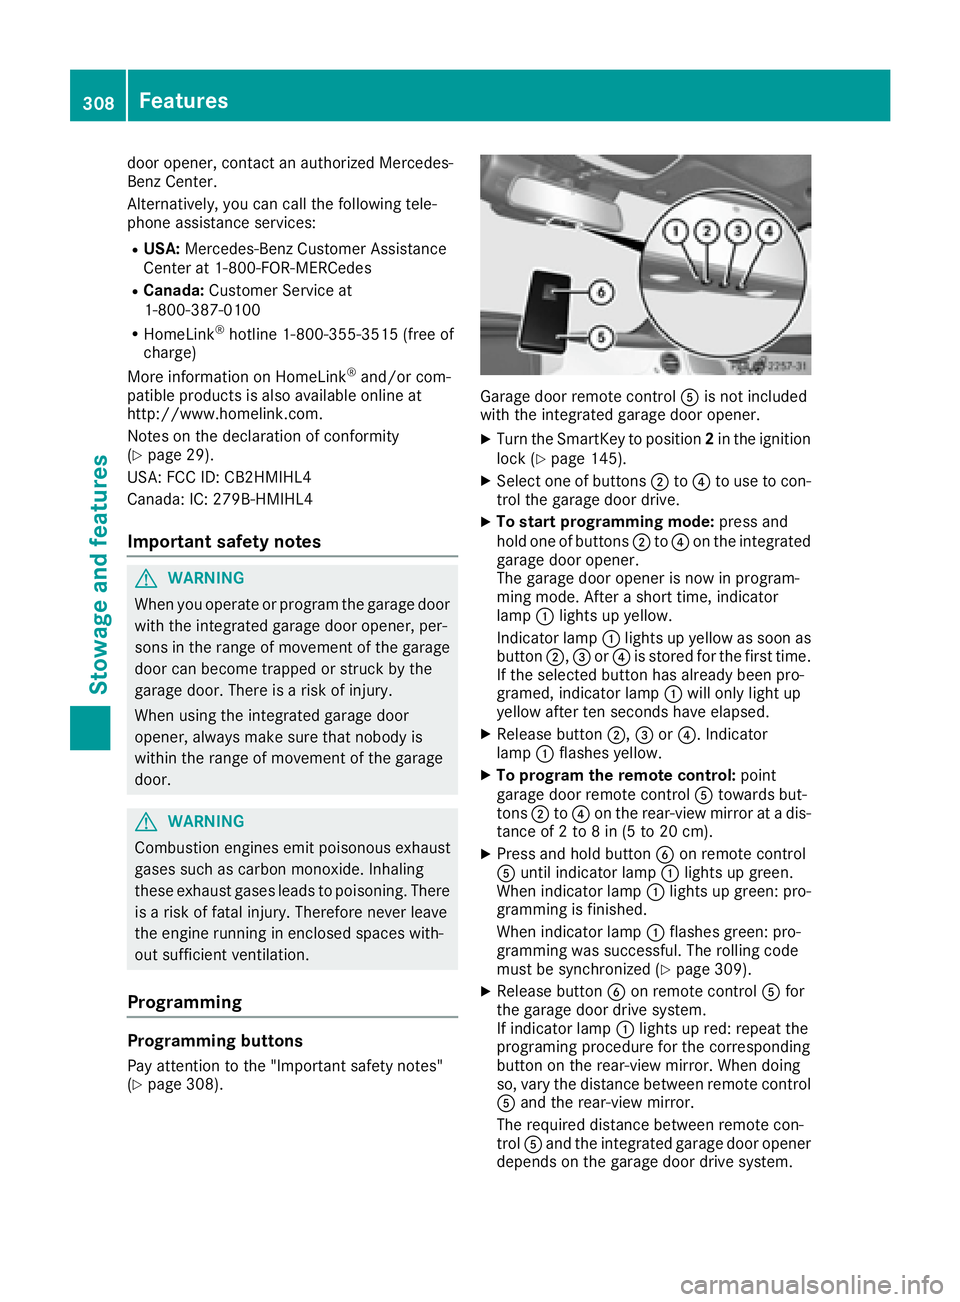
Programming
Programming buttons
Pay attention to the "Important safety notes"
( Y
page 308). Garage door remote control �
Page 311 of 382

Several attempts might be necessary. You
should test every position for at least
25 seconds before trying another position.
Synchronizing the rolling code Pay attention to the "Important safety notes"
( Y
page 308).
If the garage door system uses a rolling code,
you will also have to synchronize the garage
door system with the integrated garage door
opener in the rear-view mirror. To do this you will
need to use the programming button on the door
drive control panel. The programming button
may be located in different places depending on
the manufacturer. It is usually located on the
door drive unit on the garage ceiling.
Familiarize yourself with the garage door drive
operating instructions, e.g. under "Program-
ming additional remote controls", before carry-
ing out the following steps.
Your vehicle must be within reach of the garage
door or gate opener drive. Make sure that nei-
ther your vehicle nor any persons/objects are
present within the sweep of the door or gate. X
Turn the SmartKey to position 2 in the ignition
lock ( Y
page 145).X
Get out of the vehicle. X
Press the programming button on the door
drive unit.
Usually, you now have 30 seconds to initiate
the next step. X
Get into the vehicle. X
Press previously programed button �D , �
Page 312 of 382

The garage door opener is compatible with
devices which operate in the frequency range
of 280 to 433 MHz. R
Replace the batteries in garage door remote
control �