2017 MERCEDES-BENZ S CLASS lock
[x] Cancel search: lockPage 155 of 382
Engaging reverse gear R
! Only shift the automatic transmission to R
when the vehicle is stationary. X
If the transmission is in position D or N : push
the DIRECT SELECT lever up past the first
point of resistance. X
If the transmission is in position P : depress
the brake pedal and push the DIRECT SELECT
lever up past the first point of resistance.
The ECO start/stop function is not available
when reverse gear is engaged. Further informa-
tion on the ECO start/stop function
( Y
page 149).
Shifting to neutral N
G WARNING
If children are left unsupervised in the vehicle,
they could: R
open the doors, thus endangering other
people or road users. R
get out and disrupt traffic. R
operate the vehicle's equipment.
Additionally, children could set the vehicle in
motion if, for example, they: R
release the parking brake. R
shifting the automatic transmission out of
park position PR
Start the engine.
There is a risk of an accident and injury.
When leaving the vehicle, always take the
SmartKey with you and lock the vehicle. Never
leave children or animals unattended in the
vehicle. Always keep the SmartKey out of
reach of children. X
If the transmission is in position D or R : push
the DIRECT SELECT lever up or down to the
first point of resistance. X
If the transmission is in position P : depress
the brake pedal and push the DIRECT SELECT
lever up or down to the first point of resist-
ance.
If you switch the engine off with the transmis-
sion in position R or D , the automatic transmis-
sion shifts to N automatically. With the SmartKey: if you then open the driv-
er's door or the front-passenger door or remove
the SmartKey from the ignition, the automatic
transmission shifts to P automatically.
With the Start/Stop button: if you t hen open
t
he driver's door or the front-passenger door,
the automatic transmission shifts to P automat-
ically.
If you want the automatic transmission to
remain in neutral N , e.g. when having the vehicle
cleaned in an automatic car wash with a towing
system:
Using the SmartKey: X
Switch on the ignition. X
Depress the brake pedal and keep it
depressed. X
Shift to neutral N . X
Release the brake pedal. X
Release the electric parking brake. X
Switch off the ignition and leave the SmartKey
in the ignition lock.
With the Start/Stop button: X
Remove the Start/Stop button from the igni-
tion lock. X
Insert the SmartKey into the ignition lock. X
Switch on the ignition. X
Depress the brake pedal and keep it
depressed. X
Shift to neutral N . X
Release the brake pedal. X
Release the electric parking brake. X
Switch off the ignition and leave the SmartKey
in the ignition lock.
Engaging drive position D X
If the transmission is in position R or N : push
the DIRECT SELECT lever down past the first
point of resistance. X
If the transmission is in position P : depress
the brake pedal and push the DIRECT SELECT
lever down past the first point of resistance.Automatic transmission 153
Driving and parking Z
Page 162 of 382
If you or others come into contact with fuel,
observe the following: R
Wash away fuel from skin immediately
using soap and water. R
If fuel comes into contact with your eyes,
immediately rinse them thoroughly with
clean water. Seek medical assistance with-
out delay. R
If fuel is swallowed, seek medical assis-
tance without delay. Do not induce vomit-
ing. R
Immediately change out of clothing which
has come into contact with fuel.
G WARNING
Electrostatic buildup can create sparks and
ignite fuel vapors. There is a risk of fire and
explosion.
Always touch the vehicle body before opening
the fuel filler flap or touching the fuel pump
nozzle. Any existing electrostatic buildup is
thereby discharged.
Do not get into the vehicle again during the refu-
eling process. Otherwise, electrostatic charge
could build up again.
! Do not use diesel to refuel vehicles with a
gasoline engine. Do not switch on the ignition
if you accidentally refuel with the wrong fuel.
Otherwise, the fuel will enter the fuel system.
Even small amounts of the wrong fuel could
result in damage to the fuel system and the
engine. Notify a qualified specialist workshop
and have the fuel tank and fuel lines drained
completely.
! Overfilling the fuel tank could damage the
fuel system.
! Take care not to spill any fuel on painted
surfaces. You could otherwise damage the
paintwork.
! Use a filter when adding fuel from a fuel can.
The fuel lines and/or the fuel injection system
could otherwise be blocked by particles from
the fuel can.
If you overfill the fuel tank, fuel could spray out
when the fuel pump nozzle is removed. For further information on fuel and fuel quality
( Y
page 372).
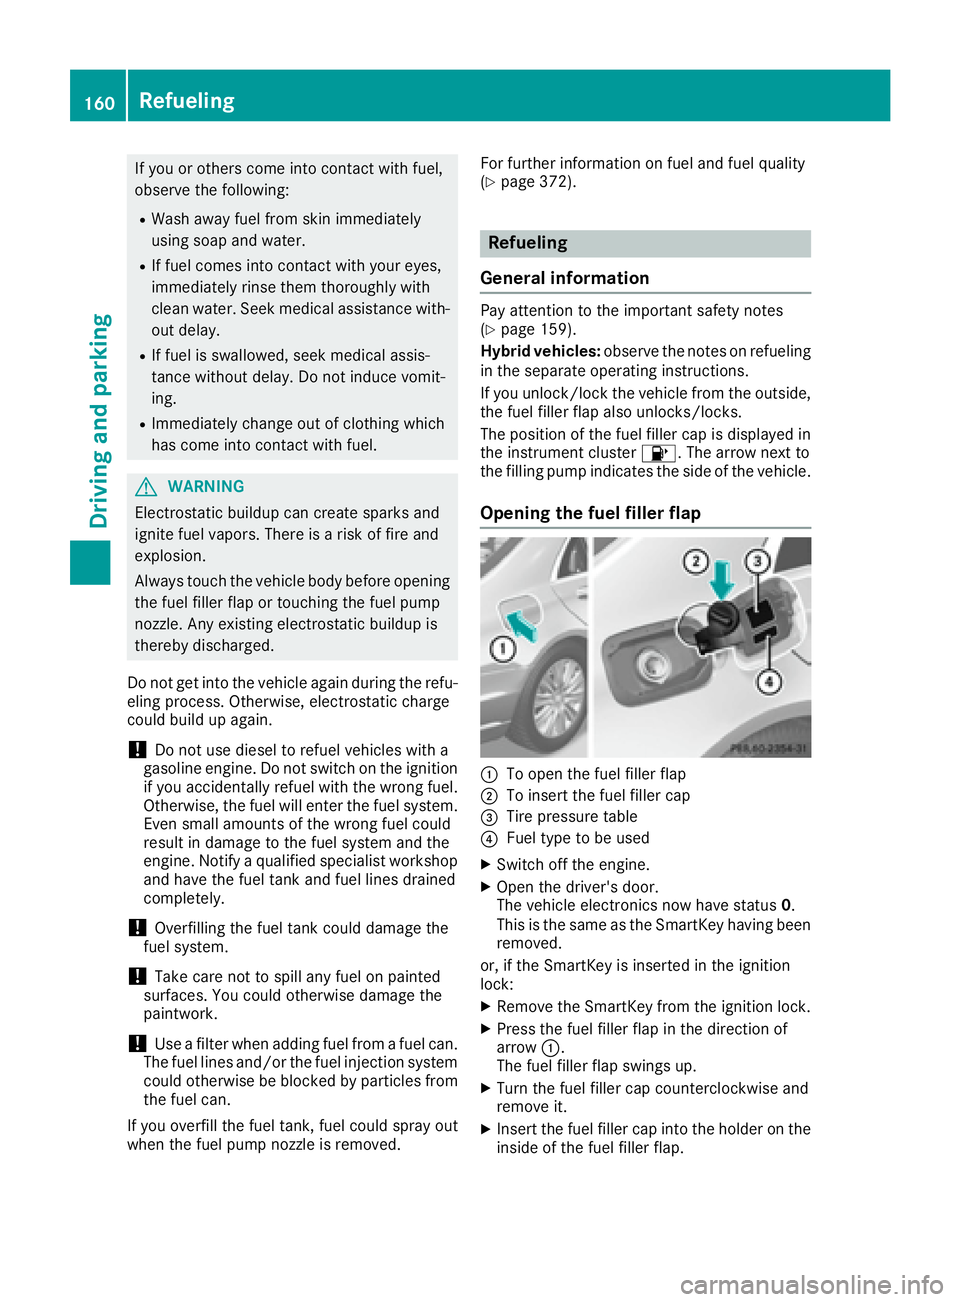
Refueling
General information Pay attention to the important safety notes
( Y
page 159).
Hybrid vehicles: observe the notes on refueling
in the separate operating instructions.
If you unlock/lock the vehicle from the outside,
the fuel filler flap also unlocks/locks.
The position of the fuel filler cap is displayed in
the instrument cluster �
Page 163 of 382
X
Completely insert the fille r neck of the fuel
pump nozz le into the tank, hook in plac e and
refuel. X
On ly fill the tank unt il the pump nozz le
swit ches off.
Do not add any more fuel after the pump stops
filli ng for the first time. Otherwise, fuel may
leak out.
Closing the fuel filler flap X
Replac e the cap on the fille r neck and turn
clock wise unt il it engages audibly.X
Close the fuel fille r flap.
Close the fuel fille r flap before locking the veh i-
cle. If you drive at spee ds above 1 mph (2 km/h)
with the fuel filler flap open, the Fuel Filler
Flap Open message is sho wn in the multifunc-
tion display.
If you are driving wit h the fuel filler cap open, the
�
Page 164 of 382
Parking
Important safety notes
G WARNING
Flammable material such as leaves, grass or
twigs may ignite if they come into contact with
hot parts of the exhaust system or exhaust
gas flow. There is a risk of fire.
Park the vehicle so that no flammable mate-
rials come into contact with parts of the vehi-
cle which are hot. Take particular care not to
park on dry grassland or harvested grain
fields.
G WARNING
If you leave children unsupervised in the vehi-
cle, they could set it in motion by, for example: R
release the parking brake. R
shift the automatic transmission out of the
parking position P .R
start the engine.
In addition, they may operate vehicle equip-
ment and become trapped. There is a risk of
an accident and injury.
When leaving the vehicle, always take the
SmartKey with you and lock the vehicle. Never
leave children unsupervised in the vehicle.
! Always secure the vehicle correctly against
rolling away. Otherwise, the vehicle or its driv-
etrain could be damaged.
To ensure that the vehicle is secured against
rolling away unintentionally: R
the electric parking brake must be applied. R
the transmission must be in position P and the
SmartKey must be removed from the ignition
lock. R
the front wheels must be turned towards the
curb on steep uphill or downhill gradients. R
the empty vehicle must be secured at the
front axle with a wheel chock or similar, for
example, on uphill or downhill gradients. R
a laden vehicle must also be secured at the
rear axle with a wheel chock or similar, for
example, on uphill or downhill gradients. Switching off the engine
G WARNING
The automatic transmission switches to neu-
tral position N when you switch off the engine.
The vehicle may roll away. There is a risk of an
accident.
After switching off the engine, always switch
to parking position P . Prevent the parked vehi-
cle from rolling away by applying the parking
brake. X
Apply the electric parking brake. X
Shift the transmission to position P .X
With the SmartKey: turn the SmartKey to
position 0 in the ignition lock and remove it.
The immobilizer is activated. X
With the Start/Stop button: press the
Start/Stop button ( Y
page 145).
The engine stops and all the indicator lamps in
the instrument cluster go out.
When the driver's door is closed, this corre-
sponds to SmartKey position 1 . When the
driver's door is open, this corresponds to
SmartKey position 0 : "Key removed".
If you switch the engine off with the transmis-
sion in position R or D , the automatic transmis-
sion shifts to N automatically.
With the SmartKey: if you then open the driv-
er's door or the front-passenger door or remove
the SmartKey from the ignition, the automatic
transmission shifts to P automatically.
With the Start/Stop button: if you then open
the driver's door or the front-passenger door,
the automatic transmission shifts to P automat-
ically.
If you want the automatic transmission to
remain in neutral N , e.g. when having the vehicle
cleaned in an automatic car wash with a towing
system: X
Remove the Start/Stop button from the igni-
tion lock. X
Insert the SmartKey into the ignition lock. X
Switch on the ignition. X
Depress the brake pedal and keep it
depressed. X
Shift to neutral N .X
Release the brake pedal.162
Parking
Driving and parking
Page 165 of 382
X
Releas e th e electric parking brake.X
Switc h off th e ignition and leav e th e SmartKey
in th e ignition lock.
The engin e can be switched off in an emergenc y
while th e vehicl e is in motion by pressin g and
holding th e Start/Sto p butto n for three sec -
onds. This function operate s independentl y of
th e ECO start/sto p automatic engin e switch-off
function .
Electric parking brake
General notes
G WARNIN G
If you leav e children unsupervised in th e vehi-
cle , they could set it in motion by, for example: R
release th e parking brake.R
shif t th e automatic transmission out of th e
parking position P .R
start th e engine.
In addition , they may operate vehicl e equip-
men t and become trapped . There is a ris k of
an acciden t and injury.
When leaving th e vehicle, always tak e th e
SmartKey wit h you and loc k th e vehicle. Never
leav e children unsupervised in th e vehicle.
The function of th e electric parking brak e is
dependen t on th e on-board voltage. If th e on -
boar d voltag e is low or there is a malfunction in
th e system, it may no t be possibl e to apply th e
release d parking brake.X
If this is th e case, only park th e vehicl e on
level ground and secure it to preven t it rollin g
away. X
Shift th e automatic transmission to position
P .
It may no t be possibl e to release an applie d
parking brak e if th e on-board voltag e is low or
there is a malfunction in th e system. Contac t a
qualified specialist workshop.
The electric parking brak e performs a function
test at regular intervals while th e engin e is
switched off . The sounds that can be hear d while
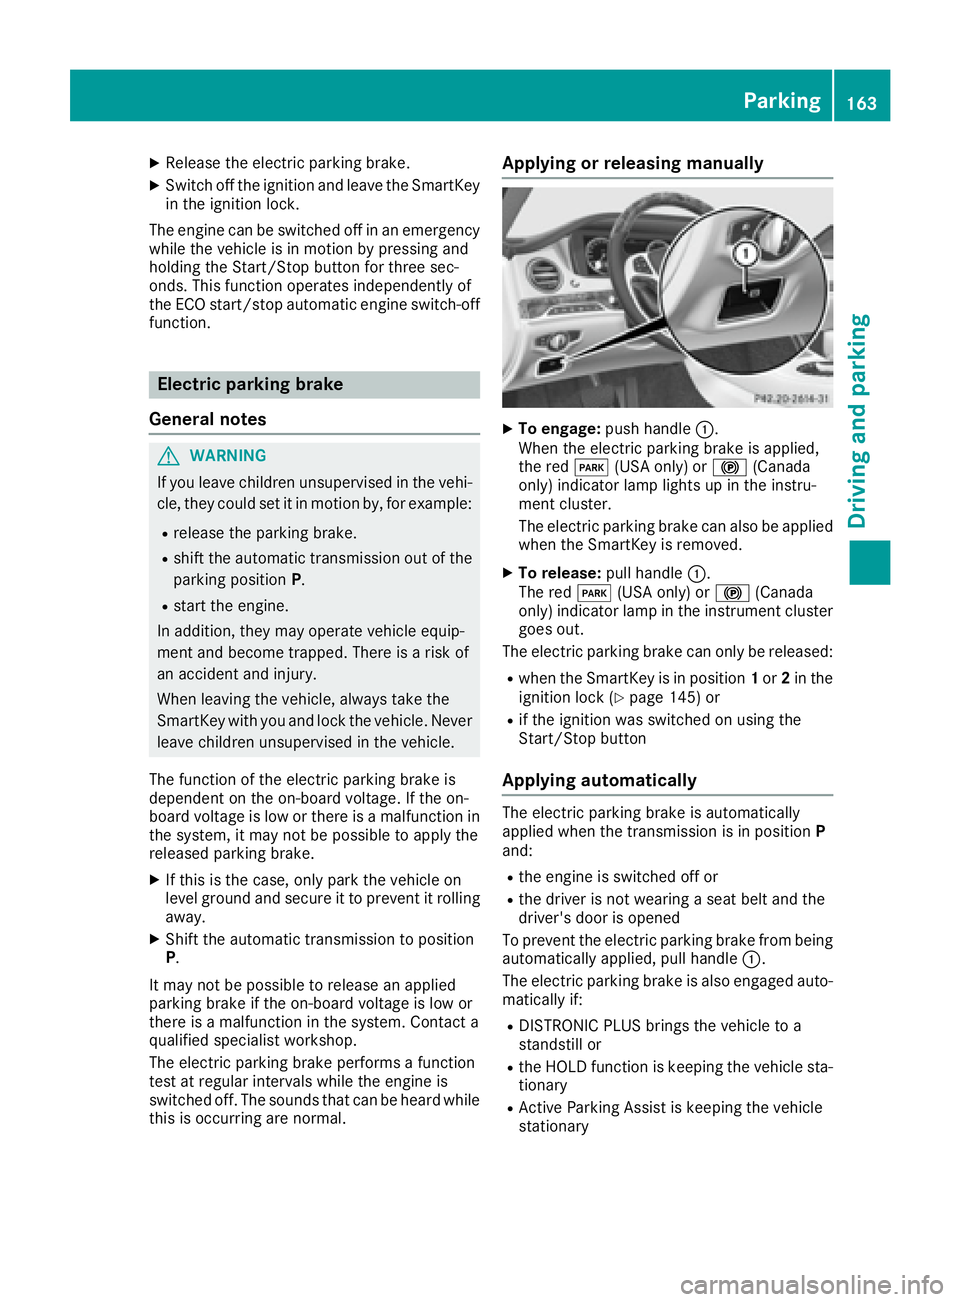
this is occurrin g are normal. Applying or releasing manually X
To engage: push handle �C .
When th e electric parking brak e is applied,
th e red �I (US A only) or �$ (Canada
only) indicator lamp lights up in th e instru-
men t cluster.
The electric parking brak e can also be applie d
when th e SmartKey is removed. X
To release: pull handle �C .
The red �I (US A only) or �$ (Canada
only) indicator lamp in th e instrumen t cluste r
goes out .
The electric parking brak e can only be released:R
when th e SmartKey is in position 1 or 2 in th e
ignition loc k ( Y
page 145) or R
if th e ignition was switched on usin g th e
Start/Sto p butto n
Applying automatically The electric parking brak e is automatically
applie d when th e transmission is in position P
and : R
th e engin e is switched off or R
th e driver is no t wearing a seat belt and th e
driver' s door is opened
To preven t th e electric parking brak e from bein g
automatically applied, pull handle �C .
The electric parking brak e is also engage d auto -
matically if: R
DISTRONI C PLU S brings th e vehicl e to a
standstill or R
th e HOLD function is keepin g th e vehicl e sta-
tionary R
Active Parking Assis t is keepin g th e vehicl e
stationary Parking 163
Driving and parking Z
Page 169 of 382
! Depressing the brake pedal constantly
results in excessive and premature wear to
the brake pads.
If the brakes have been subjected to a heavy
load, do not stop the vehicle immediately. Drive
on for a short while. This allows the airflow to
cool the brakes more quickly.
Wet roads If you have driven for a long time in heavy rain
without braking, there may be a delayed reac-
tion from the brakes when braking for the first
time. This may also occur after the vehicle has
been washed or driven through deep water.
You have to depress the brake pedal more
firmly. Maintain a greater distance from the
vehicle in front.
After driving on a wet road or having the vehicle
washed, brake firmly while paying attention to
the traffic conditions. This will warm up the
brake discs, thereby drying them more quickly
and protecting them against corrosion.
Limited braking performance on salt-
treated roads If you drive on salted roads, a layer of salt resi-
due may form on the brake discs and brake
pads. This can result in a significantly longer
braking distance. R
In order to prevent any salt build-up, apply the
brakes occasionally while paying attention to
the traffic conditions. R
Carefully depress the brake pedal and the
beginning and end of a journey. R
Maintain a greater distance to the vehicle
ahead.
Servicing the brakes
! The brake fluid level may be too low, if: R
if the red brake warning lamp lights up in
the instrument cluster and R
you hear a warning tone while the engine is
running
Observe additional warning messages in the
multifunction display.
The brake fluid level may be too low due to
brake pad wear or leaking brake lines. Have the brake system checked immediately.
Consult a qualified specialist workshop to
arrange this.
! Vehicles with 4MATIC: function or per-
formance tests may only be carried out on a 2-
axle dynamometer. If you wish to operate the
vehicle on such a dynamometer, please con-
sult a qualified specialist workshop in
advance. You could otherwise damage the
drive train or the brake system.
! Vehicles with 4MATIC: the ESP ®
system
operates automatically. The engine and the
ignition must therefore be switched off (the
SmartKey must be in position 0 or 1 in the
ignition lock or the Start/Stop button must be
in position 0 or 1 ) if the electric parking brake
is tested on a brake dynamometer.
Braking triggered automatically by ESP ®
may
cause severe damage to the brake system.
! Vehicles without 4MATIC: the ESP ®
sys-
tem operates automatically. The engine and
the ignition must therefore be switched off
(the SmartKey must be in position 0 or 1 in the
ignition lock or the Start/Stop button must be
in position 0 or 1 ) if: R
the electric parking brake is tested using a
brake dynamometer. R
the vehicle is towed with one axle raised.
Braking triggered automatically by ESP ®
may
cause severe damage to the brake system.
All checks and maintenance work on the brake
system must be carried out at a qualified spe-
cialist workshop.
Have brake pads installed and brake fluid
replaced at a qualified specialist workshop.
If the brake system has only been subject to
moderate loads, you should test the functional-
ity of your brakes at regular intervals.
Information on BAS (Brake Assist) ( Y
page 66)
and BAS PLUS (Brake Assist PLUS) ( Y
page 67).
For safety reasons, Mercedes-Benz recom-
mends only installing the following brake disks
and brake pads/linings: R
brake disks that have been approved by
Mercedes-Benz R
brake pads/linings that have been approved
by Mercedes-Benz or that are of an equiva lent
standard of quality
Other brake disks or brake pads/linings can
compromise the safety of your vehicle. Driving tips 167
Driving and parking Z
Page 171 of 382

G DANGER
If th e exhaust pipe is blocke d or adequate
ventilation is no t possible, poisonous gase s
suc h as carbon monoxide (CO) may ente r th e
vehicle. This is th e case, e.g. if th e vehicl e
become s trapped in snow. There is a ris k of
fatal injury.
If you leav e th e engin e or th e auxiliary heating
running, mak e sur e th e exhaust pipe and area
around th e vehicl e are clear of snow. To
ensur e an adequate supply of fresh air, open a
window on th e side of th e vehicl e that is no t
facing int o th e wind.
Hav e your vehicl e winter-proofe d at a qualified
specialist workshop at th e onset of winter.
Drive particularly carefully on slipper y roa d sur -
faces. Avoid sudden acceleration , steering and
braking maneuvers . Do no t use th e cruise con-
trol or DISTRONI C PLUS.
If th e vehicl e threaten s to skid or canno t be
stoppe d when moving at low speed:X
Shift th e transmission to position N .
The outside temperature indicator is no t
designed to serve as an ice-warning device and
is therefor e unsuitable for that purpose .
Changes in th e outside temperature are dis-
played after a short delay.
Indicate d temperatures jus t abov e th e freezing
poin t do no t guarantee that th e roa d surfac e is
free of ice . The roa d may s till be icy, especially in
w ooded area s or on bridges .
You should pay special attention to roa d condi-
tion s when temperatures are around freezing
point.
Fo r mor e information on drivin g wit h snow
chains, see ( Y
page 345).
Fo r mor e information on drivin g wit h summer
tires , see ( Y
page 345).
Observ e th e note s in th e "Winte r operation " sec -
tion ( Y
page 345).
Driving systems
Mercedes-Benz Intelligent Drive
Mercedes-Ben z Intelligent Drive stand s for inno-
vative driver assistanc e and safet y systems
whic h enhance comfort and support th e driver in critical situations. Wit h these intelligen t co-ordi -
nated systems Mercedes-Ben z has set a mile -
ston e on th e pat h toward s autonomous driving.
Mercedes-Ben z Intelligent Drive embraces all
elements of active and passive safet y in on e well
though t out system – for th e safet y of th e vehi-
cle occupant s and that of other roa d users.
Further information on drivin g safet y systems
( Y
page 65).
Cruise cont rol
Gene ra l notesCruis e control maintains a constan t roa d speed
for you. It brakes automatically in order to avoid
exceedin g th e set speed. Change int o a lower
gear in goo d time on lon g and steep downhill
gradients . This is especially important if th e
vehicl e is laden . By doin g so, you will mak e use
of th e braking effec t of th e engine. This relieves
th e load on th e brak e system and prevents th e
brakes from overheating and wearing to o
quickly.
You can use cruise control if you wan t to drive at
a steady speed for a prolonged period of time.
You can store any roa d speed abov e 20 mph
(30 km/h).
Import ant safety notesIf you fail to adapt your drivin g style, cruise con-
trol can neither reduce th e ris k of an acciden t
no r override th e laws of physics . Cruis e control
canno t tak e int o accoun t th e road, traffic and
weather conditions. Cruis e control is only an
aid. You are responsibl e for maintainin g a saf e
distanc e to th e vehicl e in front, for vehicl e
speed, for braking in goo d time and for stayin g in
lane.
Do no t use cruise control :R
in roa d and traffic condition s whic h do no t
allow you to maintai n a constan t speed, e.g. in
heav y traffic or on windin g roadsR
on slipper y roa d surfaces. Braking or accel-
erating could caus e th e drive wheels to lose
traction and th e vehicl e could then skidR
when there is poor visibility, e.g. due to fog ,
heav y rain or snow
If there is a chang e of drivers, advise th e ne w
driver of th e speed stored.Driving systems 169
Driving and parking Z
Page 182 of 382

The electric parking brake secures the vehicle
automatically if the HOLD function is activated
when the vehicle is stationary and: R
a system malfunction occurs. R
the power supply is not sufficient.
If a malfunction in the electric parking brake
occurs, then the transmission may also be shif-
ted into position P automatically.
MAGIC BODY CONTROL
General notes MAGIC BODY CONTROL consists of Active Body
Control (ABC), ROAD SURFACE SCAN as well as
automatic vehicle stabilization in the event of a
crosswind.
Your vehicle automatically adjusts its ride height
to improve driving safety and reduce fuel con-
sumption. The suspension mode is adjusted
according to your selection (sports or comfort),
the road surface conditions and the vehicle load.
A multifunction camera detects bumps in the
road surface before the vehicle drives over
them. This reduces chassis movements.
Important safety notes
G WARNING
When the vehicle is being lowered, people
could become trapped if their limbs are
between the vehicle body and the wheels or
underneath the vehicle. There is a risk of
injury.
Make sure no one is underneath the vehicle or
in the immediate vicinity of the wheel arches
when the vehicle is being lowered.
! The vehicle is lowered when the engine is
switched off. When parking, position your
vehicle so that it does not make contact with
the curb as the vehicle is lowered. Your vehi-
cle could otherwise be damaged.
Crosswind Assist
The crosswind stabilization operates by chang-
ing wheel loads through adjusting the ABC
spring struts. It reduces impairments in handling
when driving in a straight line and assists during
countersteering. Crosswind Assist is active in the speed range
between 50 mph (80 km/ h) and
130 mph (210 km/h) when driving straight
ahead or cornering gently.
Active Body Control ABC Vehicle level Mercedes-AMG vehicles: depending on the
vehicle level that has been selected, the vehicle
automatically adjusts its height dependent on
the current speed. The vehicle is lowered by up
to 0.4 in (10 mm) below the normal level as the
speed increases. As the speed is reduced, the
vehicle is raised up to the set vehicle height.
All other models: depending on the vehicle
level that has been set, the vehicle automatically
adjusts its height dependent on the current
speed. The vehicle is lowered by up to 0.6 in
(15 mm) as the speed increases. As the speed is
reduced, the vehicle is raised up to the set vehi-
cle height.
Select the "Normal" setting for normal road con-
ditions and "Raised" for driving with snow chains
or in particularly poor road conditions.
Setting the vehicle level X
To raise the vehicle: press button �C .
Indicator lamp �D lights up.X
To lower the vehicle: press button �C again.
Indicator lamp �D goes out.
Your selection remains stored even if you
remove the SmartKey from the ignition lock.
Suspension tuning
The electronically controlled ABC suspension
system detects the vehicle level and the vehicle
load and adjusts the setting accordingly. You
can also choose between a particularly sporty or
a comfortable tuning.180
Driving systems
Driving and parking