2017 MERCEDES-BENZ S CLASS lock
[x] Cancel search: lockPage 183 of 382
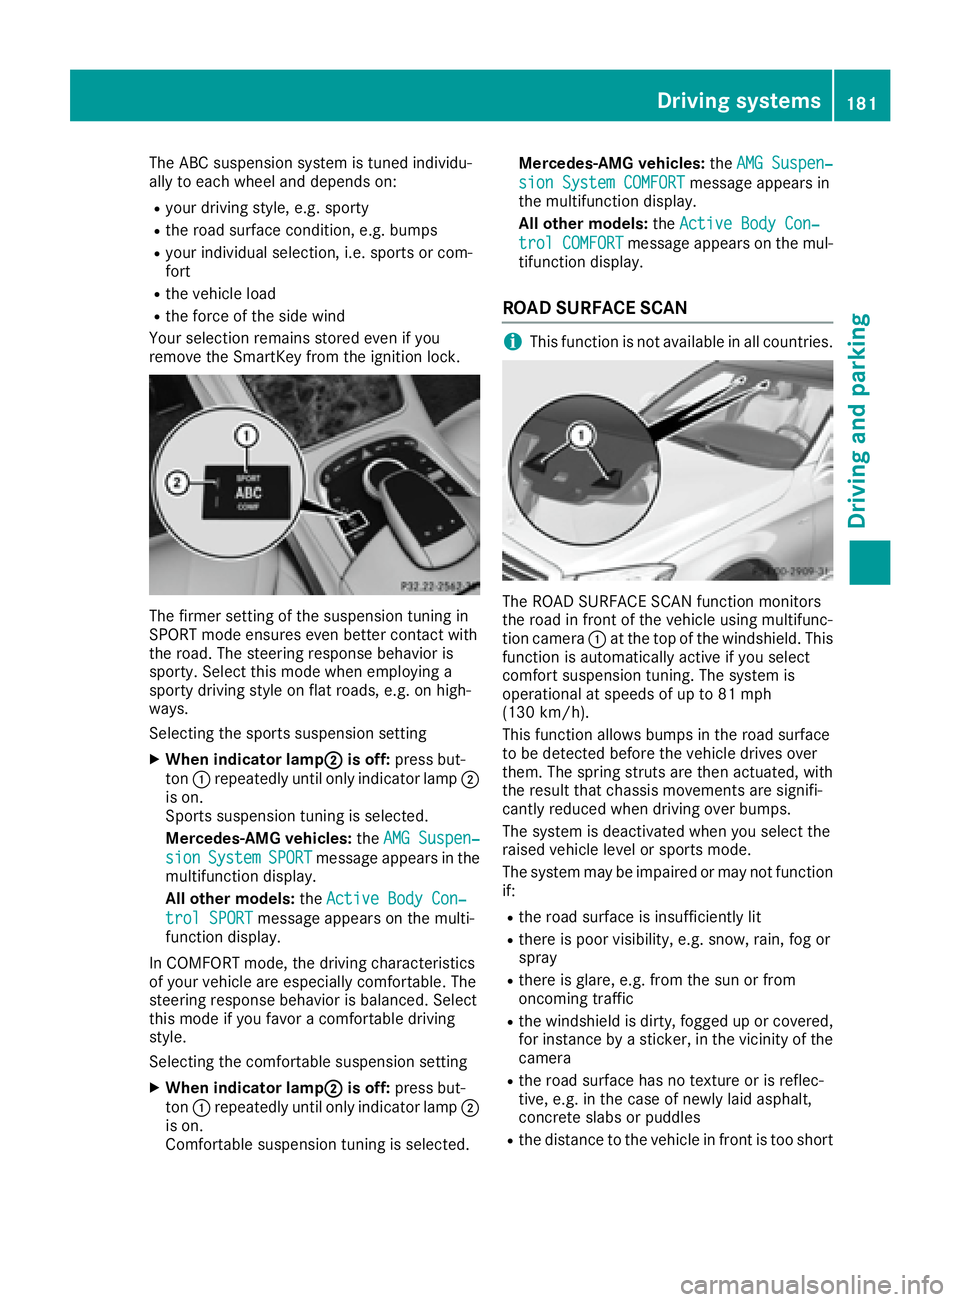
The ABC suspension system is tuned individu-
ally to each wheel and depends on: R
your driving style, e.g. sporty R
the road surface condition, e.g. bumps R
your individual selection, i.e. sports or com-
fort R
the vehicle load R
the force of the side wind
Your selection remains stored even if you
remove the SmartKey from the ignition lock.
The firmer setting of the suspension tuning in
SPORT mode ensures even better contact with
the road. The steering response behavior is
sporty. Select this mode when employing a
sporty driving style on flat roads, e.g. on high-
ways.
Selecting the sports suspension setting X
When indicator lamp �D is off: press but-
ton �C repeatedly until only indicator lamp �D
is on.
Sports suspension tuning is selected.
Mercedes-AMG vehicles: the AMG Suspen‐
sion System SPORT message appears in the
multifunction display.
All other models: the Active Body Con‐
trol SPORT message appears on the multi-
function display.
In COMFORT mode, the driving characteristics
of your vehicle are especially comfortable. The
steering response behavior is balanced. Select
this mode if you favor a comfortable driving
style.
Selecting the comfortable suspension setting X
When indicator lamp �D is off: press but-
ton �C repeatedly until only indicator lamp �D
is on.
Comfortable suspension tuning is selected. Mercedes-AMG vehicles: the AMG Suspen‐
sion System COMFORT message appears in
the multifunction display.
All other models: the Active Body Con‐
trol COMFORT message appears on the mul-
tifunction display.
ROAD SURFACE SCAN
i This function is not available in all countries.
The ROAD SURFACE SCAN function monitors
the road in front of the vehicle using multifunc-
tion camera �C at the top of the windshield. This
function is automatically active if you select
comfort suspension tuning. The system is
operational at speeds of up to 81 mph
(130 km/h).
This function allows bumps in the road surface
to be detected before the vehicle drives over
them. The spring struts are then actuated, with
the result that chassis movements are signifi-
cantly reduced when driving over bumps.
The system is deactivated when you select the
raised vehicle level or sports mode.
The system may be impaired or may not function
if: R
the road surface is insufficiently lit R
there is poor visibility, e.g. snow, rain, fog or
spray R
there is glare, e.g. from the sun or from
oncoming traffic R
the windshield is dirty, fogged up or covered,
for instance by a sticker, in the vicinity of the
camera R
the road surface has no texture or is reflec-
tive, e.g. in the case of newly laid asphalt,
concrete slabs or puddles R
the distance to the vehicle in front is too shortDriving systems 181
Driving and parking Z
Page 184 of 382
R
sections of the route have a very small radius
of curvature R
if you accelerate hard or brake sharply
AIRMATIC
General notes AIRMATIC is an air suspension with variable
damping for improved driving comfort. All-round
level control ensures the best possible suspen-
sion and constant ground clearance, even with a
laden vehicle. When you drive fast, the vehicle is
lowered automatically to improve driving safety
and to reduce fuel consumption. There is also
the option to manually adjust the vehicle level.
AIRMATIC consists of level setting, level control
and the Adaptive Damping System ADS PLUS.
Important safety notes
G WARNING
When the vehicle is being lowered, people
could become trapped if their limbs are
between the vehicle body and the wheels or
underneath the vehicle. There is a risk of
injury.
Make sure no one is underneath the vehicle or
in the immediate vicinity of the wheel arches
when the vehicle is being lowered.
Vehicle level
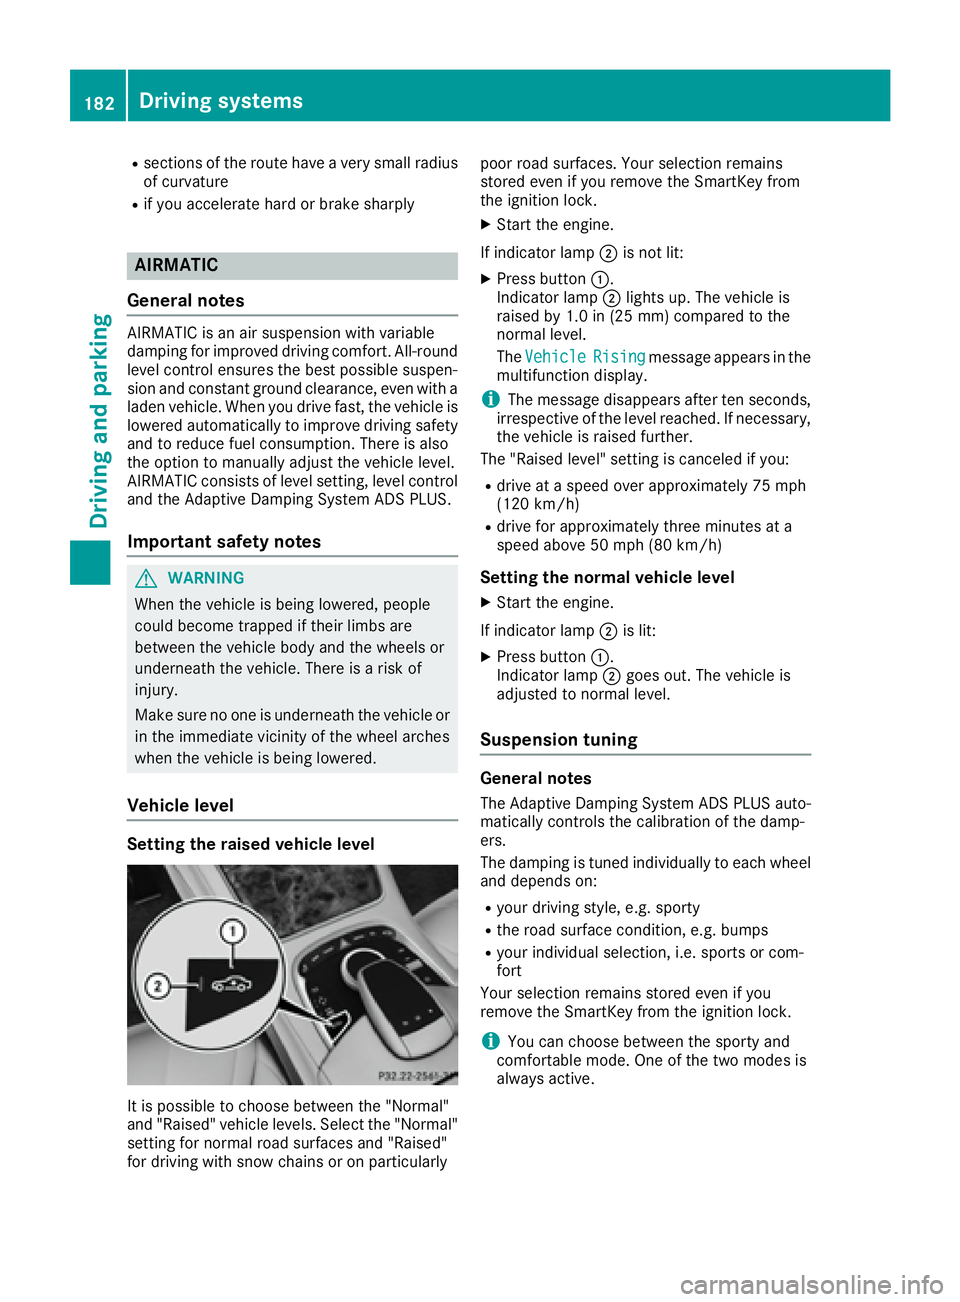
Setting the raised vehicle level
It is possible to choose between the "Normal"
and "Raised" vehicle levels. Select the "Normal"
setting for normal road surfaces and "Raised"
for driving with snow chains or on particularly poor road surfaces. Your selection remains
stored even if you remove the SmartKey from
the ignition lock. X
Start the engine.
If indicator lamp �D is not lit:X
Press button �C .
Indicator lamp �D lights up. The vehicle is
raised by 1.0 in (25 mm) compared to the
normal level.
The Vehicle
Rising message appears in the
multifunction display.
i The message disappears after ten seconds,
irrespective of the level reached. If necessary,
the vehicle is raised further.
The "Raised level" setting is canceled if you: R
drive at a speed over approximately 75 mph
(120 km/h) R
drive for approximately three minutes at a
speed above 50 mph (80 km/h)
Setting the normal vehicle level X
Start the engine.
If indicator lamp �D is lit:X
Press button �C .
Indicator lamp �D goes out. The vehicle is
adjusted to normal level.
Suspension tuning
General notes The Adaptive Damping System ADS PLUS auto-
matically controls the calibration of the damp-
ers.
The damping is tuned individually to each wheel
and depends on: R
your driving style, e.g. sporty R
the road surface condition, e.g. bumps R
your individual selection, i.e. sports or com-
fort
Your selection remains stored even if you
remove the SmartKey from the ignition lock.
i You can choose between the sporty and
comfortable mode. One of the two modes is
always active.182
Driving systems
Driving and parking
Page 189 of 382
Parking tips: R
On narrow roads, drive as close to the parking
space as possible. R
Parking spaces that are littered or overgrown
might be identified or measured incorrectly. R
Parking spaces that are partially occupied by
trailer drawbars might not be identified as
such or be measured incorrectly. R
Snowfall or heavy rain may lead to a parking
space being measured inaccurately. R
Pay attention to the PARKTRONIC
( Y
page 185) warning messages during the
parking procedure. R
You can intervene in the steering procedure
to correct it at any time. Active Parking Assist
will then be canceled R
When transporting a load which protrudes
from your vehicle, you should not use Active
Parking Assist. R
Never use Active Parking Assist when snow
chains are installed. R
Make sure that the tire pressures are always
correct. This has a direct influence on the
parking characteristics of the vehicle.
Use Active Parking Assist for parking spaces: R
parallel or at right angles to the direction of
travel R
that are on straight roads, not bends R
that are on the same level as the road, e.g. not
on the pavement
Detecting parking spaces Objects located above the height range of Active
Parking Assist will not be detected when the
parking space is measured. These are not taken
into account when the parking procedure is cal-
culated, e.g. overhanging loads, truck over-
hangs or loading ramps.
G WARNING
If there are objects above the detection range: R
Active Park Assist may steer too early R
the vehicle may not stop in front of these
objects
You may cause a collision as a result. There is
a risk of an accident. If objects are located above the detection
range, stop and deactivate Active Parking
Assist.
For further information on the detection range
( Y
page 184).
Active Parking Assist does not assist you park-
ing in spaces at right angles to the direction of
travel if: R
two parking spaces are located directly next
to one another R
the parking space is directly next to a low
obstacle such as a low curb R
you park forwards
Active Parking Assist does not assist you park-
ing in spaces that are parallel or at right angles
to the direction of travel if: R
the parking space is on a curb R
the system reads the parking space as being
blocked, for example by foliage or grass pav-
ing blocks R
the area is too small for the vehicle to maneu-
ver into R
the parking space is bordered by an obstacle,
e.g. a tree, a post or a trailer
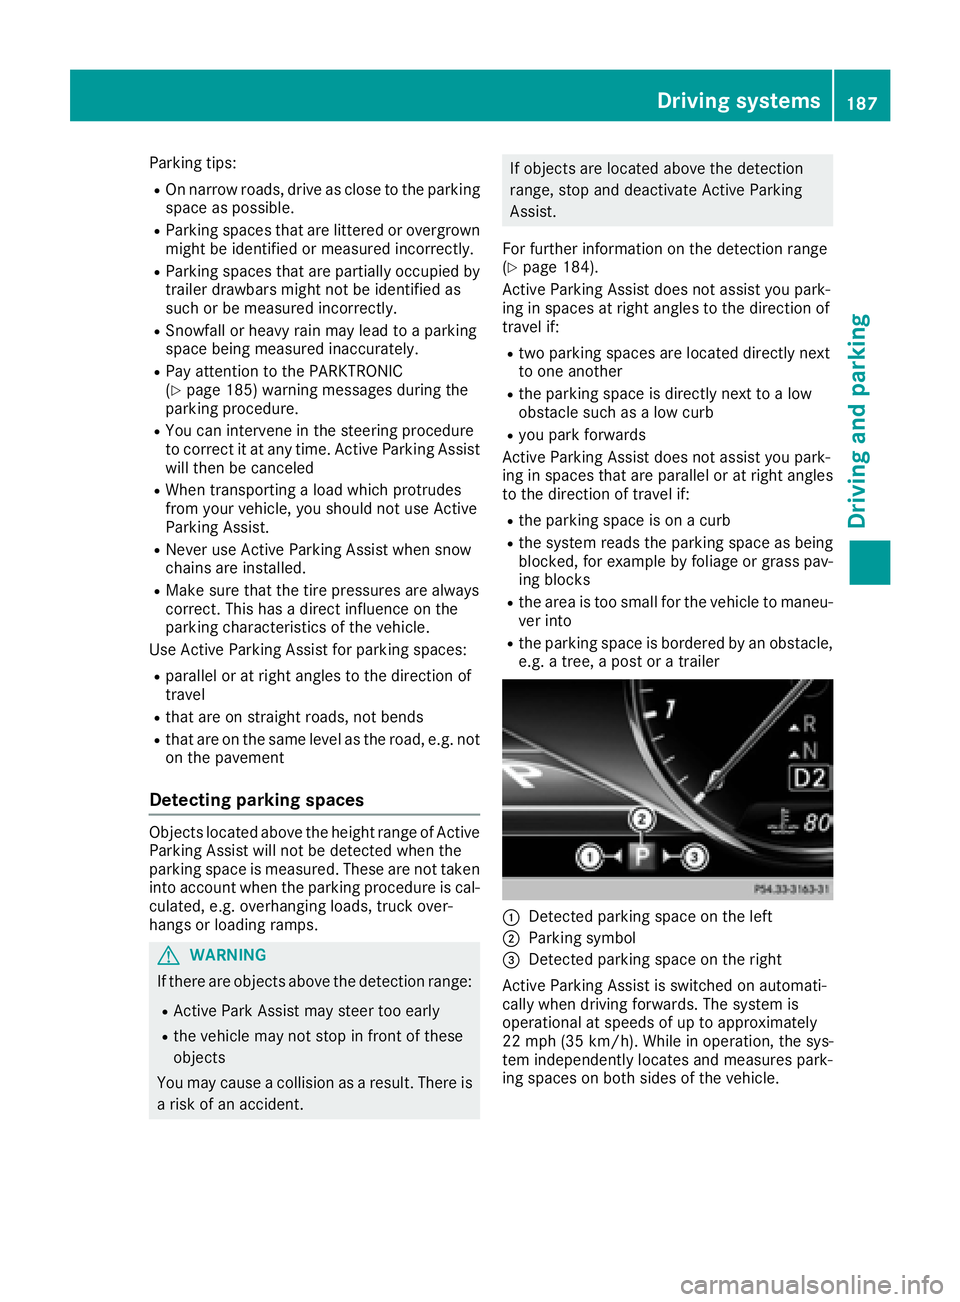
�C
Detected parking space on the left
�D
Parking symbol
�
Page 212 of 382

Important safety notes
G WARNIN G
If you operate information systems and com-
munication equipmen t integrate d in th e vehi-
cle while driving , you will be distracte d from
traffic conditions. You could also lose control
of th e vehicle. Ther e is a ris k of an accident.
Only operate th e equipmen t when th e traffic
situation permits. If you are no t sur e that this
is possible , park th e vehicl e payin g attention
to traffic condition s and operate th e equip-
men t when th e vehicl e is stationary.
You must observ e th e legal requirements for th e
country in whic h you are currentl y driving when
operating th e on-board computer.
G WARNIN G
If th e instrumen t cluste r has faile d or mal-
functioned, you may no t recognize function
restriction s in systems relevan t to safety. The
operating safet y of your vehicl e may be
impaired . Ther e is a ris k of an accident.
Drive on carefully. Hav e th e vehicl e checke d
at a qualified specialist workshop immedi-
ately.
If th e operating safet y of your vehicl e is
impaired , pull ove r as soo n as it is saf e to do so.
Contac t a qualified specialist workshop.
The on-board computer only shows message s or
warning s from certain systems in th e multifunc-
tion display. You should therefor e mak e sur e
your vehicl e is operating safely at all times .
Fo r an overview, see th e instrumen t panel illus-
tration ( Y
page 35).
Hybrid vehicles: mak e sur e that you read th e
separat e Operator's Manual. Otherwise, you
may no t recognize dangers.
Displays and operation
Instrument cluster lighting
The ligh t sensor in th e instrumen t cluste r auto -
matically control s th e brightness of th e multi-
function display. In daylight, th e displays in th e instrumen t cluste r are illuminated. A dimming
function is no t possible in daylight.
The lighting in th e instrumen t cluster, in th e dis-
plays and th e control s in th e vehicl e interior can
be adjusted usin g th e brightness control knob.
The brightness control is locate d between th e
instrumen t cluste r and th e multimedia system
display ( Y
page 36). X
Turn th e brightness control knob clockwise or
counter-clockwise.
If you tur n th e ligh t switch ( Y
page 124) to th e
�` , �X or �X position , th e brightness
will depend upon th e brightness of th e ambi -
en t light.
Speedometer segments The segments in th e speedometer indicat e
whic h spee d range is available. R
Cruis e control activated ( Y
page 169):
The segments ligh t up from th e store d spee d
to th e en d of th e scale.R
DISTRONI C PLU S activated ( Y
page 171):
On e or two segments in th e set spee d range
ligh t up. R
DISTRONI C PLU S detects a vehicl e in fron t
moving mor e slowly than th e store d speed:
The segments between th e spee d of th e vehi-
cle in fron t and th e store d spee d ligh t up.
Tachometer
! Do no t driv e in th e overrevving range, as this
could damag e th e engine.
The red ban d in th e tachometer indicates th e
engine's overrevving range.
The fuel suppl y is interrupted to protect th e
engin e when th e red ban d is reached.
Outside temperature display
You should pay special attention to road condi-
tion s when temperatures are aroun d freezing
point.
Bea r in min d that th e outside temperature dis-
play indicates th e temperature measured and
does no t record th e road temperature.
The outside temperature display is in th e multi-
function display ( Y
page 212).210
Displays and operation
On-board computer and displays
Page 215 of 382

driver to see all of the information without hav-
ing to take their eyes off the road.
A requirement for the display of the contents is
that the following functions are available in the
vehicle and are switched on: R
Cruise control R
DISTRONIC PLUS R
Traffic Sign Assist R
Navigation
Important safety notes The Head-up Display is only an aid and is not a
substitute for attentive driving.
Speed limits and overtaking restrictions are not
always correctly displayed. Traffic signs always
have priority over the Traffic Sign Assist display.
The visibility of the Head-up Display is influ-
enced by the following conditions: R
the driver's seat position R
the positioning of the display image R
the general ambient light R
sunglasses with polarization filters R
wet roads R
blocking of sunlight by objects on the display
cover
In the event of extreme sunlight, sections of the
display may fade. This can be reversed by
switching the Head-up Display off and on again.
i Vehicles with the head-up display are equip-
ped with a special windshield. Should repairs
be necessary, have the windshield replaced at
a qualified specialist workshop.
Displays and operation
Switching the Head-up Display on/off X
Press button �C .
When the Head-up Display is switched on, the
display appears in the driver's field of vision.
Standard displays in the Head-up Display
�C
Navigation messages �D
Current speed �
Page 238 of 382
Display messages
Possible causes/consequences and �P Solutions
The seat belt buckl e extender on th e right or lef t of th e rear compart-
men t is no t in th e predefine d position . The seat belt buckl e extender
may be jammed .
G WARNIN G
If th e seat belt buckl e extender is no t in th e predefine d position , th e
seat belt canno t provid e th e intended level of protection .
There is an increased ris k of injury.X
Mov e th e seat cushion forward s ( Y
page 102) and remove th e caus e
of th e jam . X
Repeat th e seat belt fastenin g procedure .
The seat belt buckl e extender on th e right or lef t of th e rear compart-
men t is no t in th e predefine d position . The seat belt may be locked.
G WARNIN G
If th e seat belt buckl e extender is no t in th e predefine d position , th e
seat belt canno t provid e th e intended level of protection .
There is an increased ris k of injury.X
Completely tak e off your seat belt .X
Repeat th e seat belt fastenin g procedure .
The seat belt buckl e extender on th e right or lef t of th e rear compart-
men t is no t in th e predefine d position . There is no t enough belt slac k
in th e system.
G WARNIN G
If th e seat belt buckl e extender is no t in th e predefine d position , th e
seat belt canno t provid e th e intended level of protection .
There is an increased ris k of injury.X
Loosen th e seat belt .X
Repeat th e seat belt fastenin g procedure .
The seat belt buckl e extender on th e right or lef t of th e rear compart-
men t is no t in th e predefine d position . The assistanc e measures
specified hav e been carrie d out . There is still a malfunction .
G WARNIN G
If th e seat belt buckl e extender is no t in th e predefine d position , th e
seat belt canno t provid e th e intended level of protection .
There is an increased ris k of injury.X
Visit a qualified specialist workshop immediately.236
Display messages
On-board computer and displays
Page 263 of 382

Warning/
indicator
lamp �Q Signal type
Possible causes/consequences and �P Solutions
�%
�Q The yellow ABS warning lamp is lit while the engine is running.
ABS (anti-lock braking system) is malfunctioning.
If there is an additional warning tone, the EBD (electronic brake force distribution)
is malfunctioning.
Other driving systems and driving safety systems may also malfunction.
G WARNING
The brake system continues to function normally, but without the functions listed
above. The front and rear wheels could therefore lock if you brake hard, for exam-
ple.
The steerability and braking characteristics may be severely affected. The braking
distance in an emergency braking situation can increase.
If ESP ®
is not operational, ESP ®
is unable to stabilize the vehicle.
There is an increased risk of skidding and an accident. X
Observe the additional display messages in the multifunction display. X
Drive on carefully. X
Visit a qualified specialist workshop immediately.
If the ABS control unit is faulty, there is also a possibility that other systems, such
as the navigation system or the automatic transmission, will not be available.
�'�M
�
Page 283 of 382
Stowage areas
Loading guidelines
G WARNING
Combustion engines emit poisonous exhaust
gases such as carbon monoxide. Exhaust
gases can enter the vehicle interior if the
trunk lid is open when the engine is running,
especially if the vehicle is in motion. There is a
risk of poisoning.
Always switch off the engine before opening
the trunk lid. Never drive with the trunk lid
open.
G WARNING
If objects, luggage or loads are not secured or
not secured sufficiently, they could slip, tip
over or be flung around and thereby hit vehicle
occupants. There is a risk of injury, particu-
larly in the event of sudden braking or a sud-
den change in direction.
Always store objects so that they cannot be
flung around. Secure objects, luggage or
loads against slipping or tipping before the
journey.
G WARNING
The exhaust tail pipe and tail pipe trim can
become very hot. If you come into contact
with these parts of the vehicle, you could burn
yourself. There is a risk of injury.
Always be particularly careful around the
exhaust tail pipe and the tail pipe trim. Allow
these components to cool down before touch-
ing them.
The handling characteristics of a laden vehicle
are dependent on the distribution of the load
within the vehicle. For this reason, you should
observe the following notes when transporting a
load: R
Never exceed the maximum permissible
gross vehicle mass or the gross axle weight
rating for the vehicle (including occupants).
The values are specified on the vehicle iden- tification plate on the B-pillar of the driver's
door. R
The trunk is the preferred place to carry
objects. R
Position heavy loads as far forwards as pos-
sible and as low down in the trunk as possible. R
The load must not protrude above the upper
edge of the seat backrests. R
Always place the load behind unoccupied
seats if possible. R
Secure the load with sufficiently strong and
wear-resistant tie-downs. Pad sharp edges for
protection.
Stowage spaces
Important safety notes
G WARNING
If objects in the passenger compartment are
stowed incorrectly, they can slide or be
thrown around and hit vehicle occupants. In
addition, cupholders, open stowage spaces
and mobile phone brackets cannot always
retain all objects they contain. There is a risk
of injury, particularly in the event of sudden
braking or a sudden change in direction. R
Always stow objects so that they cannot be
thrown around in such situations. R
Always make sure that objects do not pro-
trude from stowage spaces, parcel nets or
stowage nets. R
Close the lockable stowage spaces before
starting a journey. R
Always stow and secure heavy, hard, poin-
ted, sharp-edged, fragile or bulky objects in
the trunk.
Observe the loading guidelines ( Y
page 281).Stowage areas 281
Stowage and features Z