2017 MERCEDES-BENZ S CLASS instrument cluster
[x] Cancel search: instrument clusterPage 159 of 382
Aut oma tic drive program SDrive program S is characterized by th e follow-
ing : R
sport y engin e settings.R
th e vehicl e pulls away in first gear .R
th e automatic transmission shifts up later.
The fuel consumption possibl y bein g higher
as a result of th e later automatic transmission
shif t points .
Manual drive program M Genera l notesIn this drive program , you can briefl y chang e
gear yourself by usin g th e steering whee l paddl e
shifters. The transmission mus t be in position D .
You can activat e manual drive program M in th e
E ( C in Mercedes-AM G vehicles) and S auto -
matic drive programs.
Mercedes-AMG vehicles: as well as temporar y
drive program M , you can also activat e perma-
nent drive program M . Further information
about permanen t drive program M
( Y
page 158).
Acti va ting X
Shift th e transmission to position D .X
Pull th e lef t or right steering whee l paddl e
shifte r ( Y
page 156).
Manual drive program M is temporarily acti-
vated.
All vehicles (excep t Mercedes-AMG vehi-
cles: )M and the selected gear appear in the
multifunction display.
Shifting gears
If you pull on the left or right steering wheel
paddle shifter, the automatic transmission
switches to manual drive program M for a limi-
ted amount of time. Depending on which steer-
ing wheel paddle shifter is pulled, the automatic
transmission immediately shifts into the next
gear down or up, if permitted. X
To shift up: pull the right-hand steering wheel
paddle shifter ( Y
page 156).
The automatic transmission shifts up to the
next gear.
If the maximum engine speed on the currently
engaged gear is reached and you c ontinue to
ac
celerate, the automatic transmission auto- matically shifts up in order to prevent engine
damage.
Mercedes-AMG vehicles: the automatic
transmission will not shift up to the next gear
when the engine speed is very low. X
To shift down: pull on the left-hand steering
wheel paddle shifter ( Y
page 156).
The automatic transmission shifts down to
the next gear.
If the engine exceeds the maximum engine
speed when shifting down, the automatic
transmission protects against engine damage
by not shifting down.
Automatic down shifting occurs when coast-
ing.
Shift recommendation
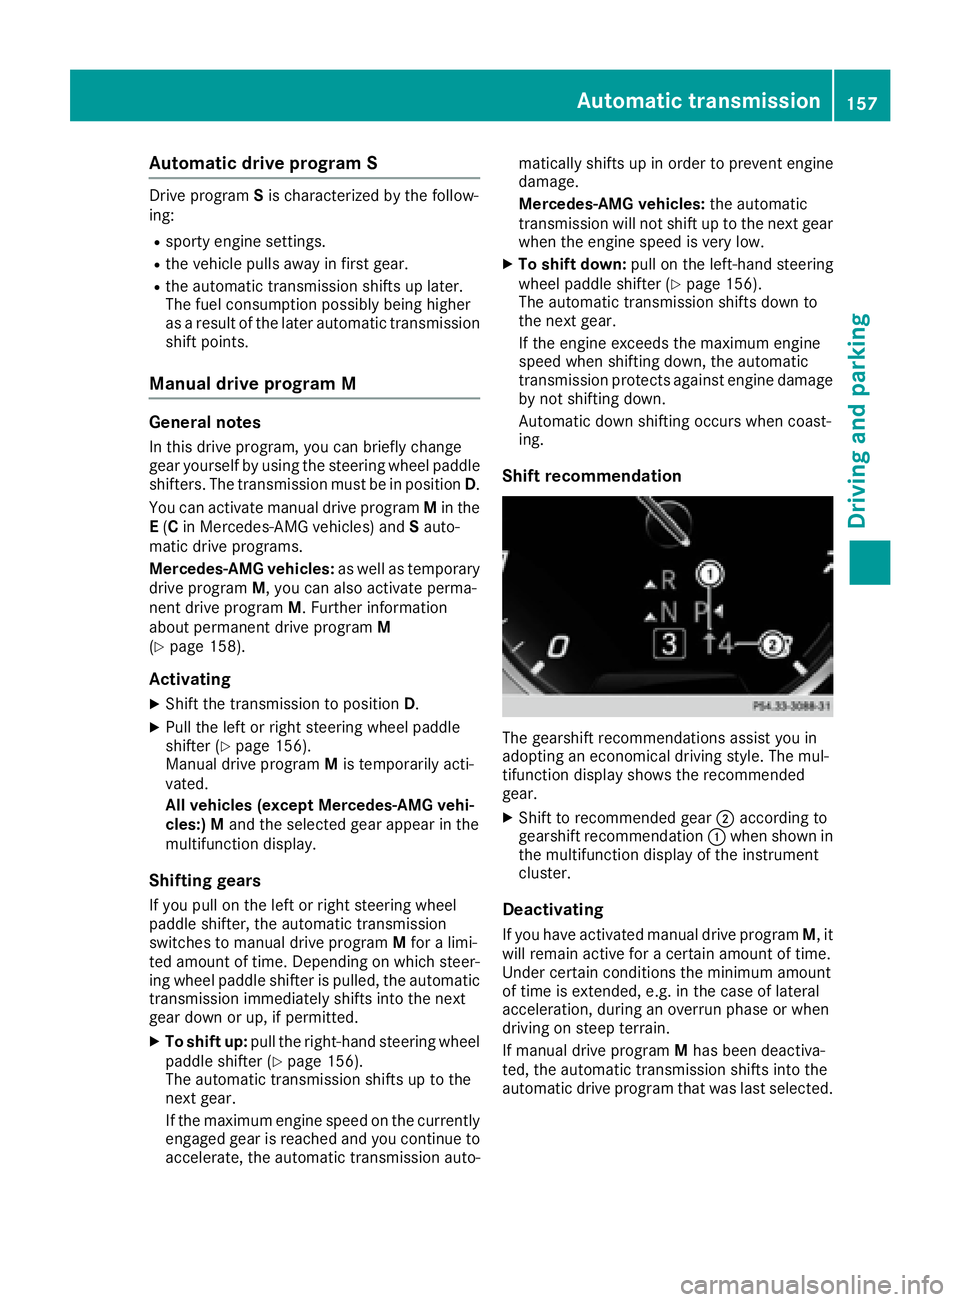
The gearshift recommendations assist you in
adopting an economical driving style. The mul-
tifunction display shows the recommended
gear. X
Shift to recommended gear �D according to
gearshift recommendation �C when shown in
the multifunction display of the instrument
cluster.
Deactivating
If you have activated manual drive program M , it
will remain active for a certain amount of time.
Under certain conditions the minimum amount
of time is extended, e.g. in the case of lateral
acceleration, during an overrun phase or when
driving on steep terrain.
If manual drive program M has been deactiva-
ted, the automatic transmission shifts into the
automatic drive program that was last selected.Automatic transmission 157
Driving and parking Z
Page 162 of 382
If you or others come into contact with fuel,
observe the following: R
Wash away fuel from skin immediately
using soap and water. R
If fuel comes into contact with your eyes,
immediately rinse them thoroughly with
clean water. Seek medical assistance with-
out delay. R
If fuel is swallowed, seek medical assis-
tance without delay. Do not induce vomit-
ing. R
Immediately change out of clothing which
has come into contact with fuel.
G WARNING
Electrostatic buildup can create sparks and
ignite fuel vapors. There is a risk of fire and
explosion.
Always touch the vehicle body before opening
the fuel filler flap or touching the fuel pump
nozzle. Any existing electrostatic buildup is
thereby discharged.
Do not get into the vehicle again during the refu-
eling process. Otherwise, electrostatic charge
could build up again.
! Do not use diesel to refuel vehicles with a
gasoline engine. Do not switch on the ignition
if you accidentally refuel with the wrong fuel.
Otherwise, the fuel will enter the fuel system.
Even small amounts of the wrong fuel could
result in damage to the fuel system and the
engine. Notify a qualified specialist workshop
and have the fuel tank and fuel lines drained
completely.
! Overfilling the fuel tank could damage the
fuel system.
! Take care not to spill any fuel on painted
surfaces. You could otherwise damage the
paintwork.
! Use a filter when adding fuel from a fuel can.
The fuel lines and/or the fuel injection system
could otherwise be blocked by particles from
the fuel can.
If you overfill the fuel tank, fuel could spray out
when the fuel pump nozzle is removed. For further information on fuel and fuel quality
( Y
page 372).
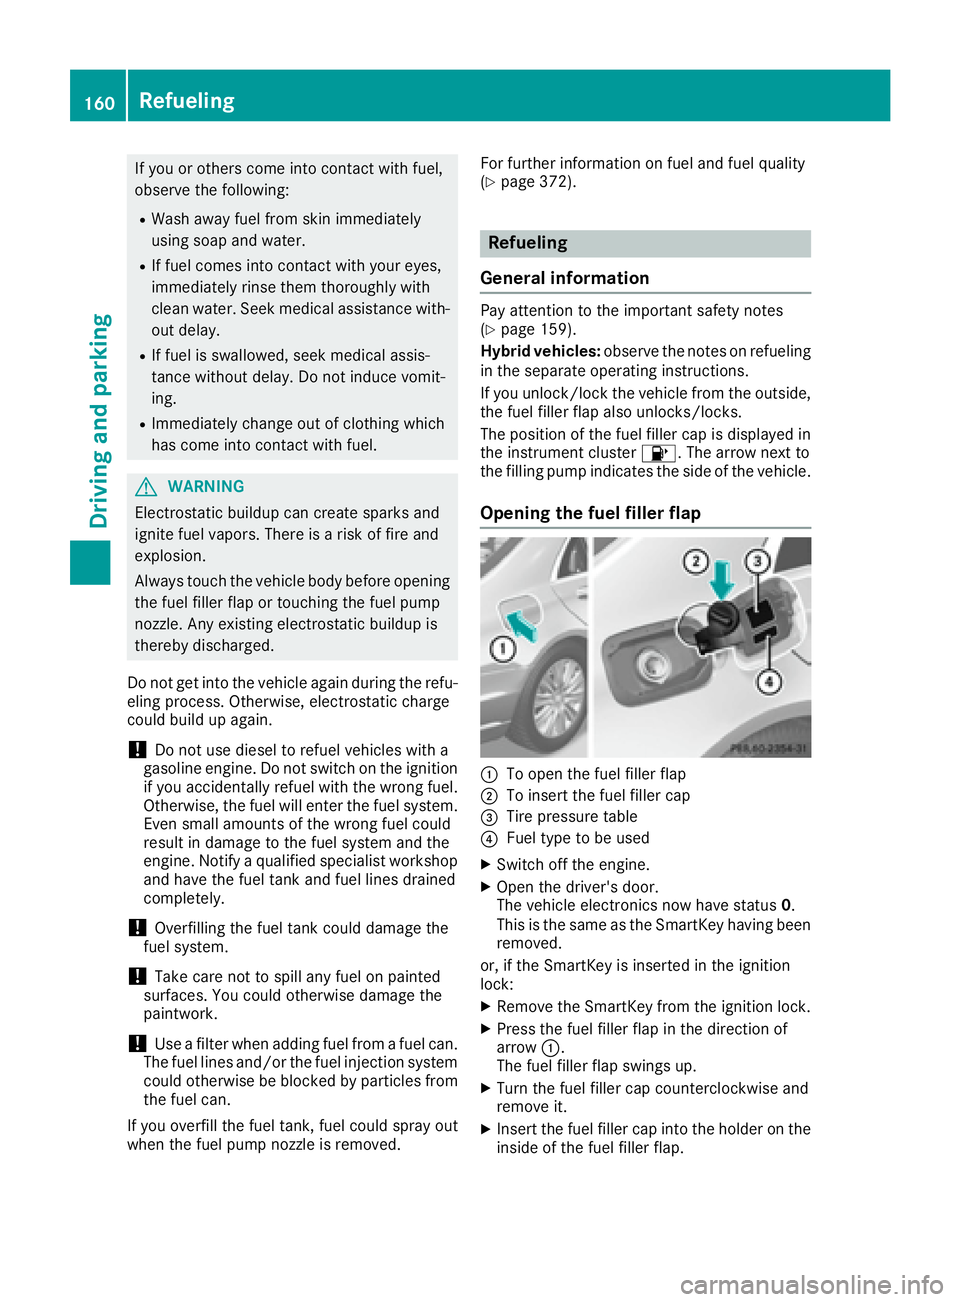
Refueling
General information Pay attention to the important safety notes
( Y
page 159).
Hybrid vehicles: observe the notes on refueling
in the separate operating instructions.
If you unlock/lock the vehicle from the outside,
the fuel filler flap also unlocks/locks.
The position of the fuel filler cap is displayed in
the instrument cluster �
Page 164 of 382
Parking
Important safety notes
G WARNING
Flammable material such as leaves, grass or
twigs may ignite if they come into contact with
hot parts of the exhaust system or exhaust
gas flow. There is a risk of fire.
Park the vehicle so that no flammable mate-
rials come into contact with parts of the vehi-
cle which are hot. Take particular care not to
park on dry grassland or harvested grain
fields.
G WARNING
If you leave children unsupervised in the vehi-
cle, they could set it in motion by, for example: R
release the parking brake. R
shift the automatic transmission out of the
parking position P .R
start the engine.
In addition, they may operate vehicle equip-
ment and become trapped. There is a risk of
an accident and injury.
When leaving the vehicle, always take the
SmartKey with you and lock the vehicle. Never
leave children unsupervised in the vehicle.
! Always secure the vehicle correctly against
rolling away. Otherwise, the vehicle or its driv-
etrain could be damaged.
To ensure that the vehicle is secured against
rolling away unintentionally: R
the electric parking brake must be applied. R
the transmission must be in position P and the
SmartKey must be removed from the ignition
lock. R
the front wheels must be turned towards the
curb on steep uphill or downhill gradients. R
the empty vehicle must be secured at the
front axle with a wheel chock or similar, for
example, on uphill or downhill gradients. R
a laden vehicle must also be secured at the
rear axle with a wheel chock or similar, for
example, on uphill or downhill gradients. Switching off the engine
G WARNING
The automatic transmission switches to neu-
tral position N when you switch off the engine.
The vehicle may roll away. There is a risk of an
accident.
After switching off the engine, always switch
to parking position P . Prevent the parked vehi-
cle from rolling away by applying the parking
brake. X
Apply the electric parking brake. X
Shift the transmission to position P .X
With the SmartKey: turn the SmartKey to
position 0 in the ignition lock and remove it.
The immobilizer is activated. X
With the Start/Stop button: press the
Start/Stop button ( Y
page 145).
The engine stops and all the indicator lamps in
the instrument cluster go out.
When the driver's door is closed, this corre-
sponds to SmartKey position 1 . When the
driver's door is open, this corresponds to
SmartKey position 0 : "Key removed".
If you switch the engine off with the transmis-
sion in position R or D , the automatic transmis-
sion shifts to N automatically.
With the SmartKey: if you then open the driv-
er's door or the front-passenger door or remove
the SmartKey from the ignition, the automatic
transmission shifts to P automatically.
With the Start/Stop button: if you then open
the driver's door or the front-passenger door,
the automatic transmission shifts to P automat-
ically.
If you want the automatic transmission to
remain in neutral N , e.g. when having the vehicle
cleaned in an automatic car wash with a towing
system: X
Remove the Start/Stop button from the igni-
tion lock. X
Insert the SmartKey into the ignition lock. X
Switch on the ignition. X
Depress the brake pedal and keep it
depressed. X
Shift to neutral N .X
Release the brake pedal.162
Parking
Driving and parking
Page 166 of 382
In addition, at least one of the following condi-
tions must be fulfilled: R
the engine is switched off R
the driver is not wearing a seat belt and the
driver's door is opened R
there is a system malfunction R
the power supply is insufficient R
the vehicle is stationary for a lengthy period
The red �I (USA only) or �$ (Canada only)
indicator lamp in the instrument cluster lights
up.
The electric parking brake is not automatically
engaged if the engine is switched off by the ECO
start/stop function.
Releasing automatically The electric parking brake is released automat-
ically when all of the following conditions are
fulfilled: R
the engine is running. R
the transmission is in position D or R .R
the seat belt has been fastened R
you depress the accelerator pedal
If the automatic transmission is in position R ,
the trunk lid must be closed.
If your seat belt is not fastened, the following
conditions must be fulfilled to automatically
release the electric parking brake: R
the driver's door is closed. R
you have shifted out of transmission position
P or you have previously driven faster than
2 mph (3 km/h).
Ensure that you do not depress the accelerator
pedal unintentionally. Otherwise the parking
brake will be released and the vehicle will start
to move.
Emergency braking The vehicle can also be braked during an emer-
gency by using the electric parking brake. X
While driving, push handle �C of the electric
parking brake ( Y
page 163).
The vehicle is braked as long as you keep
handle �C of the electric parking brake
pressed. The longer electric parking brake
handle �C is depressed, the greater the brak-
ing force. During braking: R
a warning tone sounds R
the Please Release Parking Brake mes-
sage appears R
the red �I (USA only) or �$ (Canada
only) indicator lamp in the instrument cluster
flashes
When the vehicle has been braked to a stand-
still, the electric parking brake is engaged.
Parking the vehicle for a long period If you leave the vehicle parked for longer than
four weeks, the battery may be damaged by
exhaustive discharging.
If you leave the vehicle parked for longer than six
weeks, the vehicle may suffer damage as a
result of lack of use. X
Visit a qualified specialist workshop and seek
advice.
Hybrid vehicles: observe the notes on the high-
voltage battery in the separate Operator's Man-
ual.
Driving tips
General driving tips
Important safety notes
G WARNING
If you switch off the ignition while driving,
safety-relevant functions are only available
with limitations, or not at all. This could affect,
for example, the power steering and the brake
boosting effect. You will require considerably
more effort to steer and brake. There is a risk
of an accident.
Do not switch off the ignition while driving.
G WARNING
If you operate mobile communication equip-
ment while driving, you will be distracted from
traffic conditions. You could also lose control
of the vehicle. There is a risk of an accident.
Only operate this equipment when the vehicle
is stationary.164
Driving tips
Driving and parking
Page 169 of 382
! Depressing the brake pedal constantly
results in excessive and premature wear to
the brake pads.
If the brakes have been subjected to a heavy
load, do not stop the vehicle immediately. Drive
on for a short while. This allows the airflow to
cool the brakes more quickly.
Wet roads If you have driven for a long time in heavy rain
without braking, there may be a delayed reac-
tion from the brakes when braking for the first
time. This may also occur after the vehicle has
been washed or driven through deep water.
You have to depress the brake pedal more
firmly. Maintain a greater distance from the
vehicle in front.
After driving on a wet road or having the vehicle
washed, brake firmly while paying attention to
the traffic conditions. This will warm up the
brake discs, thereby drying them more quickly
and protecting them against corrosion.
Limited braking performance on salt-
treated roads If you drive on salted roads, a layer of salt resi-
due may form on the brake discs and brake
pads. This can result in a significantly longer
braking distance. R
In order to prevent any salt build-up, apply the
brakes occasionally while paying attention to
the traffic conditions. R
Carefully depress the brake pedal and the
beginning and end of a journey. R
Maintain a greater distance to the vehicle
ahead.
Servicing the brakes
! The brake fluid level may be too low, if: R
if the red brake warning lamp lights up in
the instrument cluster and R
you hear a warning tone while the engine is
running
Observe additional warning messages in the
multifunction display.
The brake fluid level may be too low due to
brake pad wear or leaking brake lines. Have the brake system checked immediately.
Consult a qualified specialist workshop to
arrange this.
! Vehicles with 4MATIC: function or per-
formance tests may only be carried out on a 2-
axle dynamometer. If you wish to operate the
vehicle on such a dynamometer, please con-
sult a qualified specialist workshop in
advance. You could otherwise damage the
drive train or the brake system.
! Vehicles with 4MATIC: the ESP ®
system
operates automatically. The engine and the
ignition must therefore be switched off (the
SmartKey must be in position 0 or 1 in the
ignition lock or the Start/Stop button must be
in position 0 or 1 ) if the electric parking brake
is tested on a brake dynamometer.
Braking triggered automatically by ESP ®
may
cause severe damage to the brake system.
! Vehicles without 4MATIC: the ESP ®
sys-
tem operates automatically. The engine and
the ignition must therefore be switched off
(the SmartKey must be in position 0 or 1 in the
ignition lock or the Start/Stop button must be
in position 0 or 1 ) if: R
the electric parking brake is tested using a
brake dynamometer. R
the vehicle is towed with one axle raised.
Braking triggered automatically by ESP ®
may
cause severe damage to the brake system.
All checks and maintenance work on the brake
system must be carried out at a qualified spe-
cialist workshop.
Have brake pads installed and brake fluid
replaced at a qualified specialist workshop.
If the brake system has only been subject to
moderate loads, you should test the functional-
ity of your brakes at regular intervals.
Information on BAS (Brake Assist) ( Y
page 66)
and BAS PLUS (Brake Assist PLUS) ( Y
page 67).
For safety reasons, Mercedes-Benz recom-
mends only installing the following brake disks
and brake pads/linings: R
brake disks that have been approved by
Mercedes-Benz R
brake pads/linings that have been approved
by Mercedes-Benz or that are of an equiva lent
standard of quality
Other brake disks or brake pads/linings can
compromise the safety of your vehicle. Driving tips 167
Driving and parking Z
Page 170 of 382

Always replace all brake disks and brake pads/
linings on an axle at the same time. Always
install new brake pads/linings when replacing
brake disks.
The vehicle is equipped with lightweight brake
disks to which the wheel assembly with rim and
threaded connection is matched.
The use of brake disks other than those
approved by Mercedes-Benz can change the
track width and is subject to approval, if appli-
cable.
Shock-type loads when handling the brake
discs, such as when changing wheels, can lead
to a reduction in comfort when driving with light-
weight brake discs. Avoid shock-type loads on
the lightweight brake disks, particularly on the
brake plate.
Mercedes-Benz recommends that you only use
brake fluid that has been specially approved for
your vehicle by Mercedes-Benz, or which corre-
sponds to an equivalent quality standard. Brake
fluid which has not been approved for
Mercedes-Benz vehicles or which is not of an
equivalent quality could affect your vehicle's
operating safety.
AMG high-performance and ceramic
brakes The high-performance brake system is only
available on Mercedes-AMG vehicles.
The AMG brake systems are designed for heavy
loads. This may lead to noise when braking. This
will depend on: R
Speed R
Braking force R
Environmental conditions, such as tempera-
ture and humidity
The wear of individual components of the brake
system, such as the brake pads/linings or brake
discs, depends on the individual driving style
and operating conditions.
For this reason, it is impossible to state a mile-
age that will be valid under all circumstances. An
aggressive driving style will lead to high wear.
You can obtain more information on this from a
qualified specialist workshop.
New and replaced brake pads and discs only
reach their optimum braking effect after several
hundred kilometers of driving. Compensate for
this by applying greater force to the brake pedal.
Keep this in mind, and adapt your driving and
braking accordingly during this break-in period. Excessive heavy braking results in correspond-
ingly high brake wear. Observe the brake wear
warning lamp in the instrument cluster and note
any brake status messages in the multifunction
display. Especially for high performa nce d riving,
i
t is important to maintain and have the brake
system checked regularly.
Driving on wet roads
Hydroplaning If water has accumulated to a certain depth on
the road surface, there is a danger of hydro-
planing occurring, even if: R
you drive at low speeds R
the tires have adequate tread depth
For this reason, in the event of heavy rain or in
conditions in which hydroplaning may occur,
you must drive in the following manner: R
lower your speed R
avoid ruts R
avoid sudden steering movements R
brake carefully
Driving on flooded roads
! Do not drive through flooded areas. Check
the depth of any water before driving through
it. Drive slowly through standing water. Oth-
erwise, water may enter the vehicle interior or
the engine compartment. This can damage
the electronic components in the engine or
the automatic transmission. Water can also
be drawn in by the engine's air suction nozzles
and this can cause engine damage.
Winter driving
G WARNING
If you shift down on a slippery road surface in
an attempt to increase the engine's braking
effect, the drive wheels could lose their grip.
There is an increased danger of skidding and
accidents.
Do not shift down for additional engine brak-
ing on a slippery road surface.168
Driving tips
Driving an d parking
Page 190 of 382
Active Parking Assist will only detect parking
spaces: R
parallel or at right angles to the direction of
travel R
that are parallel to the direction of travel and
at least 59 in (1.5 m) wid eR
that are parallel to the direction of travel and
at least 39.5 in (1.0 m) longer than your vehi-
cle R
that are at right angles to the direction of
travel and at least 39.5 in (1.0 m) wider than
your vehicle
i Note that Active Parking Assist cannot
measure the size of a parking space if it is at
right angles to the direction of travel. You will
need to judge whether your vehicle will fit into
the parking space.
When driving at speeds below 19 mph
(30 km/h), you will see the parking symbol as a
status indicator in the instrument cluster. When
a parking space has been detected, an arrow
towards the right or the left also appears. By
default, Active Parking Assist only displays park-
ing spaces on the front-passenger side. Parking
spaces on the driver's side are displayed as
soon as the turn signal on the driver's side is
activated. When parking on the driver's side,
this must remain switched on until you acknowl-
edge the use of Active Parking Assist by press-
ing the �v button on the multifunction steer-
ing wheel. The system automatically determines
whether the parking space is parallel or at right
angles to the direction of travel.
A parking space is displayed while you are driv-
ing past it, and until you are approximately 50 ft
(15 m) away from it.
Parking
G WARNING
If you leave the vehicle when it is only being
braked by Active Parking Assist it could roll
away if: R
there is a malfunction in the system or in
the voltage supply. R
the electrical system in the engine com-
partment, the battery or the fuses have
been tampered with. R
the battery is disconnected. R
the accelerator pedal has been depressed,
e.g. by a vehicle occupant.
There is a risk of an accident.
Before leaving the vehicle, always secure it
against rolling away.
i When PARKTRONIC detects obstacles,
Active Parking Assist brakes automatically
during the parking process. You are respon-
sible for braking in good time. X
Stop the vehicle when the parking space sym-
bol shows the desired parking space in the
instrument cluster. X
Shift the transmission to position R .
The Start Park Assist? Yes: OK No: �8
message appears in the multifunction display. X
To cancel the procedure: press the �8
button on the multifunction steering wheel or
pull away.
or X
To park using Active Parking Assist: press
the �v button on the multifunction steering
wheel.
The Park Assist Active Accelerate
and Brake Observe Surroundings mes-
sage appears in the multifunction display. X
Let go of the multifunction steering wheel. X
Back up the vehicle, being ready to brake at all
times. When backing up, drive at a speed
below approximately 6 mph (10 km/h). Oth-
erwise Active Parking Assist will be canceled.
Active Parking Assist brakes the vehicle to a
standstill when the vehicle approaches the
rear border of the parking space.
Maneuvering may be required in tight parking
spaces.
The Park Assist Active Select D Observe
Surroundings message appears in the multi-
function display. X
Shift the transmission to position D while the
vehicle is stationary.
Active Parking Assist immediately steers in
the other direction.188
Driving systems
Driving and parking
Page 202 of 382

Traffic Sign Assist is not available in all coun-
tries. In this case, display �C appears in the
assistance graphic ( Y
page 221).
Important safety notes Traffic Sign Assist is only an aid and is not always
able to correctly display speed limits. Traffic
signs always have priority over the Traffic Sign
Assist display.
The system may be either functionally impaired
or temporarily unavailable if the information in
the digital street map of the navigation system is
incorrect or out of date.
Activating Traffic Sign Assist X
Activate the Traffic Sign Assist display using
the on-board computer ( Y
page 222).
If you have activated the Traffic Sign Assist dis-
play in the on-board computer, the traffic regu-
lations (speed limits and overtaking restrictions)
appear in the instrument cluster for five seconds
in each case. The wrong-way warning and the
traffic sign display for speed limits and overtak-
ing restrictions remain active even when the
display has been deactivated.
Instrument cluster display
Displaying the assistance graphic X
Call up the assistance graphics display func-
tion using the on-board computer
( Y
page 221).
Detected traffic signs appear in the instru-
ment cluster. Speed limit with unknown restriction
�C
Maximum permitted speed �D
Maximum permitted speed for vehicles for
which the restriction in the additional sign is
relevant �