2017 MERCEDES-BENZ S-Class MAYBACH Entertainment
[x] Cancel search: EntertainmentPage 19 of 382
Q
QR codeMercedes-Benz Guide App ................. 1
Rescue card .....................................3 1
Qualified specialist workshop ........... 30
Quick access for telephone
Sending DTMF tones ......................2 72
R
Radiator cover................................... 313
Radio
Selecting a station ......................... 217
Radio mode
see also Digital Operator's Man-
ual ..................................................2 69
Radio-wave reception/transmis-
sion in the vehicle
Declaration of conformity ................ 29
Rain closing feature
Panorama sliding sunroof ................ 96
Reading lamp ..................................... 127
Rear compartment
Activating/deactivating climate
control ...........................................1 35
Setting the air distribution ............. 138
Setting the air vents ......................1 43
Setting the airflow ......................... 138
Setting the temperature ................ 137
Stowage compartment .................. 283
Rear Seat Entertainment System
AUX jacks ...................................... 280
AUX jacks CD/DVD drive .............. 279
Rear seats
Adjusting ....................................... 102
Adjusting a rear reclining seat ....... 102
Overview .......................................... 41
Setting the reclined position .......... 103
Rear view camera
Cleaning instructions ..................... 323
Displays in the COMAND display ... 191
Function/notes ............................. 190
Rear window blind ............................ 293
Rear window defroster
Problem (malfunction) ................... 140
Switching on/off ........................... 139 Rear-view mirror
Anti-glare (manual) ........................ 117
Dipping (automatic) ....................... 118
Refrigerant (air-conditioning sys-
tem)
Important safety notes .................. 375
Refueling
Fuel gauge ....................................... 35
Important safety notes .................. 159
see Fuel
Remote control
Garage door opener ....................... 307
Programming (garage door
opener) .......................................... 308
Replacing bulbs
General notes ................................ 128
Reporting safety defects .................... 30
Rescue card ......................................... 31
Reserve (fuel tank)
see Fuel
Reserve fuel
Display mes sage ............................ 244
W
arning lamp ................................. 264
Residual heat (climate control) ........ 140
Restraint system
Display message ............................ 237
Introduction ..................................... 42
Warning lamp ................................. 263
Warning lamp (function) ................... 43
Reversing feature
Panorama sliding sunroof ................ 95
Roller sunblinds ............................... 96
Side windows ................................... 91
Trunk lid ........................................... 85
ROAD SURFACE SCAN ....................... 181
Roadside Assistance (breakdown) .... 28
Roller sunblind
Panorama roof with power tilt/
sliding panel ..................................... 96
Rear side windows ......................... 293
Rear window .................................. 293
Roller sunblind of the panorama
roof with power tilt/sliding panel
Operating (front roller sunblind) ....... 96
Operating (rear roller sunblind) ........ 97
Roof carrier ........................................ 289
Index17
Page 115 of 382
limited temperature sensitivity or a limited
ability to react to excessively high tempera-
tures may be affected or they may even suffer
burn-like injuries. There is a risk of injury.
Therefore, do not switch the seat heating on
repeatedly.
For vehicles equipped with the Warmth Comfort
package: the armrest in the door and the center
console can also be heated when you switch on
the seat heating of one of the front seats. You
can set this via the multimedia system; see the
Digital Operator's Manual.
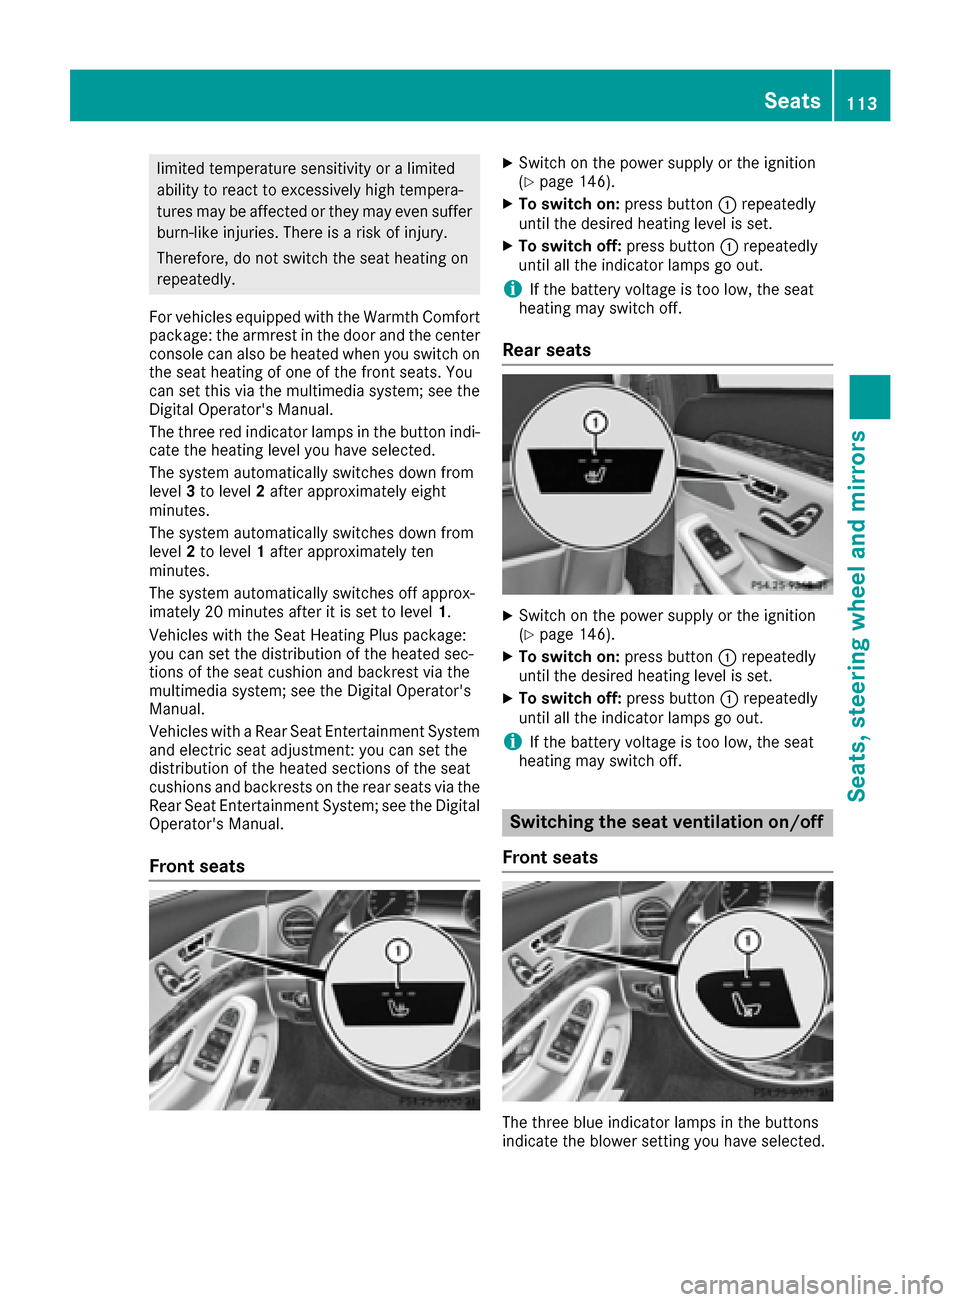
The three red indicator lamps in the button indi-
cate the heating level you have selected.
The system automatically switches down from
level 3to level 2after approximately eight
minutes.
The system automatically switches down from
level 2to level 1after approximately ten
minutes.
The system automatically switches off approx-
imately 20 minutes after it is set to level 1.
Vehicles with the Seat Heating Plus package:
you can set the distribution of the heated sec-
tions of the seat cushion and backrest via the
multimedia system; see the Digital Operator's
Manual.
Vehicles with a Rear Seat Entertainment System
and electric seat adjustment: you can set the
distribution of the heated sections of the seat
cushions and backrests on the rear seats via the
Rear Seat Entertainment System; see the Digital
Operator's Manual.
Front seats
XSwitch on the power supply or the ignition
(Ypage 146).
XTo switch on: press button:repeatedly
until the desired heating level is set.
XTo switch off: press button:repeatedly
until all the indicator lamps go out.
iIf the battery voltage is too low, the seat
heating may switch off.
Rear seats
XSwitch on the power supply or the ignition
(Ypage 146).
XTo switch on: press button:repeatedly
until the desired heating level is set.
XTo switch off: press button:repeatedly
until all the indicator lamps go out.
iIf the battery voltage is too low, the seat
heating may switch off.
Switching the seat ventilation on/off
Front seats
The three blue indicator lamps in the buttons
indicate the blower setting you have selected.
Seats113
Seats, steering wheel and mirrors
Z
Page 272 of 382
Operating system
Overview
General notes
Wearing polarized sunglasses may impair your
ability to read the display.
The display has an automatic temperature-con-
trolled switch-off feature. The brightness is
automatically reduced if the temperature is too
high. The display may temporarily switch off
completely.
Cleaning instructions
!Do not touch the display. The display has a
very sensitive high-gloss surface; there is a
risk of scratching. If you have to clean the
screen, however, use a mild cleaning agent
and a soft, lint-free cloth.
The display must be switched off and have
cooled down before you start cleaning. Do not
apply pressure to the display surface when
cleaning it, as this could cause irreversible dam-
age to the display.
Switching the multimedia system
on/off
XPress the Übutton on the center console
to the right of the controller.
When you switch the multimedia system on, a
warning message will appear. The multimedia
system calls up the previously selected menu.
If you switch the multimedia system off, play- back of the current media source will also be
switched off.
Adjusting the volume
XTurn the thumbwheel to the right of the con-
troller.
or
XPress the WorX button on the multi-
function steering wheel.
The volume of the media source currently
selected changes.
The volume is adjusted:
Rfor the currently selected media source
Rduring traffic or navigation announcements
Rin hands-free mode during a phone call
Switching the sound on or off
XPress the thumbwheel beside the controller.
or
XPress the 8button on the multifunction
steering wheel.
If the audio output is switched off, the status
line will show the 8symbol. If you switch
the media source or change the volume, the
sound is automatically switched on.
iNavigation announcements will be heard
even if the sound is muted.
Functions
The multimedia system has the following func-
tions:
RRadio mode
RMedia mode with media search
RSound systems
RNavigation system
RCommunication functions
RSIRIUS Weather
RVehicle functions with system settings
RFavorites functions
RMulti-Seat Entertainment System
Controller
The controller in the center console lets you:
Rselect menu items on the display
Renter characters
Rselect a destination on the map
Rsave entries
The controller can be:
Rturned 3
Rslid left or right 1
Rslid forwards or back 4
Rslid diagonally2
Rpressed briefly or pressed and held 7
Back button
You can use the%button to exit a menu or to
call up the basic display of the current operating
mode.
270Operating system
Multimedia system
Page 282 of 382
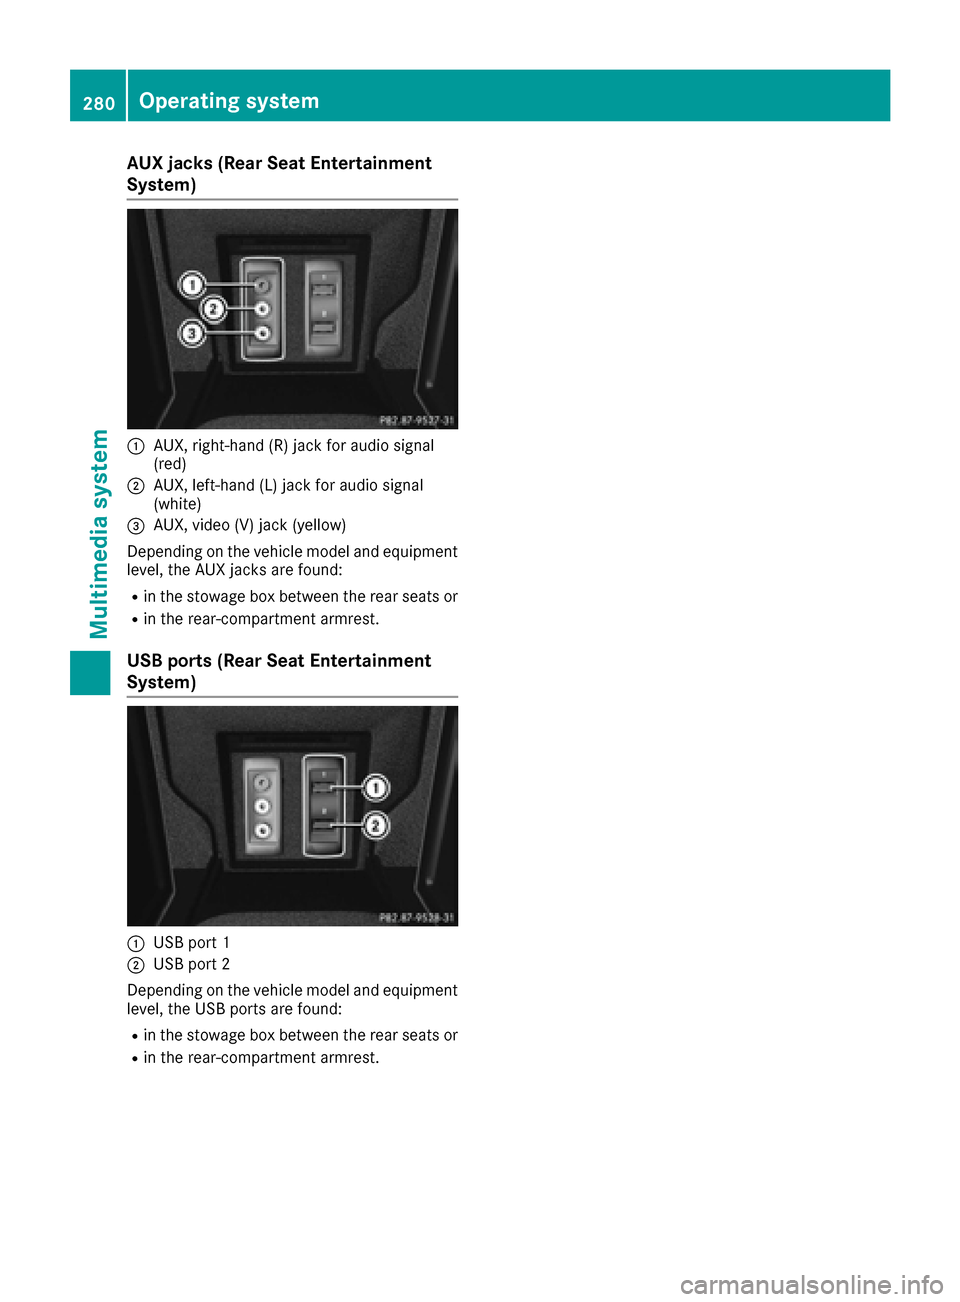
AUX jacks (Rear Seat Entertainment
System)
:AUX, right-hand (R) jac kfor audio signal
(red)
;AUX, left-han d(L) jac kfor audio signal
(white)
=AUX, video (V) jac k(yellow)
Dependin gon th evehicl emodel and equipmen t
level, th eAU Xjacks are found:
Rin th estowage box between th erear seat sor
Rin th erear-compartmen tarmrest.
USB ports (Rear Seat Entertainment
System)
:US Bpor t 1
;USBpor t 2
Dependin gon th evehicl emodel and equipmen t
level, th eUS Bports are found:
Rin th estowage box between th erear seat sor
Rin th erear-compartmen tarmrest.
280Operating system
Multimedia system
Page 297 of 382
Always hold the cigarette lighter by the knob.Always make sure that the cigarette lighter is
out of reach of children. Never leave children
unsupervised in the vehicle.
Your attention must always be focused on the
traffic conditions. Only use the cigarette lighter
when road and traffic conditions permit.
Cigarette lighter in the front compart-
ment
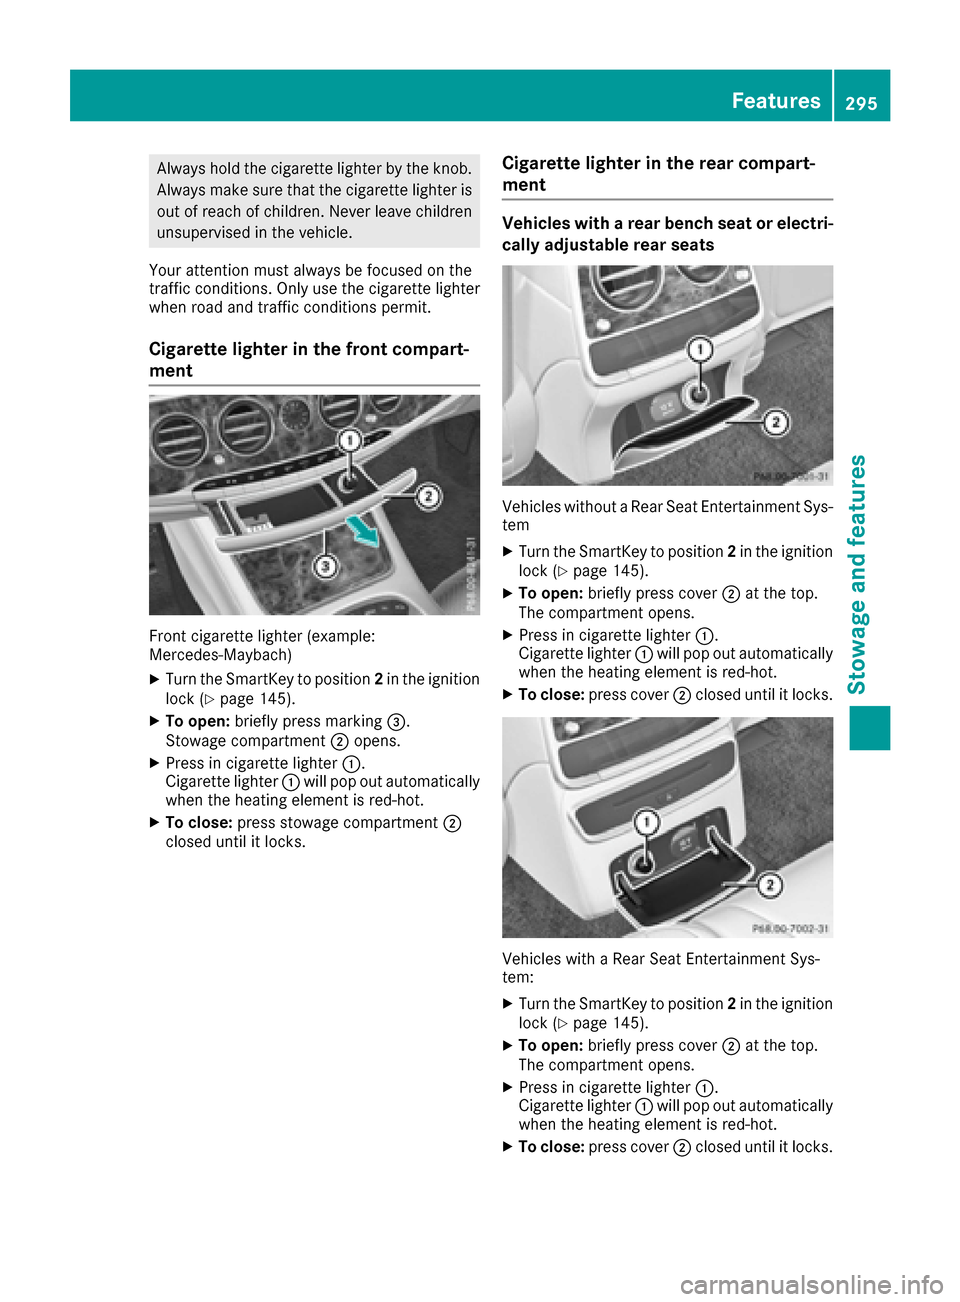
Front cigarette lighter (example:
Mercedes‑Maybach)
XTurn the SmartKey to position 2in the ignition
lock (Ypage 145).
XTo open: briefly press marking =.
Stowage compartment ;opens.
XPress in cigarette lighter :.
Cigarette lighter :will pop out automatically
when the heating element is red-hot.
XTo close: press stowage compartment ;
closed until it locks.
Cigarette lighter in the rear compart-
ment
Vehicles with a rear bench seat or electri-
cally adjustable rear seats
Vehicles without a Rear Seat Entertainment Sys-
tem
XTurn the SmartKey to position 2in the ignition
lock (Ypage 145).
XTo open: briefly press cover ;at the top.
The compartment opens.
XPress in cigarette lighter :.
Cigarette lighter :will pop out automatically
when the heating element is red-hot.
XTo close: press cover ;closed until it locks.
Vehicles with a Rear Seat Entertainment Sys-
tem:
XTurn the SmartKey to position 2in the ignition
lock (Ypage 145).
XTo open: briefly press cover ;at the top.
The compartment opens.
XPress in cigarette lighter :.
Cigarette lighter :will pop out automatically
when the heating element is red-hot.
XTo close: press cover ;closed until it locks.
Features295
Stowag ean d features
Z
Page 298 of 382
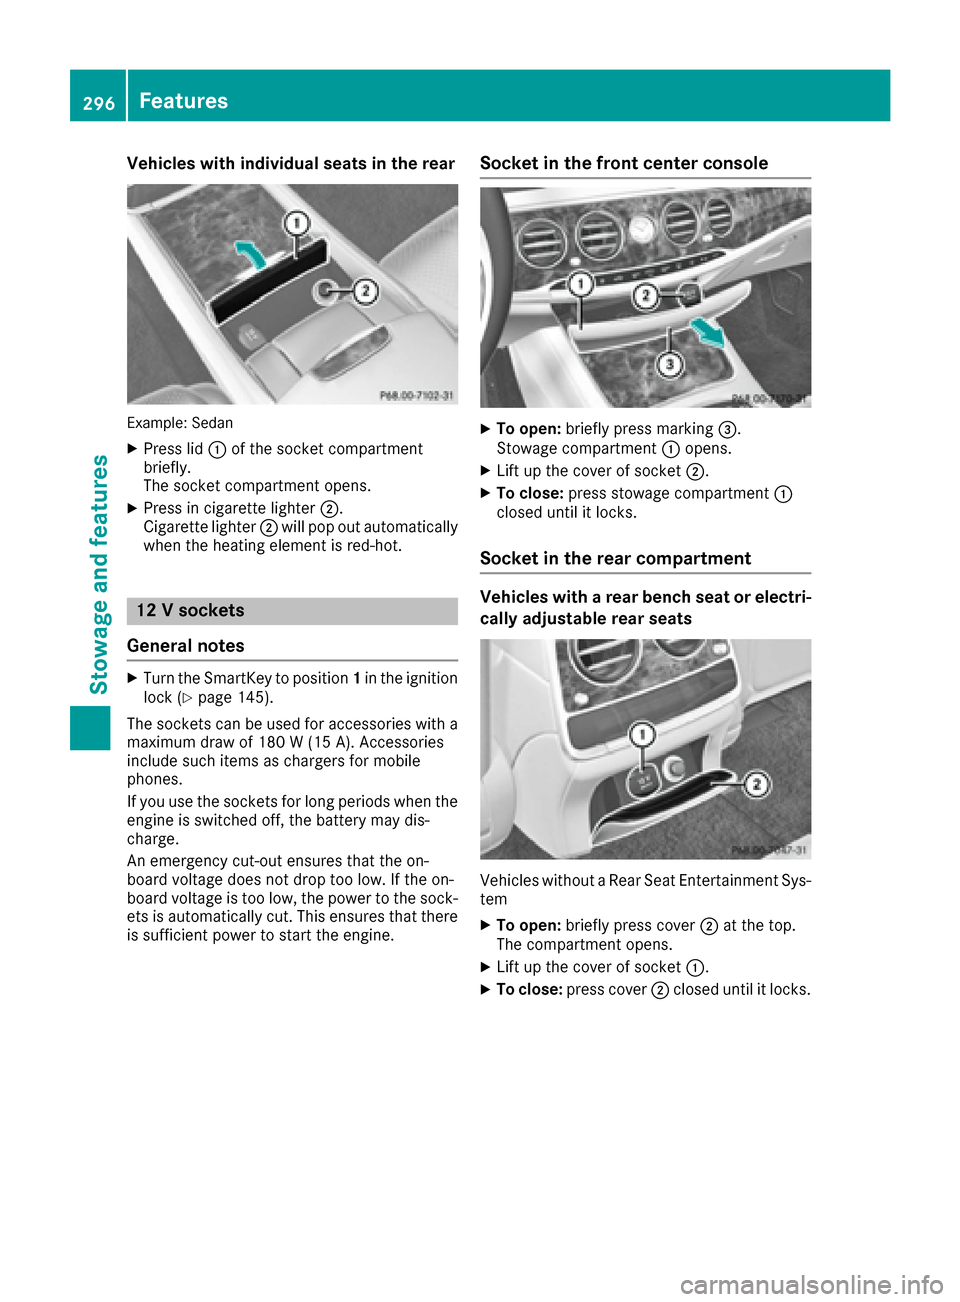
Vehicles with individual seats in the rear
Example: Sedan
XPress lid:of the socket compartment
briefly.
The socket compartment opens.
XPress in cigarette lighter ;.
Cigarette lighter ;will pop out automatically
when the heating element is red-hot.
12 V sockets
General notes
XTurn the SmartKey to position 1in the ignition
lock (Ypage 145).
The sockets can be used for accessories with a maximum draw of 180 W (15 A). Accessories
include such items as chargers for mobile
phones.
If you use the sockets for long periods when the
engine is switched off, the battery may dis-
charge.
An emergency cut-out ensures that the on-
board voltage does not drop too low. If the on-
board voltage is too low, the power to the sock-
ets is automatically cut. This ensures that there is sufficient power to start the engine.
Socket in the front center console
XTo open: briefly press marking =.
Stowage compartment :opens.
XLift up the cover of socket ;.
XTo close:press stowage compartment :
closed until it locks.
Socket in the rear compartment
Vehicles with a rear bench seat or electri-
cally adjustable rear seats
Vehicles without a Rear Seat Entertainment Sys-
tem
XTo open: briefly press cover ;at the top.
The compartment opens.
XLift up the cover of socket :.
XTo close:press cover ;closed until it locks.
296Features
Stowage and features
Page 299 of 382
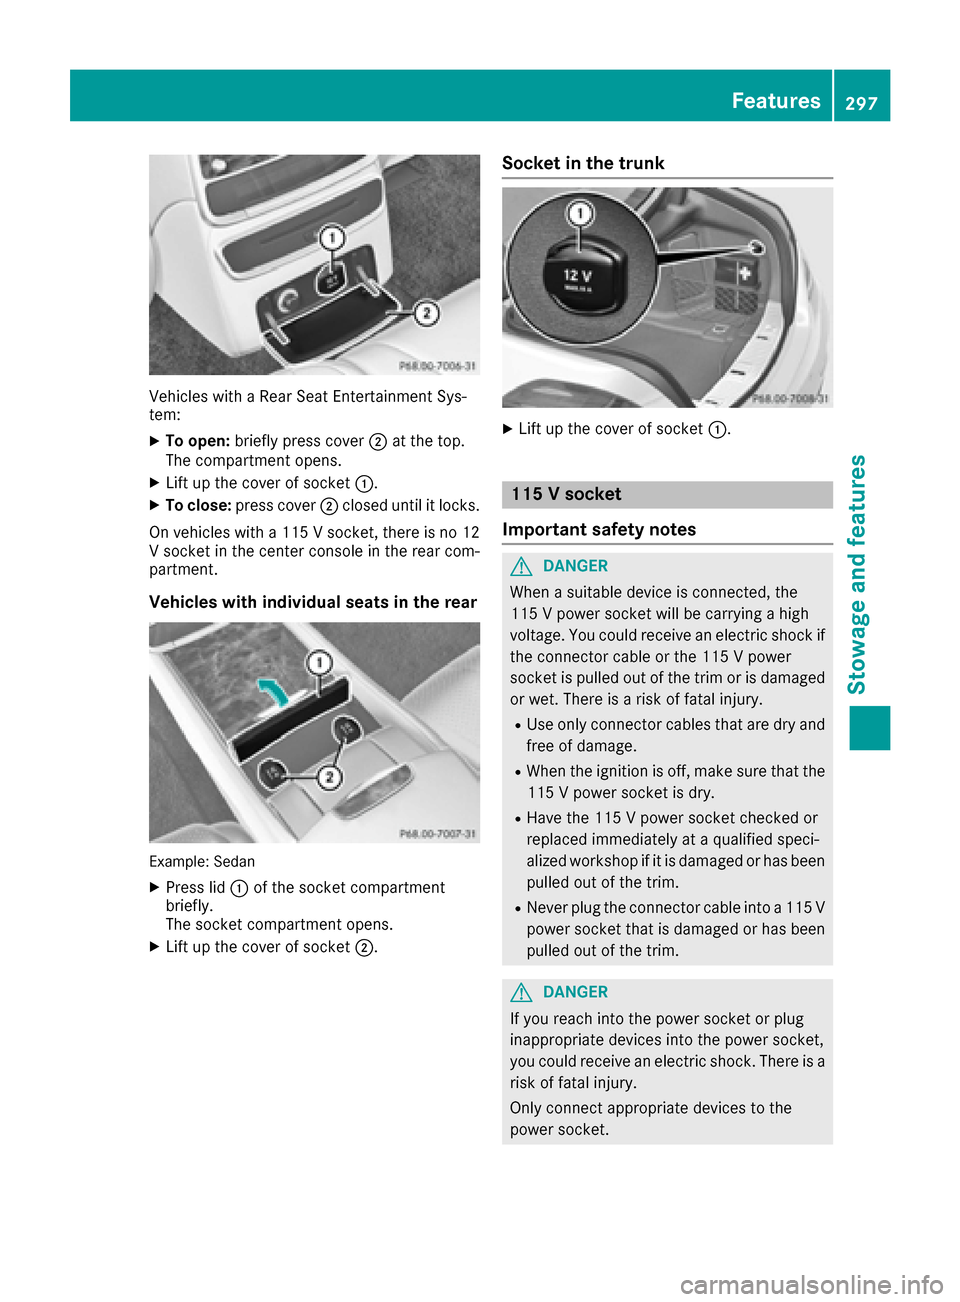
Vehicles with a Rear Seat Entertainment Sys-
tem:
XTo open:briefly press cover ;at the top.
The compartment opens.
XLift up the cover of socket :.
XTo close:press cover ;closed until it locks.
On vehicles with a 115 V socket, there is no 12
V socket in the center console in the rear com-
partment.
Vehicles with individual seats in the rear
Example: Sedan
XPress lid :of the socket compartment
briefly.
The socket compartment opens.
XLift up the cover of socket ;.
Socket in the trunk
XLift up the cover of socket:.
115 V socket
Important safety notes
GDANGER
When a suitable device is connected, the
115 V power socket will be carrying a high
voltage. You could receive an electric shock if the connector cable or the 115 V power
socket is pulled out of the trim or is damaged
or wet. There is a risk of fatal injury.
RUse only connector cables that are dry and
free of damage.
RWhen the ignition is off, make sure that the
115 V power socket is dry.
RHave the 115 V power socket checked or
replaced immediately at a qualified speci-
alized workshop if it is damaged or has been
pulled out of the trim.
RNever plug the connector cable into a 115 V
power socket that is damaged or has been
pulled out of the trim.
GDANGER
If you reach into the power socket or plug
inappropriate devices into the power socket,
you could receive an electric shock. There is a
risk of fatal injury.
Only connect appropriate devices to the
power socket.
Features297
Stowage and features
Z