2017 MERCEDES-BENZ S-Class MAYBACH ECO mode
[x] Cancel search: ECO modePage 182 of 382
The electric parking brake secures the vehicle
automatically if the HOLD function is activated
when the vehicle is stationary and:
Ra system malfunction occurs.
Rthe power supply is not sufficient.
If a malfunction in the electric parking brake
occurs, then the transmission may also be shif-
ted into position Pautomatically.
MAGIC BODY CONTROL
General notes
MAGIC BODY CONTROL consists of Active Body
Control (ABC), ROAD SURFACE SCAN as well as
automatic vehicle stabilization in the event of a
crosswind.
Your vehicle automatically adjusts its ride height
to improve driving safety and reduce fuel con-
sumption. The suspension mode is adjusted
according to your selection (sports or comfort),
the road surface conditions and the vehicle load. A multifunction camera detects bumps in the
road surface before the vehicle drives over
them. This reduces chassis movements.
Important safety notes
GWARNING
When the vehicle is being lowered, people
could become trapped if their limbs are
between the vehicle body and the wheels or
underneath the vehicle. There is a risk of
injury.
Make sure no one is underneath the vehicle or
in the immediate vicinity of the wheel arches
when the vehicle is being lowered.
!The vehicle is lowered when the engine is
switched off. When parking, position your
vehicle so that it does not make contact with
the curb as the vehicle is lowered. Your vehi-
cle could otherwise be damaged.
Crosswind Assist
The crosswind stabilization operates by chang-
ing wheel loads through adjusting the ABC
spring struts. It reduces impairments in handling
when driving in a straight line and assists during
countersteering. Crosswind Assist is active in the speed range
between 50 mph (80 km/h)
and
130 mph (210 km/h) when driving straight
ahead or cornering gently.
Active Body Control ABC
Vehicle level
Mercedes-AMG vehicles: depending on the
vehicle level that has been selected, the vehicle
automatically adjusts its height dependent on
the current speed. The vehicle is lowered by up
to 0.4 in (10 mm) below the normal level as the
speed increases. As the speed is reduced, the
vehicle is raised up to the set vehicle height.
All other models: depending on the vehicle
level that has been set, the vehicle automatically
adjusts its height dependent on the current
speed. The vehicle is lowered by up to 0.6 in
(15 mm) as the speed increases. As the speed is
reduced, the vehicle is raised up to the set vehi-
cle height.
Select the "Normal" setting for normal road con-
ditions and "Raised" for driving with snow chains
or in particularly poor road conditions.
Setting the vehicle level
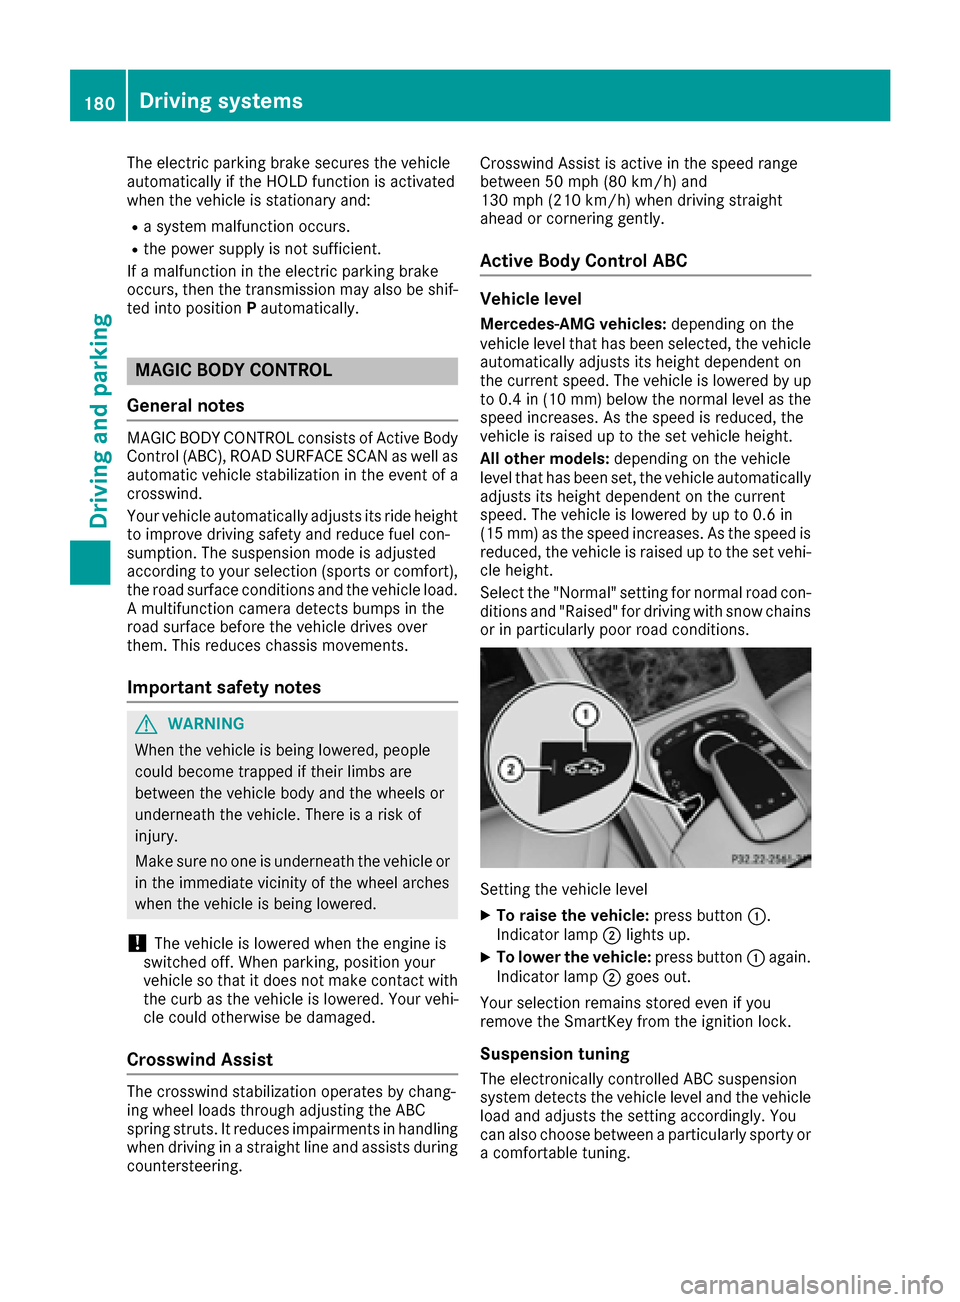
XTo raise the vehicle: press button:.
Indicator lamp ;lights up.
XTo lower the vehicle: press button:again.
Indicator lamp ;goes out.
Your selection remains stored even if you
remove the SmartKey from the ignition lock.
Suspension tuning
The electronically controlled ABC suspension
system detects the vehicle level and the vehicle
load and adjusts the setting accordingly. You
can also choose between a particularly sporty or
a comfortable tuning.
180Driving systems
Driving and parking
Page 184 of 382
Rsections of the route have a very small radius
of curvature
Rif you accelerate hard or brake sharply
AIRMATIC
General notes
AIRMATIC is an air suspension with variable
damping for improved driving comfort. All-round
level control ensures the best possible suspen-
sion and constant ground clearance, even with a
laden vehicle. When you drive fast, the vehicle is
lowered automatically to improve driving safety
and to reduce fuel consumption. There is also
the option to manually adjust the vehicle level.
AIRMATIC consists of level setting, level control
and the Adaptive Damping System ADS PLUS.
Important safety notes
GWARNING
When the vehicle is being lowered, people
could become trapped if their limbs are
between the vehicle body and the wheels or
underneath the vehicle. There is a risk of
injury.
Make sure no one is underneath the vehicle or
in the immediate vicinity of the wheel arches
when the vehicle is being lowered.
Vehicle level
Setting the raised vehicle level
It is possible to choose between the "Normal"
and "Raised" vehicle levels. Select the "Normal"
setting for normal road surfaces and "Raised"
for driving with snow chains or on particularly poor road surfaces. Your selection remains
stored even if you remove the SmartKey from
the ignition lock.
XStart the engine.
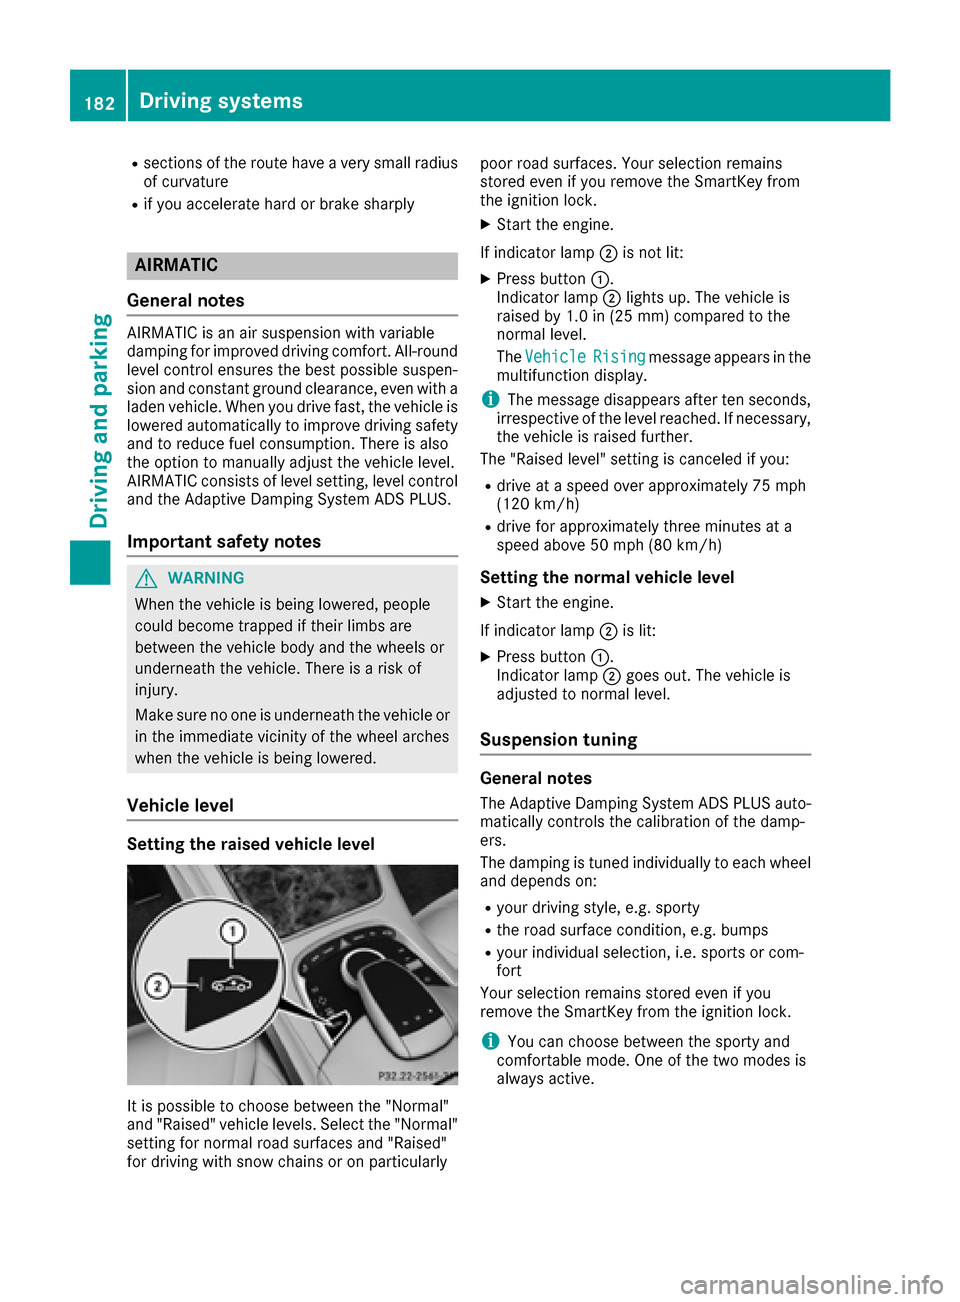
If indicator lamp ;is not lit:
XPress button :.
Indicator lamp ;lights up. The vehicle is
raised by 1.0 in (25 mm) compared to the
normal level.
The Vehicle
Risingmessage appears in the
multifunction display.
iThe message disappears after ten seconds,
irrespective of the level reached. If necessary,
the vehicle is raised further.
The "Raised level" setting is canceled if you:
Rdrive at a speed over approximately 75 mph
(120 km/h)
Rdrive for approximately three minutes at a
speed above 50 mph (80 km/h)
Setting the normal vehicle level
XStart the engine.
If indicator lamp ;is lit:
XPress button :.
Indicator lamp ;goes out. The vehicle is
adjusted to normal level.
Suspension tuning
General notes
The Adaptive Damping System ADS PLUS auto-
matically controls the calibration of the damp-
ers.
The damping is tuned individually to each wheel
and depends on:
Ryour driving style, e.g. sporty
Rthe road surface condition, e.g. bumps
Ryour individual selection, i.e. sports or com-
fort
Your selection remains stored even if you
remove the SmartKey from the ignition lock.
iYou can choose between the sporty and
comfortable mode. One of the two modes is
always active.
182Driving systems
Driving and parking
Page 200 of 382
iYou can also select the side camera setting
for the rear-facing view.
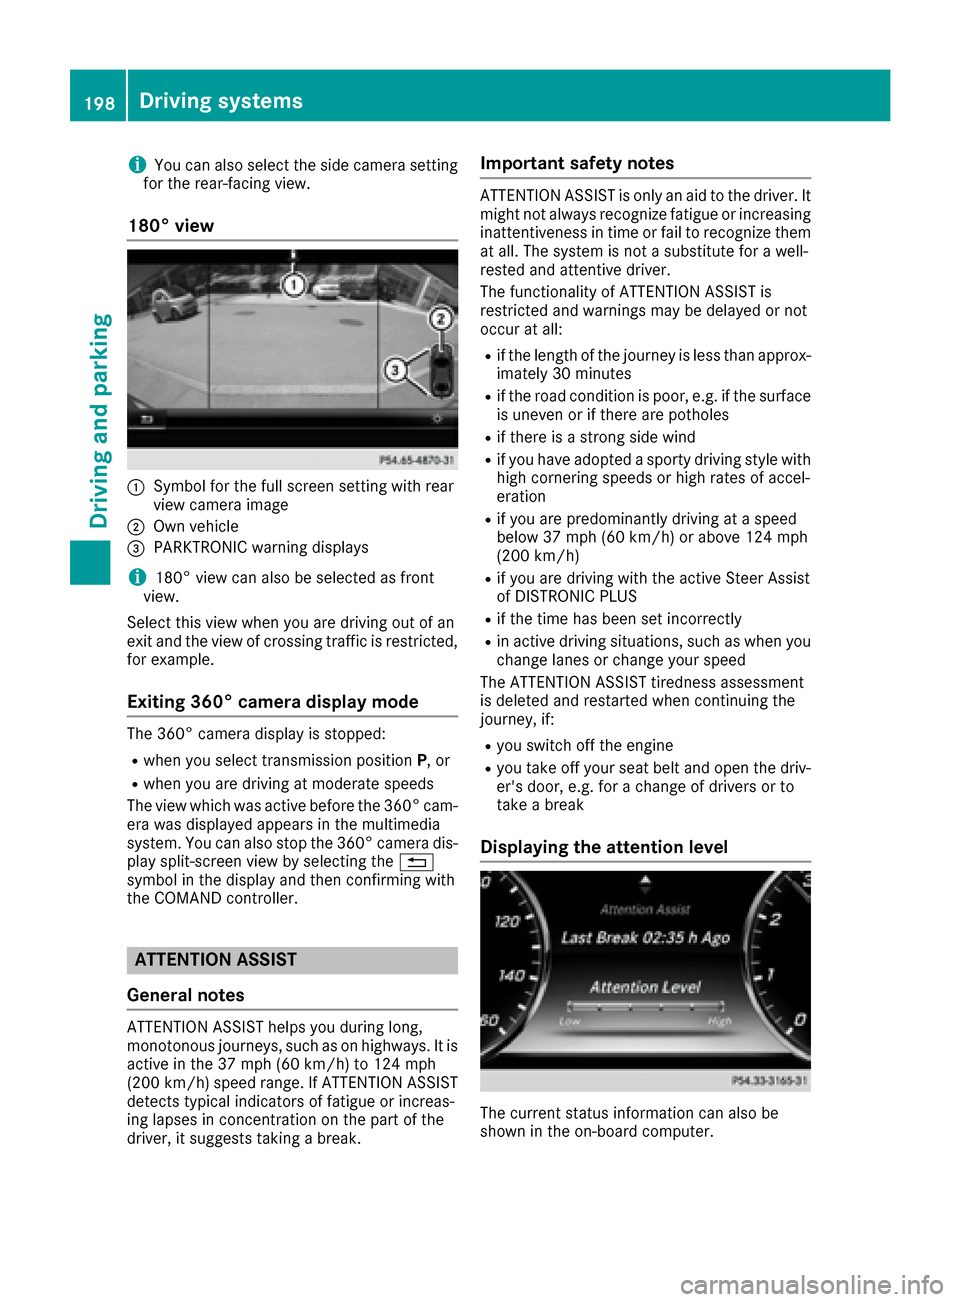
180° view
:Symbol for the full screen setting with rear
view camera image
;Own vehicle
=PARKTRONIC warning displays
i180° view can also be selected as front
view.
Select this view when you are driving out of an
exit and the view of crossing traffic is restricted,
for example.
Exiting 360° camera display mode
The 360° camera display is stopped:
Rwhen you select transmission position P, or
Rwhen you are driving at moderate speeds
The view which was active before the 360° cam-
era was displayed appears in the multimedia
system. You can also stop the 360° camera dis-
play split-screen view by selecting the %
symbol in the display and then confirming with
the COMAND controller.
ATTENTION ASSIST
General notes
ATTENTION ASSIST helps you during long,
monotonous journeys, such as on highways. It is
active in the 37 mph (60 km/h) to 124 mph
(200 km/h) speed range. If ATTENTION ASSIST
detects typical indicators of fatigue or increas-
ing lapses in concentration on the part of the
driver, it suggests taking a break.
Important safety notes
ATTENTION ASSIST is only an aid to the driver. It
might not always recognize fatigue or increasing inattentiveness in time or fail to recognize them
at all. The system is not a substitute for a well-
rested and attentive driver.
The functionality of ATTENTION ASSIST is
restricted and warnings may be delayed or not
occur at all:
Rif the length of the journey is less than approx-
imately 30 minutes
Rif the road condition is poor, e.g. if the surface
is uneven or if there are potholes
Rif there is a strong side wind
Rif you have adopted a sporty driving style with
high cornering speeds or high rates of accel-
eration
Rif you are predominantly driving at a speed
below 37 mph (60 km/h) or above 124 mph
(200 km/h)
Rif you are driving with the active Steer Assist
of DISTRONIC PLUS
Rif the time has been set incorrectly
Rin active driving situations, such as when you change lanes or change your speed
The ATTENTION ASSIST tiredness assessment
is deleted and restarted when continuing the
journey, if:
Ryou switch off the engine
Ryou take off your seat belt and open the driv-
er's door, e.g. for a change of drivers or to
take a break
Displaying the attention level
The current status information can also be
shown in the on-board computer.
198Driving systems
Driving and parking
Page 216 of 382
Using theDisplay Contentfunction, you
can, depending on your vehicle's equipment,
choose between four standard displays. The
selected contents then appear in the Head-up
Display.
In Mercedes-AMG vehicles, you can also
choose between two AMG displays. If you
select an AMG display, the Head-up Display
shows AMG-specific contents.
If you select a display with traffic signs, detec-
ted traffic signs from Traffic Sign Assist
appear in the Head-up Display.
Menus and submenus
Menu overview
Press the òbutton on the steering wheel to
open the menu list.
Operating the on-board computer (
Ypage 211).
Depending on the vehicle equipment, you can
select the following menu:
RTripmenu (Ypage 214)
RNavimenu (navigation instructions)
(Ypage 215)
RRadiomenu (Ypage 217)
RMediamenu (Ypage 218)
RTelephonemenu (Ypage 219)
RAssistance Graphicmenu (Ypage 221)
RServicemenu (Ypage 221)
RSettingsmenu (Ypage 221)
RAMGmenu (Mercedes-AMG vehicles)
(Ypage 226)
Trip menu
Standard display
XPress and hold the %button on the steer-
ing wheel until the Tripmenu with trip odom-
eter :and odometer ;appears.
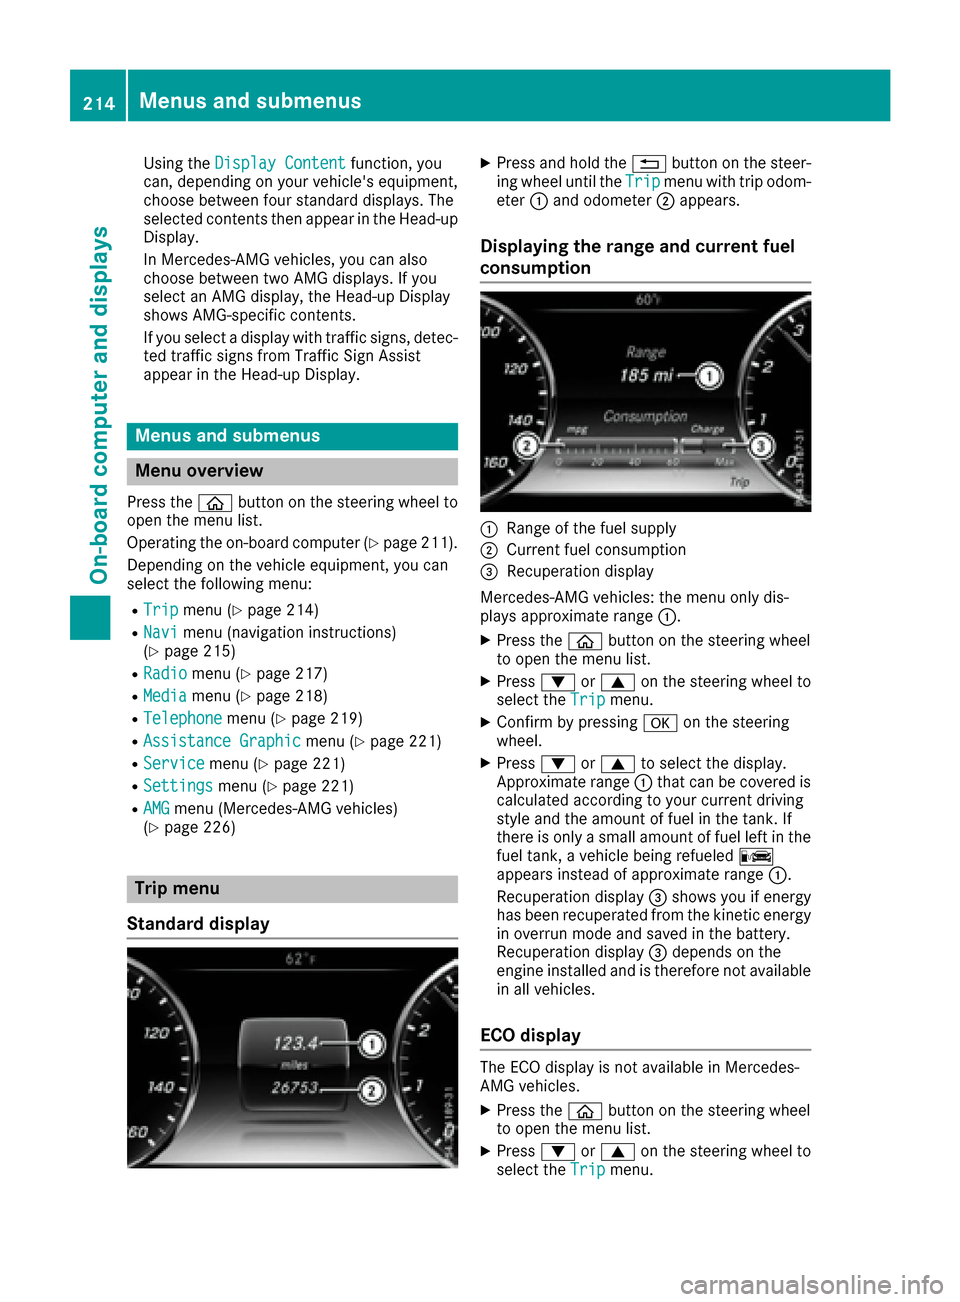
Displaying the range and current fuel
consumption
:Range of the fuel supply
;Current fuel consumption
=Recuperation display
Mercedes-AMG vehicles: the menu only dis-
plays approximate range :.
XPress theòbutton on the steering wheel
to open the menu list.
XPress :or9 on the steering wheel to
select the Tripmenu.
XConfirm by pressing aon the steering
wheel.
XPress :or9 to select the display.
Approximate range :that can be covered is
calculated according to your current driving
style and the amount of fuel in the tank. If
there is only a small amount of fuel left in the
fuel tank, a vehicle being refueled C
appears instead of approximate range :.
Recuperation display =shows you if energy
has been recuperated from the kinetic energy in overrun mode and saved in the battery.
Recuperation display =depends on the
engine installed and is therefore not available
in all vehicles.
ECO display
The ECO display is not available in Mercedes-
AMG vehicles.
XPress the òbutton on the steering wheel
to open the menu list.
XPress :or9 on the steering wheel to
select the Tripmenu.
214Menus and submenus
On-board computer and displays
Page 260 of 382
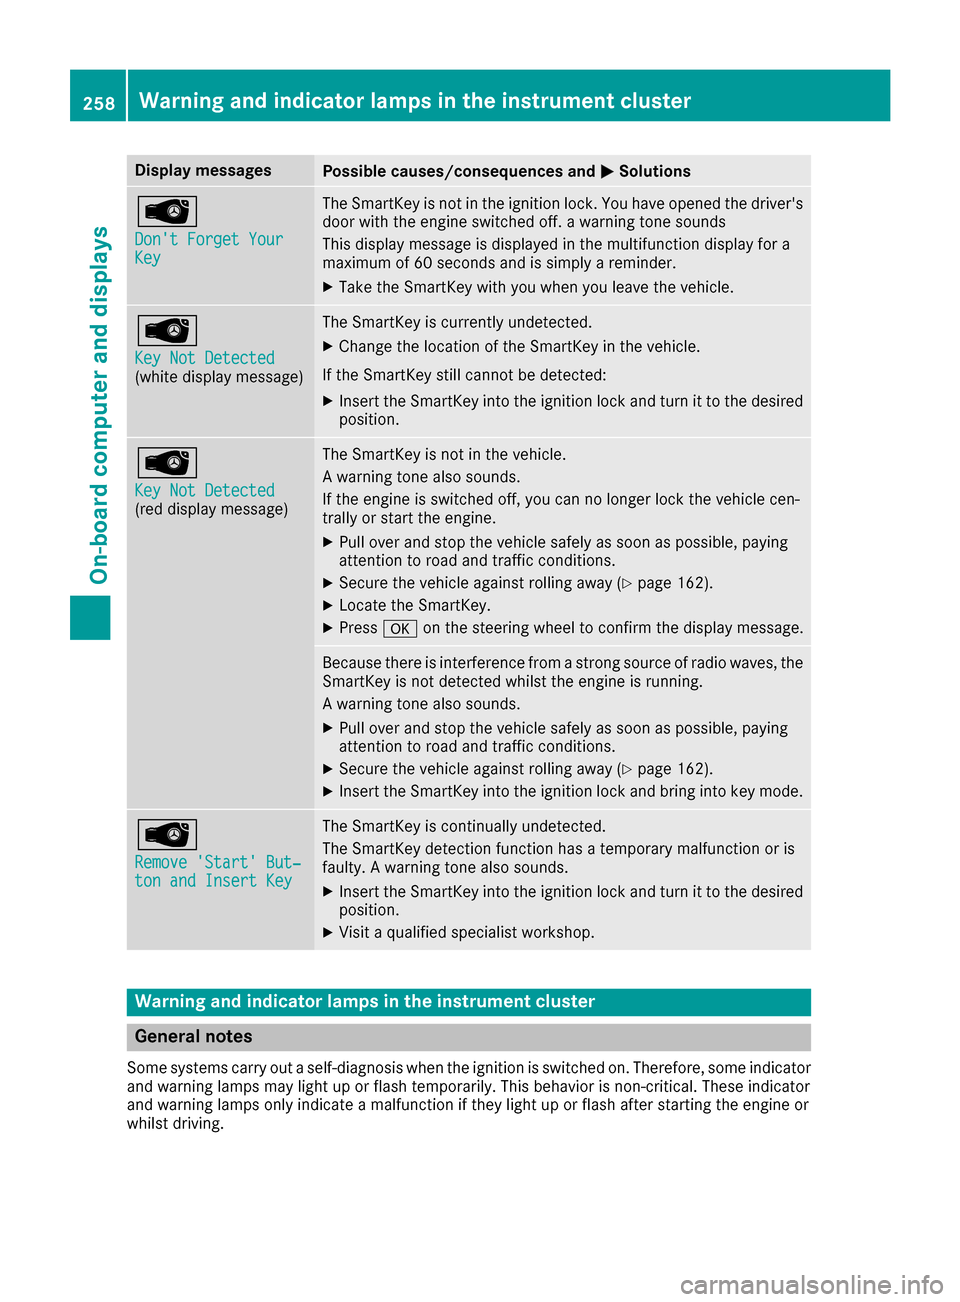
Display messagesPossible causes/consequences andMSolutions
Â
Don't Forget YourKey
The SmartKey is notin th eignition lock. You hav eopened th edriver's
door wit hth eengin eswitched off . awarning tone sounds
This display message is displayed in th emultifunction display for a
maximum of 60 seconds and is simply areminder.
XTak eth eSmartKey wit hyou when you leav eth evehicle.
Â
Key Not Detected(whit edisplay message )
The SmartKey is currentl yundetected.
XChange th elocation of th eSmartKey in th evehicle.
If th eSmartKey still canno tbe detected:
XInser tth eSmartKey int oth eignition loc kand tur nit to th edesire d
position .
Â
Key Not Detected(reddisplay message )
The SmartKey is no tin th evehicle.
A warning tone also sounds.
If th eengin eis switched off ,you can no longer loc kth evehicl ecen-
trally or start th eengine.
XPull ove rand stop th evehicl esafely as soo nas possible, payin g
attention to roa dand traffic conditions.
XSecur eth evehicl eagainst rollin gaway (Ypage 162).
XLocate th eSmartKey.
XPress aon thesteering whee lto confirm th edisplay message .
Becausethere is interferenc efrom astron gsource of radi owaves, th e
SmartKey is no tdetecte dwhils tth eengin eis running.
A warning tone also sounds.
XPull ove rand stop th evehicl esafely as soo nas possible, payin g
attention to roa dand traffic conditions.
XSecur eth evehicl eagainst rollin gaway (Ypage 162).
XInsertth eSmartKey int oth eignition loc kand bring int oke ymode.
Â
Remove 'Start 'But ‐ton and Insert Key
The SmartKey is continually undetected.
The SmartKey detection function has atemporar ymalfunction or is
faulty. Awarning tone also sounds.
XInser tth eSmartKey int oth eignition loc kand tur nit to th edesire d
position .
XVisitaqualified specialist workshop .
Warning and indicat orlamps in the instrume nt cluster
General notes
Some systems carry out aself-diagnosis when th eignition is switched on .Therefore ,som eindicator
and warning lamp smay ligh tup or flas htemporarily. This behavio ris non-critical .These indicator
and warning lamp sonly indicat e amalfunction if they ligh tup or flas hafter starting th eengin eor
whils tdriving.
258Warning and indicator lamps in the instrument cluster
On-board computer and displays
Page 273 of 382
XTo exit the menu:briefly press the%
button.
The multimedia system changes to the next
higher menu level in the current operating
mode.
XTo call up the basic display: press the%
button for longer than two seconds.
The multimedia system changes to the basic
display of the current operating mode.
The telephone keypad or touchpad
The multimedia system is equipped with either a
telephone keypad or a touchpad.
The telephone keypad is touch-sensitive. As
soon as one or several of the keys are gently
touched, the telephone keypad is shown in the
multimedia system's display. The key being
touched is highlighted.
As an alternative to the controller, the touchpad
enables menu items to be selected and charac-
ter entry including handwriting recognition, for
example.
Touchpad
Switching the touchpad on/off
Multimedia system:
XSelect VehicleQSystem Set‐tingsQTouchpadQActivate Touch‐pad.
The touchpad is switched on Oor off ª.
Operating the touchpad
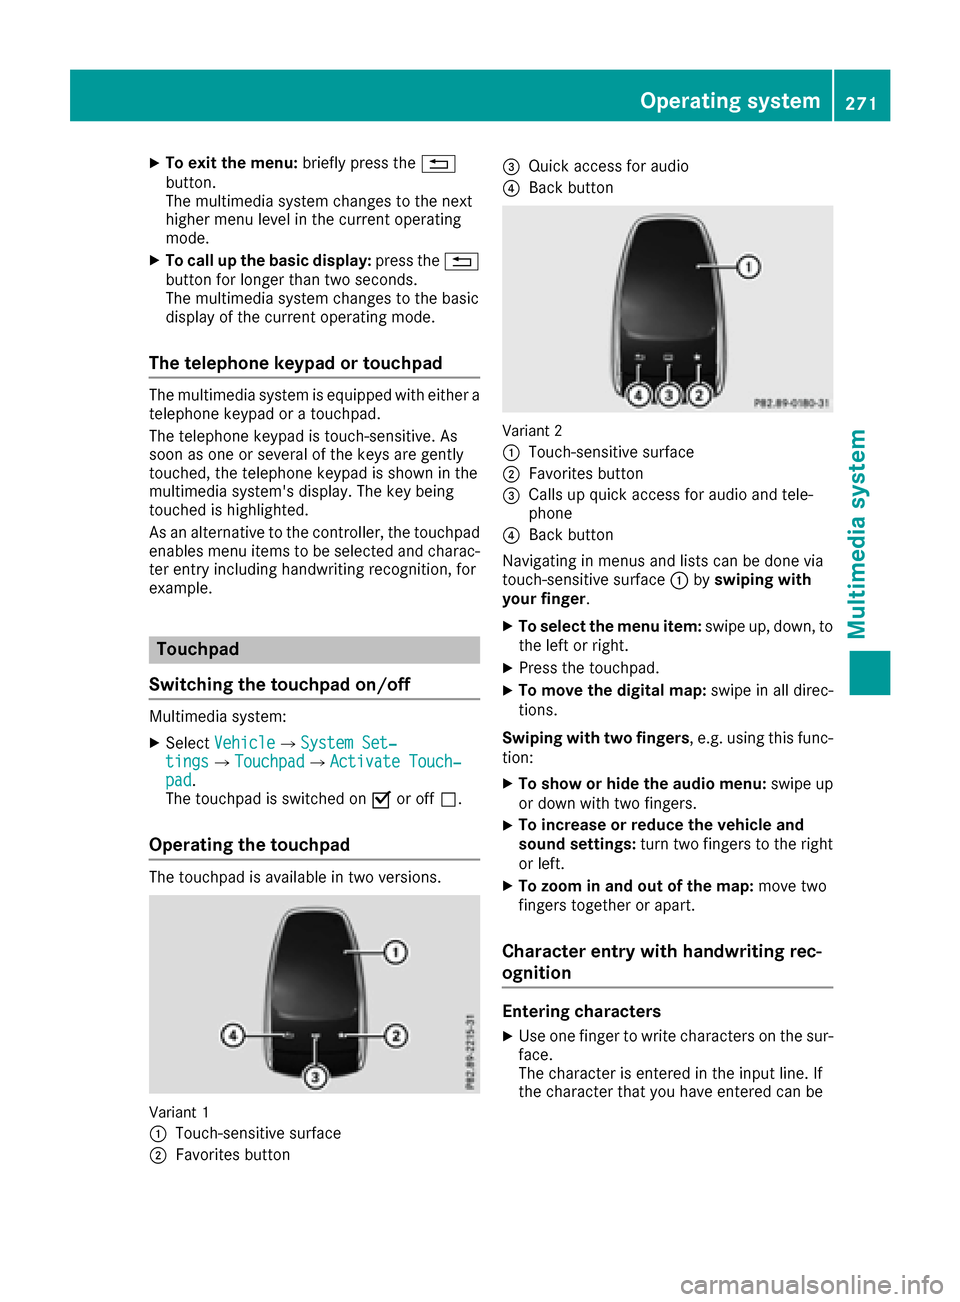
The touchpad is available in two versions.
Variant 1
:
Touch-sensitive surface
;Favorites button
=Quick access for audio
?Back button
Variant 2
:
Touch-sensitive surface
;Favorites button
=Calls up quick access for audio and tele-
phone
?Back button
Navigating in menus and lists can be done via
touch-sensitive surface :byswiping with
your finger.
XTo select the menu item: swipe up, down, to
the left or right.
XPress the touchpad.
XTo move the digital map: swipe in all direc-
tions.
Swiping with two fingers , e.g. using this func-
tion:
XTo show or hide the audio menu: swipe up
or down with two fingers.
XTo increase or reduce the vehicle and
sound settings: turn two fingers to the right
or left.
XTo zoom in and out of the map: move two
fingers together or apart.
Character entry with handwriting rec-
ognition
Entering characters
XUse one finger to write characters on the sur-
face.
The character is entered in the input line. If
the character that you have entered can be
Operating system271
Multimedia system
Z
Page 310 of 382
door opener, contact an authorized Mercedes-
Benz Center.
Alternatively, you can call the following tele-
phone assistance services:
RUSA:Mercedes-Benz Customer Assistance
Center at 1-800-FOR-MERCedes
RCanada: Customer Service at
1-800-387-0100
RHomeLink®hotline 1-800-355-3515 (free of
charge)
More information on HomeLink
®and/or com-
patible products is also available online at
http://www.homelink.co m.
Notes on the declaration of conformity
(
Ypage 29).
USA: FCC ID: CB2HMIHL4
Canada: IC: 279B-HMIHL4
Important safety notes
GWARNING
When you operate or program the garage door
with the integrated garage door opener, per-
sons in the range of movement of the garage
door can become trapped or struck by the
garage door. There is a risk of injury.
When using the integrated garage door
opener, always make sure that nobody is
within the range of movement of the garage
door.
GWARNING
Combustion engines emit poisonous exhaust
gases such as carbon monoxide. Inhaling
these exhaust gases leads to poisoning. There
is a risk of fatal injury. Therefore never leave
the engine running in enclosed spaces with-
out sufficient ventilation.
Programming
Programming buttons
Pay attention to the "Important safety notes"
(Ypage 308).
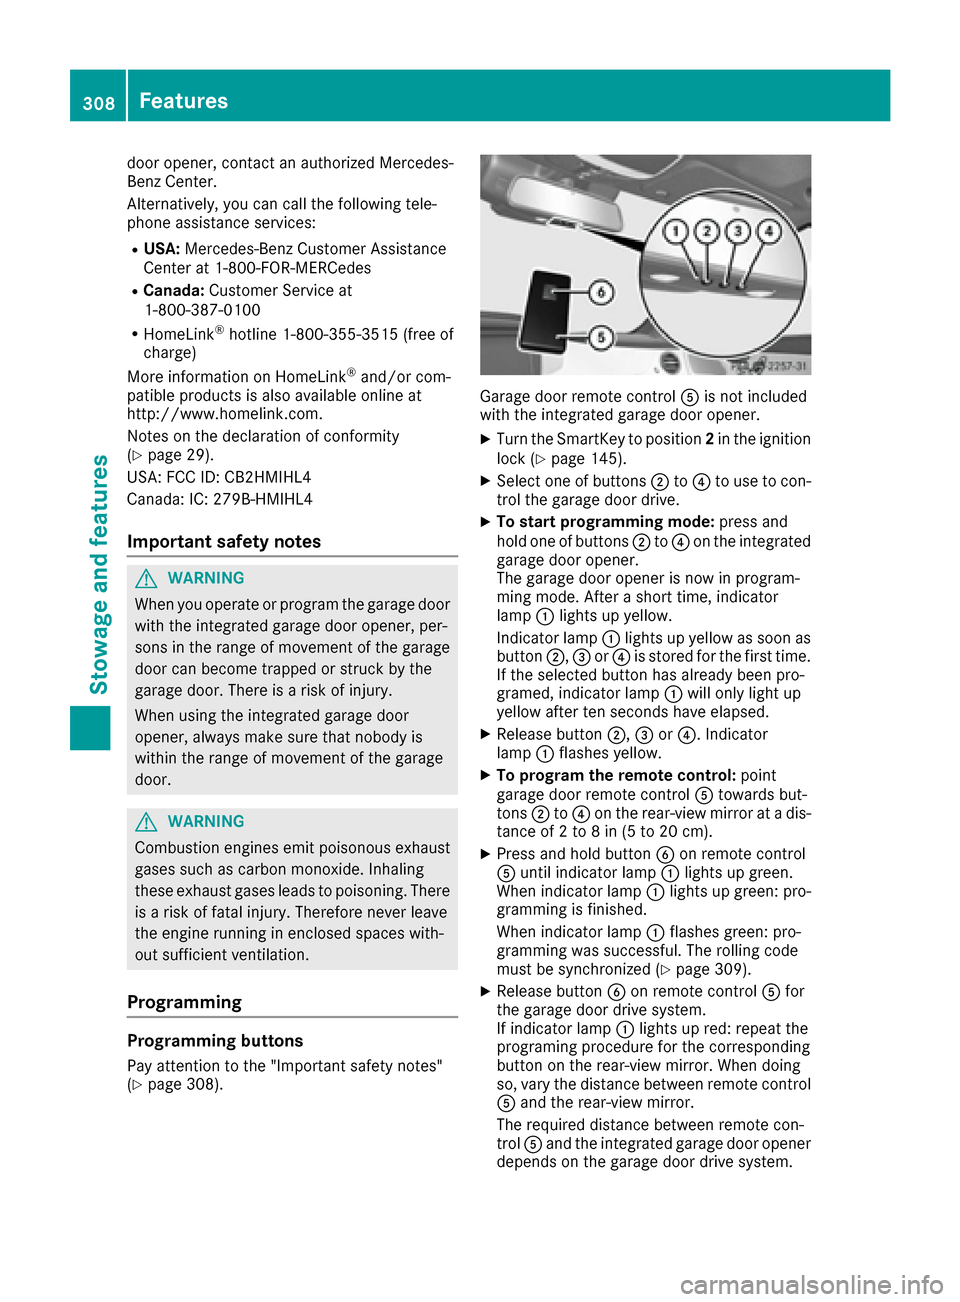
Garage door remote control Ais not included
with the integrated garage door opener.
XTurn the SmartKey to position 2in the ignition
lock (Ypage 145).
XSelect one of buttons ;to? to use to con-
trol the garage door drive.
XTo start programming mode: press and
hold one of buttons ;to? on the integrated
garage door opener.
The garage door opener is now in program-
ming mode. After a short time, indicator
lamp :lights up yellow.
Indicator lamp :lights up yellow as soon as
button ;,=or? is stored for the first time.
If the selected button has already been pro-
gramed, indicator lamp :will only light up
yellow after ten seconds have elapsed.
XRelease button ;,=or?. Indicator
lamp :flashes yellow.
XTo program the remote control: point
garage door remote control Atowards but-
tons ;to? on the rear-view mirror at a dis-
tance of 2 to 8 in (5 to 20 cm).
XPress and hold button Bon remote control
A until indicator lamp :lights up green.
When indicator lamp :lights up green: pro-
gramming is finished.
When indicator lamp :flashes green: pro-
gramming was successful. The rolling code
must be synchronized (
Ypage 309).
XRelease button Bon remote control Afor
the garage door drive system.
If indicator lamp :lights up red: repeat the
programing procedure for the corresponding
button on the rear-view mirror. When doing
so, vary the distance between remote control
A and the rear-view mirror.
The required distance between remote con-
trol Aand the integrated garage door opener
depends on the garage door drive system.
308Features
Stowage and features
Page 330 of 382
XStop the vehicle on solid, non-slippery and
level ground, as far away as possible from
traffic.
XSwitch on the hazard warning lamps.
XSecure the vehicle against rolling away
(Ypage 162).
XIf possible, bring the front wheels into the
straight-ahead position.
XSwitch off the engine.
XOpen the driver's door.
The on-board electronics now have status0.
This is the same as the SmartKey having been
removed.
XRemove the Start/Stop button from the igni-
tion lock (Ypage 145).
or, if the SmartKey is inserted in the ignition
lock:
XRemove the SmartKey from the ignition lock.
XMake sure that the engine cannot be started
via your smartphone (Ypage 147).
XMake sure that the passengers are not endan-
gered as they do so. Make sure that no one is
near the danger area while a wheel is being
changed. Anyone who is not directly assisting
in the wheel change should, for example,
stand behind the barrier.
XGet out of the vehicle. Pay attention to traffic
conditions when doing so.
XClose the driver's door.
MOExtended tires (tires with run-flat
properties)
General notes
With MOExtended tires (tires with run flat char-
acteristics), you can continue to drive your vehi-
cle even if there is a total loss of pressure in one
or more tires. The affected tire must not show
any clearly visible damage.
You can recognize MOExtended tires by the
MOExtended marking which appears on the
sidewall of the tire. You will find this marking
next to the tire size designation, the load-bear-
ing capacity and the speed index (
Ypage 357).
MOExtended tires may only be used in conjunc-
tion with an active tire pressure loss warning
system or with an active tire pressure monitor. If a pressure loss warning message appears
in the multifunction display:
Robserve the instructions in the display mes-
sages (Ypage 252).
Rcheck the tire for damage.
Rif driving on, observe the following notes.
The driving distance possible in run-flat mode is
approximately 50 miles (80 km) when the vehi-
cle is partially laden. When the vehicle is fully
laden it is approximately 19 miles (30 km).
In addition to the vehicle load, the driving dis-
tance possible depends upon:
RVehicle speed
RRoad condition
ROutside temperature
The driving distance possible in run-flat mode
may be reduced by extreme driving conditions
or maneuvers, or it can be increased through a
moderate style of driving.
The driving distance possible in run-fla
t mode is
counted from the moment the tire pressure loss
warning appears in the multifunction display.
You must not exceed a maximum permissible
speed of 50 mph (80 km/h).
When replacing one or all tires, please observe
the following specifications for your vehicle's
tires:
Rsize
Rthe type and
Rthe "MOExtended" mark
If a tire has gone flat and cannot be replaced
with a MOExtended tire, a standard tire may be
used as a temporary measure. Make sure that
you use the proper size and type (summer or
winter tires).
Vehicles equipped with MOExtended tires are
not equipped with a TIREFIT kit at the factory. It
is therefore recommended that you additionally
equip your vehicle with a TIREFIT kit if you mount tires that do not feature run-flat properties, e.g.
winter tires. A TIREFIT kit may be obtained from
a qualified specialist workshop.
Important safety notes
GWARNING
When driving in emergency mode, the driving
characteristics deteriorate, e.g. when corner-
ing, accelerating quickly and when braking.
There is a risk of an accident.
328Flat tire
Breakdown assistance