2017 MERCEDES-BENZ S-Class MAYBACH trunk release
[x] Cancel search: trunk releasePage 92 of 382
XTo deactivate:open the glove box.
XPush the switch to position :.
If the vehicle is unlocked centrally, the trunk
will also be unlocked.
Unlocking the trunk using the
mechanical key
General notes
Use the mechanical key if the trunk lid can no
longer be unlocked:
Rusing the SmartKey
Rusing HANDS-FREE ACCESS
Rusing the remote operating switch in the door
control panel
!The trunk lid swings upwards when opened.
Therefore, make sure that there is sufficient
clearance above the trunk lid.
The opening dimensions of the trunk lid can be
found in the "Vehicle data" section
(
Ypage 376).
Unlocking
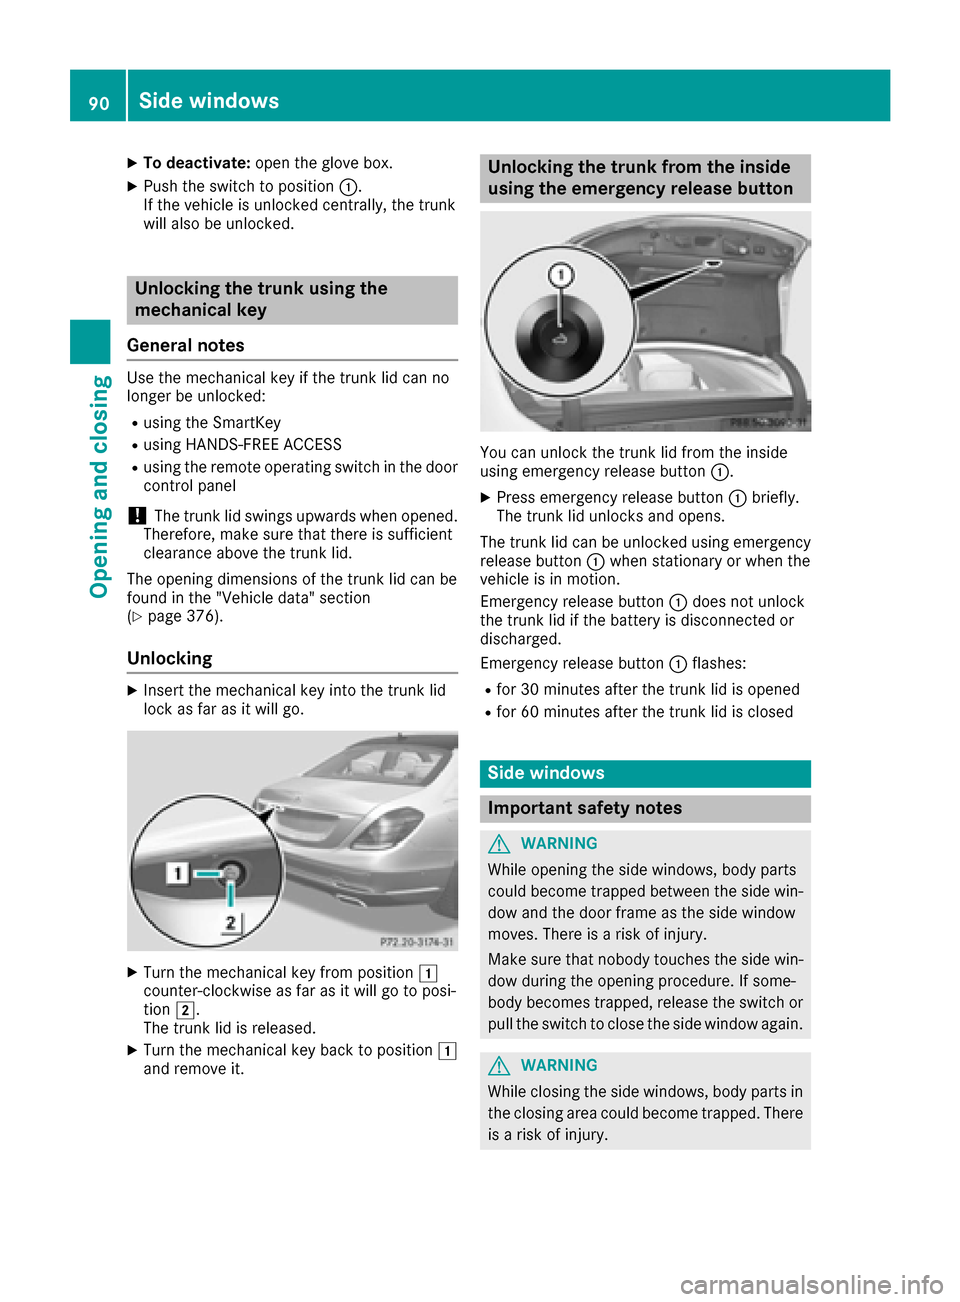
XInsert the mechanical key into the trunk lid
lock as far as it will go.
XTurn the mechanical key from position 1
counter-clockwise as far as it will go to posi-
tion 2.
The trunk lid is released.
XTurn the mechanical key back to position 1
and remove it.
Unlocking the trunk from the inside
using the emergency release button
You can unlock the trunk lid from the inside
using emergency release button :.
XPress emergency release button :briefly.
The trunk lid unlocks and opens.
The trunk lid can be unlocked using emergency
release button :when stationary or when the
vehicle is in motion.
Emergency release button :does not unlock
the trunk lid if the battery is disconnected or
discharged.
Emergency release button :flashes:
Rfor 30 minutes after the trunk lid is opened
Rfor 60 minutes after the trunk lid is closed
Side windows
Important safety notes
GWARNING
While opening the side windows, body parts
could become trapped between the side win-
dow and the door frame as the side window
moves. There is a risk of injury.
Make sure that nobody touches the side win-
dow during the opening procedure. If some-
body becomes trapped, release the switch or
pull the switch to close the side window again.
GWARNING
While closing the side windows, body parts in
the closing area could become trapped. There is a risk of injury.
90Side windows
Opening and closing
Page 166 of 382
In addition, at least one of the following condi-
tions must be fulfilled:
Rthe engine is switched off
Rthe driver is not wearing a seat belt and the
driver's door is opened
Rthere is a system malfunction
Rthe power supply is insufficient
Rthe vehicle is stationary for a lengthy period
The red F(USA only) or !(Canada only)
indicator lamp in the instrument cluster lights
up.
The electric parking brake is not automatically
engaged if the engine is switched off by the ECO
start/stop function.
Releasing automatically
The electric parking brake is released automat-
ically when all of the following conditions are
fulfilled:
Rthe engine is running.
Rthe transmission is in position Dor R.
Rthe seat belt has been fastened
Ryou depress the accelerator pedal
If the automatic transmission is in position R,
the trunk lid must be closed.
If your seat belt is not fastened, the following
conditions must be fulfilled to automatically
release the electric parking brake:
Rthe driver's door is closed.
Ryou have shifted out of transmission position
P or you have previously driven faster than
2 mph (3 km/h).
Ensure that you do not depress the accelerator
pedal unintentionally. Otherwise the parking
brake will be released and the vehicle will start
to move.
Emergency braking
The vehicle can also be braked during an emer-
gency by using the electric parking brake.
XWhile driving, push handle :of the electric
parking brake (Ypage 163).
The vehicle is braked as long as you keep
handle :of the electric parking brake
pressed. The longer electric parking brake
handle :is depressed, the greater the brak-
ing force. During braking:
Ra warning tone sounds
Rthe
Please Release Parking Brakemes-
sage appears
Rthe red F(USA only) or !(Canada
only) indicator lamp in the instrument cluster flashes
When the vehicle has been braked to a stand-
still, the electric parking brake is engaged.
Parking the vehicle for a long period
If you leave the vehicle parked for longer than
four weeks, the battery may be damaged by
exhaustive discharging.
If you leave the vehicle parked for longer than six
weeks, the vehicle may suffer damage as a
result of lack of use.
XVisit a qualified specialist workshop and seek
advice.
Hybrid vehicles: observe the notes on the high-
voltage battery in the separate Operator's Man-
ual.
Driving tips
General driving tips
Important safety notes
GWARNING
If you switch off the ignition while driving,
safety-relevant functions are only available
with limitations, or not at all. This could affect, for example, the power steering and the brake
boosting effect. You will require considerably
more effort to steer and brake. There is a risk
of an accident.
Do not switch off the ignition while driving.
GWARNING
If you operate mobile communication equip-
ment while driving, you will be distracted from traffic conditions. You could also lose control
of the vehicle. There is a risk of an accident.
Only operate this equipment when the vehicle
is stationary.
164Driving tips
Driving and parking
Page 288 of 382
Vehicles with a rear bench seat
Vehicles with electrically adjustable outer seats
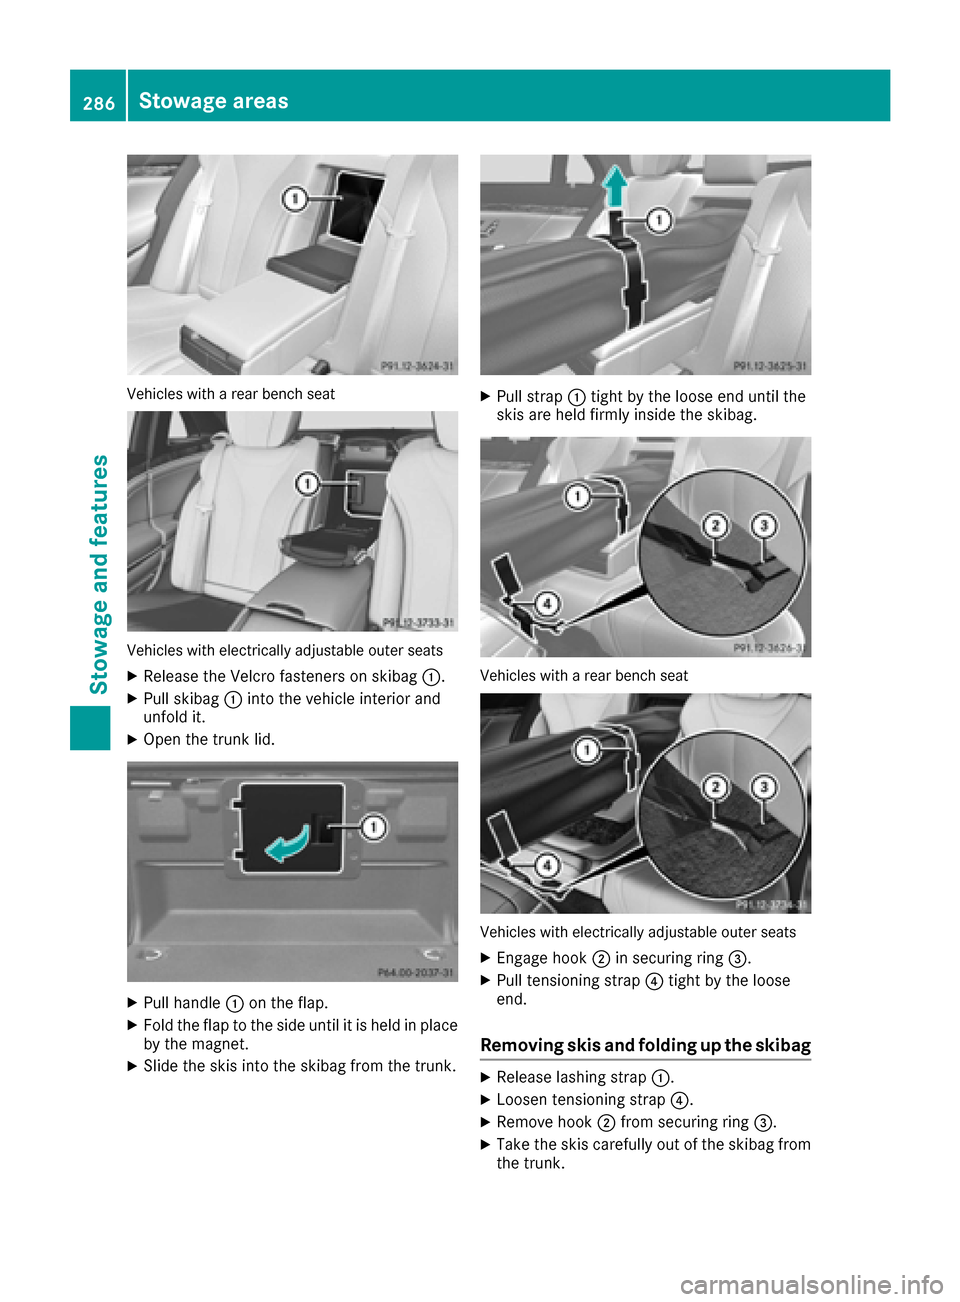
XRelease the Velcro fasteners on skibag:.
XPull skibag:into the vehicle interior and
unfold it.
XOpen the trunk lid.
XPull handle :on the flap.
XFold the flap to the side until it is held in place
by the magnet.
XSlide the skis into the skibag from the trunk.
XPull strap :tight by the loose end until the
skis are held firmly inside the skibag.
Vehicles with a rear bench seat
Vehicles with electrically adjustable outer seats
XEngage hook ;in securing ring =.
XPull tensioning strap ?tight by the loose
end.
Removing skis and folding up the skibag
XRelease lashing strap :.
XLoosen tensioning strap ?.
XRemove hook;from securing ring =.
XTake the skis carefully out of the skibag from
the trunk.
286Stowage areas
Stowage and features
Page 289 of 382
XClose the flapinthe trunk.
XFold up the skibag using the folding aid and
close it with the Velcro fasteners.
XPut the skibag into the backrest.
XFold the cover back up.
You should close the flap inthe trunk ifyou do
not require the skibag. This willprevent unau-
thorized access to the trunk from the veh icle
interior.
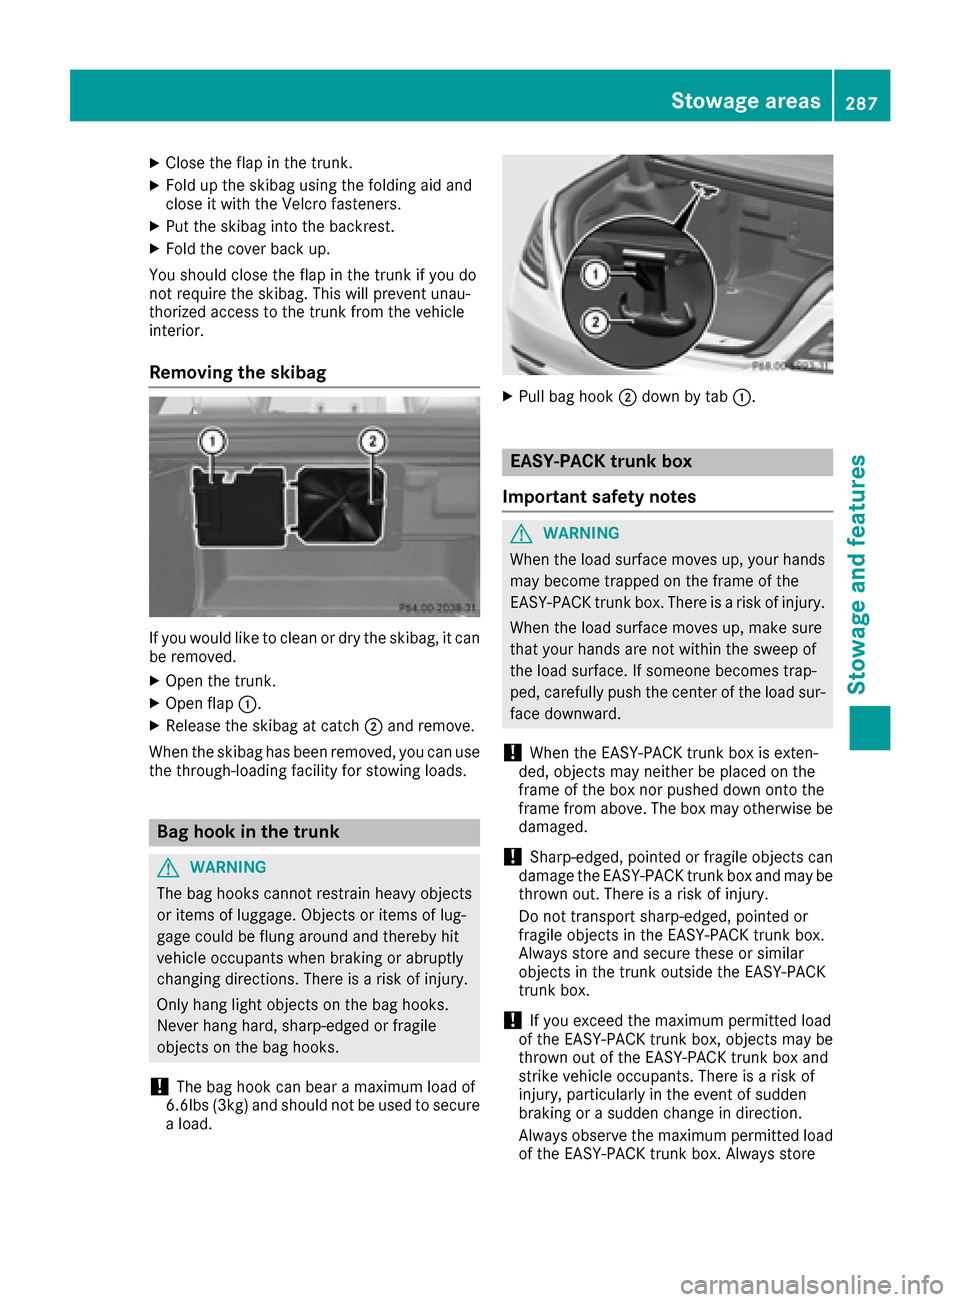
Removing the skibag
If you would like to clean or dry the skibag, itcan
be remove d.
XOpen the trunk.
XOpen flap :.
XRelease the skibag at catch;and remove.
When the skibag has been remove d,you can use
the through-loadin g facility for stowin g loads.
Bag hook in the trunk
GWARNING
The bag hooks cannot restrain heavy objects
or items of luggage. Objects or items of lug-
gage could beflung around and there byhit
veh icle occupants when braking or abrupt ly
changing directions. There isa risk of injury.
Only hang light objects on the bag hooks.
Never hang hard, sharp-edged or fragile
objects on the bag hooks.
!The bag hook can bear a maximum load of
6. 6lbs (3kg) and should not beused to secure
a load.
XPull bag hook ;down bytab :.
EASY-PACK trunk box
Important safety notes
GWARNING
When the load surface moves up, your hands may become trapped on the frame of the
EASY-PACK trunk box. There is a risk of injury.
When the load surface moves up, make sure
that your hands are not within the sweep of
the load surface. If someone becomes trap-
ped, carefully push the center of the load sur-
face down ward.
!When the EASY-PACK trunk box isexten-
ded, objects may neither beplaced on the
frame of the box nor pushed down onto the
frame from above. The box may otherwise be
damaged.
!Sharp-edged, pointed or fragile objects can
damage the EASY-PACK trunk box and may be
thrown out. There is a risk of injury.
Do not transport sharp-edged, pointed or
fragile objects in the EASY-PACK trunk box.
Always store and secure these or similar
objects in the trunk outside the EASY-PACK
trunk box.
!If you exceed the maximum permitted load
of the EASY-PACK trunk box, objects may be
thrown out of the EASY-PACK trunk box and
strike vehicle occupants. There is a risk of
injury, particularly in the event of sudden
braking or a sudden change indirection.
Alwa ys observe the maximum permitted load
of the EASY-PACK trunk box.Always store
Stowage areas287
Stowage and features
Z
Page 343 of 382
The fuses in your vehicle serve to close down
faulty circuits. If a fuse blows, all the compo-
nents on the circuit and their functions stop
operating.
If a newly inserted fuse also blows, have the
cause traced and rectified at a qualified special-
ist workshop, e.g. an authorized Mercedes-Benz
Center.
!Only use fuses that have been approved for
Mercedes-Benz vehicles and which have the
correct fuse rating for the system concerned.
Otherwise, components or systems could be
damaged.
!Make sure that no moisture can enter the
fuse box when the cover is open.
!When closing the cover, make sure that it is
lying correctly on the fuse box. Moisture seep-
ing in or dirt could otherwise impair the oper-
ation of the fuses.
Before changing a fuse
Observe the important safety notes
(Ypage 340)
XSwitch off the engine.
XSwitch off all electrical consumers.
XMake sure that the ignition is switched off
(Ypage 145).
or
XWhen using the SmartKey, turn the SmartKey
to position 0in the ignition lock and remove it
(
Ypage 145).
XSecure the vehicle against rolling away
(Ypage 162).
All indicator lamps in the instrument cluster
must be off.
The fuses are located in various fuse boxes:
RFuse box on the driver's side of the dashboard
RFuse box in the front-passenger footwell
RFuse box in the engine compartment on the
left-hand side of the vehicle, when viewed in
the direction of travel
RFuse box in the trunk
Dashboard fuse box
The fuse box is under a cover on the side of the dashboard. You can obtain further information
from an authorized Mercedes-Benz Center.
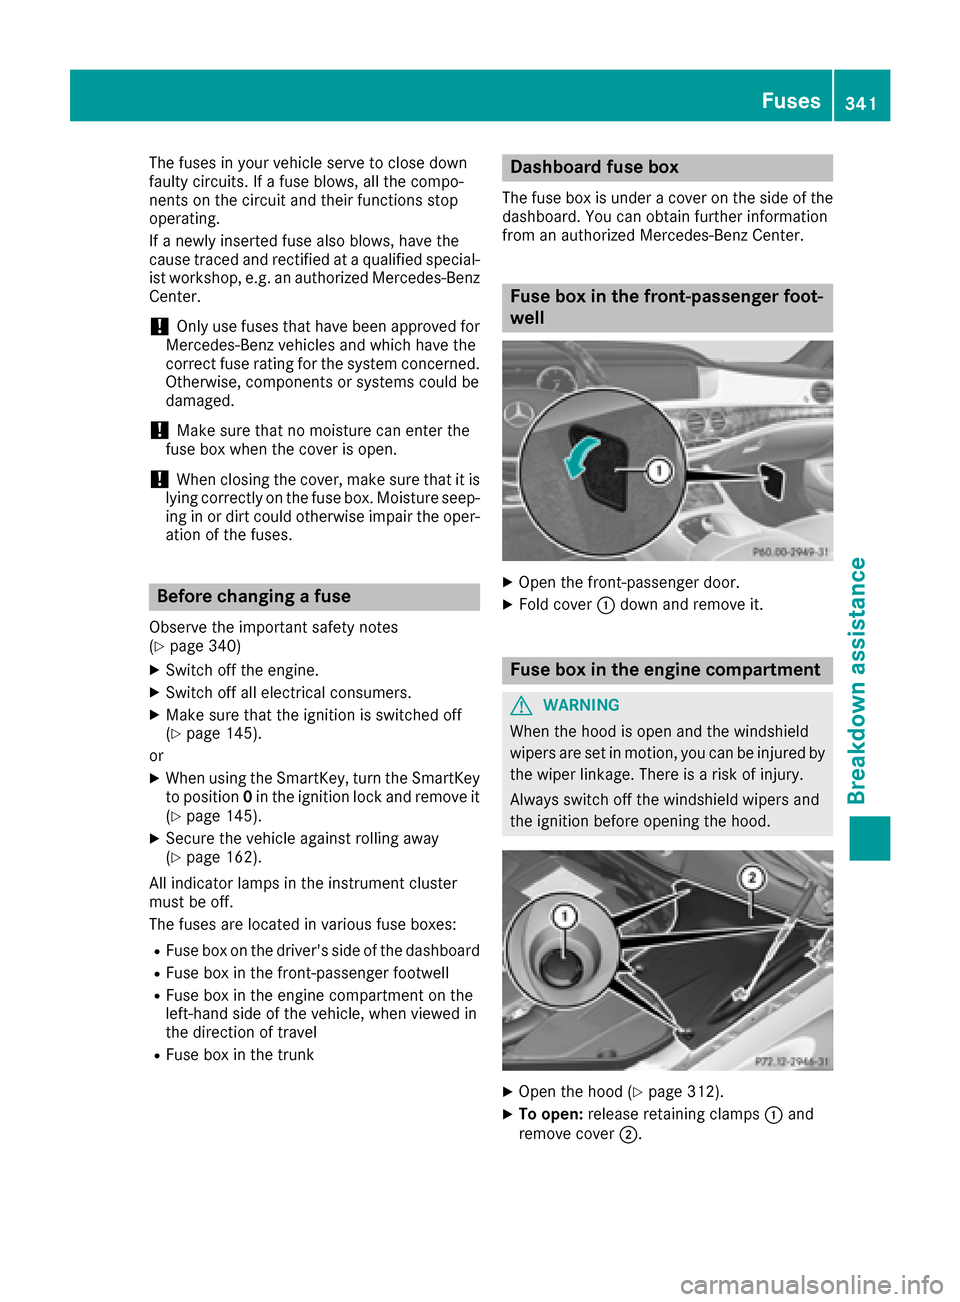
Fuse box in the front-passenger foot-
well
XOpen the front-passenger door.
XFold cover :down and remove it.
Fuse box in the engine compartment
GWARNING
When the hood is open and the windshield
wipers are set in motion, you can be injured by
the wiper linkage. There is a risk of injury.
Always switch off the windshield wipers and
the ignition before opening the hood.
XOpen the hood (Ypage 312).
XTo open: release retaining clamps :and
remove cover ;.
Fuses341
Breakdown assistance
Z