2017 MERCEDES-BENZ S-Class MAYBACH height
[x] Cancel search: heightPage 108 of 382
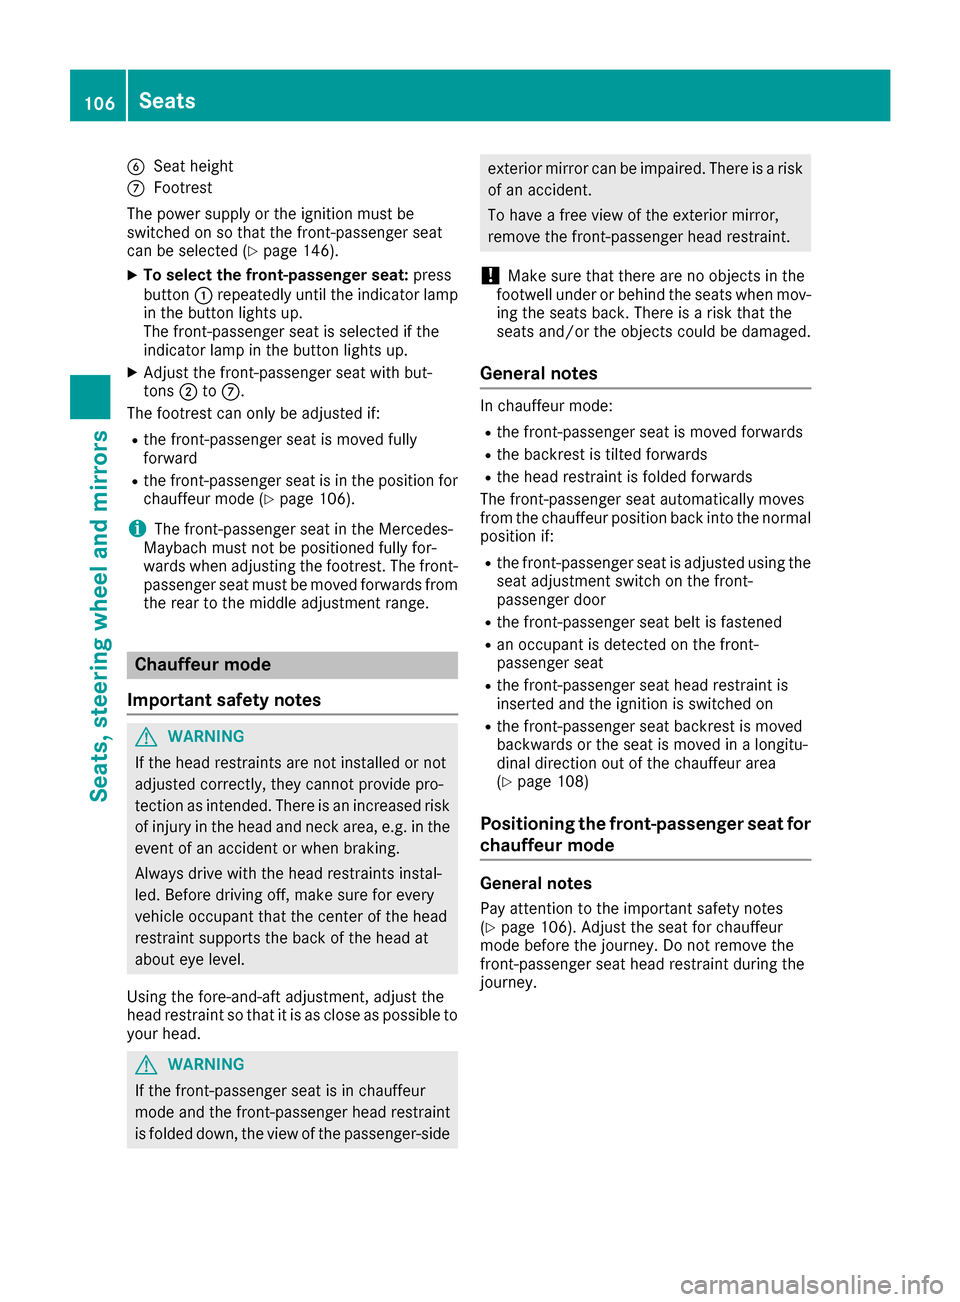
BSeat height
CFootrest
The power supply or the ignition must be
switched on so that the front-passenger seat
can be selected (
Ypage 146).
XTo select the front-passenger seat: press
button :repeatedly until the indicator lamp
in the button lights up.
The front-passenger seat is selected if the
indicator lamp in the button lights up.
XAdjust the front-passenger seat with but-
tons ;toC.
The footrest can only be adjusted if:
Rthe front-passenger seat is moved fully
forward
Rthe front-passenger seat is in the position for
chauffeur mode (Ypage 106).
iThe front-passenger seat in the Mercedes-
Maybach must not be positioned fully for-
wards when adjusting the footrest. The front-
passenger seat must be moved forwards from
the rear to the middle adjustment range.
Chauffeur mode
Important safety notes
GWARNING
If the head restraints are not installed or not
adjusted correctly, they cannot provide pro-
tection as intended. There is an increased risk
of injury in the head and neck area, e.g. in the event of an accident or when braking.
Always drive with the head restraints instal-
led. Before driving off, make sure for every
vehicle occupant that the center of the head
restraint supports the back of the head at
about eye level.
Using the fore-and-aft adjustment, adjust the
head restraint so that it is as close as possible to
your head.
GWARNING
If the front-passenger seat is in chauffeur
mode and the front-passenger head restraint
is folded down, the view of the passenger-side
exterior mirror can be impaired. There is a risk of an accident.
To have a free view of the exterior mirror,
remove the front-passenger head restraint.
!Make sure that there are no objects in the
footwell under or behind the seats when mov-
ing the seats back. There is a risk that the
seats and/or the objects could be damaged.
General notes
In chauffeur mode:
Rthe front-passenger seat is moved forwards
Rthe backrest is tilted forwards
Rthe head restraint is folded forwards
The front-passenger seat automatically moves
from the chauffeur position back into the normal
position if:
Rthe front-passenger seat is adjusted using the
seat adjustment switch on the front-
passenger door
Rthe front-passenger seat belt is fastened
Ran occupant is detected on the front-
passenger seat
Rthe front-passenger seat head restraint is
inserted and the ignition is switched on
Rthe front-passenger seat backrest is moved
backwards or the seat is moved in a longitu-
dinal direction out of the chauffeur area
(
Ypage 108)
Positioning the front-passenger seat for
chauffeur mode
General notes
Pay attention to the important safety notes
(Ypage 106). Adjust the seat for chauffeur
mode before the journey. Do not remove the
front-passenger seat head restraint during the
journey.
106Seats
Seats, steering wheel and mirrors
Page 112 of 382
Adjust the driver's seat, head restraint, steer-ing wheel and mirror and fasten your seat belt
before starting the engine.
GWARNING
If the head restraints are not installed or not
adjusted correctly, they cannot provide pro-
tection as intended. There is an increased risk
of injury in the head and neck area, e.g. in the event of an accident or when braking.
Always drive with the head restraints instal-
led. Before driving off, make sure for every
vehicle occupant that the center of the head
restraint supports the back of the head at
about eye level.
Do not rotate the head restraints of the front and rear seats. Otherwise, you cannot adjust the
height and angle of the head restraints to the
correct position.
Using the fore-and-aft adjustment, adjust the
head restraint so that it is as close as possible to
your head.
Pay attention to the important safety notes
(
Ypage 100).
Adjusting the front head restraints
Adjusting the head restraints manually
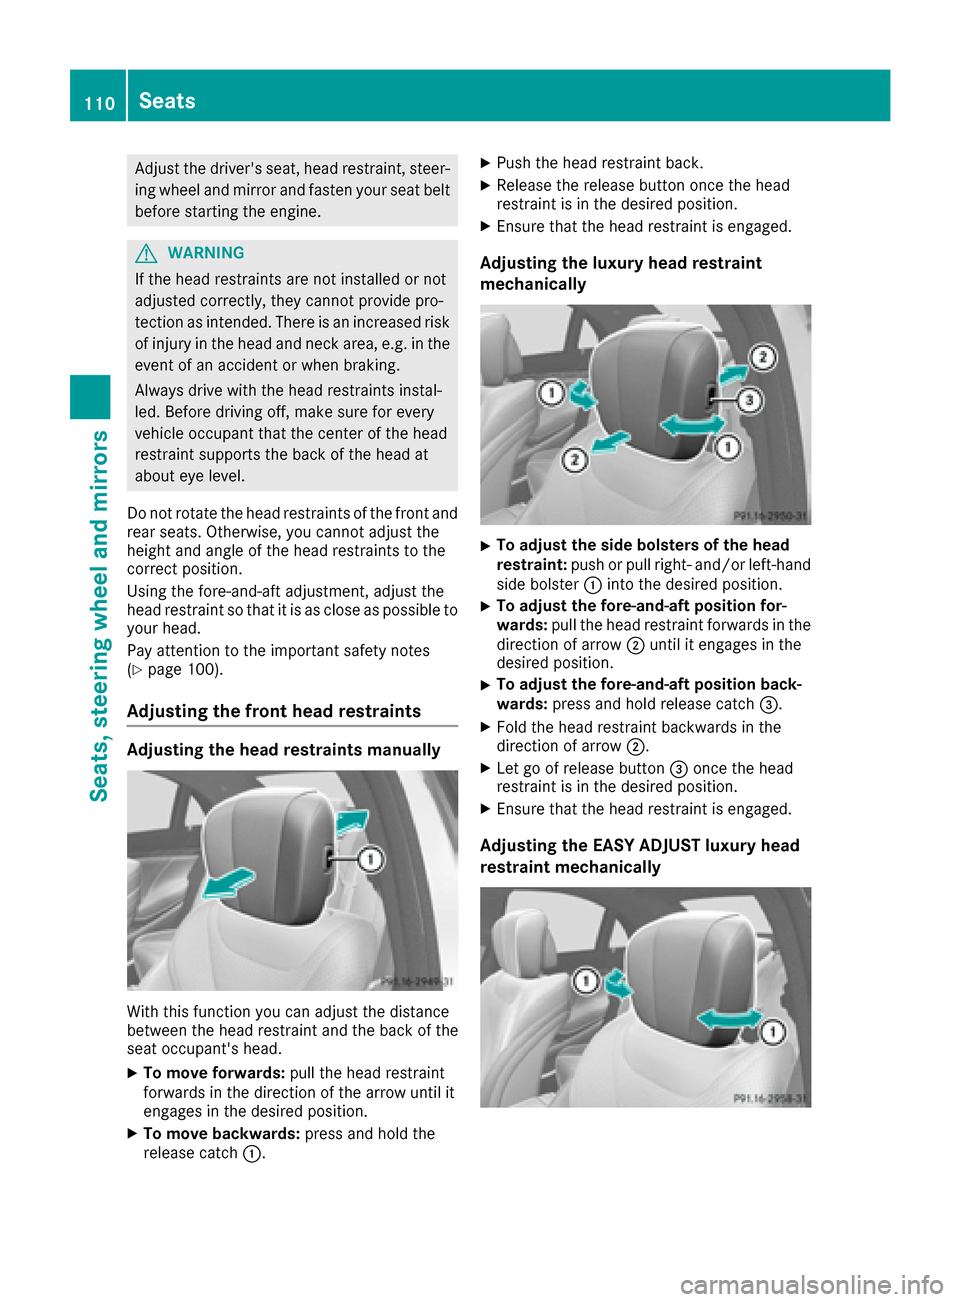
With this function you can adjust the distance
between the head restraint and the back of the
seat occupant's head.
XTo move forwards: pull the head restraint
forwards in the direction of the arrow until it
engages in the desired position.
XTo move backwards: press and hold the
release catch :.
XPush the head restraint back.
XRelease the release button once the head
restraint is in the desired position.
XEnsure that the head restraint is engaged.
Adjusting the luxury head restraint
mechanically
XTo adjust the side bolsters of the head
restraint:push or pull right- and/or left-hand
side bolster :into the desired position.
XTo adjust the fore-and-aft position for-
wards: pull the head restraint forwards in the
direction of arrow ;until it engages in the
desired position.
XTo adjust the fore-and-aft position back-
wards: press and hold release catch =.
XFold the head restraint backwards in the
direction of arrow;.
XLet go of release button =once the head
restraint is in the desired position.
XEnsure that the head restraint is engaged.
Adjusting the EASY ADJUST luxury head
restraint mechanically
110Seats
Seats, steering wheel and mirrors
Page 113 of 382
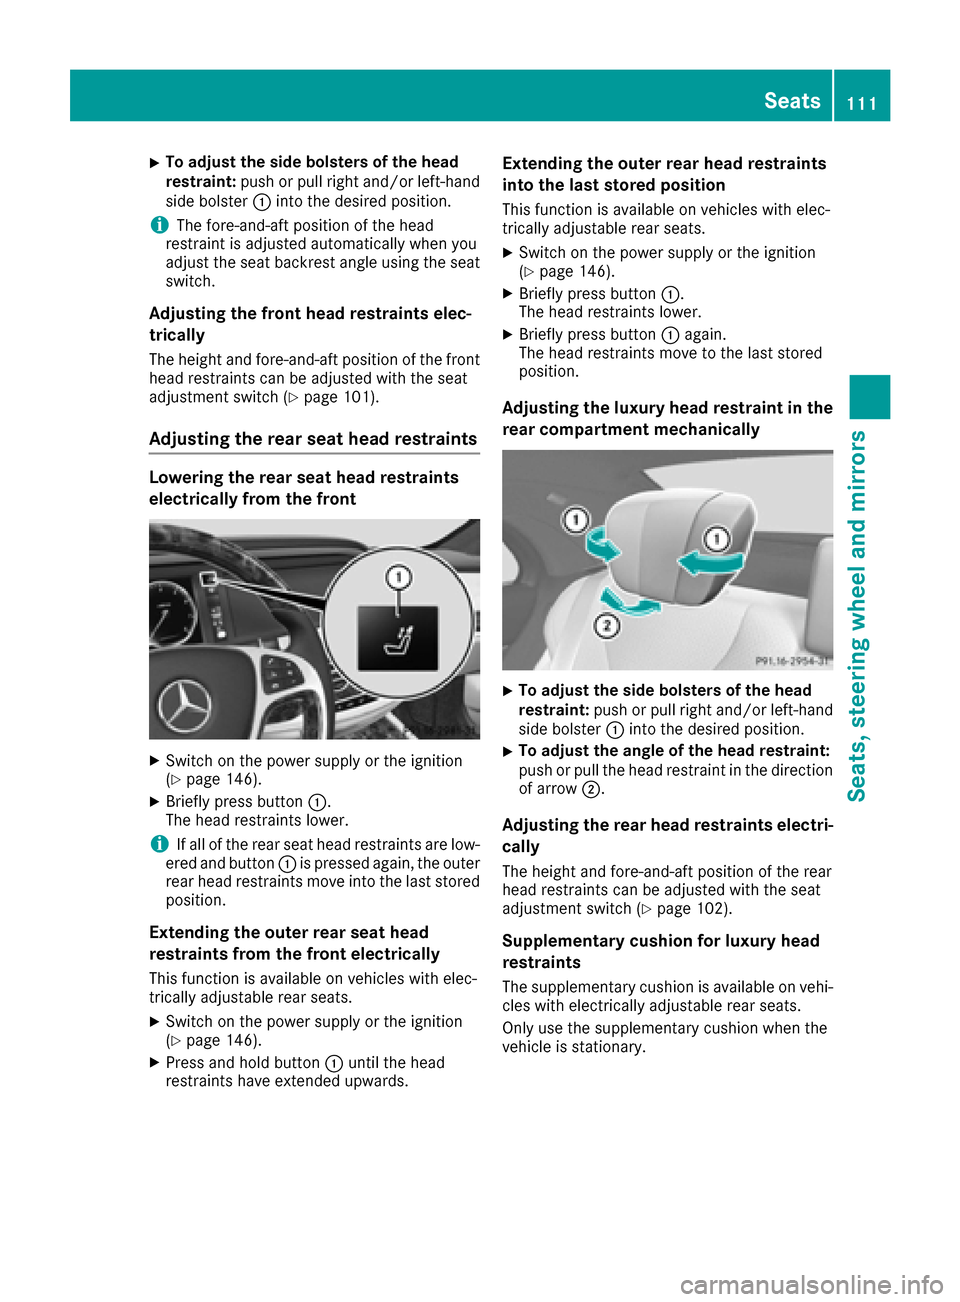
XTo adjust the side bolsters of the head
restraint:push or pull right and/or left-hand
side bolster :into the desired position.
iThe fore-and-aft position of the head
restraint is adjusted automatically when you
adjust the seat backrest angle using the seat
switch.
Adjusting the front head restraints elec-
trically
The height and fore-and-aft position of the front
head restraints can be adjusted with the seat
adjustment switch (
Ypage 101).
Adjusting the rear seat head restraints
Lowering the rear seat head restraints
electrically from the front
XSwitch on the power supply or the ignition
(Ypage 146).
XBriefly press button :.
The head restraints lower.
iIf all of the rear seat head restraints are low-
ered and button :is pressed again, the outer
rear head restraints move into the last stored
position.
Extending the outer rear seat head
restraints from the front electrically
This function is available on vehicles with elec-
trically adjustable rear seats.
XSwitch on the power supply or the ignition
(Ypage 146).
XPress and hold button :until the head
restraints have extended upwards.
Extending the outer rear head restraints
into the last stored position
This function is available on vehicles with elec-
trically adjustable rear seats.
XSwitch on the power supply or the ignition
(Ypage 146).
XBriefly press button :.
The head restraints lower.
XBriefly press button :again.
The head restraints move to the last stored
position.
Adjusting the luxury head restraint in the
rear compartment mechanically
XTo adjust the side bolsters of the head
restraint: push or pull right and/or left-hand
side bolster :into the desired position.
XTo adjust the angle of the head restraint:
push or pull the head restraint in the direction
of arrow ;.
Adjusting the rear head restraints electri-
cally
The height and fore-and-aft position of the rear
head restraints can be adjusted with the seat
adjustment switch (
Ypage 102).
Supplementary cushion for luxury head
restraints
The supplementary cushion is available on vehi-
cles with electrically adjustable rear seats.
Only use the supplementary cushion when the
vehicle is stationary.
Seats111
Seats, steering wheel and mirrors
Z
Page 117 of 382
Steering wheel
Important safety notes
GWARNING
You could lose control of your vehicle if you do the following while driving:
Radjust the driver's seat, head restraint,
steering wheel or mirrors
Rfasten the seat belt
There is a risk of an accident.
Adjust the driver's seat, head restraint, steer-
ing wheel and mirror and fasten your seat belt before starting the engine.
GWARNING
Children could injure themselves if they
adjust the steering wheel. There is a risk of
injury.
When leaving the vehicle, always take the
SmartKey with you and lock the vehicle. Never
leave children unsupervised in the vehicle.
The electrically adjustable steering wheel can
still be adjusted when there is no SmartKey in
the ignition lock.
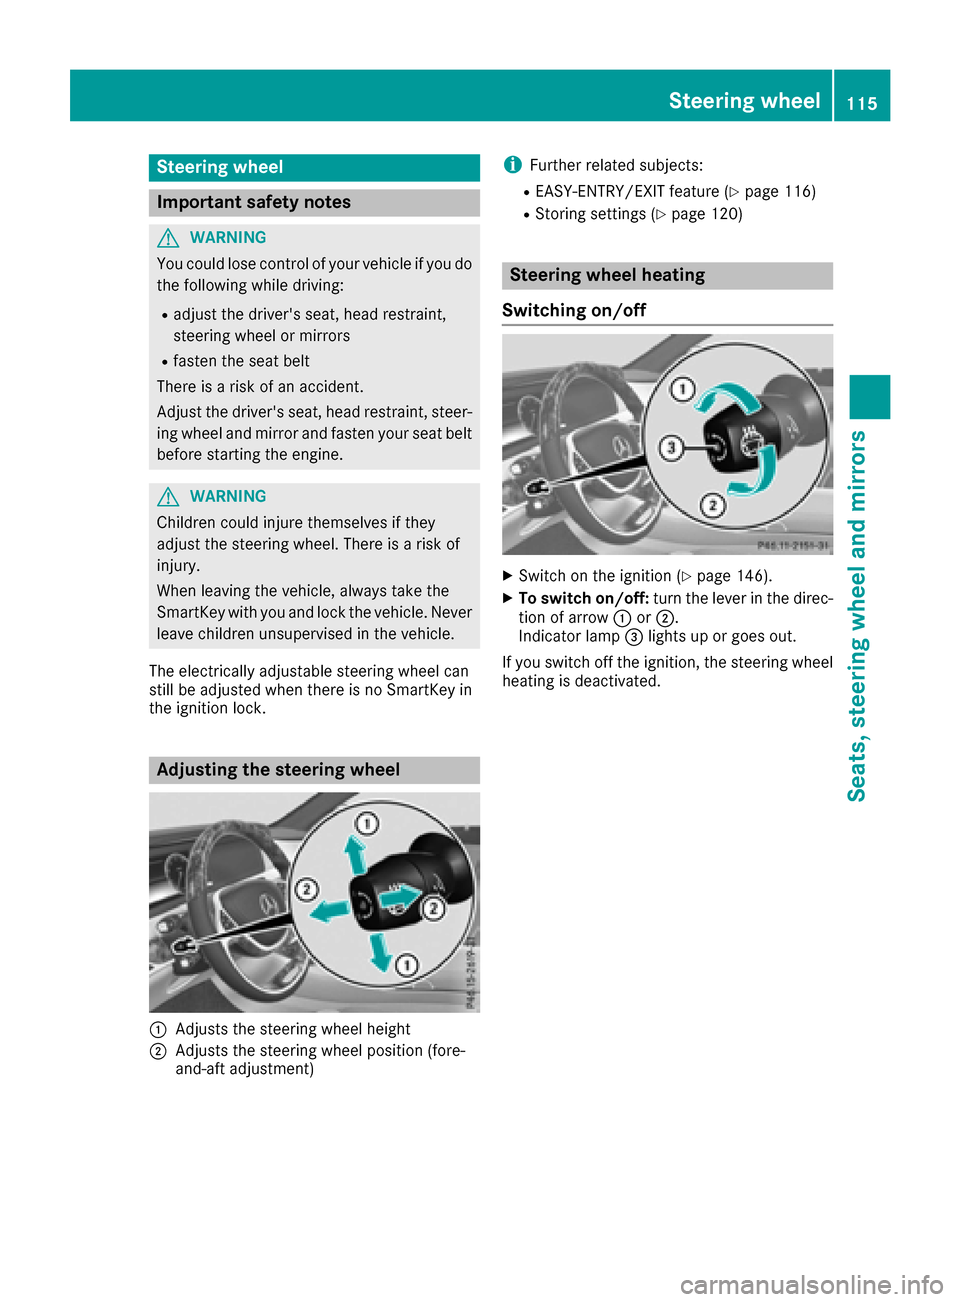
Adjusting the steering wheel
:Adjusts the steering wheel height
;Adjusts the steering wheel position (fore-
and-aft adjustment)
iFurther related subjects:
REASY-ENTRY/EXIT feature (Ypage 116)
RStoring settings (Ypage 120)
Steering wheel heating
Switching on/off
XSwitch on the ignition (Ypage 146).
XTo switch on/off: turn the lever in the direc-
tion of arrow :or;.
Indicator lamp =lights up or goes out.
If you switch off the ignition, the steering wheel
heating is deactivated.
Steering wheel115
Seats, steering wheel and mirrors
Z
Page 182 of 382
The electric parking brake secures the vehicle
automatically if the HOLD function is activated
when the vehicle is stationary and:
Ra system malfunction occurs.
Rthe power supply is not sufficient.
If a malfunction in the electric parking brake
occurs, then the transmission may also be shif-
ted into position Pautomatically.
MAGIC BODY CONTROL
General notes
MAGIC BODY CONTROL consists of Active Body
Control (ABC), ROAD SURFACE SCAN as well as
automatic vehicle stabilization in the event of a
crosswind.
Your vehicle automatically adjusts its ride height
to improve driving safety and reduce fuel con-
sumption. The suspension mode is adjusted
according to your selection (sports or comfort),
the road surface conditions and the vehicle load. A multifunction camera detects bumps in the
road surface before the vehicle drives over
them. This reduces chassis movements.
Important safety notes
GWARNING
When the vehicle is being lowered, people
could become trapped if their limbs are
between the vehicle body and the wheels or
underneath the vehicle. There is a risk of
injury.
Make sure no one is underneath the vehicle or
in the immediate vicinity of the wheel arches
when the vehicle is being lowered.
!The vehicle is lowered when the engine is
switched off. When parking, position your
vehicle so that it does not make contact with
the curb as the vehicle is lowered. Your vehi-
cle could otherwise be damaged.
Crosswind Assist
The crosswind stabilization operates by chang-
ing wheel loads through adjusting the ABC
spring struts. It reduces impairments in handling
when driving in a straight line and assists during
countersteering. Crosswind Assist is active in the speed range
between 50 mph (80 km/h)
and
130 mph (210 km/h) when driving straight
ahead or cornering gently.
Active Body Control ABC
Vehicle level
Mercedes-AMG vehicles: depending on the
vehicle level that has been selected, the vehicle
automatically adjusts its height dependent on
the current speed. The vehicle is lowered by up
to 0.4 in (10 mm) below the normal level as the
speed increases. As the speed is reduced, the
vehicle is raised up to the set vehicle height.
All other models: depending on the vehicle
level that has been set, the vehicle automatically
adjusts its height dependent on the current
speed. The vehicle is lowered by up to 0.6 in
(15 mm) as the speed increases. As the speed is
reduced, the vehicle is raised up to the set vehi-
cle height.
Select the "Normal" setting for normal road con-
ditions and "Raised" for driving with snow chains
or in particularly poor road conditions.
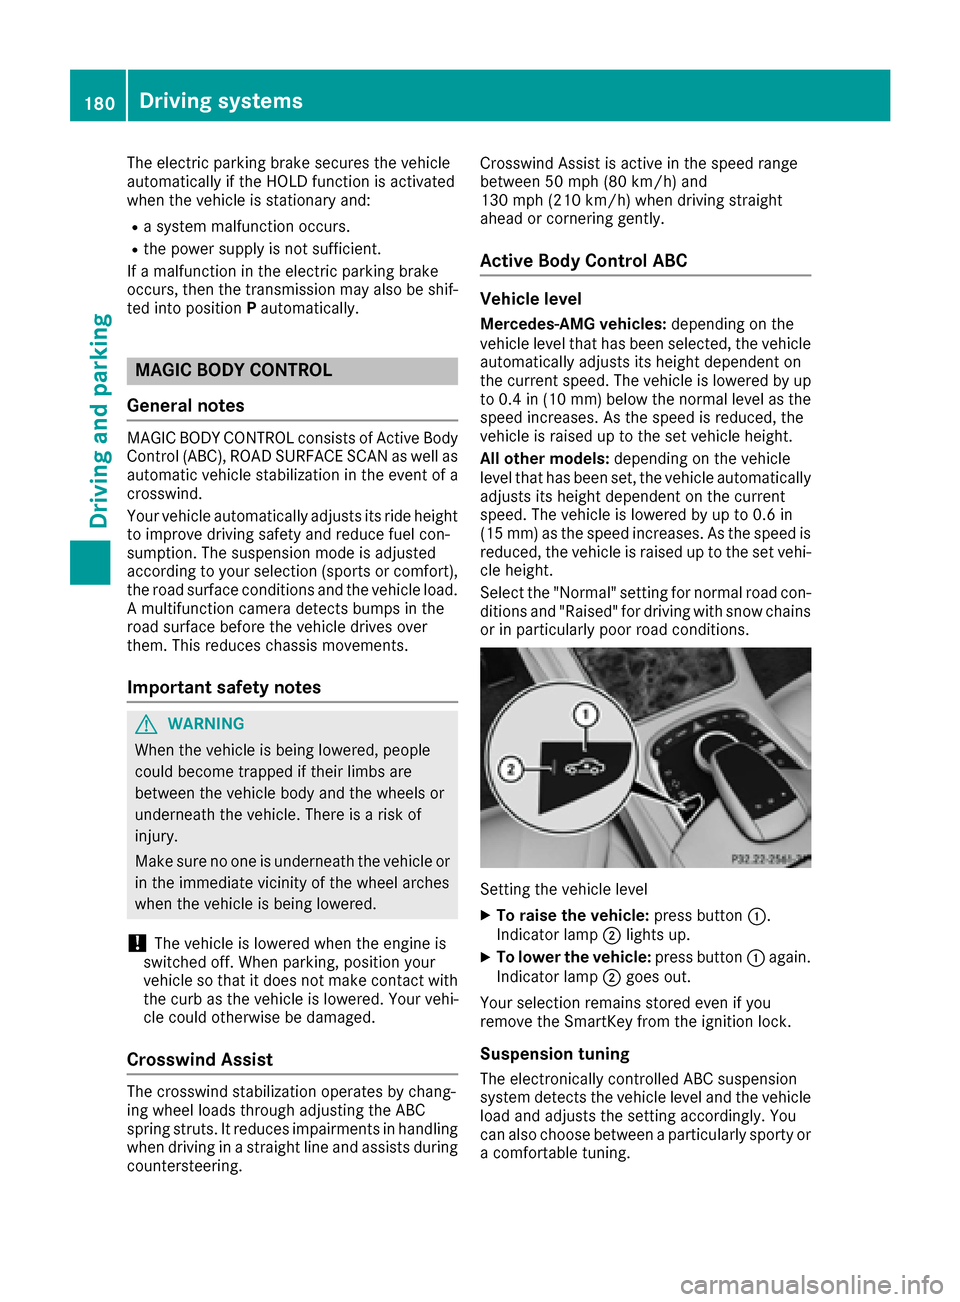
Setting the vehicle level
XTo raise the vehicle: press button:.
Indicator lamp ;lights up.
XTo lower the vehicle: press button:again.
Indicator lamp ;goes out.
Your selection remains stored even if you
remove the SmartKey from the ignition lock.
Suspension tuning
The electronically controlled ABC suspension
system detects the vehicle level and the vehicle
load and adjusts the setting accordingly. You
can also choose between a particularly sporty or
a comfortable tuning.
180Driving systems
Driving and parking
Page 189 of 382
Parking tips:
ROn narrow roads, drive as close to the parkingspace as possible.
RParking spaces that are littered or overgrown
might be identified or measured incorrectly.
RParking spaces that are partially occupied by
trailer drawbars might not be identified as
such or be measured incorrectly.
RSnowfall or heavy rain may lead to a parking
space being measured inaccurately.
RPay attention to the PARKTRONIC
(Ypage 185) warning messages during the
parking procedure.
RYou can intervene in the steering procedure
to correct it at any time. Active Parking Assist
will then be canceled
RWhen transporting a load which protrudes
from your vehicle, you should not use Active
Parking Assist.
RNever use Active Parking Assist when snow
chains are installed.
RMake sure that the tire pressures are always
correct. This has a direct influence on the
parking characteristics of the vehicle.
Use Active Parking Assist for parking spaces:
Rparallel or at right angles to the direction of
travel
Rthat are on straight roads, not bends
Rthat are on the same level as the road, e.g. not on the pavement
Detecting parking spaces
Objects located above the height range of Active
Parking Assist will not be detected when the
parking space is measured. These are not taken
into account when the parking procedure is cal-
culated, e.g. overhanging loads, truck over-
hangs or loading ramps.
GWARNING
If there are objects above the detection range:
RActive Park Assist may steer too early
Rthe vehicle may not stop in front of these
objects
You may cause a collision as a result. There is
a risk of an accident.
If objects are located above the detection
range, stop and deactivate Active Parking
Assist.
For further information on the detection range
(
Ypage 184).
Active Parking Assist does not assist you park-
ing in spaces at right angles to the direction of
travel if:
Rtwo parking spaces are located directly next
to one another
Rthe parking space is directly next to a low
obstacle such as a low curb
Ryou park forwards
Active Parking Assist does not assist you park-
ing in spaces that are parallel or at right angles
to the direction of travel if:
Rthe parking space is on a curb
Rthe system reads the parking space as being
blocked, for example by foliage or grass pav-
ing blocks
Rthe area is too small for the vehicle to maneu-
ver into
Rthe parking space is bordered by an obstacle,
e.g. a tree, a post or a trailer
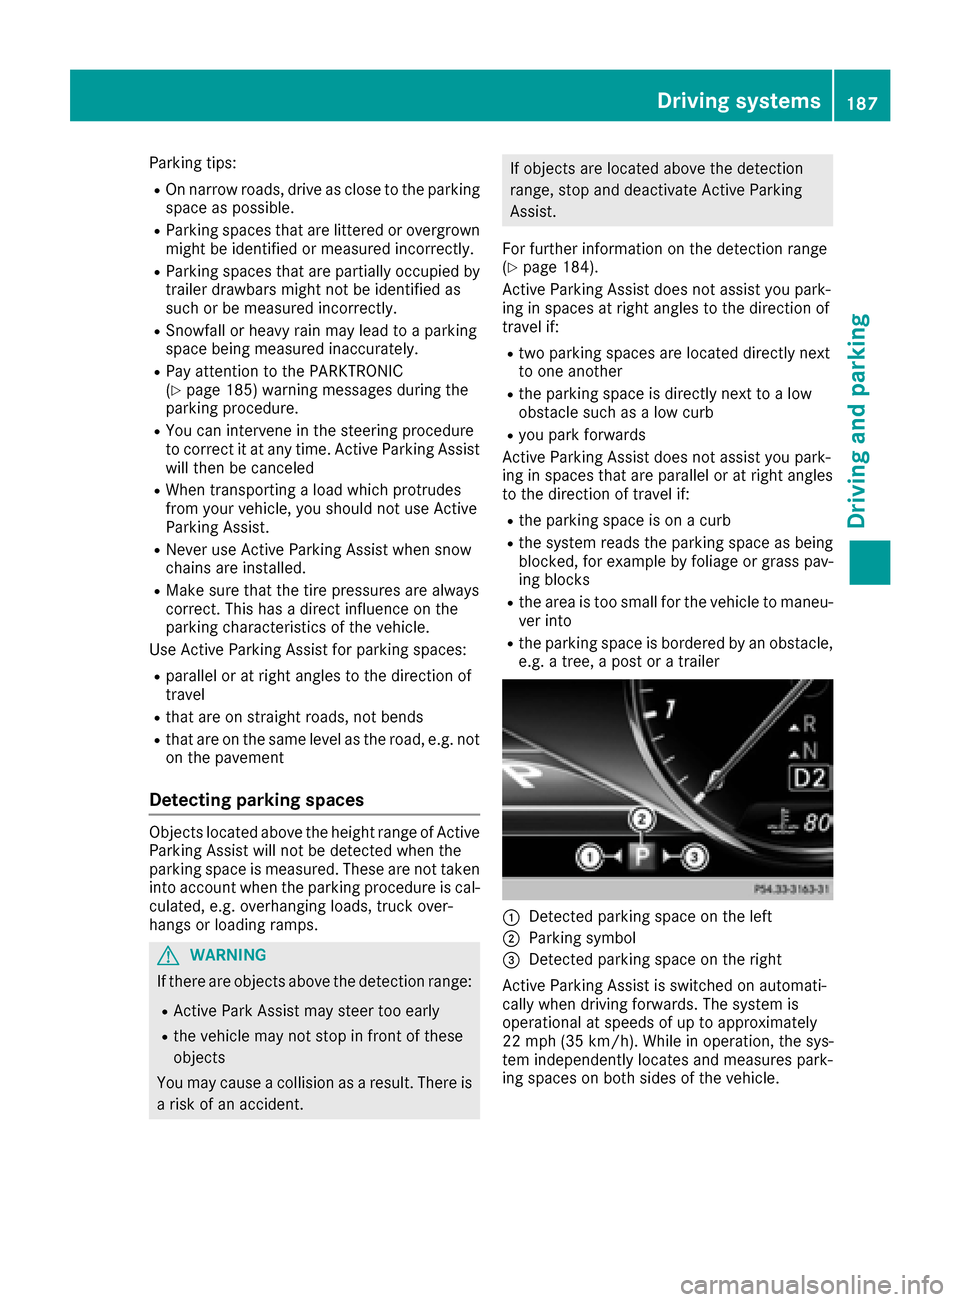
:Detected parking space on the left
;Parking symbol
=Detected parking space on the right
Active Parking Assist is switched on automati-
cally when driving forwards. The system is
operational at speeds of up to approximately
22 mph (35 km/ h). While in operation, the sys-
tem independently locates and measures park-
ing spaces on both sides of the vehicle.
Driving systems187
Driving and parking
Z
Page 197 of 382
make sure that there are no persons, animals or
objects in the area in which you are maneuver-
ing.
You are always responsible for safety, and must
always pay attention to your surroundings when parking and maneuvering. This applies to the
areas behind, in front of and beside the vehicle.
You could otherwise endanger yourself and oth-
ers.
The 360° camera will not function or will func-
tion in a limited manner:
Rif the doors are open
Rif the exterior mirrors are folded in
Rif the trunk lid is open
Rin heavy rain, snow or fog
Rat night or in very dark places
Rif the cameras are exposed to very bright light
Rif the area is lit by fluorescent bulbs or LED
lighting (the display may flicker)
Rif the camera lenses fog up, e.g. when driving
into a heated garage in winter, causing a rapid
change in temperature
Rif the camera lenses are dirty or covered.
Observe the notes on cleaning
(
Ypage 323)
Rif the vehicle components in which the cam-
eras are installed are damaged. In this event,have the camera position and setting checked
at a qualified specialist workshop
Do not use the 360° camera in this case. You
can otherwise injure others or cause damage to
objects or the vehicle.
The guide lines on the multimedia system show
the distances to your vehicle. The distances only
apply to road level.
The cameras in the front and in the rear area are
each protected by a flap. These flaps are opened when the 360° camera is activated. Observe the
notes on cleaning (
Ypage 323). For technical
reasons, the flaps may remain open briefly after
the 360° camera has been deactivated.
The field of vision and other functions of the
camera system may be restricted due to addi-
tional attachments (e.g. license plate holder,
rear bicycle carrier).
On vehicl es w
ith height-adjustable chassis,
depending on technical conditions, leaving the
standard height can result in:
Rinaccuracies in the guide lines
Rinaccuracies in the display of generated
images (top view)
Activation conditions
The image from the 360° camera appears if:
Rthe multimedia system is switched on
Rthe 360° Camerafunction is switched on
If the 360° camera is activated at speeds above approximately 19 mph (30 km/h), a warning
message appears.
The warning message disappears if:
Rthe vehicle's speed falls below approximately
19 mph (30 km/h). The 360° camera is then
activated.
Rthe message is confirmed with the %but-
ton.
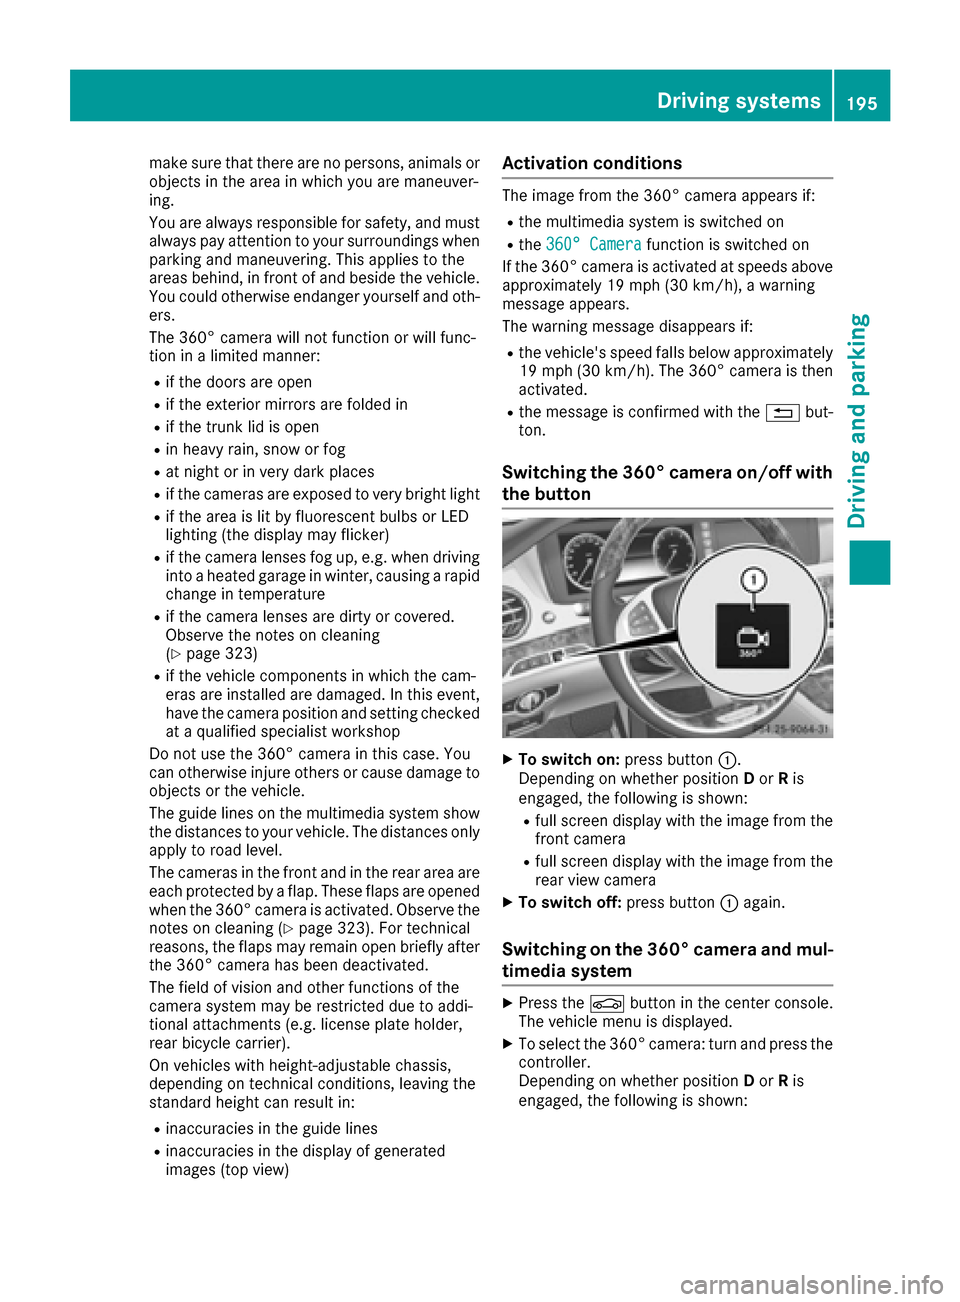
Switching the 360° camera on/off with
the button
XTo switch on: press button:.
Depending on whether position Dor Ris
engaged, the following is shown:
Rfull screen display with the image from the
front camera
Rfull screen display with the image from the
rear view camera
XTo switch off: press button:again.
Switching on the 360° camera and mul-
timedia system
XPress the Øbutton in the center console.
The vehicle menu is displayed.
XTo select the 360° camera: turn and press the
controller.
Depending on whether position Dor Ris
engaged, the following is shown:
Driving systems195
Driving and parking
Z
Page 226 of 382
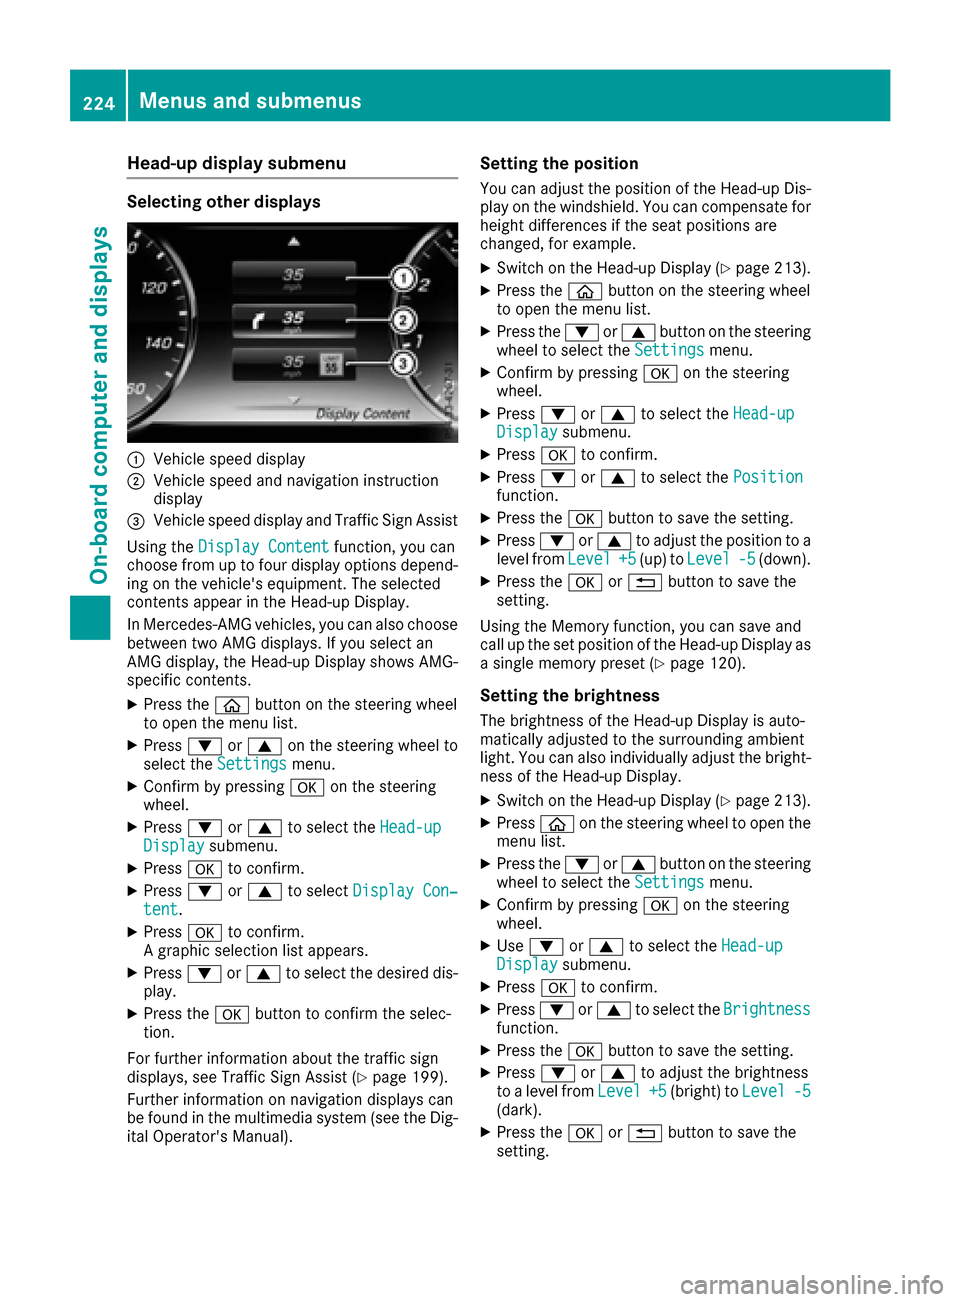
Head-up display submenu
Selecting other displays
:Vehicle speed display
;Vehicle speed and navigation instruction
display
=Vehicle speed display and Traffic Sign Assist
Using the Display Content
function, you can
choose from up to four display options depend-
ing on the vehicle's equipment. The selected
contents appear in the Head-up Display.
In Mercedes-AMG vehicles, you can also choose
between two AMG displays. If you select an
AMG display, the Head-up Display shows AMG-
specific contents.
XPress the òbutton on the steering wheel
to open the menu list.
XPress :or9 on the steering wheel to
select the Settingsmenu.
XConfirm by pressing aon the steering
wheel.
XPress :or9 to select the Head-upDisplaysubmenu.
XPressato confirm.
XPress :or9 to select Display Con‐tent.
XPressato confirm.
A graphic selection list appears.
XPress :or9 to select the desired dis-
play.
XPress the abutton to confirm the selec-
tion.
For further information about the traffic sign
displays, see Traffic Sign Assist (
Ypage 199).
Further information on navigation displays can
be found in the multimedia system (see the Dig-
ital Operator's Manual).
Setting the position
You can adjust the position of the Head-up Dis-
play on the windshield. You can compensate for
height differences if the seat positions are
changed, for example.
XSwitch on the Head-up Display (Ypage 213).
XPress the òbutton on the steering wheel
to open the menu list.
XPress the :or9 button on the steering
wheel to select the Settingsmenu.
XConfirm by pressing aon the steering
wheel.
XPress :or9 to select the Head-upDisplaysubmenu.
XPressato confirm.
XPress :or9 to select the Positionfunction.
XPress theabutton to save the setting.
XPress :or9 to adjust the position to a
level from Level+5(up) toLevel-5(down).
XPress the aor% button to save the
setting.
Using the Memory function, you can save and
call up the set position of the Head-up Display as
a single memory preset (
Ypage 120).
Setting the brightness
The brightness of the Head-up Display is auto-
matically adjusted to the surrounding ambient
light. You can also individually adjust the bright-
ness of the Head-up Display.
XSwitch on the Head-up Display (Ypage 213).
XPress òon the steering wheel to open the
menu list.
XPress the :or9 button on the steering
wheel to select the Settingsmenu.
XConfirm by pressing aon the steering
wheel.
XUse : or9 to select the Head-upDisplaysubmenu.
XPressato confirm.
XPress :or9 to select the Brightnessfunction.
XPress theabutton to save the setting.
XPress :or9 to adjust the brightness
to a level from Level+5(bright) toLevel-5(dark).
XPress theaor% button to save the
setting.
224Menus and submenus
On-board computer and displays