2017 MERCEDES-BENZ S-Class MAYBACH fold seats
[x] Cancel search: fold seatsPage 112 of 382
Adjust the driver's seat, head restraint, steer-ing wheel and mirror and fasten your seat belt
before starting the engine.
GWARNING
If the head restraints are not installed or not
adjusted correctly, they cannot provide pro-
tection as intended. There is an increased risk
of injury in the head and neck area, e.g. in the event of an accident or when braking.
Always drive with the head restraints instal-
led. Before driving off, make sure for every
vehicle occupant that the center of the head
restraint supports the back of the head at
about eye level.
Do not rotate the head restraints of the front and rear seats. Otherwise, you cannot adjust the
height and angle of the head restraints to the
correct position.
Using the fore-and-aft adjustment, adjust the
head restraint so that it is as close as possible to
your head.
Pay attention to the important safety notes
(
Ypage 100).
Adjusting the front head restraints
Adjusting the head restraints manually
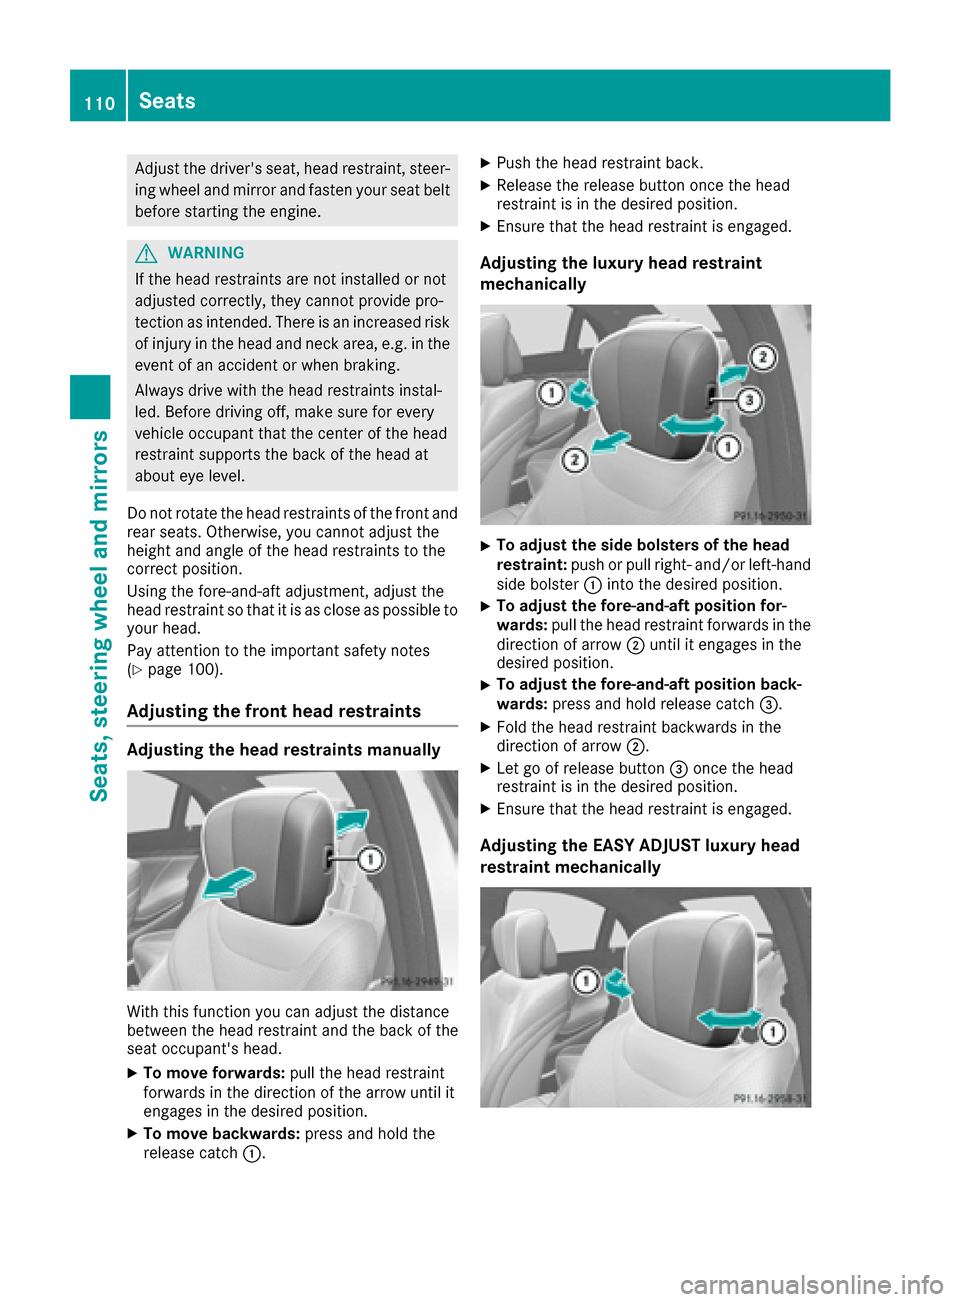
With this function you can adjust the distance
between the head restraint and the back of the
seat occupant's head.
XTo move forwards: pull the head restraint
forwards in the direction of the arrow until it
engages in the desired position.
XTo move backwards: press and hold the
release catch :.
XPush the head restraint back.
XRelease the release button once the head
restraint is in the desired position.
XEnsure that the head restraint is engaged.
Adjusting the luxury head restraint
mechanically
XTo adjust the side bolsters of the head
restraint:push or pull right- and/or left-hand
side bolster :into the desired position.
XTo adjust the fore-and-aft position for-
wards: pull the head restraint forwards in the
direction of arrow ;until it engages in the
desired position.
XTo adjust the fore-and-aft position back-
wards: press and hold release catch =.
XFold the head restraint backwards in the
direction of arrow;.
XLet go of release button =once the head
restraint is in the desired position.
XEnsure that the head restraint is engaged.
Adjusting the EASY ADJUST luxury head
restraint mechanically
110Seats
Seats, steering wheel and mirrors
Page 114 of 382
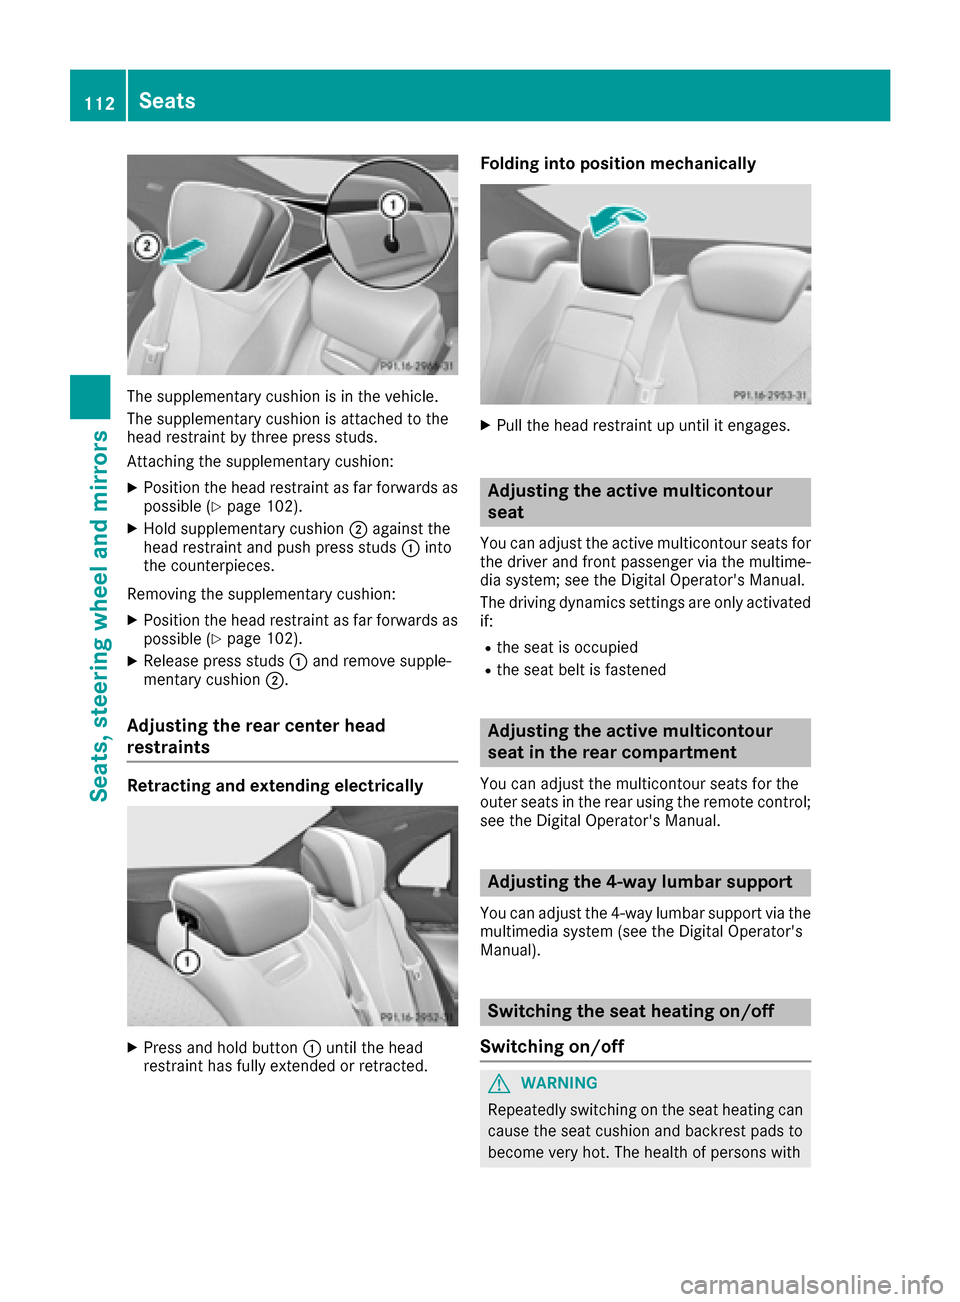
The supplementary cushion is in the vehicle.
The supplementary cushion is attached to the
head restraint by three press studs.
Attaching the supplementary cushion:
XPosition the head restraint as far forwards as
possible (Ypage 102).
XHold supplementary cushion;against the
head restraint and push press studs :into
the counterpieces.
Removing the supplementary cushion:
XPosition the head restraint as far forwards as
possible (Ypage 102).
XRelease press studs :and remove supple-
mentary cushion ;.
Adjusting the rear center head
restraints
Retracting and extending electrically
XPress and hold button :until the head
restraint has fully extended or retracted.
Folding into position mechanically
XPull the head restraint up until it engages.
Adjusting the active multicontour
seat
You can adjust the active multicontour seats for
the driver and front passenger via the multime-
dia system; see the Digital Operator's Manual.
The driving dynamics settings are only activated if:
Rthe seat is occupied
Rthe seat belt is fastened
Adjusting the active multicontour
seat in the rear compartment
You can adjust the multicontour seats for the
outer seats in the rear using the remote control;
see the Digital Operator's Manual.
Adjusting the 4-way lumbar support
You can adjust the 4-way lumbar support via the
multimedia system (see the Digital Operator's
Manual).
Switching the seat heating on/off
Switching on/off
GWARNING
Repeatedly switching on the seat heating can
cause the seat cushion and backrest pads to
become very hot. The health of persons with
112Seats
Seats, steering wheel and mirrors
Page 120 of 382
The indicator lamp goes out again after some
time. You can adjust the selected exterior
mirror using button:as long as the indicator
lamp is lit.
XPress button :up, down, or to the left or
right until you have adjusted the exterior mir- ror to the correct position. You should have a
good overview of traffic conditions.
The convex exterior mirrors provide a larger field of vision.
After the engine has been started, the exterior
mirrors are automatically heated if the rear win-
dow defroster is switched on and the outside
temperature is low.
Folding the exterior mirrors in or out
electrically
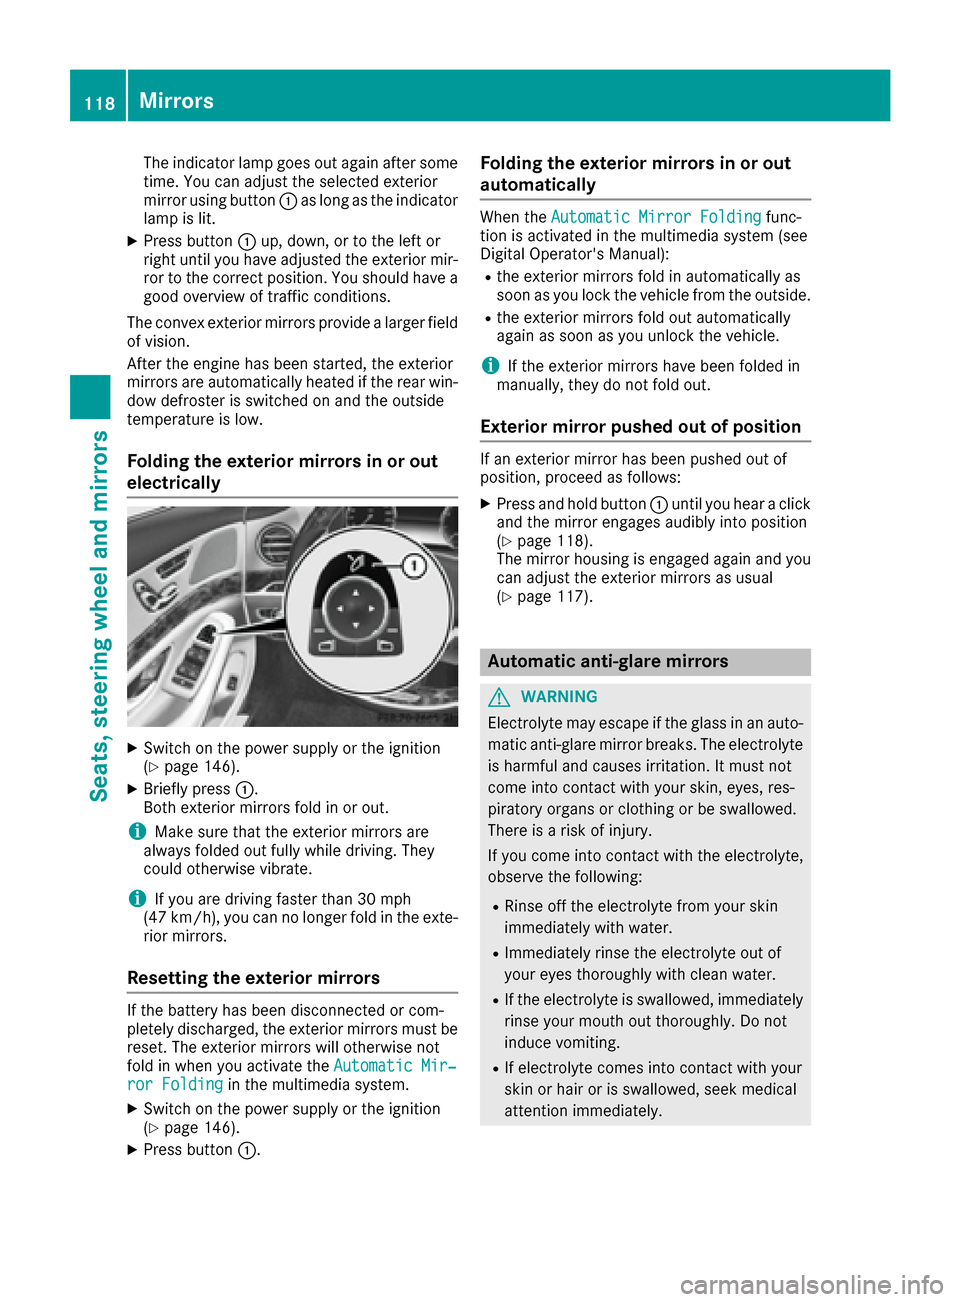
XSwitch on the power supply or the ignition
(Ypage 146).
XBriefly press :.
Both exterior mirrors fold in or out.
iMake sure that the exterior mirrors are
always folded out fully while driving. They
could otherwise vibrate.
iIf you are driving faster than 30 mph
(47 km/h), you can no longer fold in the exte-
rior mirrors.
Resetting the exterior mirrors
If the battery has been disconnected or com-
pletely discharged, the exterior mirrors must be
reset. The exterior mirrors will otherwise not
fold in when you activate the Automatic Mir‐
ror Foldingin the multimedia system.
XSwitch on the power supply or the ignition
(Ypage 146).
XPress button:.
Folding the exterior mirrors in or out
automatically
When theAutomatic Mirror Foldingfunc-
tion is activated in the multimedia system (see
Digital Operator's Manual):
Rthe exterior mirrors fold in automatically as
soon as you lock the vehicle from the outside.
Rthe exterior mirrors fold out automatically
again as soon as you unlock the vehicle.
iIf the exterior mirrors have been folded in
manually, they do not fold out.
Exterior mirror pushed out of position
If an exterior mirror has been pushed out of
position, proceed as follows:
XPress and hold button :until you hear a click
and the mirror engages audibly into position
(
Ypage 118).
The mirror housing is engaged again and you
can adjust the exterior mirrors as usual
(
Ypage 117).
Automatic anti-glare mirrors
GWARNING
Electrolyte may escape if the glass in an auto-
matic anti-glare mirror breaks. The electrolyte
is harmful and causes irritation. It must not
come into contact with your skin, eyes, res-
piratory organs or clothing or be swallowed.
There is a risk of injury.
If you come into contact with the electrolyte,
observe the following:
RRinse off the electrolyte from your skin
immediately with water.
RImmediately rinse the electrolyte out of
your eyes thoroughly with clean water.
RIf the electrolyte is swallowed, immediately
rinse your mouth out thoroughly. Do not
induce vomiting.
RIf electrolyte comes into contact with your
skin or hair or is swallowed, seek medical
attention immediately.
118Mirrors
Seats, steering wheel and mirrors
Page 285 of 382
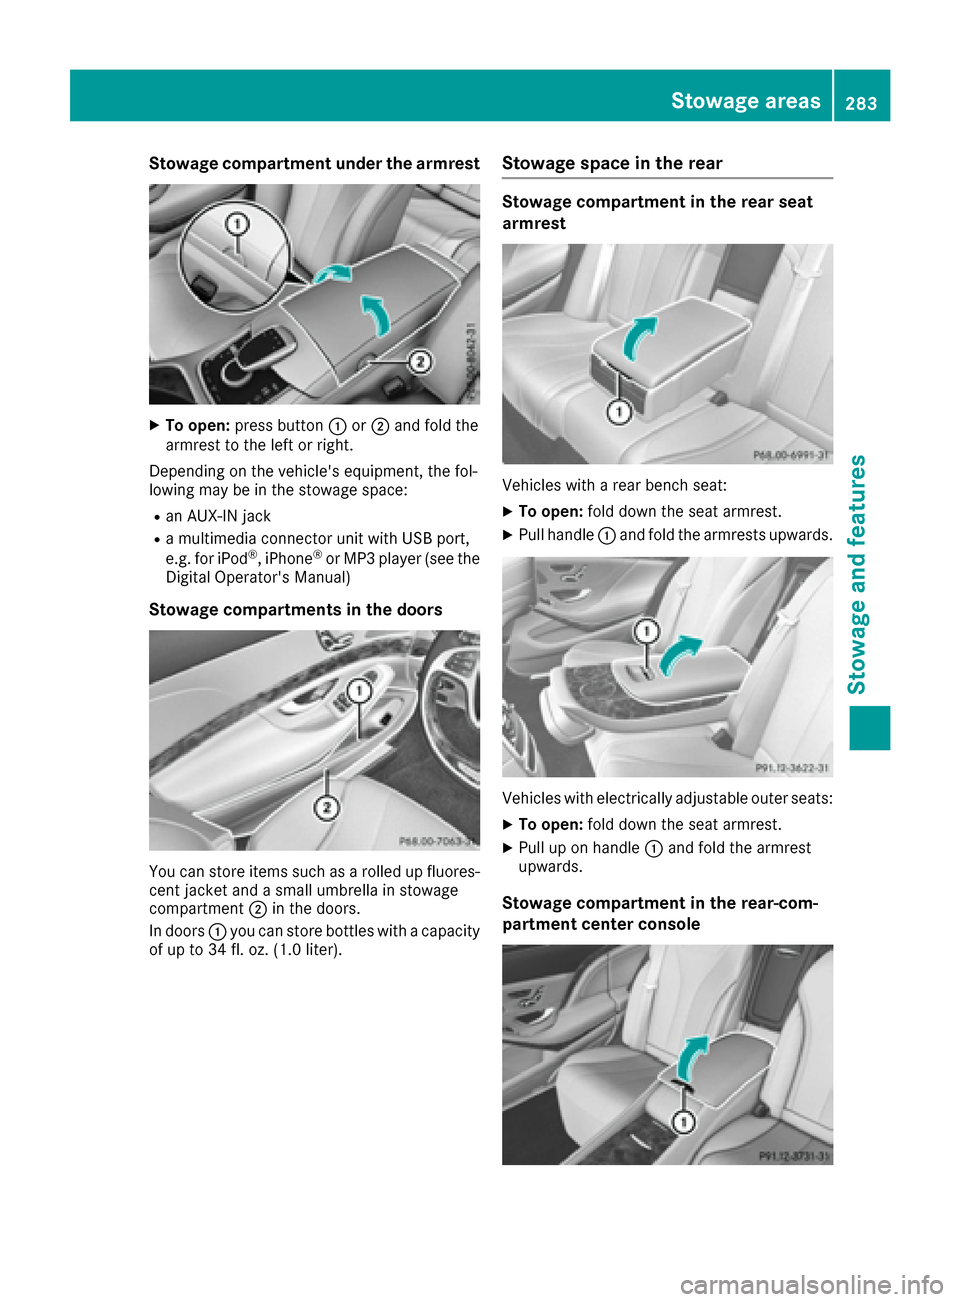
Stowage compartment under the armrest
XTo open:press button :or; and fold the
armrest to the left or right.
Depending on the vehicle's equipment, the fol-
lowing may be in the stowage space:
Ran AUX-IN jack
Ra multimedia connector unit with USB port,
e.g. for iPod®, iPhone®or MP3 player (see the
Digital Operator's Manual)
Stowage compartments in the doors
You can store items such as a rolled up fluores-
cent jacket and a small umbrella in stowage
compartment ;in the doors.
In doors :you can store bottles with a capacity
of up to 34 fl. oz. (1.0 liter).
Stowage space in the rear
Stowage compartment in the rear seat
armrest
Vehicles with a rear bench seat:
XTo open: fold down the seat armrest.
XPull handle :and fold the armrests upwards.
Vehicles with electrically adjustable outer seats:
XTo open: fold down the seat armrest.
XPull up on handle :and fold the armrest
upwards.
Stowage compartment in the rear-com-
partment center console
Stowage areas283
Stowage and features
Z
Page 286 of 382
Vehicles with individual seats and center con-
sole in the rear
XPull up on handle:and fold the armrest
upwards.
Depending on the vehicle's equipment, the fol-
lowing may be installed in the rear compart-
ment:
Ra USB port
Ran AUX-IN jack
Ra mobile phone bracket
Ra 115 V socket
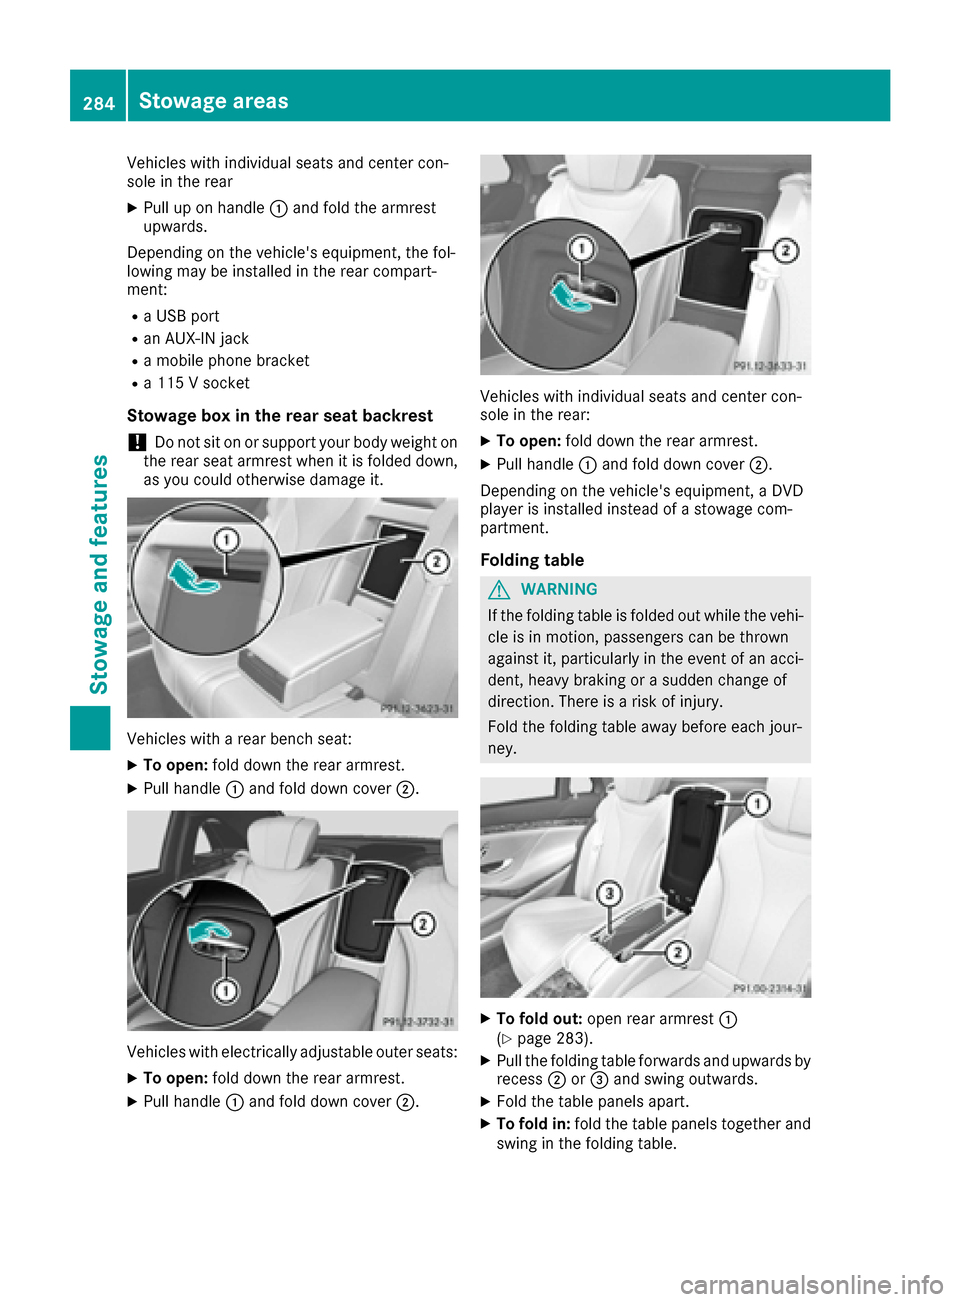
Stowage box in the rear seat backrest
!Do not sit on or support your body weight on
the rear seat armrest when it is folded down,
as you could otherwise damage it.
Vehicles with a rear bench seat:
XTo open: fold down the rear armrest.
XPull handle :and fold down cover ;.
Vehicles with electrically adjustable outer seats:
XTo open:fold down the rear armrest.
XPull handle :and fold down cover ;.
Vehicles with individual seats and center con-
sole in the rear:
XTo open:fold down the rear armrest.
XPull handle :and fold down cover ;.
Depending on the vehicle's equipment, a DVD
player is installed instead of a stowage com-
partment.
Folding table
GWARNING
If the folding table is folded out while the vehi-
cle is in motion, passengers can be thrown
against it, particularly in the event of an acci-
dent, heavy braking or a sudden change of
direction. There is a risk of injury.
Fold the folding table away before each jour-
ney.
XTo fold out: open rear armrest :
(Ypage 283).
XPull the folding table forwards and upwards by
recess ;or= and swing outwards.
XFold the table panels apart.
XTo fold in: fold the table panels together and
swing in the folding table.
284Stowage areas
Stowage and features
Page 287 of 382
Stowage nets
Stowage nets are located:
Rin the front-passenger footwell
Ron the back of the driver's and front-
passenger seat
Ron the left and right-hand side in the trunk
Observe the loading guidelines (
Ypage 281)
and the safety notes regarding stowage spaces
(
Ypage 281).
Skibag
Important safety notes
GWARNING
The skibag in conjunction with the lashing
straps cannot restrain any objects other than
skis.
Vehicle occupants could be struck in the
event of sudden braking or an accident, for
instance, if you:
Rtransport other heavy or sharp-edged
objects in the skibag
Rdo not secure the skibag with the lashing
straps
There is a risk of accident and injury.
Store only skis in the skibag. Always secure
the skibag with the lashing straps so that it
cannot move around.
Observe the following points when using the
skibag:
Rdo not transport more than three pairs of skis
in the skibag.
Rwhen carefully sliding the skis into or remov-
ing them from the skibag, mind the sharp
edges and corners of the skis.
Rstow the skis as described in the following:
-when sliding the skis in, position the run-
ning surfaces of the respective pair of skis
together.
-position one pair of skis at the bottom with the tips of the skis pointing to the outside.
-position the two additional pairs of skis on
the left and right-hand sides above the
lower pair of skis. The tips of the skis being
offset by 90° to the tips of the skis below.
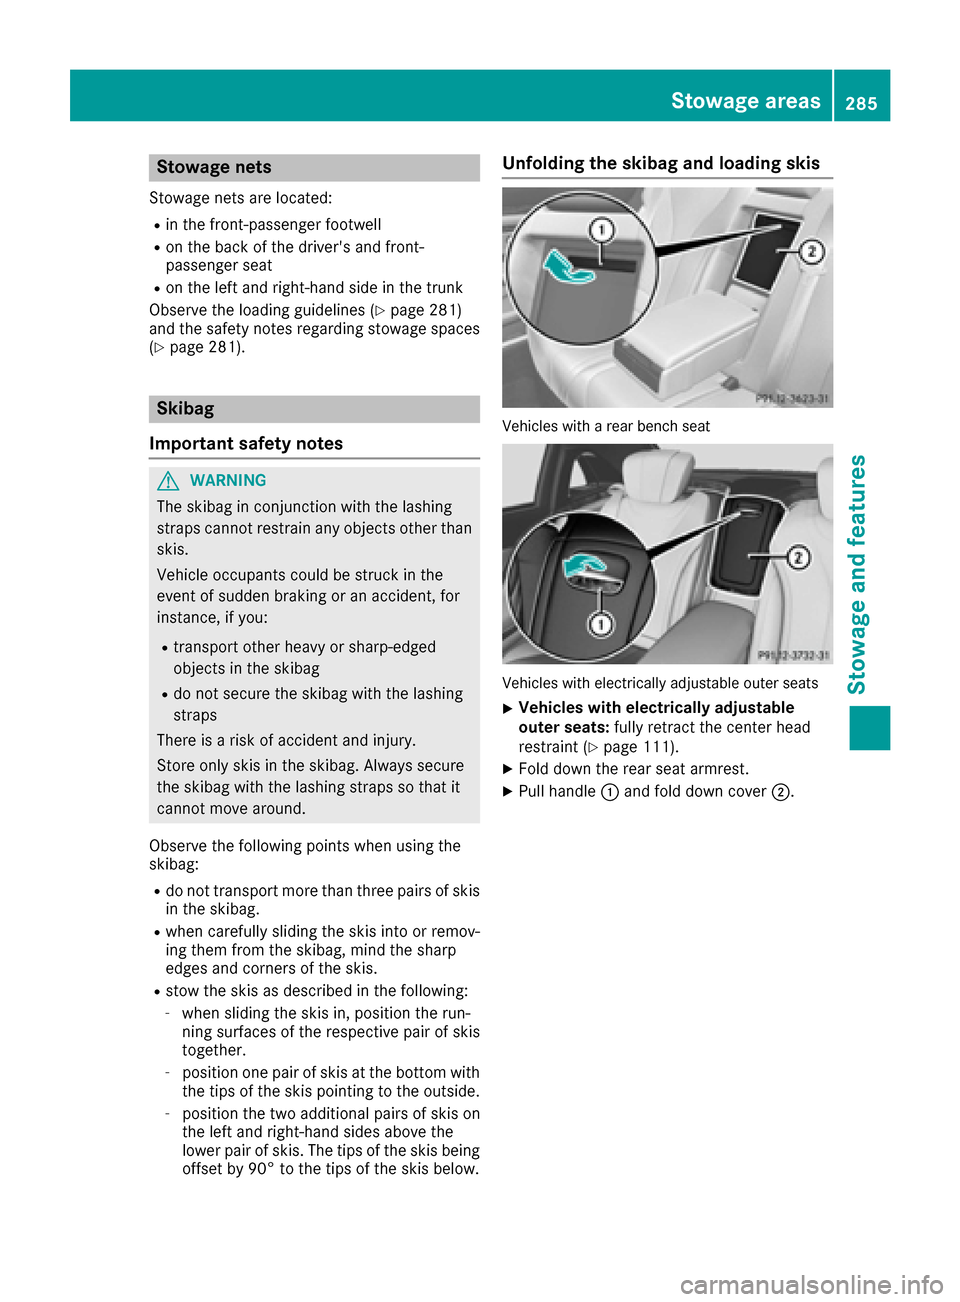
Unfolding the skibag and loading skis
Vehicles with a rear bench seat
Vehicles with electrically adjustable outer seats
XVehicles with electrically adjustable
outer seats: fully retract the center head
restraint (
Ypage 111).
XFold down the rear seat armrest.
XPull handle :and fold down cover ;.
Stowage areas285
Stowage and features
Z
Page 288 of 382
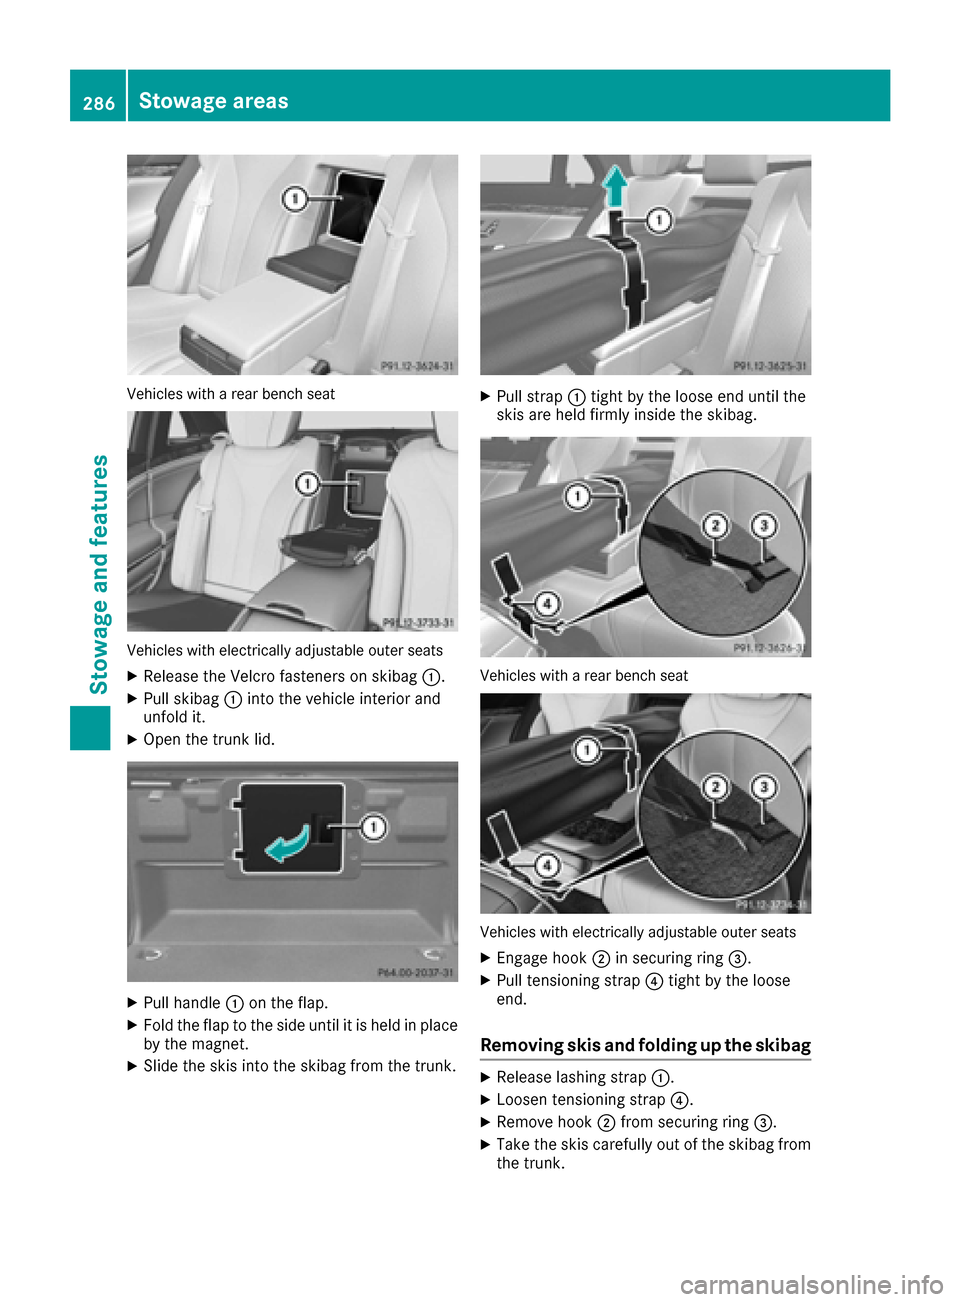
Vehicles with a rear bench seat
Vehicles with electrically adjustable outer seats
XRelease the Velcro fasteners on skibag:.
XPull skibag:into the vehicle interior and
unfold it.
XOpen the trunk lid.
XPull handle :on the flap.
XFold the flap to the side until it is held in place
by the magnet.
XSlide the skis into the skibag from the trunk.
XPull strap :tight by the loose end until the
skis are held firmly inside the skibag.
Vehicles with a rear bench seat
Vehicles with electrically adjustable outer seats
XEngage hook ;in securing ring =.
XPull tensioning strap ?tight by the loose
end.
Removing skis and folding up the skibag
XRelease lashing strap :.
XLoosen tensioning strap ?.
XRemove hook;from securing ring =.
XTake the skis carefully out of the skibag from
the trunk.
286Stowage areas
Stowage and features
Page 293 of 382
XTo open:open the stowage compartment
(Ypage 282).
XOpen the protective flap if necessary.
XTo remove: slide catch:forwards and pull
the cup holder upwards.
XTo insert: make sure that the protective flap
is closed.
XInsert the cup holder and slide catch :back.
You can remove the cup holder and the rubber
mat for cleaning. Clean them with clean, luke-
warm water only.
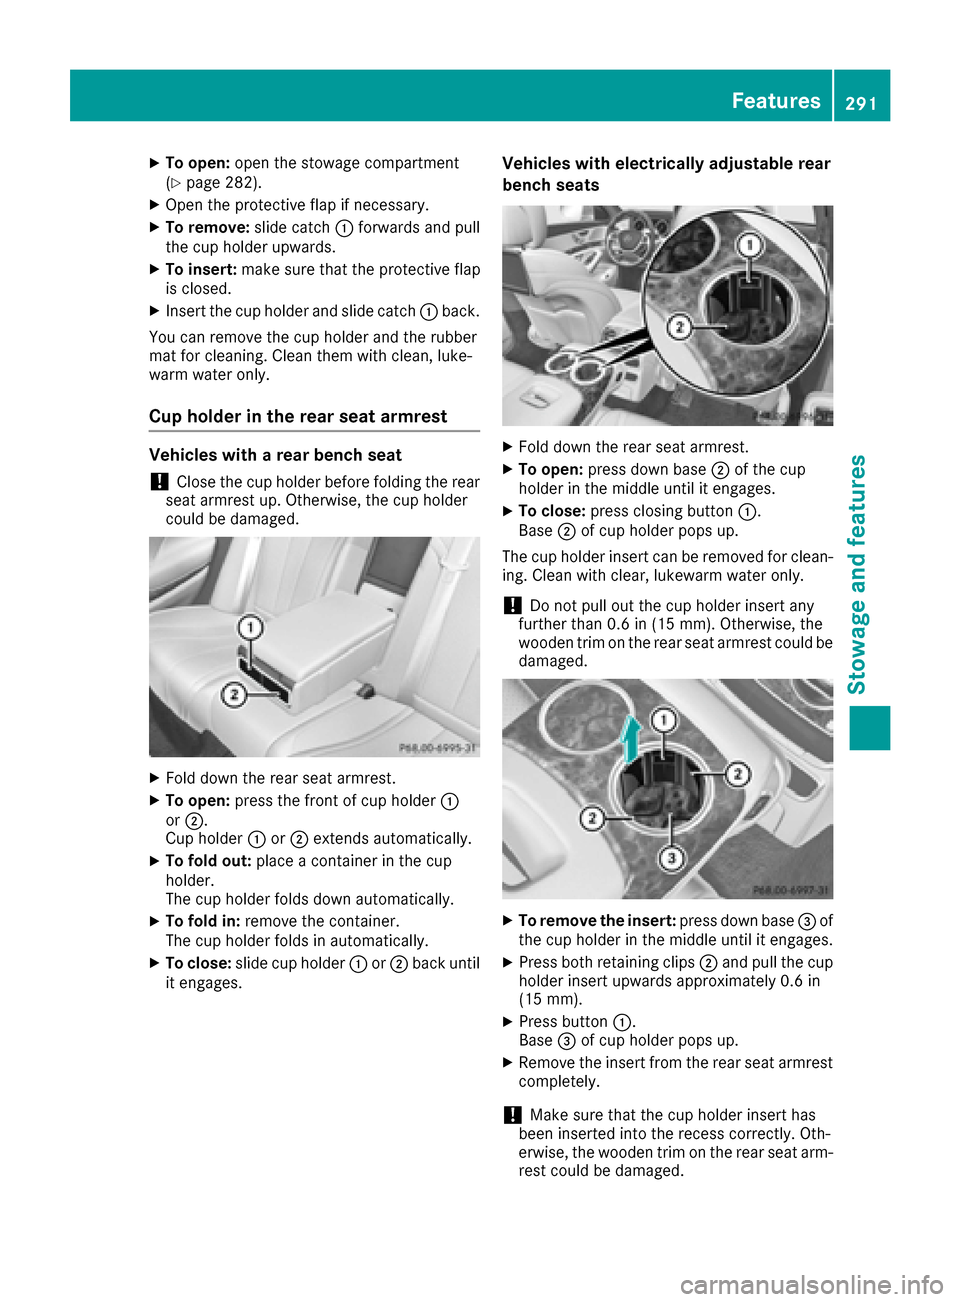
Cup holder in the rear seat armrest
Vehicles with a rear bench seat
!Close the cup holder before folding the rear
seat armrest up. Otherwise, the cup holder
could be damaged.
XFold down the rear seat armrest.
XTo open: press the front of cup holder :
or ;.
Cup holder :or; extends automatically.
XTo fold out: place a container in the cup
holder.
The cup holder folds down automatically.
XTo fold in: remove the container.
The cup holder folds in automatically.
XTo close: slide cup holder :or; back until
it engages.
Vehicles with electrically adjustable rear
bench seats
XFold down the rear seat armrest.
XTo open: press down base ;of the cup
holder in the middle until it engages.
XTo close: press closing button :.
Base ;of cup holder pops up.
The cup holder insert can be removed for clean-
ing. Clean with clear, lukewarm water only.
!Do not pull out the cup holder insert any
further than 0.6 in (15 mm). Otherwise, the
wooden trim on the rear seat armrest could be
damaged.
XTo remove the insert: press down base=of
the cup holder in the middle until it engages.
XPress both retaining clips ;and pull the cup
holder insert upwards approximately 0.6 in
(15 mm).
XPress button :.
Base =of cup holder pops up.
XRemove the insert from the rear seat armrest
completely.
!Make sure that the cup holder insert has
been inserted into the recess correctly. Oth-
erwise, the wooden trim on the rear seat arm-
rest could be damaged.
Features291
Stowag ean d features
Z