2017 MERCEDES-BENZ S-Class MAYBACH warning light
[x] Cancel search: warning lightPage 289 of 382
XClose the flapinthe trunk.
XFold up the skibag using the folding aid and
close it with the Velcro fasteners.
XPut the skibag into the backrest.
XFold the cover back up.
You should close the flap inthe trunk ifyou do
not require the skibag. This willprevent unau-
thorized access to the trunk from the veh icle
interior.
Removing the skibag
If you would like to clean or dry the skibag, itcan
be remove d.
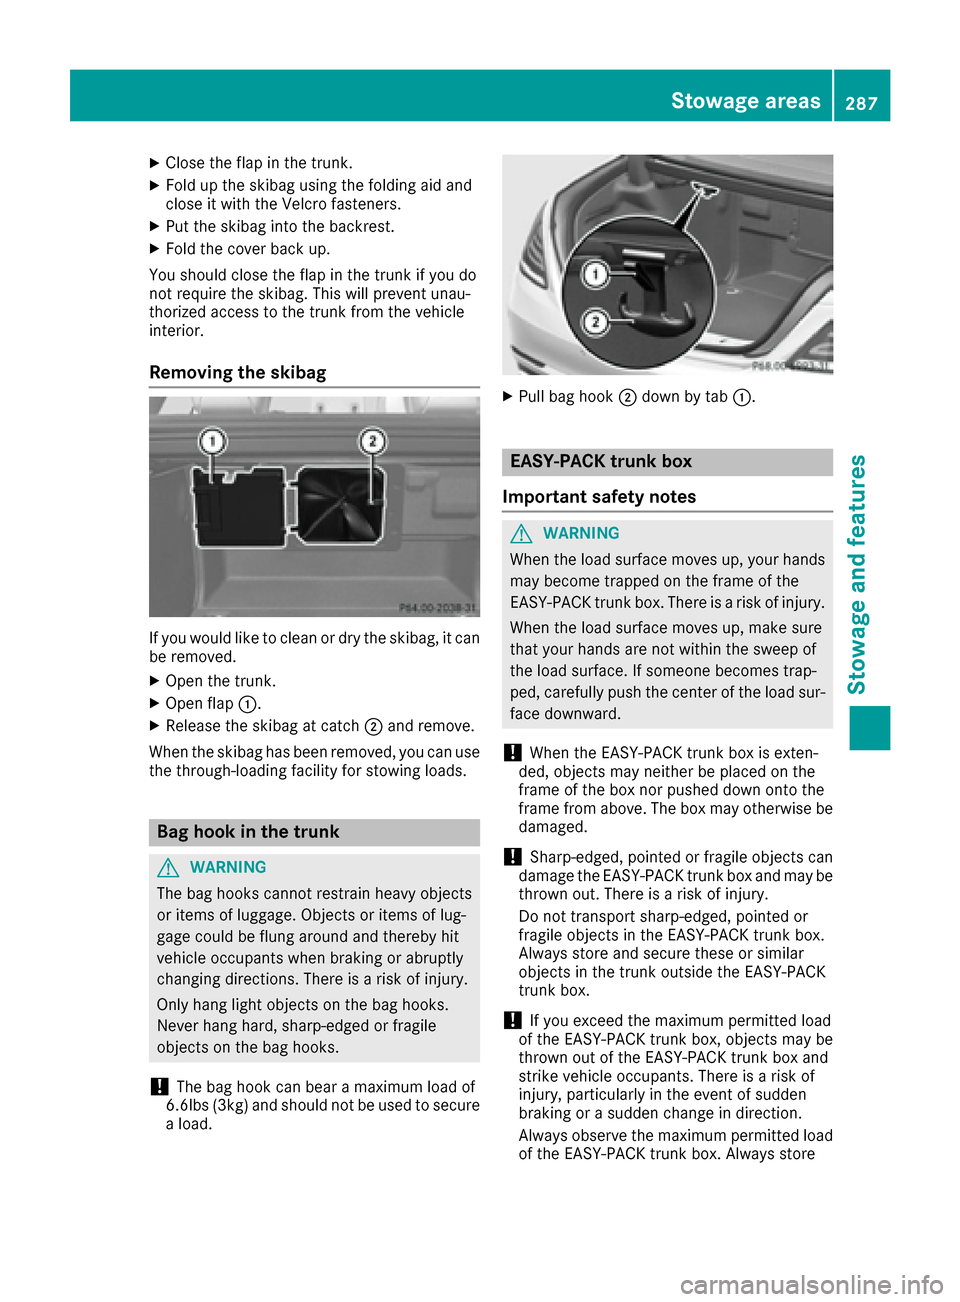
XOpen the trunk.
XOpen flap :.
XRelease the skibag at catch;and remove.
When the skibag has been remove d,you can use
the through-loadin g facility for stowin g loads.
Bag hook in the trunk
GWARNING
The bag hooks cannot restrain heavy objects
or items of luggage. Objects or items of lug-
gage could beflung around and there byhit
veh icle occupants when braking or abrupt ly
changing directions. There isa risk of injury.
Only hang light objects on the bag hooks.
Never hang hard, sharp-edged or fragile
objects on the bag hooks.
!The bag hook can bear a maximum load of
6. 6lbs (3kg) and should not beused to secure
a load.
XPull bag hook ;down bytab :.
EASY-PACK trunk box
Important safety notes
GWARNING
When the load surface moves up, your hands may become trapped on the frame of the
EASY-PACK trunk box. There is a risk of injury.
When the load surface moves up, make sure
that your hands are not within the sweep of
the load surface. If someone becomes trap-
ped, carefully push the center of the load sur-
face down ward.
!When the EASY-PACK trunk box isexten-
ded, objects may neither beplaced on the
frame of the box nor pushed down onto the
frame from above. The box may otherwise be
damaged.
!Sharp-edged, pointed or fragile objects can
damage the EASY-PACK trunk box and may be
thrown out. There is a risk of injury.
Do not transport sharp-edged, pointed or
fragile objects in the EASY-PACK trunk box.
Always store and secure these or similar
objects in the trunk outside the EASY-PACK
trunk box.
!If you exceed the maximum permitted load
of the EASY-PACK trunk box, objects may be
thrown out of the EASY-PACK trunk box and
strike vehicle occupants. There is a risk of
injury, particularly in the event of sudden
braking or a sudden change indirection.
Alwa ys observe the maximum permitted load
of the EASY-PACK trunk box.Always store
Stowage areas287
Stowage and features
Z
Page 292 of 382
!To avoid damaging or scratching the covers,
do not use metallic or hard objects to open
them.
An incorrectly secured roof carrier or roof load
may become detached from the vehicle. You
must therefore ensure that you observe the roof carrier manufacturer's installation instructions.
Vehicles with a panorama roof with power
tilt/sliding panel: the panorama roof with
power tilt/sliding panel cannot be opened if a
roof carrier is installed. The panorama roof with
power tilt/sliding panel can still be raised to
allow ventilation of the vehicle interior.
If the panorama roof with power tilt/sliding
panel makes contact with a roof carrier
approved by Mercedes-Benz, the sunroof will
lower slightly but remain raised at the rear.
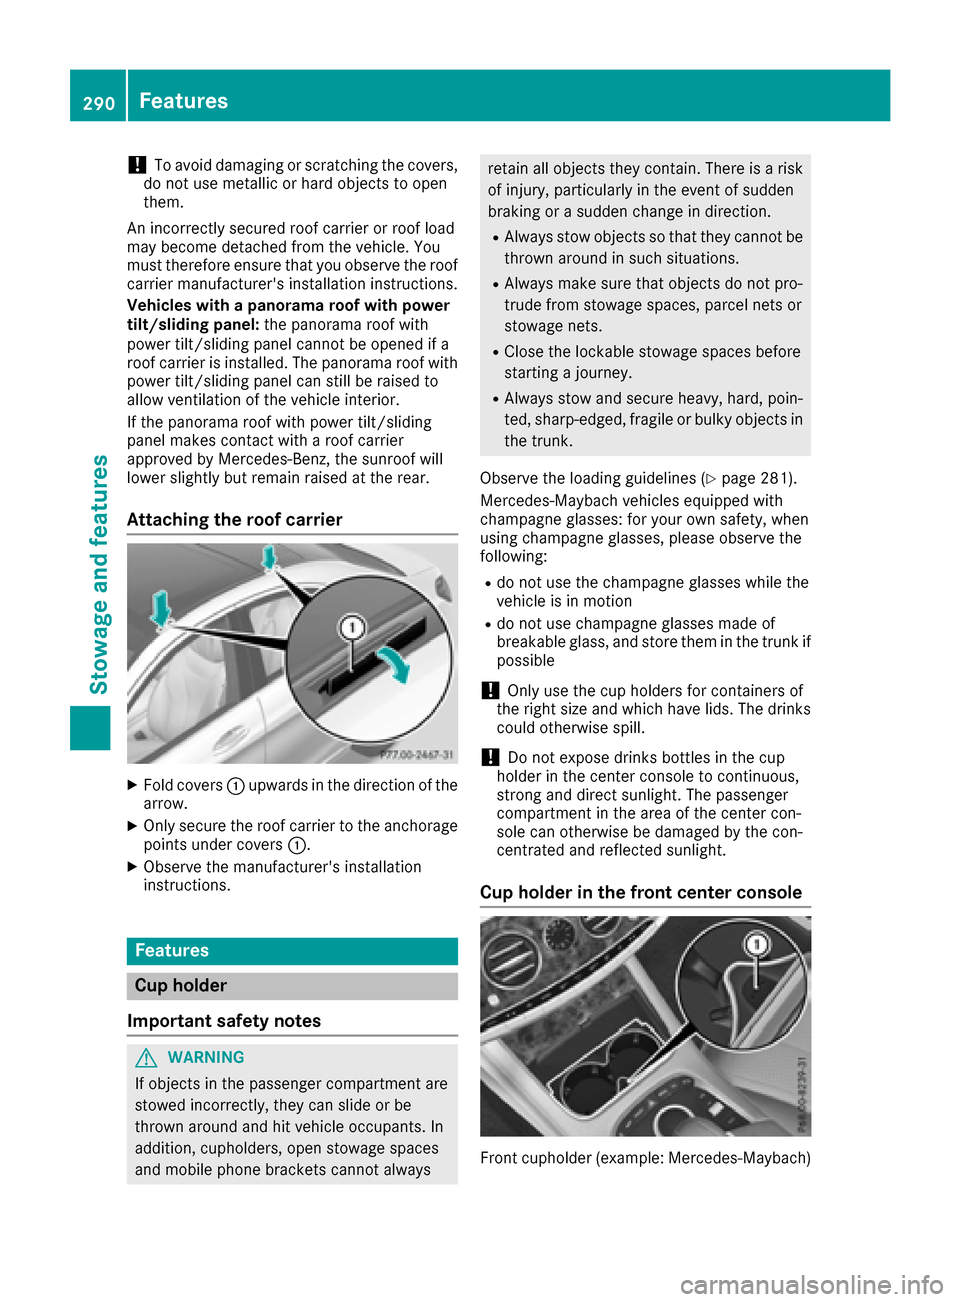
Attaching the roof carrier
XFold covers :upwards in the direction of the
arrow.
XOnly secure the roof carrier to the anchorage
points under covers :.
XObserve the manufacturer's installation
instructions.
Features
Cup holder
Important safety notes
GWARNING
If objects in the passenger compartment are
stowed incorrectly, they can slide or be
thrown around and hit vehicle occupants. In
addition, cupholders, open stowage spaces
and mobile phone brackets cannot always
retain all objects they contain. There is a risk of injury, particularly in the event of sudden
braking or a sudden change in direction.
RAlways stow objects so that they cannot be
thrown around in such situations.
RAlways make sure that objects do not pro-
trude from stowage spaces, parcel nets or
stowage nets.
RClose the lockable stowage spaces before
starting a journey.
RAlways stow and secure heavy, hard, poin-
ted, sharp-edged, fragile or bulky objects in
the trunk.
Observe the loading guidelines (
Ypage 281).
Mercedes-Maybach vehicles equipped with
champagne glasses: for your own safety, when
using champagne glasses, please observe the
following:
Rdo not use the champagne glasses while the
vehicle is in motion
Rdo not use champagne glasses made of
breakable glass, and store them in the trunk if
possible
!Only use the cup holders for containers of
the right size and which have lids. The drinks
could otherwise spill.
!Do not expose drinks bottles in the cup
holder in the center console to continuous,
strong and direct sunlight. The passenger
compartment in the area of the center con-
sole can otherwise be damaged by the con-
centrated and reflected sunlight.
Cup holder in the front center console
Front cupholder (example: Mercedes ‑Maybach)
290Features
Stowage and features
Page 294 of 382
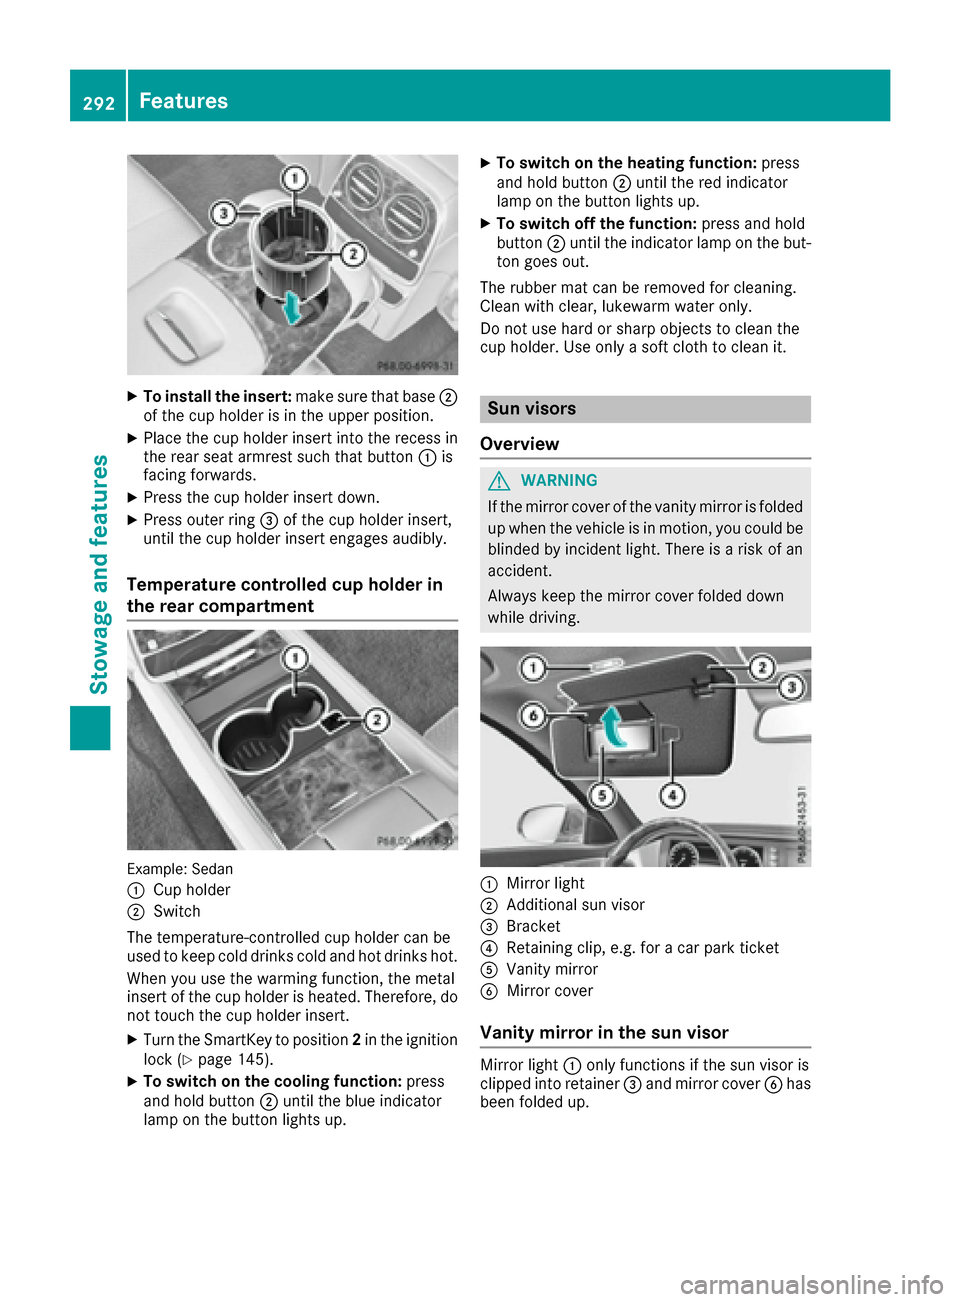
XTo install the insert:make sure that base;
of the cup holder is in the upper position.
XPlace the cup holder insert into the recess in
the rear seat armrest such that button :is
facing forwards.
XPress the cup holder insert down.
XPress outer ring =of the cup holder insert,
until the cup holder insert engages audibly.
Temperature controlled cup holder in
the rear compartment
Example: Sedan
:
Cup holder
;Switch
The temperature-controlled cup holder can be
used to keep cold drinks cold and hot drinks hot.
When you use the warming function, the metal
insert of the cup holder is heated. Therefore, do not touch the cup holder insert.
XTurn the SmartKey to position 2in the ignition
lock (Ypage 145).
XTo switch on the cooling function: press
and hold button ;until the blue indicator
lamp on the button lights up.
XTo switch on the heating function: press
and hold button ;until the red indicator
lamp on the button lights up.
XTo switch off the function: press and hold
button ;until the indicator lamp on the but-
ton goes out.
The rubber mat can be removed for cleaning.
Clean with clear, lukewarm water only.
Do not use hard or sharp objects to clean the
cup holder. Use only a soft cloth to clean it.
Sun visors
Overview
GWARNING
If the mirror cover of the vanity mirror is folded
up when the vehicle is in motion, you could be
blinded by incident light. There is a risk of an
accident.
Always keep the mirror cover folded down
while driving.
:Mirror light
;Additional sun visor
=Bracket
?Retaining clip, e.g. for a car park ticket
AVanity mirror
BMirror cover
Vanity mirror in the sun visor
Mirror light :only functions if the sun visor is
clipped into retainer =and mirror cover Bhas
been folded up.
292Features
Stowag ean d features
Page 296 of 382
Extending/retracting from the rear
XTurn the SmartKey to position1or 2in the
ignition lock (Ypage 145).
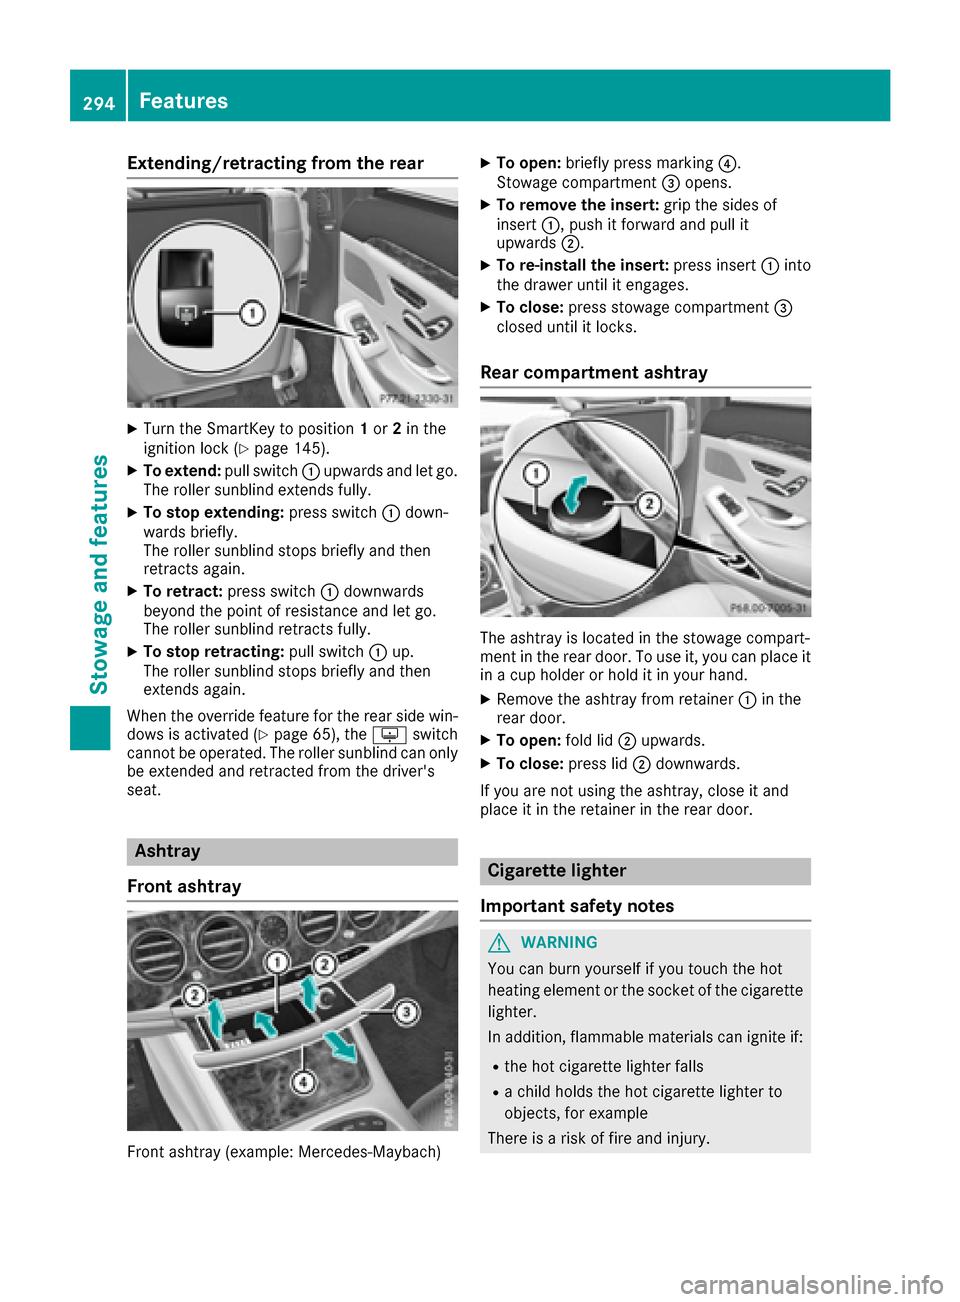
XTo extend: pull switch:upwards and let go.
The roller sunblind extends fully.
XTo stop extending: press switch:down-
wards briefly.
The roller sunblind stops briefly and then
retracts again.
XTo retract: press switch :downwards
beyond the point of resistance and let go.
The roller sunblind retracts fully.
XTo stop retracting: pull switch:up.
The roller sunblind stops briefly and then
extends again.
When the override feature for the rear side win-
dows is activated (
Ypage 65), the uswitch
cannot be operated. The roller sunblind can only be extended and retracted from the driver's
seat.
Ashtray
Front ashtray
Front ashtray (example: Mercedes‑Maybach)
XTo open: briefly press marking ?.
Stowage compartment =opens.
XTo remove the insert: grip the sides of
insert :, push it forward and pull it
upwards ;.
XTo re-install the insert: press insert:into
the drawer until it engages.
XTo close: press stowage compartment =
closed until it locks.
Rear compartment ashtray
The ashtray is located in the stowage compart-
ment in the rear door. To use it, you can place it
in a cup holder or hold it in your hand.
XRemove the ashtray from retainer :in the
rear door.
XTo open: fold lid;upwards.
XTo close: press lid;downwards.
If you are not using the ashtray, close it and
place it in the retainer in the rear door.
Cigarette lighter
Important safety notes
GWARNING
You can burn yourself if you touch the hot
heating element or the socket of the cigarette lighter.
In addition, flammable materials can ignite if:
Rthe hot cigarette lighter falls
Ra child holds the hot cigarette lighter to
objects, for example
There is a risk of fire and injury.
294Features
Stowage and features
Page 301 of 382
Problems with the 115 V power socket
ProblemPossible causes/consequences andMSolutions
The warning lamp on the
115 V power socket is
not lit.The on-board voltage is too low because the battery is too weak.
XStart the engine.
or
XCharge the battery (Ypage 334).
If the indicator lamp still does not light up:
XVisit a qualified specialist workshop.
The temperature of the DC/AC converter is temporarily too high.
XRemove the electronic device connector from the 115 V socket.
XLet the DC/AC converter cool down.
If the indicator lamp still does not light up after cooling down the
converter:
XVisit a qualified specialist workshop.
You have connected an electronic device that has a constant nominal
power of less than 150 watts, but has a very high switch-on current.
This device will not work. If you connect such a device, the 115 V
power socket will not supply it with power.
XConnect a suitable electronic device.
Coolbox in the rear compartment
Important safety notes
GWARNING
If you cover the ventilation grille for the cool-
box, it may overheat. There is a risk of fire.
Always make sure that the ventilation grille is not covered.
The ventilation grille for the coolbox is in the
trunk.
The coolbox can bear a maximum load of 7.7 lb (3.5 kg).
If you want to store a bottle in the upper com-
partment of the coolbox, the capacity of the
bottle must not exceed 17 fl. oz. (0.5 l).
Store only plastic bottles in the upper compart-
ment of the coolbox.
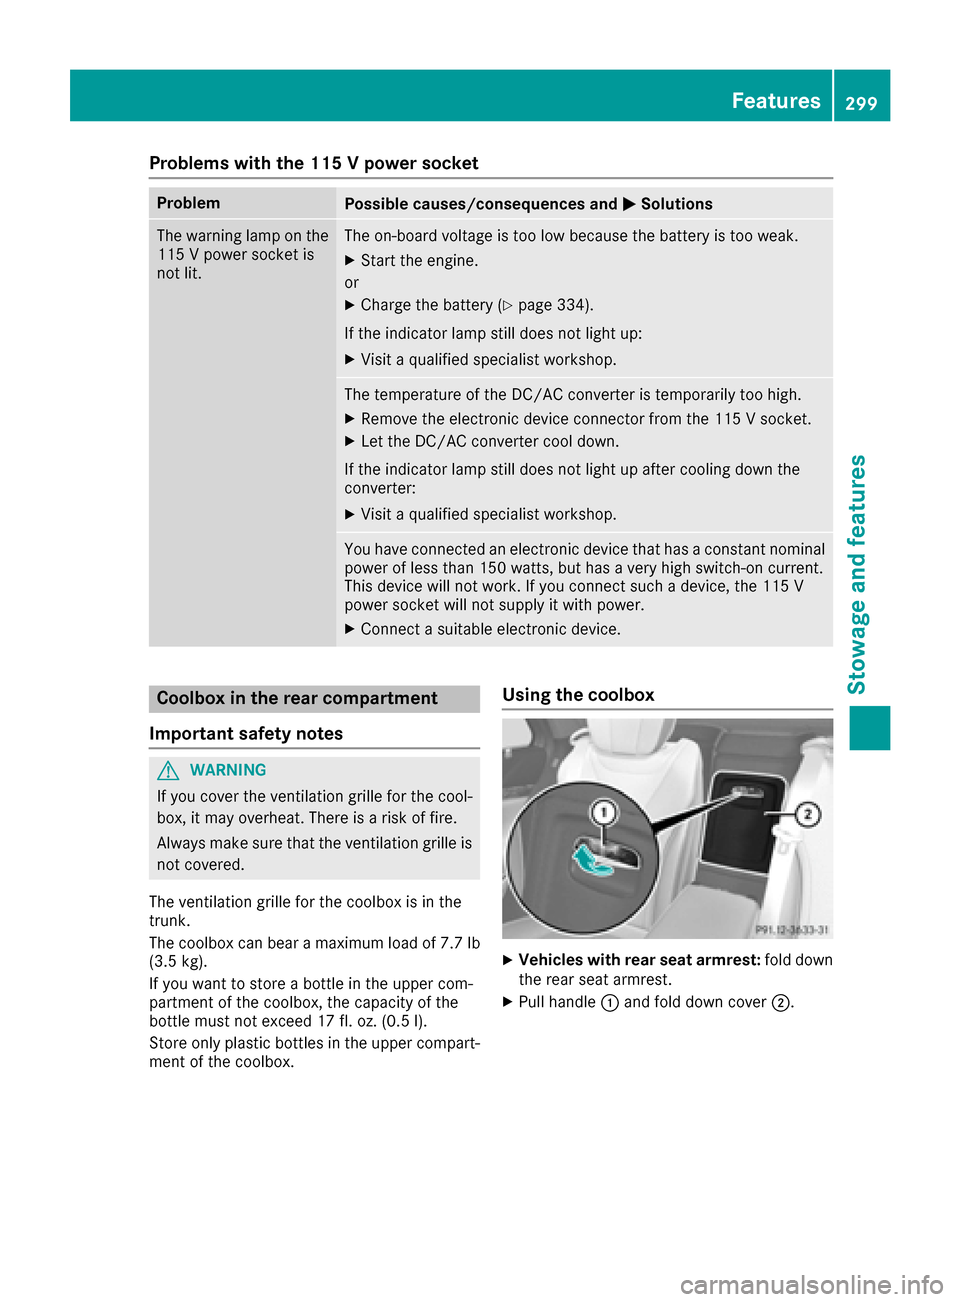
Using the coolbox
XVehicles with rear seat armrest: fold down
the rear seat armrest.
XPull handle :and fold down cover ;.
Features299
Stowage and features
Z
Page 303 of 382
The system is available if:
Rit has been activated and is operational
Rthe corresponding mobile phone network is
available for transmitting data to the Cus-
tomer Center
Ra service subscription is available
Determining the location of the vehicle on a map
is only possible if:
RGPS reception is available.
Rthe vehicle position can be forwarded to the
Customer Assistance Center.
The mbrace system
To adjust the volume during a call, proceed as
follows:
XPress the WorX button on the multi-
function steering wheel.
or
XUse the multimedia system volume control.
The system offers various services, e.g.:
RAutomatic and manual emergency call
RRoadside Assistance call
RInfo call
You can find information and a description of all
available features under "Owners Online" at
http://www.mbusa.com.
System self-test
After you have switched on the ignition, the sys-
tem carries out a self-diagnosis.
A malfunction in the system has been detected if one of the following occurs:
RThe indicator lamp in the SOS button does notcome on during the system self-test.
RThe indicator lamp in the FRoadside
Assistance button does not light up during
self-diagnosis of the system.
Rthe indicator lamp in the ïInfo call button
does not light up during the system self-diag-
nosis
RThe indicator lamp in one or more of the fol-
lowing buttons continues to light up red after the system self-diagnosis:
-SOS button
-F Roadside Assistance call button
-Info call buttonï
Rafter the system self-diagnosis, the Inoper‐ativeorServiceNotActivatedmessage
appears in the multifunction display.
If a malfunction is indicated as outlined above,
the system may not operate as expected. In the
event of an emergency, help will have to be
summoned by other means.
Have the system checked at the nearest
Mercedes-Benz Service Center or contact the
following service hotlines:
Mercedes-Benz Customer Assistance Center at
1-800-FOR-MERCedes (1-800-367-6372) or
1-866-990-9007
Emergency call
Important safety notes
GWARNING
It can be dangerous to remain in the vehicle,
even if you have pressed the SOS button in an emergency if:
Ryou see smoke inside or outside of the vehi-
cle, e.g. if there is a fire after an accident
Rthe vehicle is on a dangerous section of
road
Rthe vehicle is not visible or cannot easily beseen by other road users, particularly when
dark or in poor visibility conditions
There is a risk of an accident and injury.
Leave the vehicle immediately in this or simi-
lar situations as soon as it is safe to do so.
Move to a safe location along with other vehi-
cle occupants. In such situations, secure the
vehicle in accordance with national regula-
tions, e. g. with a warning triangle.
General notes
Observe the notes on system activation
(Ypage 300).
An emergency call is dialed automatically if an
air bag or Emergency Tensioning Device is trig-
Features301
Stowage and features
Z
Page 310 of 382
door opener, contact an authorized Mercedes-
Benz Center.
Alternatively, you can call the following tele-
phone assistance services:
RUSA:Mercedes-Benz Customer Assistance
Center at 1-800-FOR-MERCedes
RCanada: Customer Service at
1-800-387-0100
RHomeLink®hotline 1-800-355-3515 (free of
charge)
More information on HomeLink
®and/or com-
patible products is also available online at
http://www.homelink.co m.
Notes on the declaration of conformity
(
Ypage 29).
USA: FCC ID: CB2HMIHL4
Canada: IC: 279B-HMIHL4
Important safety notes
GWARNING
When you operate or program the garage door
with the integrated garage door opener, per-
sons in the range of movement of the garage
door can become trapped or struck by the
garage door. There is a risk of injury.
When using the integrated garage door
opener, always make sure that nobody is
within the range of movement of the garage
door.
GWARNING
Combustion engines emit poisonous exhaust
gases such as carbon monoxide. Inhaling
these exhaust gases leads to poisoning. There
is a risk of fatal injury. Therefore never leave
the engine running in enclosed spaces with-
out sufficient ventilation.
Programming
Programming buttons
Pay attention to the "Important safety notes"
(Ypage 308).
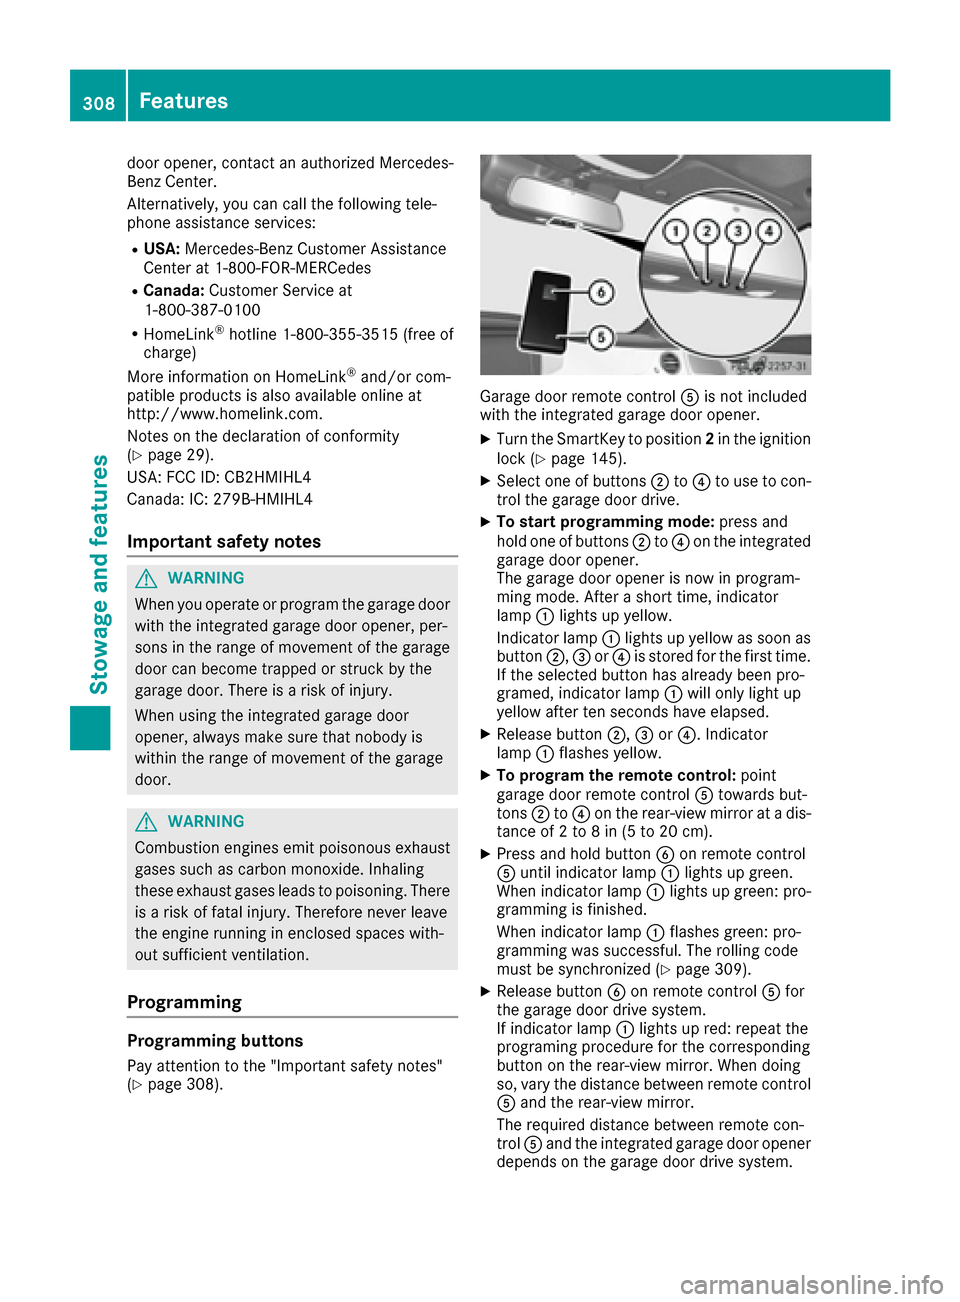
Garage door remote control Ais not included
with the integrated garage door opener.
XTurn the SmartKey to position 2in the ignition
lock (Ypage 145).
XSelect one of buttons ;to? to use to con-
trol the garage door drive.
XTo start programming mode: press and
hold one of buttons ;to? on the integrated
garage door opener.
The garage door opener is now in program-
ming mode. After a short time, indicator
lamp :lights up yellow.
Indicator lamp :lights up yellow as soon as
button ;,=or? is stored for the first time.
If the selected button has already been pro-
gramed, indicator lamp :will only light up
yellow after ten seconds have elapsed.
XRelease button ;,=or?. Indicator
lamp :flashes yellow.
XTo program the remote control: point
garage door remote control Atowards but-
tons ;to? on the rear-view mirror at a dis-
tance of 2 to 8 in (5 to 20 cm).
XPress and hold button Bon remote control
A until indicator lamp :lights up green.
When indicator lamp :lights up green: pro-
gramming is finished.
When indicator lamp :flashes green: pro-
gramming was successful. The rolling code
must be synchronized (
Ypage 309).
XRelease button Bon remote control Afor
the garage door drive system.
If indicator lamp :lights up red: repeat the
programing procedure for the corresponding
button on the rear-view mirror. When doing
so, vary the distance between remote control
A and the rear-view mirror.
The required distance between remote con-
trol Aand the integrated garage door opener
depends on the garage door drive system.
308Features
Stowage and features
Page 312 of 382
The garage door opener is compatible with
devices which operate in the frequency range
of 280 to 433 MHz.
RReplace the batteries in garage door remote
controlA. This increases the likelihood that
garage door remote control Awill transmit a
strong and precise signal to the integrated
garage door opener.
RWhen programming, hold remote control A
at varying distances and angles from but-
tons ;to? which you are programming. Try
various angles at a distance between 2and
8 inches (5to 20 cm) or at the same angle but
at varying distances.
RIf another remote control Ais available for
the same garage door drive, repeat the same
programming steps with this remote control
A. Before performing these steps, make sure
that new batteries have been installed in
garage door drive remote control A.
RNote that some remote controls only transmit
for a limited amount of time (the indicator
lamp on the remote control goes out). Press
buttonBon remote control Aagain before
transmission ends.
RAlign the antenna cable of the garage door
opener unit. This can improve signal recep-
tion/transmission.
Opening/closing the garage door
After it has been programmed, the integrated
garage door opener performs the function of the
garage door system remote control. Please also
read the operating instructions for the garage
door system.
XTurn the SmartKey to position 2in the ignition
lock (Ypage 145).
XPress button ;,=or? which you have
programmed to operate the garage door.
Garage door system with a fixed code: indi-
cator lamp :lights up green.
Garage door system with a rolling code: indi-
cator lamp :flashes green.
The transmitter will transmit a signal as long
as the button is pressed. The transmission is
halted after a maximum of ten seconds and
indicator lamp :lights up yellow.
XPress button ;,=or? again if necessary.
Clearing the memory
Make sure that you clear the memory of the
integrated garage door opener before selling the
vehicle.
XTurn the SmartKey to position 2in the ignition
lock (Ypage 145).
XPress and hold buttons ;and ?.
The indicator lamp initially lights up yellow
and then green.
XRelease buttons ;and ?.
The memory of the integrated garage door
opener in the rear-view mirror is cleared.
Floormats
GWARNING
Objects in the driver's footwell can restrict the pedal travel or obstruct a depressed pedal.
The operating and road safety of the vehicle is
jeopardized. There is a risk of an accident.
Make sure that all objects in the vehicle are
stowed correctly, and that they cannot enter
the driver's footwell. Install the floormats
securely and as specified in order to ensure
sufficient clearance for the pedals. Do not use
loose floormats and do not place floormats on
top of one another.
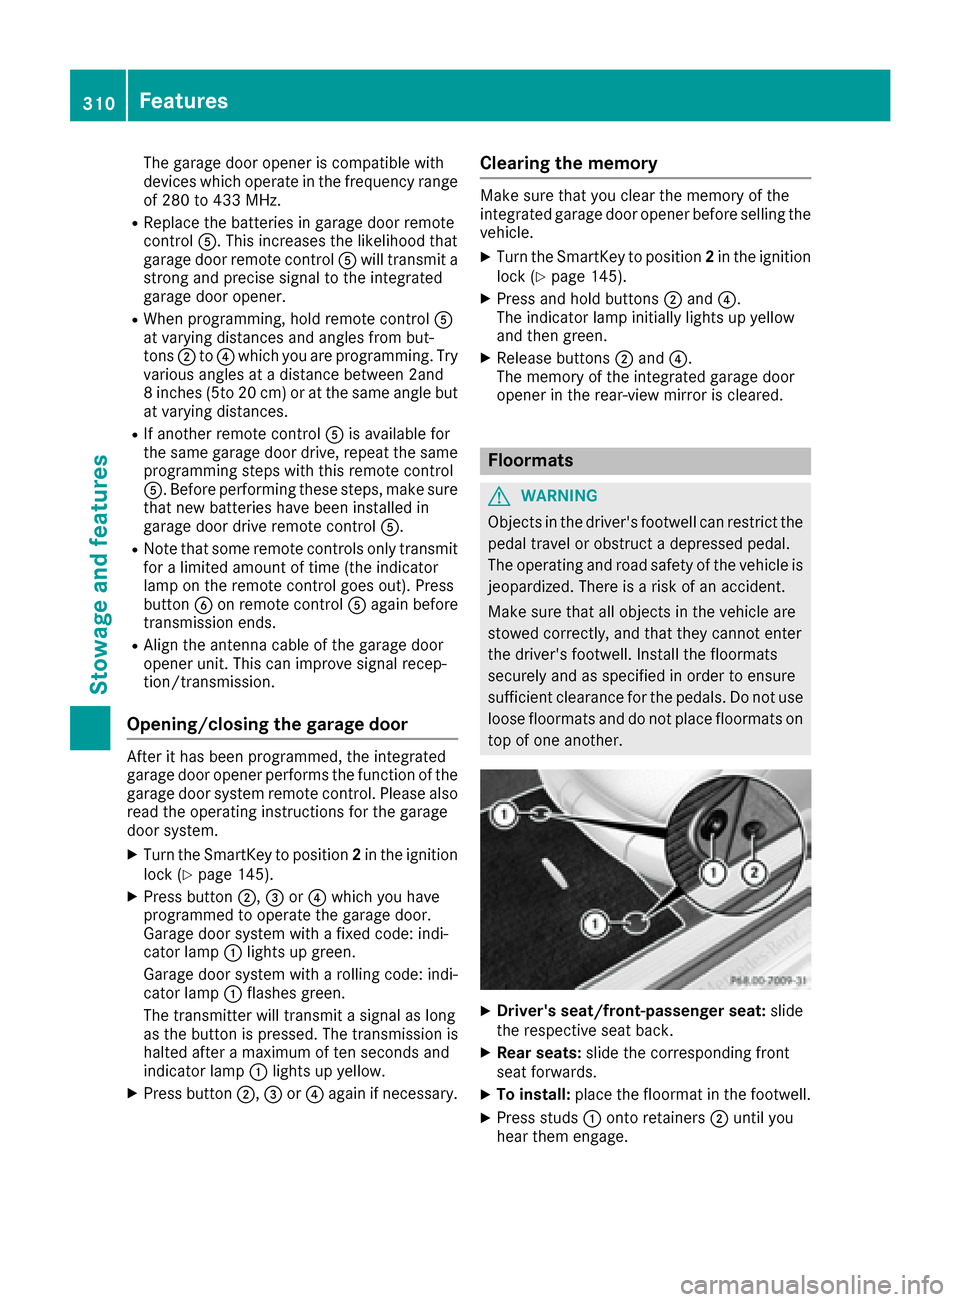
XDriver's seat/front-passenger seat: slide
the respective seat back.
XRear seats: slide the corresponding front
seat forwards.
XTo install: place the floormat in the footwell.
XPress studs :onto retainers ;until you
hear them engage.
310Features
Stowage and features