2017 MERCEDES-BENZ S-Class MAYBACH run flat
[x] Cancel search: run flatPage 8 of 382
Replacing........................................ .80
Battery (vehicle)
Charging ........................................ 334
Display message ............................ 243
Important safety notes .................. 332
Jump starting ................................. 335
Belt
see Seat belts
Belt bag ................................................ 46
Blind Spot Assist
see Active Blind Spot Assist
Blootooth
®
Connecting a different mobile
phone ............................................ 278
Bluetooth
®
Searching for a mobile phone ........ 277
see also Digital Operator's Man-
ual .................................................. 269
Telephony ...................................... 277
Box (trunk) ......................................... 287
Brake Assist
see BAS (Brake Assist System)
Brake fluid
Display message ............................ 233
Notes ............................................. 374
Brake force distribution
see EBD (electronic brake force
distribution)
Brakes
ABS .................................................. 66
Adaptive Brake Assist ...................... 70
BAS .................................................. 66
BAS PLUS with Cross-Traffic
Assist ............................................... 67
Brake fluid (notes) ......................... 374
Display message ............................ 228
EBD .................................................. 73
High-performance brake system .... 168
Hill start assist ............................... 148
HOLD function ............................... 178
Important safety notes .................. 166
Maintenance .................................. 167
Parking brake ................................ 163
Riding tips ...................................... 166
Warning lamp ................................. 260
Breakdown
Where will I find...? ........................ 327 see Flat tire
see Towing away
Brightness control (instrument
cluster lighting) ................................... 36
Buttons on the steering wheel ......... 211
C
California
Important notice for retail cus-
tomers and lessees .......................... 27
Calling up a malfunction
see Display messages
Calling up the climate control bar
Multimedia system ........................ 274
Calling up the climate control
menu
Multimedia system ........................ 274
Camera
see Rear view camera
Car
see Vehicle
Care
360° camera ................................. 323
Car wash ........................................ 319
Carpets .......................................... 326
Display ........................................... 324
Exhaust pipe .................................. 323
Exterior lights ................................ 322
General notes ................................ 319
Interior ........................................... 324
Matte finish ................................... 321
Night View Assist Plus ................... 324
Paint .............................................. 321
Plastic trim .................................... 324
Power washer ................................ 320
Rear view camera .......................... 323
Roof lining ...................................... 326
Seat belt ........................................ 325
Seat cover ..................................... 325
Selector lever ................................ 325
Sensors ......................................... 323
Steering wheel ............................... 325
Trim pieces .................................... 325
Washing by hand ........................... 320
Wheels ........................................... 322
Windows ........................................ 322
Wiper blades .................................. 322
6Index
Page 13 of 382

Display message ............................ 228
Function/notes ................................ 71
General notes .................................. 71
Important safety information ........... 71
Trailer stabilization ........................... 72
Warning lamp ................................. 261
ETS/4ETS (Electronic Traction Sys-
tem) ...................................................... 71
Exhaust
see Exhaust pipe
Exhaust check ................................... 165
Exhaust pipe
Cleaning ......................................... 323
Exhaustive discharging (high-volt-
age battery) ....................................... 334
Exterior lighting
Cleaning ......................................... 322
Setting options .............................. 124
see Lights
Exterior mirrors
Adjusting ....................................... 117
Dipping (automatic) ....................... 118
Folding in/out (automatically) ....... 118
Folding in/out (electrically) ........... 118
Out of position (troubleshooting) ... 118
Setting ........................................... 118
Storing settings (memory func-
tion) ............................................... 120
Storing the parking position .......... 119
External audio source
Connecting .................................... 279
Eyeglasses compartment ................. 282
F
Favorites
Overview ........................................ 273
Features ............................................. 290
Filling capacities (Technical data) ... 371
Flat tire
Changing a wheel/mounting the
spare wheel ................................... 362
MOExtended tires .......................... 328
Preparing the vehicle ..................... 327
TIREFIT kit ...................................... 329
Floormats ........................................... 310
Folding table ...................................... 284 Frequencies
Mobile phone ................................. 369
Two-way radio ................................ 369
Fuel
Additives ........................................ 373
Consumption statistics .................. 215
Displaying the current consump-
tion ................................................ 214
Displaying the range ...................... 214
Driving tips .................................... 165
Fuel gauge ....................................... 35
Grade (gasoline) ............................ 372
Important safety notes .................. 372
Problem (malfunction) ................... 161
Refueling ........................................ 159
Tank content/reserve fuel ............. 372
Fuel level
Calling up the range (on-board
computer) ...................................... 214
Fuel tank
Capacity ........................................ 372
Problem (malfunction) ................... 161
Fuses
Allocation chart ............................. 340
Before changing ............................. 341
Dashboard fuse box ....................... 341
Fuse box in the engine compart-
ment .............................................. 341
Fuse box in the front-passenger
footwell .......................................... 341
Fuse box in the trunk ..................... 342
Important safety notes .................. 340
G
Garage door openerClearing the memory ..................... 310
General notes ................................ 307
Important safety notes .................. 308
Opening/closing the garage doo r..3 10
Problems when programming ........3 09
Programming (button in the rear-
view mirror) ................................... 308
Synchronizing the rolling code ....... 309
Gasoline ............................................. 372
Gear indicator (on-board com-
puter, Mercedes-AMG vehicles) ....... 226
Genuine parts ...................................... 26
Index11
Page 24 of 382
Traction (definition) ....................... 362
Tread wear .....................................356
Uniform Tire Quality Grading
Standards ...................................... 356
Uniform Tire Quality Grading
Standards (definition) .................... 360
Wear indicator (definition) ............. 362
Wheel and tire combination ........... 367
Wheel rim (definition) .................... 361
see Flat tire
Top Tether ............................................ 62
Touchpad
Changing the station/music
track .............................................. 272
Character suggestions ................... 271
Deleting characters ....................... 272
Entering a space ............................ 272
Entering characters ....................... 271
Gesture control .............................. 271
Handwriting recognition ................ 272
Operating the touchpad ................. 271
Overview ........................................ 271
Quick access for Audio .................. 272
Quick access for telephone ........... 272
Switching ....................................... 271
Switching input line ....................... 272
Tow-starting
Emergency engine starting ............ 340
Important safety notes .................. 338
Towing a trailer
ESP
®(Electronic Stability Pro-
gram) ............................................... 72
Towing away
Important safety guidelines ........... 338
Installing the towing eye ................ 339
Notes for 4MATIC vehicles ............ 340
Removing the towing eye ...............3 39
Transporting the vehicle ................ 340
With both axles on the ground ....... 339
Towing eye ......................................... 327
Traffic reports
see also Digital Operator's Man-
ual ..................................................2 69
Traffic Sign Assist
Activating ....................................... 200
Display message ............................ 249
Function/notes .............................1 99
Important safety notes .................. 200 Instrument cluster display .............
200
Sw
itching on/off ........................... 222
Transfer case ..................................... 159
Transmission
see Automatic transmission
Transporting the vehicle .................. 340
Trim pieces (cleaning instruc-
tions) ..................................................3 25
Trip computer (on-board com-
puter) ..................................................2 15
Trip odometer
Calling up ....................................... 214
Resetting (on-board computer) ...... 215
Trunk
Emergency release .......................... 90
Emergency release button ...............9 0
Important safety notes .................... 85
Locking separately ........................... 89
Opening/closing (automatically
from inside) ...................................... 89
Opening/closing (automatically
from outside) ................................... 86
Opening/closing (from outside,
HANDS-FREE ACCESS) .................... 87
Opening/closing (manually from
outside) ............................................ 86
Power closing .................................. 84
Trunk lid
Display message ............................ 255
Obstacle recognition ........................ 85
Opening dimensions ...................... 376
Opening/closing .............................. 85
Trunk load (maximum) ...................... 376
Turn signals
Display message ............................ 241
Switching on/off ........................... 125
Two-way radio
Frequencies ................................... 369
Installation ..................................... 369
Transmission output (maximum) .... 369
Windshield (infrared reflective) ...... 311
Type identification plate
see Vehicle identification plate
U
UnlockingEmergency unlocking ....................... 84
22Index
Page 57 of 382
ProblemPossible causes/consequences andMSolutions
The PASSENGER AIR
BAG OFF indicator lamp
lights up and remains lit,
even though the front-
passenger seat is occu-
pied by an adult or a per-
son of a stature corre-
sponding to that of an
adult.The classification of the person on the front-passenger seat is incor-
rect.
XMake sure the conditions for a correct classification of the person
on the front-passenger seat are met (Ypage 51).
XIf the PASSENGER AIR BAG OFF indicator lamp remains lit, the front-
passenger seat may not be used.
XHave OCS checked as soon as possible at an authorized Mercedes- Benz Center.
The PASSENGER AIR
BAG OFF indicator lamp
does not light up and/or
does not stay on.
The front-passenger seat
is:
Runoccupied
Roccupied with the
weight of a child up to
twelve months old in a
child restraint system
OCS is malfunctioning.
XMake sure there is nothing between the seat cushion and the child
seat.
XMake sure that the entire base of the child restraint system rests on
the seat cushion of the front-passenger seat. The backrest of the
forward-facing child restraint system must lie as flat as possible
against the backrest of the front-passenger seat. If necessary,
adjust the position of the front-passenger seat.
XMake sure that the seat cushion length is fully retracted.
XWhen installing the child restraint system, make sure that the seat
belt is tight. Do not pull the seat belt tight using the front-passenger seat adjustment. This could result in the seat belt and the child
restraint system being pulled too tightly.
XCheck for correct installation of the child restraint system.
Make sure that the head restraint does not apply a load to the child
restraint system. If necessary, adjust the head restraint accord-
ingly.
XMake sure that no objects are applying additional weight onto the
seat.
XIf the PASSENGER AIR BAG OFF indicator lamp remains off and/or
the PASSENGER AIR BAG ON indicator lamp lights up, do not install a child restraint system on the front-passenger seat. It is recom-
mended that you install the child restraint system on a suitable rear
seat.
XHave OCS checked as soon as possible at an authorized Mercedes-Benz Center.
Deployment of Emergency Tensioning
Devices and air bags
Important safety notes
GWARNING
The air bag parts are hot after an air bag has
been deployed. There is a risk of injury.
Do not touch the air bag parts. Have a
deployed air bag replaced at a qualified spe-
cialist workshop as soon as possible.
GWARNING
A deployed air bag no longer offers any pro-
tection and cannot provide the intended pro-
tection in an accident. There is an increased
risk of injury.
Have the vehicle towed to a qualified special-
ist workshop in order to have a deployed air
bag replaced.
It is important for your safety and that of your
passenger to have deployed air bags replaced
Occupant safety55
Safety
Z
Page 167 of 382
Observe the legal requirements for the country
in which you are driving. Some jurisdictions pro-
hibit the driver from using a mobile phone while
driving a vehicle.
If you make a call while driving, always use
hands-free mode. Only operate the telephone
when the traffic situation permits. If you are
unsure, pull over to a safe location and stop
before operating the telephone.
Bear in mind that at a speed of only 30 mph
(approximately 50 km/h), the vehicle covers a
distance of 44 ft (approximately 14m)per sec-
ond.
Drive sensibly – save fuel
Observe the following tips to save fuel:
XThe tires should always be inflated to the rec-
ommended tire pressure.
XRemove unnecessary loads.
XRemove roof racks when they are not needed.
XWarm up the engine at low engine speeds.
XAvoid frequent acceleration or braking.
XHave all maintenance work carried out as
indicated by the service intervals in the Main-
tenance Booklet or by the service interval dis-
play.
Fuel consumption also increases when driving in cold weather, in stop-start traffic and in hilly ter-
rain.
Drinking and driving
GWARNING
Drinking and driving and/or taking drugs and driving are very dangerous combinations.
Even a small amount of alcohol or drugs can
affect your reflexes, perceptions and judg-
ment.
The possibility of a serious or even fatal acci-
dent is greatly increased when you drink or
take drugs and drive.
Do not drink or take drugs and drive or allow
anyone to drive who has been drinking or tak-
ing drugs.
Emission control
GWARNING
Combustion engines emit poisonous exhaust
gases such as carbon monoxide. Inhaling
these exhaust gases leads to poisoning. There
is a risk of fatal injury. Therefore never leave
the engine running in enclosed spaces with-
out sufficient ventilation.
Certain engine systems are designed to keep
the level of poisonous components in exhaust
fumes within legal limits.
These systems only work at peak efficiency if
they are serviced exactly in accordance with the
manufacturer's specifications. Always have
work on the engine carried out at a qualified
specialist workshop . Mercedes-Benz recom-
mends that you use an authorized Mercedes-
Benz Center for this purpose. In particular, work
relevant to safety or on safety-related systems
must be carried out at a qualified specialist
workshop.
The engine settings must not be changed under any circumstances. Furthermore, all specific
service work must be carried out at regular
intervals and in accordance with the Mercedes-
Benz service requirements. Details can be found in the Maintenance Booklet.
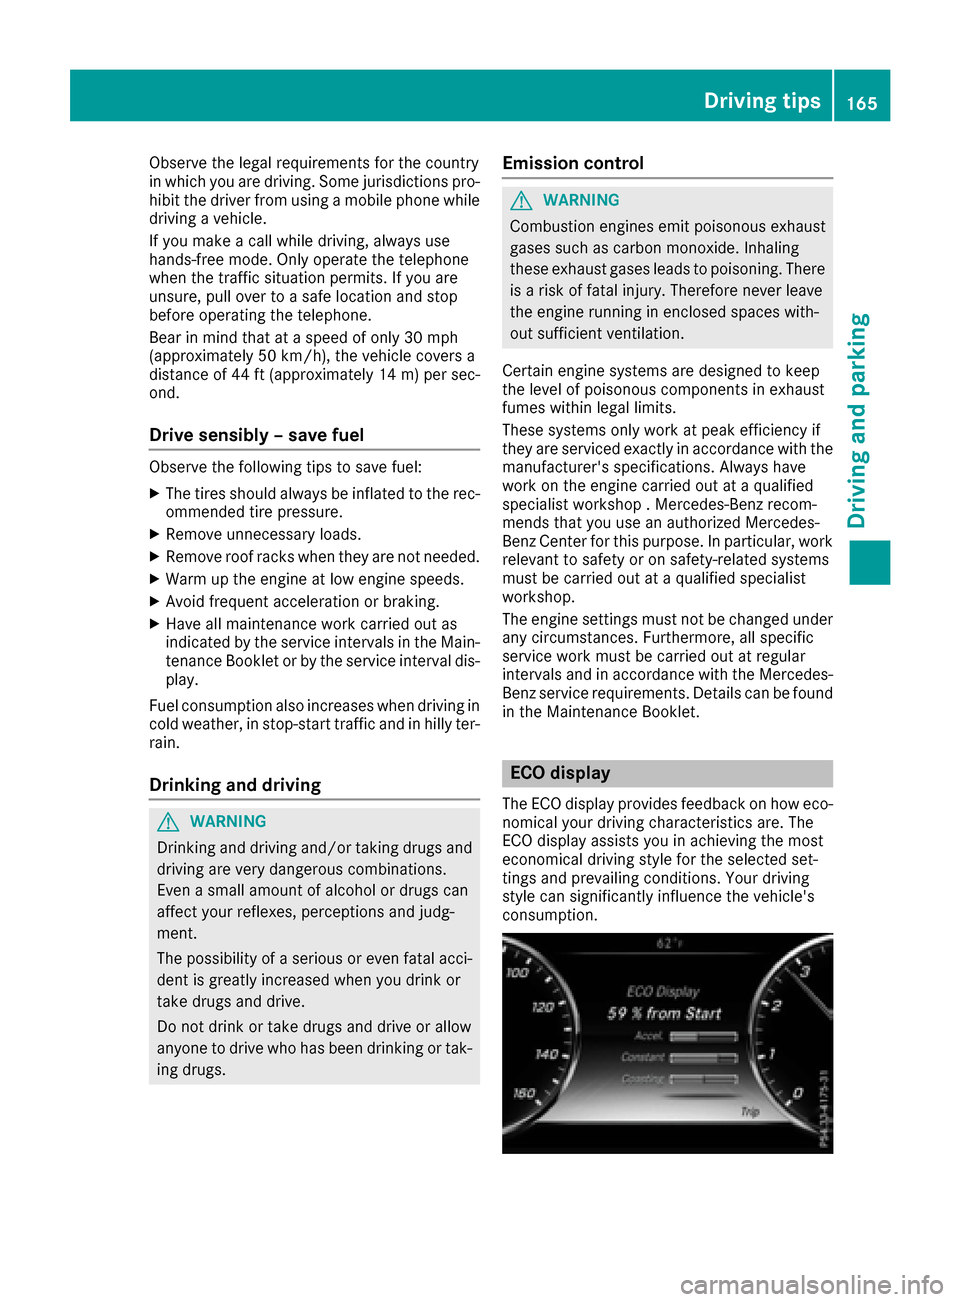
ECO display
The ECO display provides feedback on how eco-
nomical your driving characteristics are. The
ECO display assists you in achieving the most
economical driving style for the selected set-
tings and prevailing conditions. Your driving
style can significantly influence the vehicle's
consumption.
Driving tips165
Driving and parking
Z
Page 254 of 382
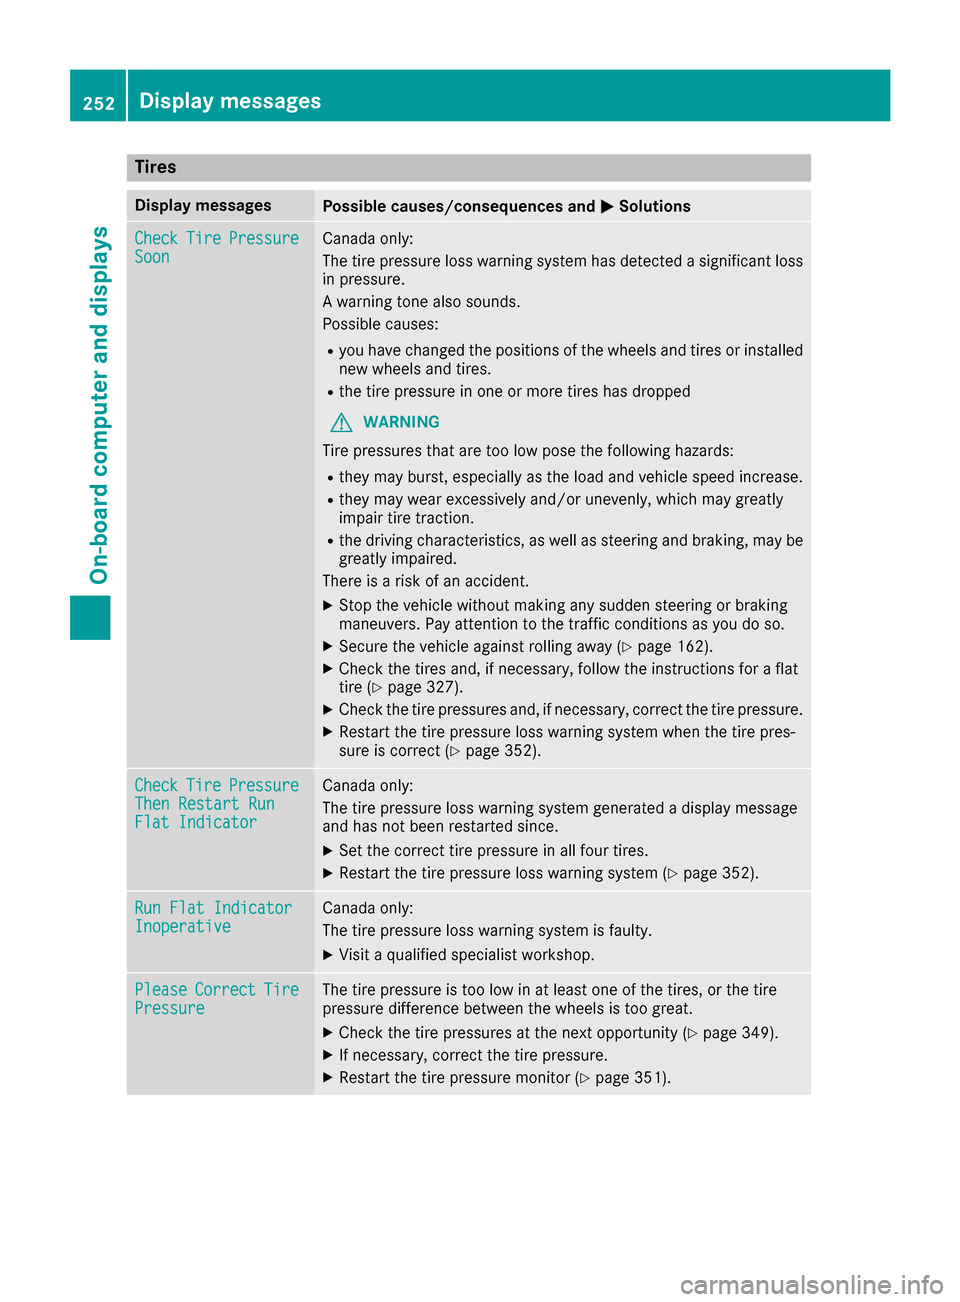
Tires
Display messagesPossible causes/consequences andMSolutions
CheckTirePressureSoonCanada only:
The tire pressure loss warning system has detected a significant loss
in pressure.
A warning tone also sounds.
Possible causes:
Ryou have changed the positions of the wheels and tires or installed
new wheels and tires.
Rthe tire pressure in one or more tires has dropped
GWARNING
Tire pressures that are too low pose the following hazards:
Rthey may burst, especially as the load and vehicle speed increase.
Rthey may wear excessively and/or unevenly, which may greatly
impair tire traction.
Rthe driving characteristics, as well as steering and braking, may be
greatly impaired.
There is a risk of an accident.
XStop the vehicle without making any sudden steering or braking
maneuvers. Pay attention to the traffic conditions as you do so.
XSecure the vehicle against rolling away (Ypage 162).
XCheck the tires and, if necessary, follow the instructions for a flat
tire (Ypage 327).
XCheck the tire pressures and, if necessary, correct the tire pressure.
XRestart the tire pressure loss warning system when the tire pres-
sure is correct (Ypage 352).
CheckTirePressureThen Restart RunFlat Indicator
Canada only:
The tire pressure loss warning system generated a display message
and has not been restarted since.
XSet the correct tire pressure in all four tires.
XRestart the tire pressure loss warning system (Ypage 352).
Run Flat IndicatorInoperativeCanada only:
The tire pressure loss warning system is faulty.
XVisit a qualified specialist workshop.
PleaseCorrectTirePressureThe tire pressure is too low in at least one of the tires, or the tire
pressure difference between the wheels is too great.
XCheck the tire pressures at the next opportunity (Ypage 349).
XIf necessary, correct the tire pressure.
XRestart the tire pressure monitor (Ypage 351).
252Displa y messages
On-board computer and displays
Page 255 of 382

Display messagesPossible causes/consequences andMSolutions
Check TiresThe tire pressurein on eor mor etires has dropped significantly. The
whee lposition is shown in th emultifunction display.
A warning tone also sounds.
GWARNIN G
Tir epressures that are to olow pos eth efollowin ghazards :
Rthey may burst, especially as th eload and vehicl espeed increase.
Rthey may wear excessivel yand/o runevenly, whic hmay greatl y
impair tire traction .
Rthedrivin gcharacteristics ,as well as steering and braking ,may be
greatl yimpaired.
There is aris kof an accident.
XStop th evehicl ewithout making any sudden steering or braking
maneuvers .Pay attention to th etraffic condition sas you do so.
XSecur eth evehicl eagainst rollin gaway (Ypage 162).
XCheckth etires and ,if necessary, follow th einstruction sfor aflat
tire (Ypage 327).
XChec kth etire pressur e (Ypage 349).
XIf necessary, correc tth etire pressure.
Warnin gTir eMal ‐functionThe tire pressur ein on eor mor etires has dropped suddenly. The whee l
position is shown in th emultifunction display.
GWARNIN G
Drivin gwit h a flat tire poses aris kof th efollowin ghazards :
Raflat tire affects th eabilit yto steer or brak eth evehicle.
Ryou could lose control of th evehicle.
Rcontinued drivin gwit h a flat tire will caus eexcessive heat build-up
and possibl y afire.
There is aris kof an accident.
XStop th evehicl ewithout making any sudden steering or braking
maneuvers .Pay attention to th etraffic condition sas you do so.
XSecur eth evehicl eagainst rollin gaway (Ypage 162).
XCheckth etires and ,if necessary, follow th einstruction sfor aflat
tire (Ypage 327).
TirePress.Monito rCurrently Unavaila‐ble
Becausethere is interferenc efrom astron gsource of radi owaves, no
signals from th etire pressur esensor sare detected. The tire pressur e
monitor is temporarily malfunctioning .
XDrive on.
The tire pressur emonitor restarts automatically as soo nas th e
problem has been resolved.
TirePress .Sen ‐sor(s) Missin gThere is no signal from th etire pressur esensor of on eor several
wheels. The pressur eof th eaffecte dtire is no tdisplayed in th emul-
tifunction display.
XHav eth efault ytire pressur esensor replace dat aqualified special -
ist workshop .
Display messages253
On-board computer and displays
Z
Page 290 of 382
and secure heavy objects in the trunk outside
the EASY-PACK trunk box.
The maximum permitted load of the EASY-PACK
trunk box is 22 lbs (10 kg). With a load of above
approximately 11 lbs (5 kg), the bottom of the
box moves downwards until it rests on the mat
of the trunk floor. Thus, overloading of the box is avoided.
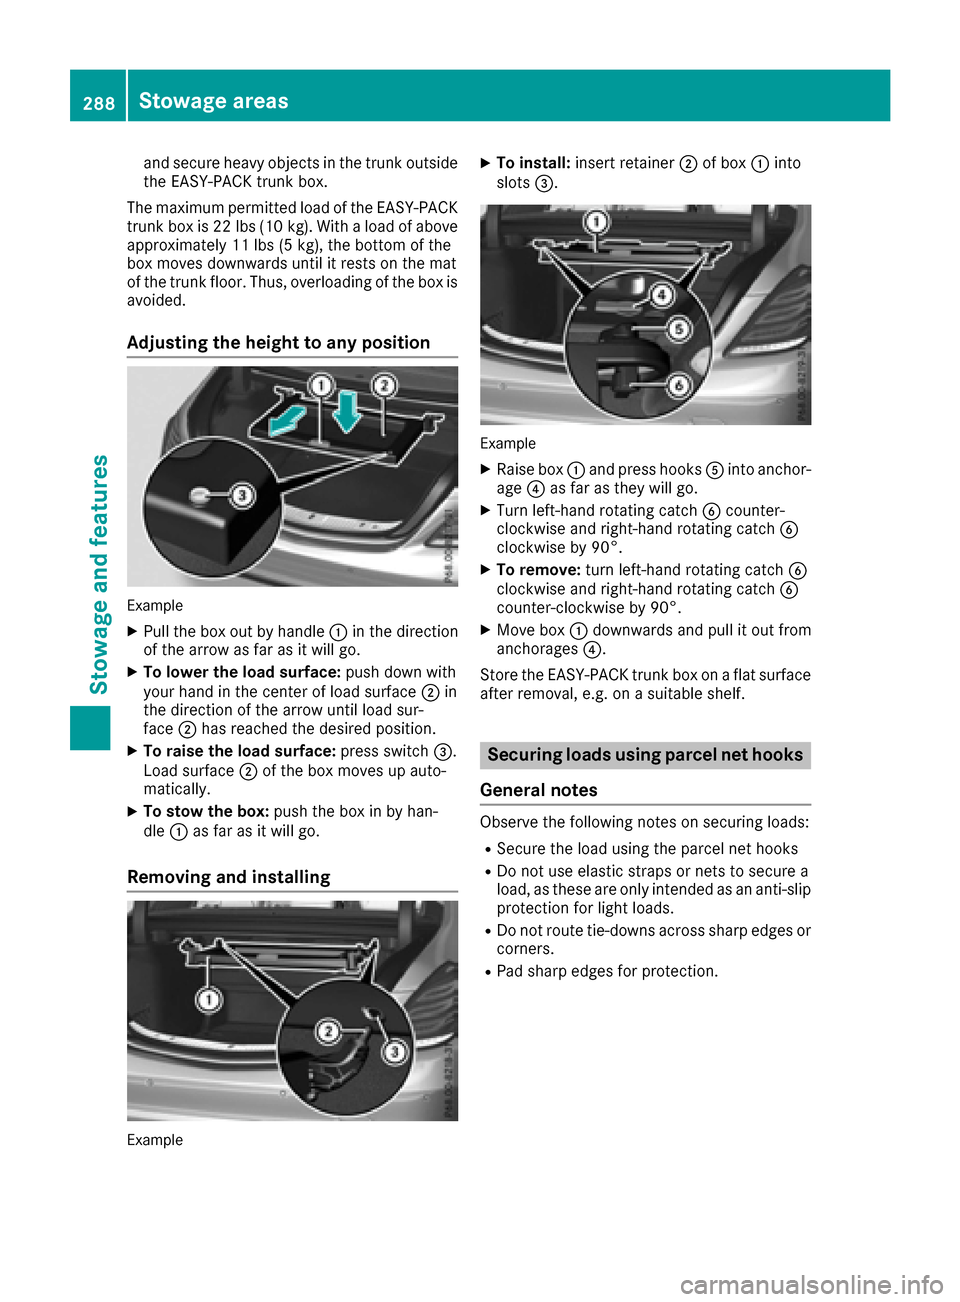
Adjusting the height to any position
Example
XPull the box out by handle :in the direction
of the arrow as far as it will go.
XTo lower the load surface: push down with
your hand in the center of load surface ;in
the direction of the arrow until load sur-
face ;has reached the desired position.
XTo raise the load surface: press switch=.
Load surface ;of the box moves up auto-
matically.
XTo stow the box: push the box in by han-
dle :as far as it will go.
Removing and installing
Example
XTo install: insert retainer ;of box :into
slots =.
Example
XRaise box :and press hooks Ainto anchor-
age ?as far as they will go.
XTurn left-hand rotating catch Bcounter-
clockwise and right-hand rotating catch B
clockwise by 90°.
XTo remove: turn left-hand rotating catch B
clockwise and right-hand rotating catch B
counter-clockwise by 90°.
XMove box :downwards and pull it out from
anchorages ?.
Store the EASY-PACK trunk box on a flat surface
after removal, e.g. on a suitable shelf.
Securing loads using parcel net hooks
General notes
Observe the following notes on securing loads:
RSecure the load using the parcel net hooks
RDo not use elastic straps or nets to secure a
load, as these are only intended as an anti-slip
protection for light loads.
RDo not route tie-downs across sharp edges or
corners.
RPad sharp edges for protection.
288Stowage areas
Stowage and features