Page 409 of 533

*
NO
TEDama getoelectronic component
parts from theu se of tyre-fitting tools Ve
hicles with atyrep ressur emonitoring
sy stem: electronic component parts are
located in thew heel. Tyre-fitting tools should
no tbea pplied in thea reaoft hevalve.
The tools could damag ethe electronic com‐
ponent parts. #
Have thet yres changed at aqualified
specialis tworks hop onl y. *
NO
TEDama getosummer tyres at low
ambient temp eratures Using summer tyres at
very lowa mbient
te mp eratures can cause crac kstoform,
th ereb ydamaging thet yres permanentl y.#
Attemp eratures belo w7°Cuse M+S-
tyres. Ac
cessor yparts that ar enotappr ovedfor your
ve hicle byMercedes-Benzora renotb eing used
cor rectl yc an impair theo perating saf ety. Befor
epurch asing and using non-appr oved
accesso ries, visit aqualified specialis tworks hop
and enquir eabout:
R Suitability
R Legal stipulations
R Factor yrecommendations &
WARNING Risk of accident wi thhigh
per form anc etyres
The special tyr etread in combinatio nwith
th eo ptimised tyr ecompound, means that
th er isk of skidding or hydroplaning on wet
ro ads is inc reased.
In addition ,the tyr egripisg reatl yr educed at
al ow outside temp eratur eand tyr erunning
te mp erature. #
Switc hont he ESP ®
and adap tyour
driving stylea ccordingly. #
Use M+S tyres at outside temp eratures
of less than 50 °F. Obse
rvet he following when selecting, fitting and
re placing tyres:
R Countr y-specific requirements fort yre
appro valthat define aspecific tyr etype for
yo ur vehicle.
Fu rthermore, theu se of cer tain tyr etypes in
cer tain regions and areas of operation can
be highl ybeneficial.
R Onlyuse tyres and wheels of thes ame type
(summer tyres, winter tyres, MOEx tended
tyres) and thes ame make.
R Onlyfit wheel softhe same size on one axle
(lef tand right).
It is onl ypermissible tofitad iffe re nt wheel
size in thee vent of aflat tyr einorder to
driv etot he specialis tworks hop.
R Onlyfit ty resoft he cor rect size ont othe
wheels.
R Do no tmakea nymodifications totheb rake
sy stem, thew heels or thet yres.
The use of shims or brak edusts hields is not
permitted and ma yinva lidat ethe vehicle's
ge neral operating pe rmit. 406
Wheels and tyres
Page 410 of 533

R
Vehicles with atyrep ressur emonitoring
sy stem: allfitted wheels mu stbe equipped
wit hfunctioning sensor sfor thet yrep res‐
sur em onitoring sy stem.
R Attemp eratures belo w7°C, use winter tyres
or all-season tyres mar kedM +Sfora ll
wheels.
Wi nter tyres bearing thei snowflake
symbol in addition totheM +S marking pro‐
vide theb estp ossible grip in wintr yroad
conditions.
R ForM +S tyres, only use tyres wit hthe same
tread.
R Obser vethem aximum permissible speed for
th eM +S tyres fitted.
If th is is belo wthe vehicle's maximum speed,
th is mus tbeindicated in an appropriat elabel
in thed rive r's field of vision.
R Runinn ewtyres at moderat espeed sfor the
fi rs t1 00 km.
R Replace thet yres af ters ixyearsatt he latest,
re ga rdless of wear. R
When replacing with tyres that do not
fe atur erun-flat characteristics: vehicles
wit hM OExtended tyres ar enotequipped
wit haT IREFIT kit at thef actor y.Equi pthe
ve hicle wit haTIREFIT kit af terr eplacing with
tyres that do no tfeatur erun- flat characteris‐
tics, e.g .winter tyres.
Fo rm orei nformation on wheels and tyres, con‐
ta ct aq ualified specialis tworks hop.
Be sur etoalso obse rvet he following fur ther
re lated subjects:
R Notesont yrep ressur e(→pag e397)
R Tyre pressur etable (→ page398) Note
soni nterchanging wheels &
WARNING Risk of inju rythro ugh dif fer‐
ent whee lsizes
Inter changing thef ront and rear wheels if the
wheels or tyres ha vediffere nt dimensions
ma yseve rely impair thed riving characteris‐
tics. The disk brakes or wheel suspension compo‐
nents ma yalso be damaged. #
Rotate front and rear wheels on lyifthe
wheels and tyres ar eofthe same
dimensions. Inter
changing thef ront and rear wheels if the
wheels or tyres ha vediffere nt dimensions can
re nde rthe general operating pe rmit in valid.
The wear pat tern sont he front and rear wheels
dif fer:
R Front wheels wear mor eonthe shoulder of
th et yre
R Rear wheels wear mor einthe centre ofthe
tyre
On vehicles wit hthe same front and rear wheel
size, youc an inter chang ethe wheels every
5,000 to10,000 km, dependin gonthewear.
Ensur ethe direction of rotatio nism aintained for
th ew heels.
It is imperativ etoobservethei nstruction sand
saf etyn otes on "Wheel change" when doin gso. Wheels and tyres
407
Page 411 of 533

Note
sons toring wheels R
Afterr emoving wheels, stor et hem in acool,
dr ya nd preferably dar kplace.
R Protect thet yres from conta ct withoil,
grease or fuel. Overvie
wofthe tyre-chang etool kit Apar
tfroms ome countr y-specific variants, vehi‐
cles ar enotequipped wit hatyre-chang etool kit.
Fo rm orei nformation on which tyre-changing
to ols ar erequired and appr ovedfor per form ing a
wheel chang eony ourvehicle, consult aqualified
specialis tworks hop.
Re quired tyre-chang etools ma yinclude, for
ex ample:
R jack
R chock
R wheel spanner
R centri ng pin
% The jac kweighs appr oximatel y3.4kg.
The maximum load capacity of thej ackc an
be found on thes tickera ffixed tothej ack. The jac
kismaintenance-free. If ther eisa
malfunction, please conta ctaq ualified spe‐
cialis tworks hop.
The tyre-chang etool kit is located under the
boo tfloor. 1
Ratchet
2 centring pin
3 Jack ing support
4 Jack
5 Wheel spanner
6 Folding chock Setting up
thef olding wheel chock Prepa
ring thev ehicle foraw heelchange Re
quirements:
R The requ ired tyre-chang etool kit is available.
If yo ur vehicle is no tequipped wit hthe tyre-
ch ang etool kit, consult aqualified specialist
wo rkshop tofind ou tabout suitable tools. 408
Wheels and tyres
Page 412 of 533

R
The vehicle is no tonaslope.
R The vehicle is on solid, non-slipper yand le vel
ground. #
Appl ythe electric parking brak emanually. #
Movethef ront wheels tothes traight-ahead
position. #
Vehicles with automatic transmission:
shif tint op osition j. #
Vehicles with AIRB ODYC ONT ROL:setthe
normal vehicle le vel(→pag e198). #
Switc hoffthee ngine. #
Mak esuret hat thee ngine cann otbe star ted. #
Place choc ks orother suitable items under
th ef ront and rear of thew heel that is diago‐
nall yopposit ethe wheel youw ish tochange. #
Remo vetheh ub caps if necessary
(→ pag e411). #
Raising thev ehicle (→ page412). Re
moving and fittin ghub caps Re
quirement:
R The vehicle is prepared foraw heelchange
(→ pag e408).
Pla stic hub cap #
Toremo ve: turnthe centre coveroft he hub
cap anti-clockwise and remo vetheh ub cap. #
Tofit: mak esuret hat thec ent recoveroft he
hub cap is turned anti-clockwise. #
Position theh ub cap and tur nthe centre
co verc lockwise until theh ub cap engages
ph ysicall yand audibly. Aluminium hub cap #
Toremo ve: positio nsocket 2on hu bcap
1.
% The soc ketc an be found in thet yre-change
to ol kit. #
Position wheel spanner 3on soc ket2. #
Using whee lspa nner 3,turnh ub cap 1
anti-clo ckwise and remo veit. #
Tofit: position hub cap 1and tur nuntil it is
comple tely flush wit hthe wheel. #
Position soc ket2on hu bcap 1. Wheels and tyres
409
Page 413 of 533

#
Attach wheel spanner 3tosoc ket 2and
tighten theh ub cap clockwise.
Specified tightening torq ue: 25 Nm. #
Raise thev ehicle (→ page412). Ra
ising thev ehicle when changing awheel Re
quirements:
R Ther eareno persons in thev ehicle.
R The vehicle has been prepared foraw heel
ch ang e(→pag e408).
R The hub caps ha vebeen remo ved
( → pag e409).
Impor tant no tesonu singthej ack:
R onlyusethev ehicle-specific jac kthat has
been tested and appr ovedbyM ercedes-Benz
to raise thev ehicle.
R thej ackiso nlyd esigned forr aising and hold‐
ing thev ehicle foras horttime while awheel
is being changed and no tfor maintenance
wo rkunder thev ehicle. R
thej ackm ustbep laced on afirm, flat and
non-slip sur face. If necessar y,use alarge,
load-bearing, non-slip underla y.
R thef ootoft he jac kmustbep ositioned verti‐
call yunder thej acking point. Ru
les of conduct when thev ehicle is raised:
R Neverp lace your hands or feet under the
ve hicle.
R Do no tlie under thev ehicle.
R Do no tstar tthe engine and do no trelease
th ee lectric parking brake.
R Do no topen or close an ydoor sort he boot
lid. #
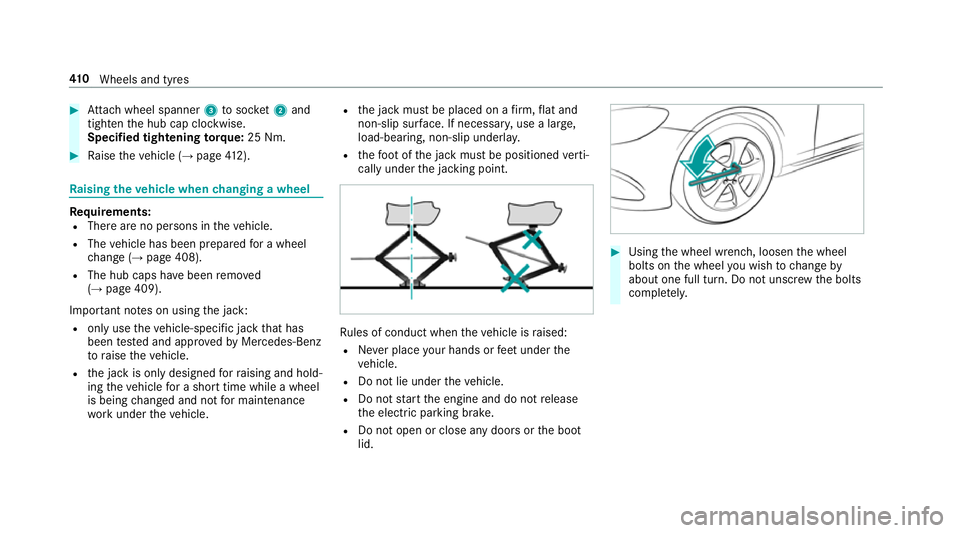
Using thew heel wrench, loosen thew heel
bolts on thew heel youw ish tochang eby
about on efull turn. Do no tunscr ewtheb olts
comple tely. 41 0
Wheels and tyres
Page 414 of 533

Po
sition of jac ksuppor tpoints &
WARNING Risk of inju ryfrom incor rect
positioning of thej ack
If yo udon otpositio nthe jac kcorrectly at
th ea ppropriat ejacking point of thev ehicle,
th ej ackc ould tip wit hthe vehicle raised. #
Onlyposition thej ackatt he appropri‐
at ej acking point of thev ehicle. The
base of thej ackm ustbep ositioned ver‐
tically under thej acking point of the
ve hicle. *
NO
TEVehicle damag efromt he jack If
yo udon otpositio nthe jac kcorrectl yat
th ea ppropriat ejacks uppor tpoint of the
ve hicle, thej ackc ould tip overwitht he vehi‐
cle raised. #
The jac kisdesigned exclusively for
jacking up thev ehicle at thej acks up‐
por tpoints. #
Take ther atche tring sp anner ou tofthe tyre-
ch ang etool kit and place it on theh exagon
nut of thej acksot hatthel ette ring "AUF" is
visible. #
Position jack 2at jac ksuppor tpoint 1. #
Turn ratche tring sp anner 3clockwise until
jack 2sitsc omple tely on ja cksuppor tpoint
1 and theb ase of thej ackl ies evenlyon
th eg round. #
Continue totur nratche tring sp anner 3
unti lthe tyr eisraised amaximum of 3cm
of ft he ground. #
Loosen and remo vethew heel (→ page414). Wheels an
dtyres 411
Page 415 of 533

Re
moving awheel Re
quirement:
R The vehicle is raised (→ page410).
When changing awheel, avoid applying an yforce
to theb rake discs, since this could impair the
le ve lofc omfort when braking.
* NO
TEDama getothre adin gfromd irton
wheel bolts #
Do no tplace wheel bolt sinsandoron
ad irty sur face. #
Unscr ew theu ppermos twheel bolt com‐
ple tely. #
Screw centring pin 1instead of thew heel
bolt int othe thre ading. #
Unscr ew ther emaining wheel bolt sfully. #
Remo vethew heel. #
Fitthen ew wheel (→ page414). Fi
ttin gan ewwheel Re
quirement:
R The wheel is remo ved( →pag e412). &
WARNING Risk of accident from losing a
wheel
Oiled, greased or damaged wheel bolt/wheel
nut thre ads or wheel hub/wheel mounting
bolt thre ads can caus ethe wheel bolts/
wheel nuts tocome loose.
As aresult, youc ould lose awheel while driv‐
ing. #
Nevero il or grease thet hreads. #
Inthee vent of dama getothet hreads,
contact aqualified specialis tworks hop
immediatel y. #
Have thed amaged wheel bolts or dam‐
aged hub thre ads replaced. #
Do no tcontinue driving. #
Obser vethei nformation on thec hoice of
tyres (→ page404).
Fo rtyres wit haspecified direction of rotation,
an ar rowonthes ide wall of thet yrei ndicates
th ec orrect di rection of rotation. Obse rvet he
direction of rotatio nw henf itting. 412
Wheels and tyres
Page 416 of 533

#
Slide thew heel tobe mounted ont othe cen‐
tring pin and push it on. &
WARNING Risk of inju ryfrom tightening
whee lbolts and nuts
If yo ut ighten thew heel bolts or wheel nuts
when thev ehicle is raised, thej ackc ould tip. #
Onlytighten wheel bolts or wheel nuts
when thev ehicle is on theg round. #
Fors afet yr easons, onl yuse wheel bolts
whic hhaveb een appr ovedbyM ercedes-
Benz and fort he wheel in question. #
Tighten thew heel bolts until they aref inger-
tight. #
Unscr ew thec ent ring pin. #
Tighten thel astw heel bolt until it is finger-
tight. #
Ifth ec ollapsible emer gency spa rewheel has
been fitted ,infla tethec ollapsible emer gency
spa rewheel (→ page417). #
Lowe rthe vehicle (→ page415). Lo
weri ngthev ehicle af teraw heelchange Re
quirements:
R The ne wwheel has been fitted (→ page 412).
* NO
TEDama getothee mer gency spa re
wheel when lo wering thev ehicle If
th ec ollapsible emer gency spa rewheel is
no tinflated befor ethe vehicle is lo wered, its
ri mm aybe dama ged. #
Inflat ethe collapsibl eemer gency spa re
wheel befor elowe ring thev ehicle, using
th et yrei nflation compressor. #
Place ther atche tring sp anner ont othe he xa‐
gon nut of thej acksot hatthel ette ring "AB"
is visible. #
Tolowe rthe vehicle: turnthe ratche tring
sp an ner of thej acka nti-clockwise. #
Tighten thew heel bolts evenlyinad iagonal
patter ninthe order indicated (1 to5 ).
Specified tightening torq ue: 150N m. &
WARNING Risk of accident du etoincor‐
re ct tigh tening torque
Th ew heel scould come loose if thew heel
bolts or wheel nuts ar enottightened tothe
prescribed torque. #
Have thet ightening torque checked
immediatel yataqualified specialist
wo rkshop af terc hanging awheel. Wheels and tyres
413