2017 MERCEDES-BENZ S-Class COUPE tow
[x] Cancel search: towPage 273 of 338
The garage door opener is compatible with
devices which operate in the frequency range
of 280 to 433 MHz.
RReplace the batteries in garage door remote
control0083. This increases the likelihood that
garage door remote control 0083will transmit a
strong and precise signal to the integrated
garage door opener.
RWhen programming, hold remote control 0083
at varying distances and angles from but-
tons 0044to0085 which you are programming. Try
various angles at a distance between 2and
8 inches (5to 20 cm) or at the same angle but
at varying distances.
RIf another remote control 0083is available for
the same garage door drive, repeat the same
programming steps with this remote control
0083. Before performing these steps, make sure
that new batteries have been installed in
garage door drive remote control 0083.
RNote that some remote controls only transmit
for a limited amount of time (the indicator
lamp on the remote control goes out). Press
button0084on remote control 0083again before
transmission ends.
RAlign the antenna cable of the garage door
opener unit. This can improve signal recep-
tion/transmission.
Opening/closing the garage door
After it has been programmed, the integrated
garage door opener performs the function of the
garage door system remote control. Please also
read the operating instructions for the garage
door system.
XTurn the SmartKey to position 2in the ignition
lock (Ypage 121).
XPress button 0044,0087or0085 which you have
programmed to operate the garage door.
Garage door system with a fixed code: indi-
cator lamp 0043lights up green.
Garage door system with a rolling code: indi-
cator lamp 0043flashes green.
The transmitter will transmit a signal as long
as the button is pressed. The transmission is
halted after a maximum of ten seconds and
indicator lamp 0043lights up yellow.
XPress button 0044,0087or0085 again if necessary.
Clearing the memory
Make sure that you clear the memory of the
integrated garage door opener before selling the
vehicle.
XTurn the SmartKey to position 2in the ignition
lock (Ypage 121).
XPress and hold buttons 0044and 0085.
The indicator lamp initially lights up yellow
and then green.
XRelease buttons 0044and 0085.
The memory of the integrated garage door
opener in the rear-view mirror is cleared.
Floormats
GWARNING
Objects in the driver's footwell can restrict the pedal travel or obstruct a depressed pedal.
The operating and road safety of the vehicle is
jeopardized. There is a risk of an accident.
Make sure that all objects in the vehicle are
stowed correctly, and that they cannot enter
the driver's footwell. Install the floormats
securely and as specified in order to ensure
sufficient clearance for the pedals. Do not use
loose floormats and do not place floormats on
top of one another.
XDriver's seat/front-passenger seat: slide
the respective seat back.
XRear seats: slide the corresponding front
seat forwards.
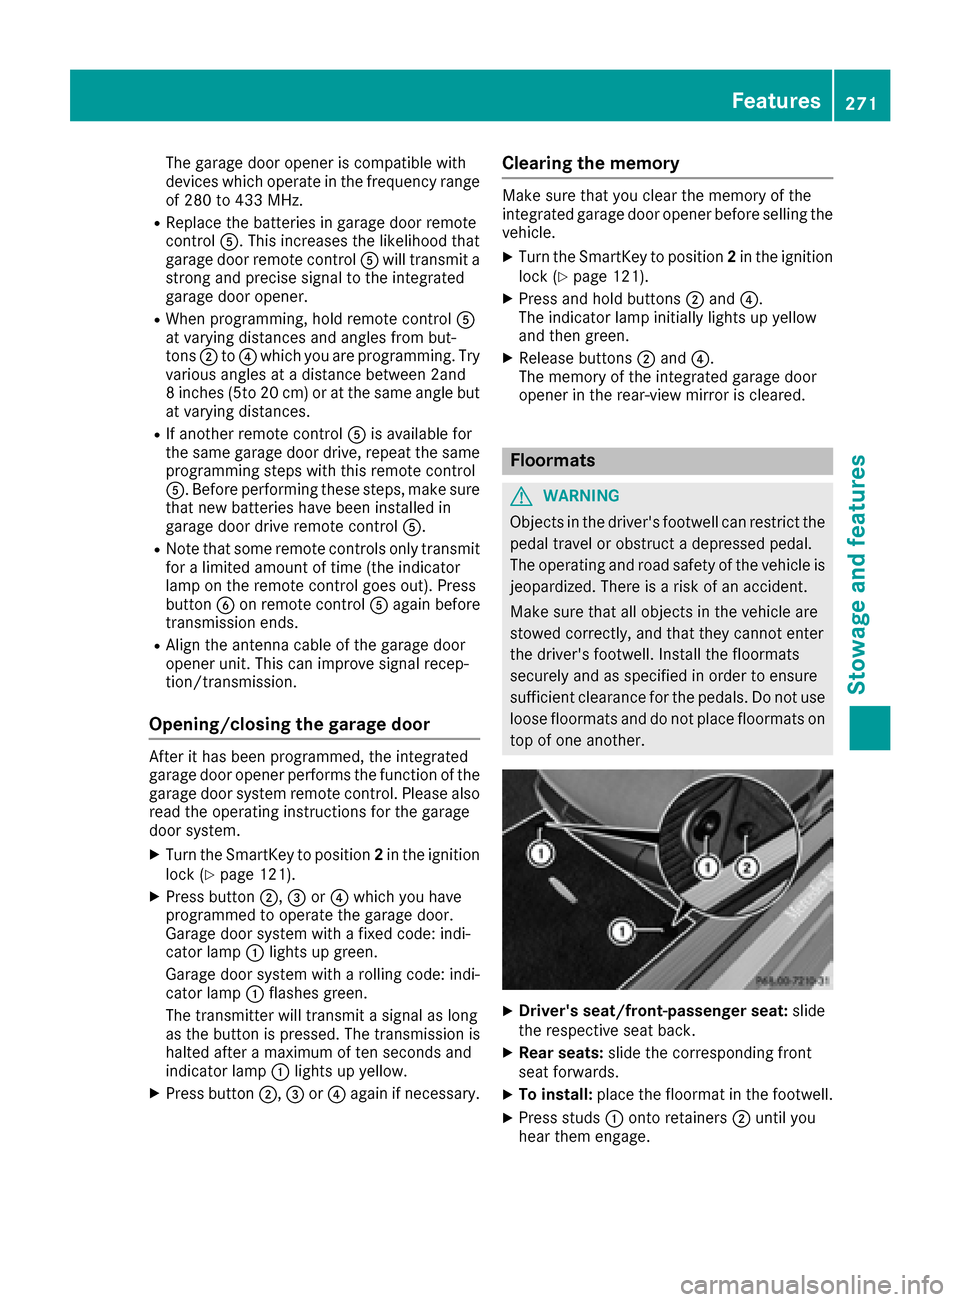
XTo install: place the floormat in the footwell.
XPress studs 0043onto retainers 0044until you
hear them engage.
Features271
Stowage and features
Z
Page 274 of 338
XTo remove:pull the floormat from retain-
ers 0044.
XRemove the floormat.
Infrared reflective windshield
The infrared reflecting glass prevents the vehi-
cle interior from becoming too hot. It also blocks
radio waves from penetrating the windshield up
into the gigahertz range.
In order to operate radio-controlled equipment,
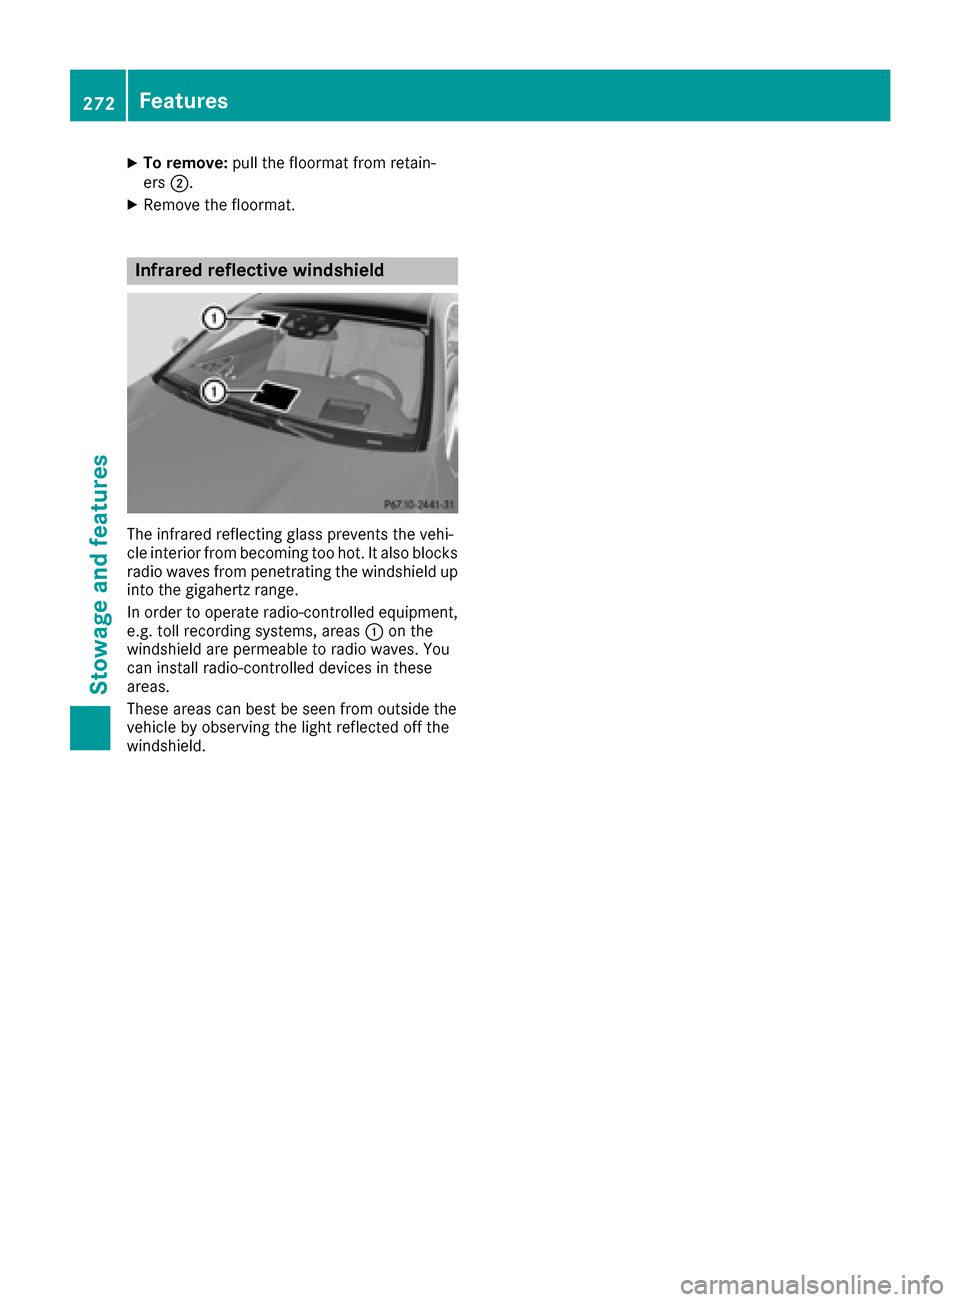
e.g. toll recording systems, areas 0043on the
windshield are permeable to radio waves. You
can install radio-controlled devices in these
areas.
These areas can best be seen from outside the
vehicle by observing the light reflected off the
windshield.
272Features
Stowag ean d features
Page 282 of 338
Drivingabroad
An extensive Mercedes-Ben zServic enetwor kis
also available in other countries. You can obtain
further information from any authorized
Mercedes-Ben zCenter.
Car e
General notes
!
Fo rcleanin gyour vehicle, do no tuse any of
th efollowing:
Rdry, rough or har dcloths
Rabrasiv ecleanin gagents
Rsolvents
Rcleanin gagents containin gsolvents
Do no tscrub .
Do no ttouch th esurfaces or protective films
wit hhar dobjects ,e.g. arin gor ic escraper.
You could otherwise scratch or damage th e
surfaces and protective film.
!Do no tpar kyour vehicle fo r alon gperiod of
time directl yafter cleaning, particularly after
cleanin gth ewhee lrim wit hwhee lcleaner.
Wheel cleaner can lead to th eincrease dcor-
rosio nof th ebrake discs and pads .Therefore,
drive fo r afew minutes after cleaning. By
heatin gup th ebrakes, th ebrake discs and
pads dry. The vehicle can then be parke dfo r a
lon gperiod of time.
HEnvironmental not e
Dispose of empty packagin gand cleanin g
cloths in an environmentally responsible man -
ner.
Regular car eof your vehicle is acondition fo r
retainin gth equalit yin th elon gterm .
Use car eproducts and cleanin gagents recom -
mended and approved by Mercedes-Benz.
Washing th evehicle an dcleaning th e
paintwor k
Automatic car was h
GWARNING
Brakin gefficiency is reduce dafter washin g
th evehicle. There is aris kof an accident.
Afte rth evehicle has bee nwashed, brake
carefully whil epayin gattention to th etraffic
condition suntil full braking powe ris restored .
!WhenDISTRONIC PLU Sor th eHOLD func-
tion is activated, th evehicle brake sautomat -
ically in certain situations.
To avoid damage to th evehicle, deactivat e
DISTRONIC PLU Sand th eHOLD function in
th efollowin gor similar situations:
Rwhen towin gth evehicle
Rin th ecar wash
!Never clean your vehicle in aTouchless
Automatic Car Wash as these use special
cleanin gagents .These cleanin gagents can
damage th epaintwor kor plasti cparts .
!Makesur ethat :
Rthesid ewindows are full yclose d
Rtheblower is switched of f
Rthewindshield wipe rswitch is at position 0
Rthe360° camera or rea rvie wcamera is
switched of f
The vehicle may otherwise be damaged .
!If theSmartKey is within th erea rdetection
range of KEYLESS-GO ,th efollowin gsitua-
tions, fo rexample, could lead to th euninten -
tional opening of th etrunk :
Rusing acar wash
Rusin g apowe rwasher
Mak esur ethat th eSmartKey is at leas t10 ft
(3 m) away from th evehicle.
!Mak esur ethat th eautomatic transmissio n
is in neutral position Nwhen washin gyour
vehicle in atow-through car wash .The vehicle
may otherwise be damaged .
ROperatingwit hth eSmartKey:
Do no tremov eth eSmartKey from th eigni-
tion lock. Do no tope nth edriver's doo r
when th eengin eis switched of for at ver y
low speeds .Otherwise ,when in transmis -
sio nposition Dor Rtheautomatic trans -
missio nwill automatically switch to par k
position Pand bloc kth ewheels.
ROperatin gwit hth eStart/Sto pbutton:
Do no tope nth edriver's doo rwhen th e
engin eis switched of for at ver ylow
speeds .Otherwise ,when in transmissio n
position Dor Rth eautomatic transmissio n
280Care
Maintenance and care
Page 283 of 338
will automatically switch to park positionP
and block the wheels.
Observe the following to make sure that the
automatic transmission stays in position Nneu-
tral:
Operating with the SmartKey:
XMake sure that the ignition is switched on.
XMake sure that the vehicle is stationary.
XDepress and hold the brake pedal.
XShift to neutral N.
XRelease the brake pedal.
XRelease the electric parking brake, if neces-
sary.
XSwitch off the ignition and leave the SmartKey
in the ignition lock.
Operating with the Start/Stop button:
XMake sure that the ignition is switched on.
XMake sure that the vehicle is stationary.
XDepress and hold the brake pedal.
XEngage park position P.
XRelease the brake pedal.
XRemove Start/Stop button from ignition lock
(Ypage 121).
XInsert the SmartKey into the ignition lock.
XSwitch on the ignition.
XDepress and hold the brake pedal.
XShift to neutral N.
XRelease the brake pedal.
XRelease the electric parking brake, if neces-
sary.
XSwitch off the ignition and leave the SmartKey
in the ignition lock.
You can wash the vehicle in an automatic car
wash from the very start.
If the vehicle is very dirty, pre-wash it before
cleaning it in an automatic car wash.
After using an automatic car wash, wipe off wax
from the windshield and the wiper blades. This
will prevent smears and reduce wiping nois es
c
aused by residue on the windshield.
Washing by hand
In some countries, washing by hand is only
allowed at specially equipped washing bays.
Observe the legal requirements in each country.
XDo not use hot water and do not wash the
vehicle in direct sunlight.
XUse a soft sponge to clean.
XUse a mild cleaning agent, such as a car
shampoo approved by Mercedes-Benz.
XThoroughly hose down the vehicle with a gen-
tle jet of water.
XDo not point the water jet directly towards the
air inlet.
XUse plenty of water and rinse out the sponge
frequently.
XRinse the vehicle with clean water and dry
thoroughly with a chamois.
XDo not let the cleaning agent dry on the paint-
work.
Carefully remove all deposits of road salt as
soon as possible when driving in winter.
Power washers
GWARNING
The water jet from a circular jet nozzle (dirt
blasters) can cause invisible exterior damage
to the tires or chassis components. Compo-
nents damaged in this way may fail unexpect-
edly. There is a risk of an accident.
Do not use power washers with circular jet
nozzles to clean the vehicle. Have damaged
tires or chassis components replaced imme-
diately.
!Always maintain a distance of at least
11.8 in (30 cm) between the vehicle and the
power washer nozzle. Information about the
correct distance is available from the equip-
ment manufacturer.
Move the power washer nozzle around when
cleaning your vehicle.
Do not aim directly at any of the following:
RTires
RDoor gaps, roof gaps, joints, etc.
RElectrical components
RBattery
RConnectors
RLamps
RSeals
RTrim
RVentilation slots
Care281
Maintenance and care
Z
Page 290 of 338
Where will I find...?
Vehicle tool kit
General notes
Apart from certain country-specific variations,
the vehicles are not equipped with a tire-change
tool kit. If your vehicle is equipped with a tire-
change tool kit, it is located in the stowage well
under the trunk floor. Some tools for changing a
wheel are specific to the vehicle. For more infor-
mation on which tire changing tools are required
and approved to perform a wheel change on
your vehicle, consult a qualified specialist work- shop.
Necessary tire-changing tools can include, for
example:
RJack
RWheel chock
RLug wrench
RRatchet wrench
RAlignment bolt
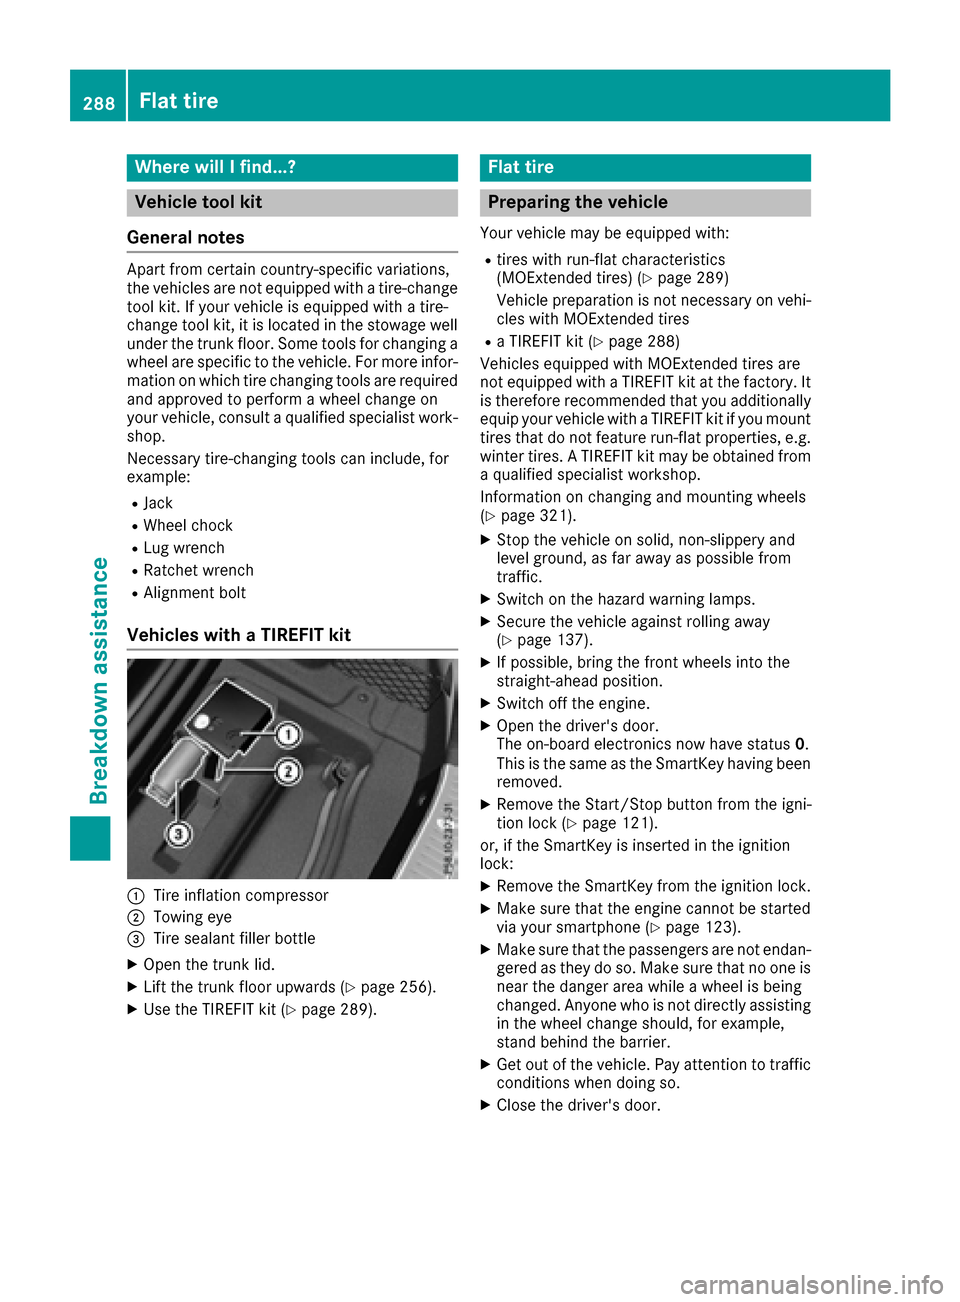
Vehicles with a TIREFIT kit
0043Tire inflation compressor
0044Towing eye
0087Tire sealant filler bottle
XOpen the trunk lid.
XLift the trunk floor upwards (Ypage 256).
XUse the TIREFIT kit (Ypage 289).
Flat tire
Preparing the vehicle
Your vehicle may be equipped with:
Rtires with run-flat characteristics
(MOExtended tires) (Ypage 289)
Vehicle preparation is not necessary on vehi-
cles with MOExtended tires
Ra TIREFIT kit (Ypage 288)
Vehicles equipped with MOExtended tires are
not equipped with a TIREFIT kit at the factory. It
is therefore recommended that you additionally
equip your vehicle with a TIREFIT kit if you mount
tires that do not feature run-flat properties, e.g.
winter tires. A TIREFIT kit may be obtained from a qualified specialist workshop.
Information on changing and mounting wheels
(
Ypage 321).
XStop the vehicle on solid, non-slippery and
level ground, as far away as possible from
traffic.
XSwitch on the hazard warning lamps.
XSecure the vehicle against rolling away
(Ypage 137).
XIf possible, bring the front wheels into the
straight-ahead position.
XSwitch off the engine.
XOpen the driver's door.
The on-board electronics now have status 0.
This is the same as the SmartKey having been
removed.
XRemove the Start/Stop button from the igni-
tion lock (Ypage 121).
or, if the SmartKey is inserted in the ignition
lock:
XRemove the SmartKey from the ignition lock.
XMake sure that the engine cannot be started
via your smartphone (Ypage 123).
XMake sure that the passengers are not endan-
gered as they do so. Make sure that no one is near the danger area while a wheel is being
changed. Anyone who is not directly assisting
in the wheel change should, for example,
stand behind the barrier.
XGet out of the vehicle. Pay attention to traffic
conditions when doing so.
XClose the driver's door.
288Flat tire
Breakdown assistance
Page 292 of 338
GWARNING
In the following situations, the tire sealant is
unable to provide sufficient breakdown assis-
tance, as it is unable to seal the tire properly:
Rthere are cuts or punctures in the tire larger
than those mentioned above.
Rthe wheel rim is damaged.
Ryou have driven at very low tire pressures or on a flat tire.
There is a risk of an accident.
Do not drive the vehicle. Contact a qualified
specialist workshop.
GWARNING
The tire sealant is harmful and causes irrita-
tion. It must not come into contact with your
skin, eyes or clothing or be swallowed. Do not inhale TIREFIT fumes. Keep tire sealant away
from children. There is a risk of injury.
If you come into contact with the tire sealant,
observe the following:
RRinse off the tire sealant from your skin
immediately with water.
RIf the tire sealant comes into contact with
your eyes, immediately rinse them thor-
oughly with clean water.
RIf tire sealant is swallowed, immediately
rinse your mouth out thoroughly and drink
plenty of water. Do not induce vomiting,
and seek medical attention immediately.
RImmediately change out of clothing which
has come into contact with tire sealant.
RIf an allergic reaction occurs, seek medical
attention immediately.
!Residue from the tire sealant may come out
of the filler hose after use. This could cause
stains.
Therefore, place the filler hose in the plastic
bag which contained the TIREFIT kit.
HEnvironmental note
Have the used tire sealant bottle disposed of
professionally, e.g. at a qualified specialist
workshop.
!Do not operate the tire inflation compressor
for longer than eight minutes at a time without
a break. It may otherwise overheat.
The tire inflation compressor can be operated
again once it has cooled down.
Comply with the manufacturer’s safety instruc-
tions on the sticker on the tire inflation com-
pressor.
Using the TIREFIT kit
XDo not remove any foreign objects which have
penetrated the tire, e.g. screws or nails.
XRemove the tire sealant bottle, the accompa-
nying TIREFIT sticker and the tire inflation
compressor from the stowage well under-
neath the trunk floor (
Ypage 288).
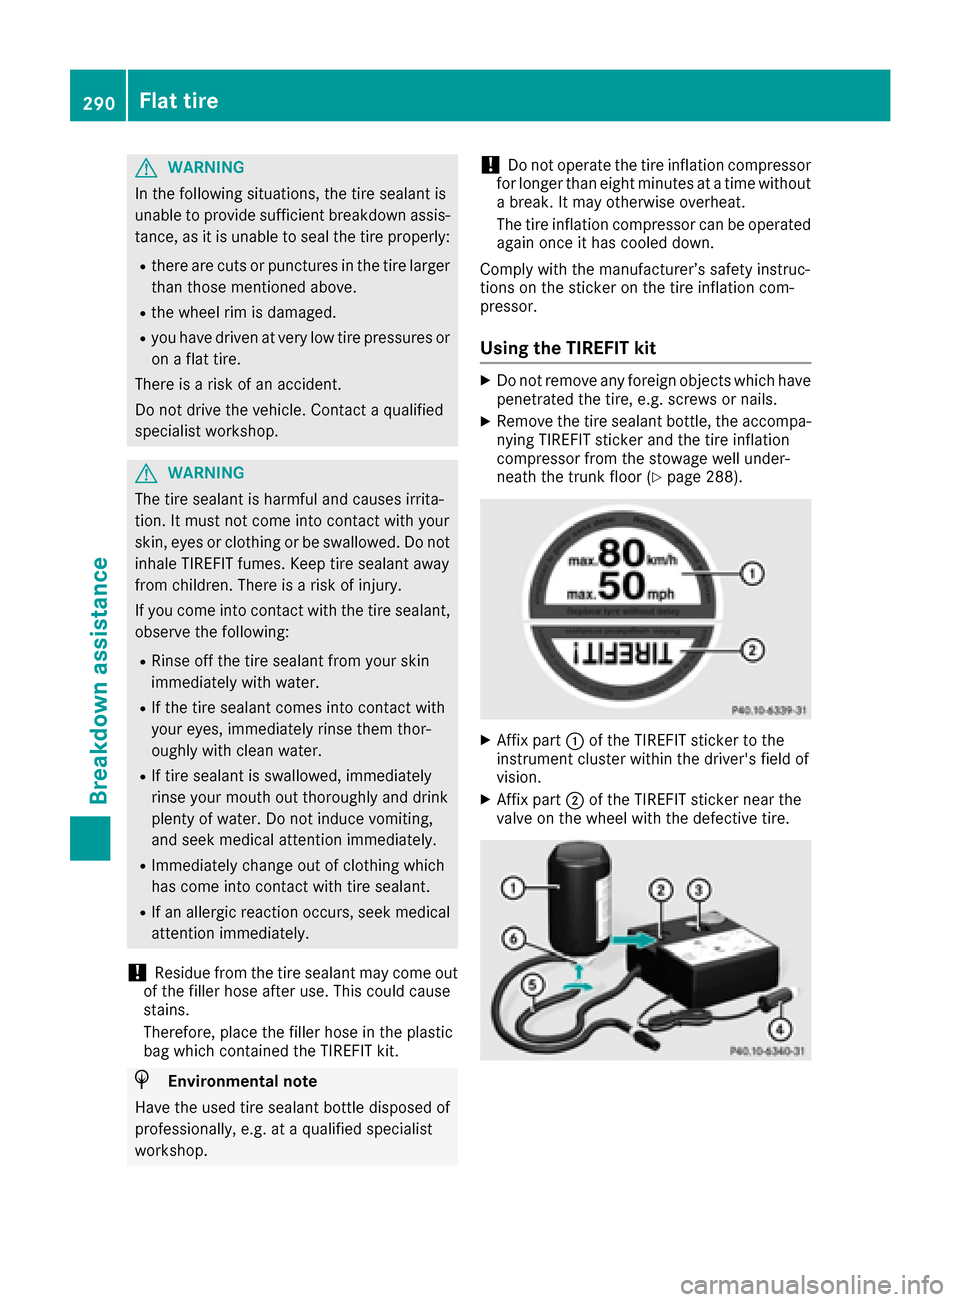
XAffix part 0043of the TIREFIT sticker to the
instrument cluster within the driver's field of
vision.
XAffix part 0044of the TIREFIT sticker near the
valve on the wheel with the defective tire.
290Flat tire
Breakdown assistance
Page 294 of 338
If a tire pressure of 180 kPa (1.8 bar/26 psi) has
been attained after five minutes:
XSwitch off the tire inflation compressor.
XUnscrew the filler hose from the valve of the
faulty tire.
Tire sealant may escape when the filler hose is
unscrewed.
XStow the tire sealant bottle and the tire infla-
tion compressor.
XPull away immediately.
XStop after driving for approximately ten
minutes and check the tire pressure with the
tire inflation compressor.
The tire pressure must now be at least
130 kPa (1.3 bar/19 psi).
GWARNING
If the required tire pressure is not reached
after driving for a short period, the tire is too
badly damaged. The tire sealant cannot repair
the tire in this instance. Damaged tires and a
tire pressure that is too low can significantly
impair the vehicle's braking and driving char-
acteristics. There is a risk of accident.
Do not continue driving. Contact a qualified
specialist workshop.
In cases such as the one mentioned above, con- tact an authorized Mercedes-Benz Center. Or
call 1-800-FOR-MERCedes (in the USA) or
1-800-387-0100 (in Canada).
XCorrect the tire pressure if it is still at least
130 kPa (1.3 bar/19 psi). See the Tire and
Loading Information placard on the B-pillar on
the driver's side or the tire pressure table in
the fuel filler flap for values.
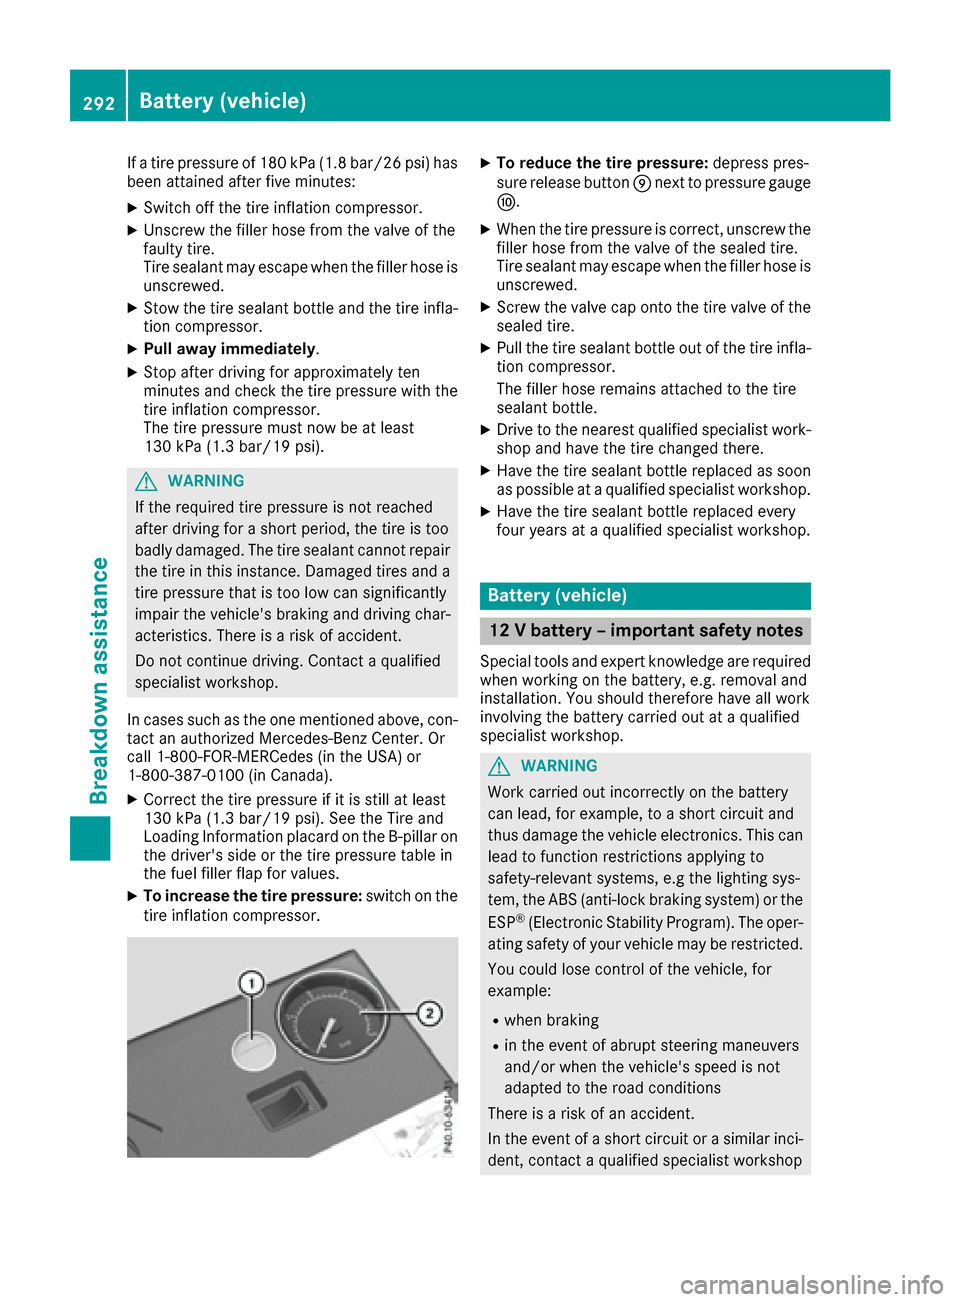
XTo increase the tire pressure: switch on the
tire inflation compressor.
XTo reduce the tire pressure: depress pres-
sure release button 006Dnext to pressure gauge
006E.
XWhen the tire pressure is correct, unscrew the
filler hose from the valve of the sealed tire.
Tire sealant may escape when the filler hose is
unscrewed.
XScrew the valve cap onto the tire valve of the
sealed tire.
XPull the tire sealant bottle out of the tire infla-
tion compressor.
The filler hose remains attached to the tire
sealant bottle.
XDrive to the nearest qualified specialist work-
shop and have the tire changed there.
XHave the tire sealant bottle replaced as soon
as possible at a qualified specialist workshop.
XHave the tire sealant bottle replaced every
four years at a qualified specialist workshop.
Battery (vehicle)
12 V battery – important safety notes
Special tools and expert knowledge are required
when working on the battery, e.g. removal and
installation. You should therefore have all work
involving the battery carried out at a qualified
specialist workshop.
GWARNING
Work carried out incorrectly on the battery
can lead, for example, to a short circuit and
thus damage the vehicle electronics. This can
lead to function restrictions applying to
safety-relevant systems, e.g the lighting sys-
tem, the ABS (anti-lock braking system) or the
ESP
®(Electronic Stability Program). The oper-
ating safety of your vehicle may be restricted.
You could lose control of the vehicle, for
example:
Rwhen braking
Rin the event of abrupt steering maneuvers
and/or when the vehicle's speed is not
adapted to the road conditions
There is a risk of an accident.
In the event of a short circuit or a similar inci-
dent, contact a qualified specialist workshop
292Battery (vehicle)
Breakdown assistance
Page 300 of 338
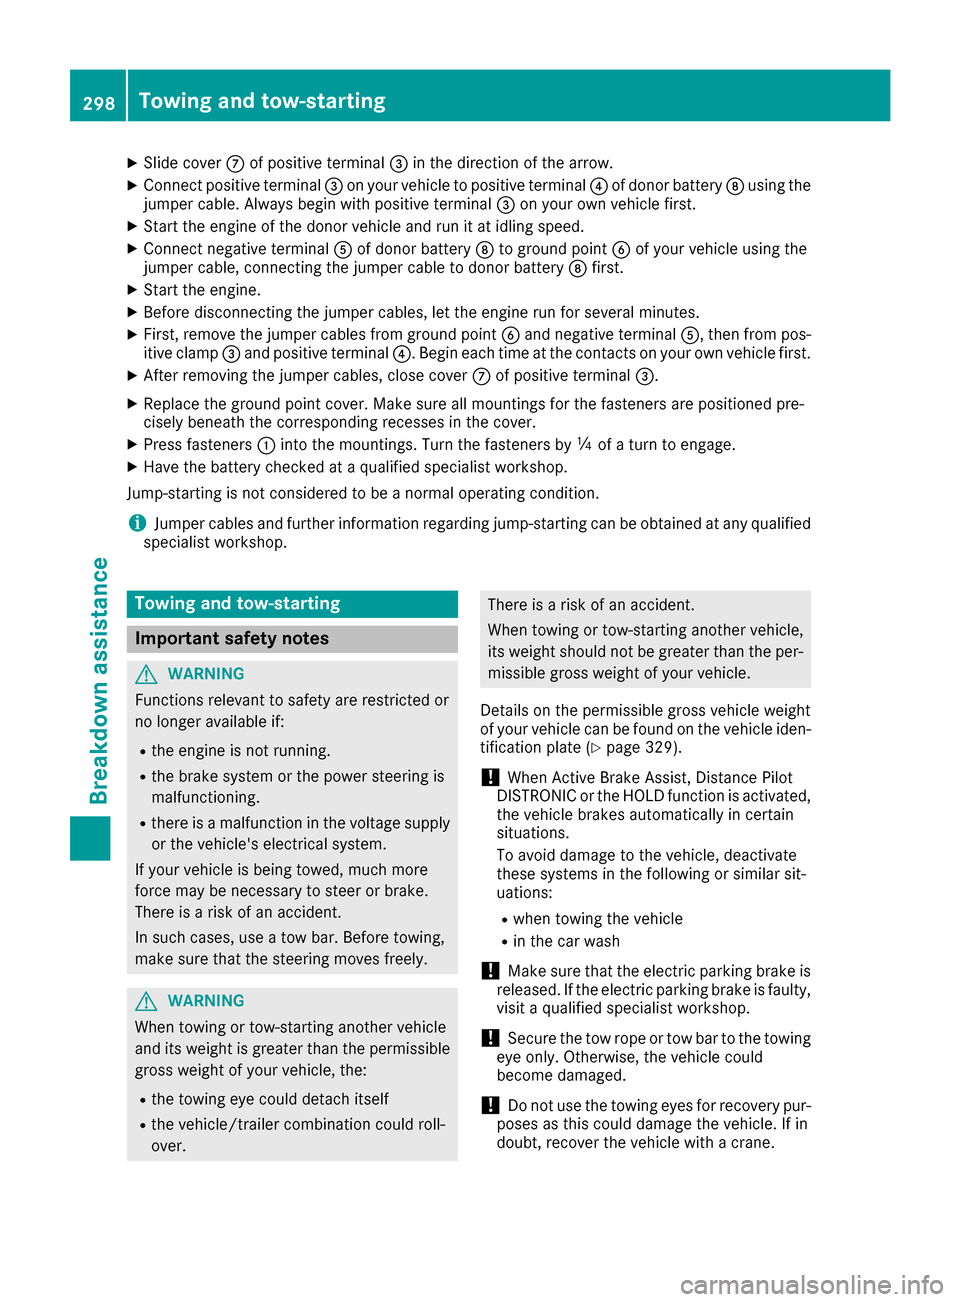
XSlide cover006Bof positive terminal 0087in the direction of the arrow.
XConnect positive terminal 0087on your vehicle to positive terminal 0085of donor battery 006Cusing the
jumper cable. Always begin with positive terminal 0087on your own vehicle first.
XStart the engine of the donor vehicle and run it at idling speed.
XConnect negative terminal 0083of donor battery 006Cto ground point 0084of your vehicle using the
jumper cable, connecting the jumper cable to donor battery 006Cfirst.
XStart the engine.
XBefore disconnecting the jumper cables, let the engine run for several minutes.
XFirst, remove the jumper cables from ground point 0084and negative terminal 0083, then from pos-
itive clamp 0087and positive terminal 0085. Begin each time at the contacts on your own vehicle first.
XAfter removing the jumper cables, close cover 006Bof positive terminal 0087.
XReplace the ground point cover. Make sure all mountings for the fasteners are positioned pre-
cisely beneath the corresponding recesses in the cover.
XPress fasteners0043into the mountings. Turn the fasteners by 00C4of a turn to engage.
XHave the battery checked at a qualified specialist workshop.
Jump-starting is not considered to be a normal operating condition.
iJumper cables and further information regarding jump-starting can be obtained at any qualified
specialist workshop.
Towing and tow-starting
Important safety notes
GWARNING
Functions relevant to safety are restricted or
no longer available if:
Rthe engine is not running.
Rthe brake system or the power steering is
malfunctioning.
Rthere is a malfunction in the voltage supply or the vehicle's electrical system.
If your vehicle is being towed, much more
force may be necessary to steer or brake.
There is a risk of an accident.
In such cases, use a tow bar. Before towing,
make sure that the steering moves freely.
GWARNING
When towing or tow-starting another vehicle
and its weight is greater than the permissible
gross weight of your vehicle, the:
Rthe towing eye could detach itself
Rthe vehicle/trailer combination could roll-
over.
There is a risk of an accident.
When towing or tow-starting another vehicle,
its weight should not be greater than the per- missible gross weight of your vehicle.
Details on the permissible gross vehicle weight
of your vehicle can be found on the vehicle iden-
tification plate (
Ypage 329).
!When Active Brake Assist, Distance Pilot
DISTRONIC or the HOLD function is activated,
the vehicle brakes automatically in certain
situations.
To avoid damage to the vehicle, deactivate
these systems in the following or similar sit-
uations:
Rwhen towing the vehicle
Rin the car wash
!Make sure that the electric parking brake is
released. If the electric parking brake is faulty,
visit a qualified specialist workshop.
!Secure the tow rope or tow bar to the towing
eye only. Otherwise, the vehicle could
become damaged.
!Do not use the towing eyes for recovery pur-
poses as this could damage the vehicle. If in
doubt, recover the vehicle with a crane.
298Towing and tow-starting
Breakdown assistance