2017 MERCEDES-BENZ S-Class COUPE tow
[x] Cancel search: towPage 23 of 338

Sidewall (definition) ....................... 321
Snow chains .................................. 305
Speed rating (definition) ................ 320
Storing ........................................... 322
Structure and characteristics
(definition) ..................................... 319
Summer tires in winter .................. 305
Temperature .................................. 316
TIN (Tire Identification Number)
(definition) ..................................... 321
Tire bead (definition) ...................... 321
Tire pressure (definition) ................ 321
Tire pressures (recommended) ...... 320
Tire size (data) ............................... 326
Tire size designation, load-bearing
capacity, speed rating .................... 316
Tire tread ....................................... 304
Tire tread (definition) ..................... 321
Total load limit (definition) ............. 321
Traction ......................................... 315
Traction (definition) ....................... 321
Tread wear ..................................... 315
Uniform Tire Quality Grading
Standards ...................................... 315
Uniform Tire Quality Grading
Standards (definition) .................... 319
Wear indicator (definition) ............. 321
Wheel and tire combination ........... 326
Wheel rim (definition) .................... 320
see Flat tire
Top Tether ............................................ 60
Touchpad
Changing the station/music
track .............................................. 245
Character suggestions ................... 244
Deleting characters ....................... 245
Entering a space ............................ 245
Entering characters ....................... 244
Gesture control .............................. 244
Handwriting recognition ................ 245
Operating the touchpad ................. 244
Overview ........................................ 244
Quick access for Audio .................. 245
Quick access for telephone ........... 245
Switching ....................................... 244
Switching input line ....................... 245
Tow-starting
Emergency engine starting ............ 300 Important safety notes .................. 298
Towing away
Important safety guidelines ........... 298
Installing the towing eye ................ 299
No
tes for 4MATIC vehicles ............ 300
Removing the towing eye ............... 299
Transporting the vehicle ................ 300
With both axles on the ground ....... 299
Towing eye ......................................... 288
Traffic reports
see also Digital Operator's Man-
ual .................................................. 242
Traffic Sign Assist
Activating ....................................... 176
Display message ............................ 223
Function/notes ............................. 176
Important safety notes .................. 176
Instrument cluster display ............. 177
Switching on/off ........................... 198
Transfer case ..................................... 135
Transmission
see Automatic transmission
Transporting the vehicle .................. 300
Trim pieces (cleaning instruc-
tions) .................................................. 286
Trip computer (on-board com-
puter) .................................................. 191
Trip odometer
Calling up ....................................... 190
Resetting (on-board computer) ...... 191
Trunk
Emergency release .......................... 84
Emergency release button ............... 85
Important safety notes .................... 80
Locking separately ........................... 84
Opening ........................................... 81
Opening/closing (automatically
from inside) ...................................... 83
Opening/closing (automatically
from outside) ................................... 81
Opening/closing (from outside,
HANDS-FREE ACCESS) .................... 82
Power closing .................................. 79
Trunk lid
Display message ............................ 229
Obstacle recognition ........................ 80
Opening dimensions ...................... 335
Index21
Page 24 of 338
Opening/closing .............................. 80
Trunk load (maximum) ......................335
Turn signals
Display message ............................ 215
Switching on/off ........................... 105
Two-way radio
Frequencies ................................... 328
Installation ..................................... 328
Transmission output (maximum) .... 328
Windshield (infrared reflective) ...... 272
Type identification plate
see Vehicle identification plate
U
UnlockingEmergency unlocking ....................... 79
From inside the vehicle (central
unlocking button) .............................7 8
Upshift indicator (on-board com-
puter, Mercedes-AMG vehicles) .......202
USB devices
Connecting to the Media Inter-
face ............................................... 251
V
Vanity mirror (in the sun visor) ........258
Vehicle
Correct use ...................................... 29
Data acquisition ............................... 30
Display message ............................ 227
Equipment ....................................... 26
Individual settings .......................... 197
Limited Warranty .............................3 0
Loading .......................................... 312
Locking (in an emergency) ............... 79
Locking (SmartKey) .......................... 72
Lowering ........................................ 326
Maintenance .................................... 27
Operating safety .............................. 28
Parking .......................................... 137
Parking for a long period ................ 140
Pulling away ................................... 124
Raising ........................................... 323
Reporting problems ......................... 29
Securing from rolling away ............ 322
Towing away .................................. 298 Transporting .................................. 300
Unlocking (in an emergency) ........... 79
Unlocking (SmartKey) ...................... 72
Vehicle data ................................... 335
Vehicle dimensions ........................... 335
Vehicle emergency locking ................ 79
Vehicle identification number
see VIN
Vehicle identification plate .............. 329
Vehicle level
Active Body Control ABC ............... 156
AIRMATIC ...................................... 158
Display message ............................ 219
Vehicle tool kit .................................. 288
Video
Operating the DVD ......................... 195
see also Digital Operator's Man-
ual .................................................. 242
Video-AUX
Connecting an external video
source ............................................ 252
VIN
Type plate ...................................... 329
W
Warning and indicator lampsABS ................................................ 234
Brakes ........................................... 233
Check Engine ................................. 237
Coolant .......................................... 237
Distance warning ........................... 239
ESP
®.............................................. 234
ESP®OFF ....................................... 236
Fuel tank ........................................ 237
General notes ................................ 231
Overview .......................................... 34
Parking brake ................................ 236
PASSENGER AIR BAG ...................... 42
Reserve fuel ................................... 237
Restraint system ............................ 236
Seat belt ........................................ 232
Steering ......................................... 241
Tire pressure monitor .................... 240
Warranty .............................................. 26
Washer fluid
Display message ............................ 230
22Index
Page 31 of 338
Diagnostics connection
The diagnosticsconnection is only intended fo r
th econnection of diagnostic equipmen tat a
qualified specialis tworkshop .
GWARNING
If you connec tequipmen tto adiagnostic s
connection in th evehicle, it may affec tth e
operation of vehicle systems .As aresult ,th e
operatin gsafet yof th evehicle could be affec -
ted. There is aris kof an accident.
Only connec tequipmen tto adiagnostic scon-
nection in th evehicle, whic his approved fo r
your vehicle by Mercedes-Benz.
GWARNING
Objects in th edriver's footwell can restric tth e
peda ltrave lor obstruct adepressed pedal.
The operatin gand road safet yof th evehicle is
jeopardized. There is aris kof an accident.
Mak esur ethat all objects in th evehicle are
stowed correctly, and that they canno tente r
th edriver's footwell. Install th efloormat s
securely and as specifie din order to ensur e
sufficien tclearanc efo rth epedals. Do no tuse
loose floormat sand do no tplac efloormat son
to pof on eanother.
!If th eengin eis switched of fand equipmen t
on th ediagnostic sconnection is used ,th e
starter battery may discharge.
Connectin gequipmen tto th ediagnostic scon-
nection can lead to emission smonitorin ginfor-
mation bein greset ,fo rexample. Thi smay lead
to th evehicle failin gto mee tth erequirements of
th enext emission stest durin gth emain inspec-
tion .
Qualified specialist workshop
An authorized Mercedes-Ben zCente ris aquali-
fie dspecialis tworkshop .It has th enecessary
specialis tknowledge ,tools and qualification sto
correctl ycarry out th ewor krequire don your
vehicle. Thi sis especially th ecas efo rwor krel -
evant to safety.
Observ eth enote sin th eMaintenance Booklet .Always hav
eth efollowin gwor kcarrie dout at an
authorized Mercedes-Ben zCenter:
Rwor krelevant to safet y
Rserviceand maintenance wor k
Rrepair work
Ralterations, installation wor kand modifica-
tion s
Rworkon electronic component s
Correct use
If you remov eany warnin gstickers ,you or oth-
ers could fail to recogniz ecertain dangers.
Leave warnin gstickers in position .
Observ eth efollowin ginformation when drivin g
your vehicle:
Rth esafet ynote sin this manual
Rtechnical dat afo rth evehicle
Rtraffic rule sand regulation s
Rlaws and safetystandard spertainin gto moto r
vehicles
Problem swit hyou rvehicle
If you should experience aproblem wit hyour
vehicle, particularly on ethat you believe may
affec tit s saf eoperation ,we urg eyou to contact
an authorized Mercedes-Ben zCente rimmedi-
ately to hav eth eproblem diagnosed and recti -
fied. If th eproblem is no tresolved to your sat -
isfaction ,please discus sth eproblem again wit h
an authorized Mercedes-Ben zCente ror ,if nec-
essary, contact us at on eof th efollowin g
addresses.
In th eUSA
Customer Assistanc eCente r
Mercedes-Ben zUSA, LL C
3 Mercedes Drive
Montvale, NJ 07645-0350
In Canad a
Customer Relation sDepartmen t
Mercedes-Ben zCanada, Inc.
98 Vanderhoo fAvenue
Toronto ,Ontario M4 G4C9
Reporting safet ydefect s
USAonly:
Operating safety29
Introduction
Z
Page 42 of 338
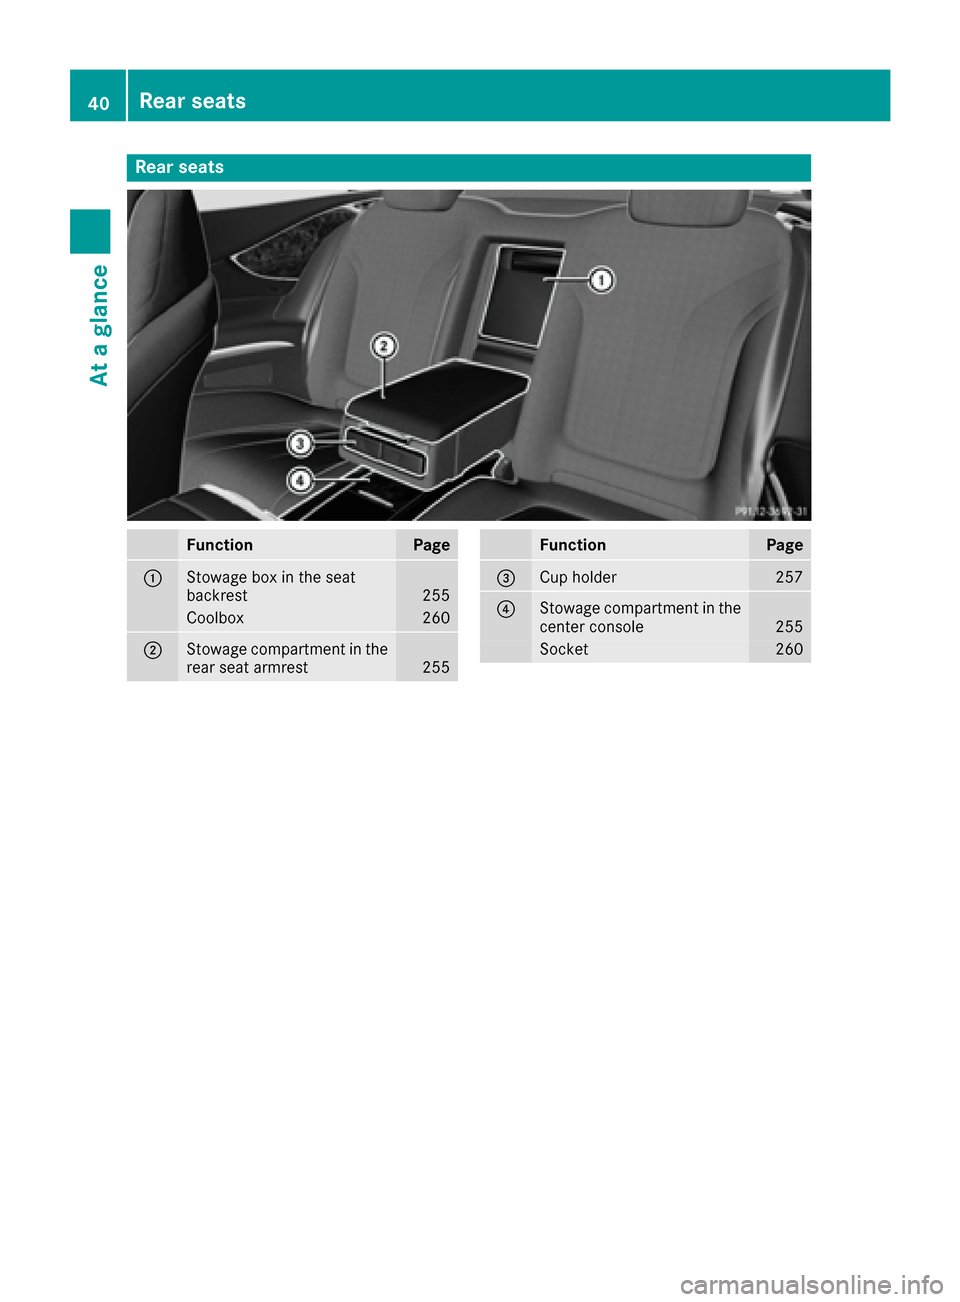
Rear seats
FunctionPage
0043Stowage box in the seat
backrest255
Coolbox260
0044Stowage compartment in the
rear seat armrest255
FunctionPage
0087Cup holder257
0085Stowage compartment in the
center console255
Socket260
40Rear seats
At a glance
Page 56 of 338
tection in an accident. There is an increased
risk of injury.
Have the vehicle towed to a qualified special-
ist workshop in order to have a deployed air
bag replaced.
It is important for your safety and that of your
passenger to have deployed air bags replaced
and to have any malfunctioning air bags
repaired. This will help to make sure the air bags
continue to perform their protective function for
the vehicle occupants in the event of a crash.
GWARNING
Emergency Tensioning Devices that have
deployed pyrotechnically are no longer opera-
tional and are unable to perform their inten-
ded protective function. This poses an
increased risk of injury or even fatal injury.
Have pyrotechnically triggered Emergency
Tensioning Devices replaced immediately at a
qualified specialist workshop.
An electric motor is used by PRE-SAFE
®to trig-
ger the tightening of the seat belt in hazardous
situations. This procedure is reversible.
If Emergency Tensioning Devices are triggered
or air bags are deployed, you will hear a bang,
and a small amount of powder may also be
released. The 0075restraint system warning
lamp lights up.
Only in rare cases will the bang affect your hear-
ing. The powder that is released generally does
not constitute a health hazard, but it may cause short-term breathing difficulties in people with
asthma or other respiratory problems. Provided
it is safe to do so, you should leave the vehicle
immediately or open the window in order to pre-
vent breathing difficulties.
Air bags and pyrotechnic Emergency Tensioning
Devices (ETDs) conta in p
erchlorate material,
which may require special handling and regard
for the environment. National guidelines must
be observed during disposal. In California, see
www.dtsc.ca.gov/HazardousWaste/
Perchlorate/index.cfm.
Method of operation
During the first stage of a collision, the restraint
system control unit evaluates important physi-
cal data relating to vehicle deceleration or accel-
eration, such as:
Rduration
Rdirection
Rintensity
Based on the evaluation of this data, the
restraint system control unit triggers the Emer-
gency Tensioning Devices during a frontal or
rear collision.
An Emergency Tensioning Device can only be
triggered, if:
Rthe ignition is switched on
Rthe components of the restraint system are
operational. You can find further information
under: "Restraint system warning lamp"
(
Ypage 42)
Rthe belt tongue is engaged in the buckle on
the respective front-passenger seat
The Emergency Tensioning Devices in the rear
compartment are triggered independently of the
lock status of the seat belts.
If the restraint system control unit detects a
more severe accident, further components of
the restraint system are activated independ-
ently of each other in certain frontal collision
situations:
RFront air bags as well as driver's and front-
passenger knee bags
RWindow curtain air bag, if the system deter-
mines that deployment can offer additional
protecti on to th
at provided by the seat belt
The front-passenger front air bag is activated or
deactivated depending on the person on the
front-passenger seat. The front-passenger front
air bag can only deploy in an accident if the
PASSENGER AIR BAG OFF indicator lamp is off.
Observe the information on the PASSENGER AIR
BAG indicator lamps (
Ypage 42).
Your vehicle has two-stage front air bags. During
the first deployment stage, the front air bag is
filled with propellant gas to reduce the risk of
injuries. The front air bag is fully deployed with
the maximum amount of propellant gas if a sec- ond deployment threshold is reached within a
few milliseconds.
The activation threshold of the Emergency Ten-
sioning Devices and the air bag are determined by evaluating the rate of vehicle deceleration or
54Occupant safety
Safety
Page 60 of 338
secured properly. The special seat belt retrac-tor is disabled and the inertia real draws in a
portion of the seat belt. The seat belt cannot
be immediately refastened. There is an
increased risk of injury, possibly even fatal.
Stop the vehicle immediately, paying atten-
tion to road and traffic conditions. Reactivate
the special seat belt retractor and secure the
child restraint system properly.
All seat belts except the driver's seat belt are
equipped with a special seat belt retractor.
When activated, the special seat belt retractor
ensures that the seat belt will not slacken once
the child restraint system has been secured.
Installing a child restraint system:
XAlways comply with the child restraint system
manufacturer's installation instructions.
XPull the front seat belt smoothly out of the
seat-belt extender and the rear seat belt out
of the belt outlet.
XEngage the seat belt tongue in the belt buckle.
Activating the special seat belt retractor:
XPull the seat belt out fully and let the inertia
reel retract it again.
While the seat belt is retracting, you should
hear a ratcheting sound. The special seat belt
retractor is activated.
XPush the child seat restraint system down so
that the seat belt is tight and does not loosen.
Removing a child restraint system and deacti-
vating the special seat belt retractor:
XAlways comply with the child restraint system
manufacturer's installation instructions.
XPress the release button of the belt buckle,
hold the belt tongue firmly and guide it back to
the seat-belt extender in the front and the belt
outlet in the rear.
The special seat belt retractor is deactivated.
Child restraint system
The use of seat belts and child restraint systems
is required by law in:
Rall 50 states
Rthe U.S. territories
Rthe District of Columbia
Rall Canadian provinces You can obtain further information about the
correct child restraint system from any author-
ized Mercedes-Benz Center.
GWARNING
If the child restraint system is installed incor-
rectly on a suitable seat, it cannot protect as
intended. The child cannot then be restrained
in the event of an accident, heavy braking or
sudden changes of direction. There is an
increased risk of injury, possibly even fatal.
Make sure that you observe the child restraint
system manufacturer's installation instruc-
tions and the notes on use. Please ensure,
that the base of the child restraint system is
always resting completely on the seat cush-
ion. Never place objects, e.g. cushions, under or behind the child restraint system. Only use
child restraint systems with the original cover
designed for them. Only replace damaged
covers with genuine covers.
GWARNING
If the child restraint system is installed incor-
rectly or is not secured, it can come loose in
the event of an accident, heavy braking or a
sudden change in direction. The child
restraint system could be thrown about, strik-
ing vehicle occupants. There is an increased
risk of injury, possibly even fatal.
Always install child restraint systems prop-
erly, even if they are not being used. Make
sure that you observe the child restraint sys-
tem manufacturer's installation instructions.
You will find further information on stowing
objects, luggage or loads under "Loading guide-
lines" (
Ypage 253).
GWARNING
Child restraint systems or their securing sys-
tems which have been damaged or subjected
to a load in an accident can no longer protect
as intended. The child cannot then be
restrained in the event of an accident, heavy
braking or sudden changes of direction. There is an increased risk of injury, possibly even
fatal.
58Children in the vehicle
Safety
Page 81 of 338
If a locked door is opened from the inside, the
previous unlock status of the vehicle will be
taken into consideration if:
Rthe vehicle was locked using the locking but-
ton for the central locking, or
Rif the vehicle was locked automatically
The vehicle will be fully unlocked if it had previ-
ously been fully unlocked. If only the driver's
door had been previously unlocked, only the
door which has been opened from the inside is
unlocked.
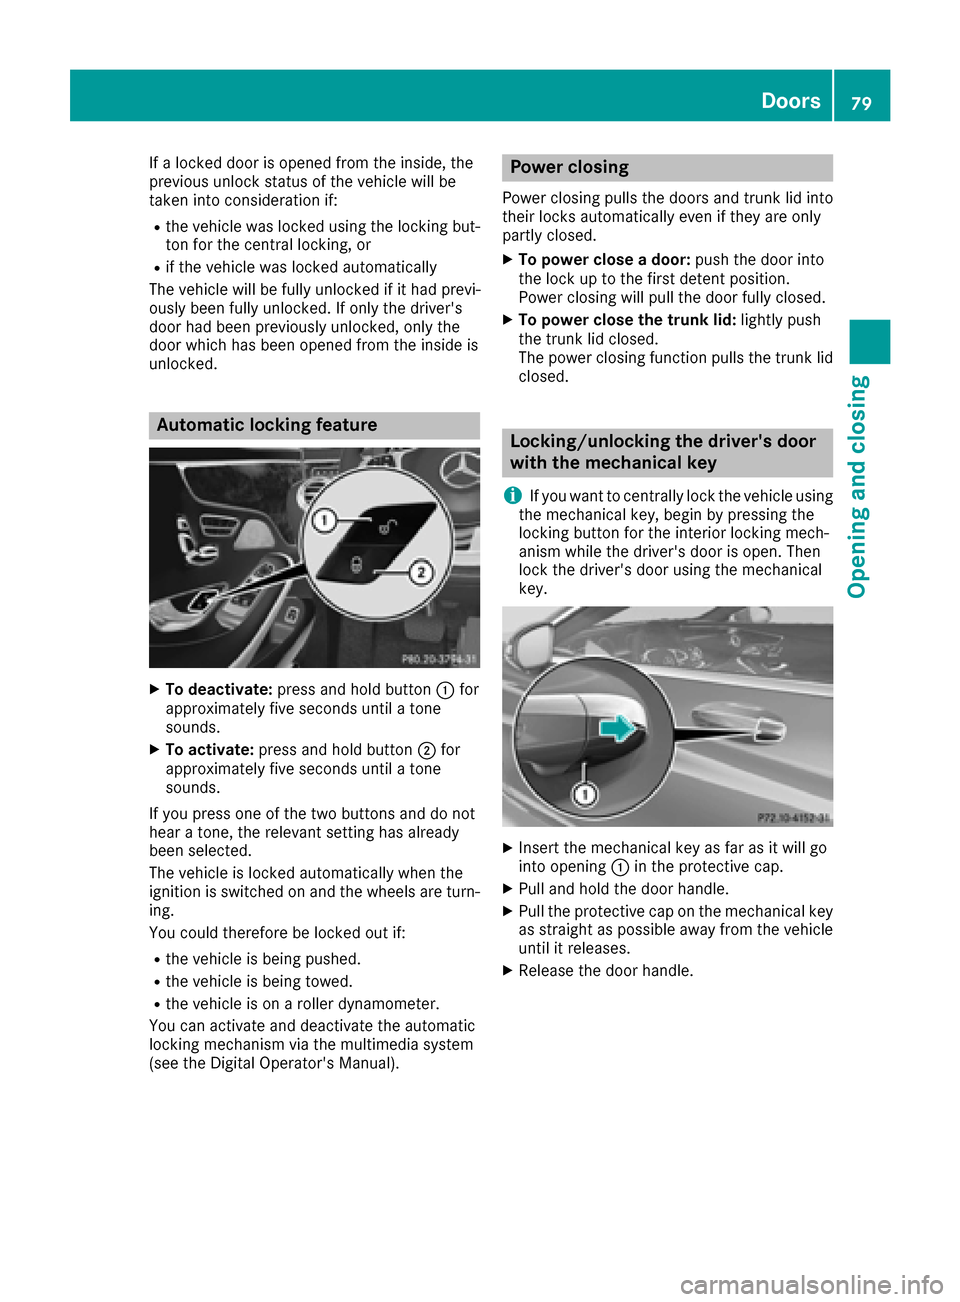
Automatic locking feature
XTo deactivate: press and hold button 0043for
approximately five seconds until a tone
sounds.
XTo activate: press and hold button 0044for
approximately five seconds until a tone
sounds.
If you press one of the two buttons and do not
hear a tone, the relevant setting has already
been selected.
The vehicle is locked automatically when the
ignition is switched on and the wheels are turn-
ing.
You could therefore be locked out if:
Rthe vehicle is being pushed.
Rthe vehicle is being towed.
Rthe vehicle is on a roller dynamometer.
You can activate and deactivate the automatic
locking mechanism via the multimedia system
(see the Digital Operator's Manual).
Power closing
Power closing pulls the doors and trunk lid into
their locks automatically even if they are only
partly closed.
XTo power close a door: push the door into
the lock up to the first detent position.
Power closing will pull the door fully closed.
XTo power close the trunk lid: lightly push
the trunk lid closed.
The power closing function pulls the trunk lid
closed.
Locking/unlocking the driver's door
with the mechanical key
i
If you want to centrally lock the vehicle using
the mechanical key, begin by pressing the
locking button for the interior locking mech-
anism while the driver's door is open. Then
lock the driver's door using the mechanical
key.
XInsert the mechanical key as far as it will go
into opening 0043in the protective cap.
XPull and hold the door handle.
XPull the protective cap on the mechanical key
as straight as possible away from the vehicle
until it releases.
XRelease the door handle.
Doors79
Opening and closing
Z
Page 122 of 338

Notes on breaking-in a new vehicle
Important safety notes
The sensor system of some driving and driving
safety systems adjusts automatically while a
certain distance is being driven after the vehiclehas been delivered or after repairs. Full system
effectiveness is not reached until the end of this
teach-in procedure.
New and replaced brake pads and discs only
reach their optimum braking effect after several hundred kilometers of driving. Compensate for
this by applying greater force to the brake pedal.
The first 1000 miles (1500 km)
The more you look after the engine when it is
new, the more satisfied you will be with its per-
formance in the future.
RYou should therefore drive at varying vehicle
and engine speeds for the first 1000 miles
(1500 km).
RAvoid heavy loads, e.g. driving at full throttle,during this period.
RWhen shifting gears manually, upshift in good
time, before the tachometer needle reaches
00C3 of the way to the red area of the tachom-
eter.
RDo not manually shift to a lower gear to brake
the vehicle.
RTry to avoid depressing the accelerator pedal
beyond the point of resistance (kickdown).
RAll vehicles (except Mercedes-AMG vehi-
cles): ideally, for the first 1,000 miles
(1,500 km), drive in drive program E.
Additional breaking-in notes for Mercedes-AMG vehicles:
RDo not drive faster than 85 mph (140 km/h)
for the first 1,000 miles (1,500 km).
ROnly allow the engine to reach a maximum
engine speed of 4,500 rpm briefly.
RChange gear in good time.
RIdeally, for the first 1,000 miles (1,500 km),
drive in program C.
After 1000 miles (1500 km),you can incre
ase
th eengin espeed gradually and accelerate th e
vehicl eto full speed.
You should also observ ethese note son break-
in g in if th eengin eor part sof th edrive train on
your vehicl ehav ebeen replaced. Always observ
eth emaximum permissibl e
speed.
Driving
Imp ortant safety notes
GWARNIN G
Objects in th edriver's footwell can restrict th e
pedal travel or obstruct adepressed pedal .
The operating and roa dsafet yof th evehicl eis
jeopardized. There is aris kof an accident.
Mak esur ethat all objects in th evehicl eare
stowed correctly, and that they canno tente r
th edriver's footwell. Install th efloormats
securel yand as specified in order to ensur e
sufficien tclearance for th epedals. Do no tuse
loos efloormats and do no tplac efloormats on
to pof on eanother.
GWARNIN G
Unsuitable footwear can hinder correc tusage
of th epedals, e.g. :
Rshoes withthick sole s
Rshoes withhigh heels
Rslipper s
There is aris kof an accident.
Wear suitable footwear to ensur ecorrec t
usage of th epedals.
GWARNIN G
If you switch off th eignition while driving,
safety-relevant function sare only available
wit hlimitations, or no tat all. This could affect,
for example, th epowe rsteerin gand th ebrak e
boostin geffect. You will require considerably
mor eeffort to steer and brake. There is aris k
of an accident.
Do no tswitch off th eignition while driving.
GWARNIN G
If th eparkin gbrak ehas no tbeen full y
release dwhen driving, th eparkin gbrak ecan :
Roverheat and caus e afire
Rlose it shold function .
120Driving
Driving and parking