2017 MERCEDES-BENZ S-Class COUPE seat memory
[x] Cancel search: seat memoryPage 95 of 338
0083Seat cushion length
0084Seat fore-and-aft adjustment
006BBackrest angle
iIf PRE-SAFE®is triggered, the front-
passenger seat will be moved to a better posi- tion if it was previously in an unfavorable posi-
tion (
Ypage 55).
iYou can store the seat settings using the
memory function (Ypage 103).
iTo ensure the largest possible range of seat
settings, certain seat adjustment functions
will also adjust other settings.
iThe head restraint height is adjusted auto-
matically when you adjust the seat height or
the seat fore-and-aft position.
Adjusting the front-passenger seat
from the driver’s seat
Important safety notes
GWARNING
When you adjust a seat, you or other vehicle
occupants could become trapped, e.g. on the seat guide rail. There is a risk of injury.
Make sure when adjusting a seat that no one
has any body parts in the sweep of the seat.
Observe the safety notes on "Air bags"
(
Ypage 46) and "Children in the Vehicle"
(Ypage 57).
GWARNING
The front-air bags for could also injure the
vehicle occupants in the front If the front
seats are positioned too close to the dash-
board or steering wheel. This poses an
increased risk of injury or even fatal injury.
Always adjust the front seats so that they are
as far from the front air bags as possible. Also
observe the notes on the correct adjustment
of the seats.
GWARNING
Children could become trapped if they adjust
the seats, particularly when unattended.
There is a risk of injury.
When leaving the vehicle, always take the
SmartKey with you and lock the vehicle. Never
leave children unsupervised in the vehicle.
!Do not move the front-passenger seat fully
forwards if there are objects in the parcel net
in the front-passenger footwell. The objects
could otherwise be damaged.
Adjusting the front-passenger seat
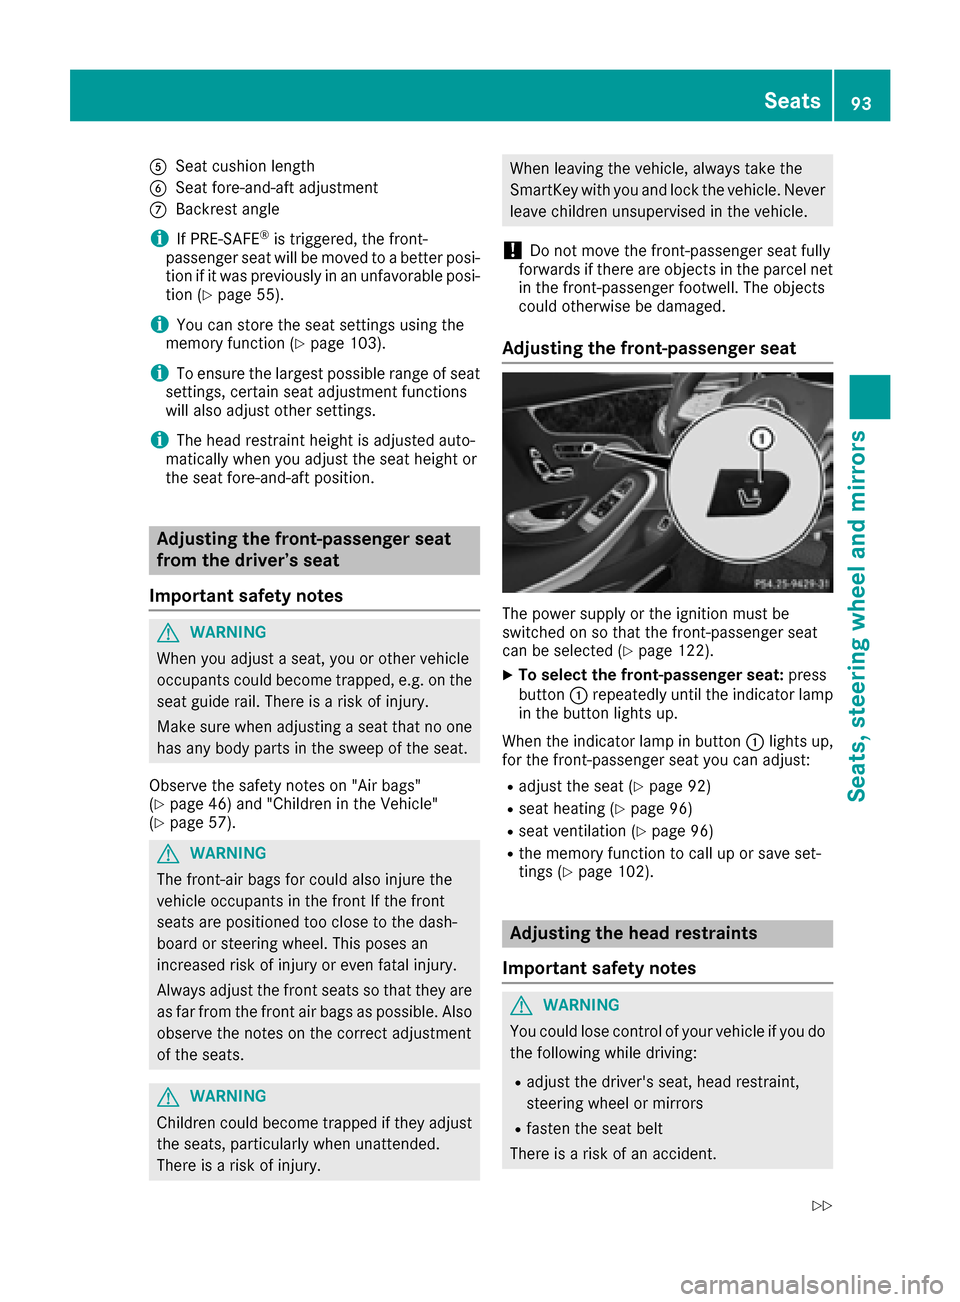
The power supply or the ignition must be
switched on so that the front-passenger seat
can be selected (
Ypage 122).
XTo select the front-passenger seat: press
button 0043repeatedly until the indicator lamp
in the button lights up.
When the indicator lamp in button 0043lights up,
for the front-passenger seat you can adjust:
Radjust the seat (Ypage 92)
Rseat heating (Ypage 96)
Rseat ventilation (Ypage 96)
Rthe memory function to call up or save set-
tings (Ypage 102).
Adjusting the head restraints
Important safety notes
GWARNING
You could lose control of your vehicle if you do the following while driving:
Radjust the driver's seat, head restraint,
steering wheel or mirrors
Rfasten the seat belt
There is a risk of an accident.
Seats93
Seats, steering wheel and mirrors
Z
Page 101 of 338
Problems with the steering wheel heating
ProblemPossible causes/consequences and0050Solutions
The steering wheel heat-
ing has switched off pre-
maturely or cannot be
switched on.The on-board voltage is too low because too many electrical consum-
ers are switched on.
XSwitch off electrical consumers that you do not need, such as the
rear window defroster or interior lighting.
EASY-ENTRY/EXIT feature
Important safety notes
GWARNING
When the EASY-ENTRY/EXIT feature adjusts
the steering wheel and the driver's seat, you
and other vehicle occupants – particularly
children – could become trapped. There is a
risk of injury.
While the EASY-ENTRY/EXIT feature is mak-
ing adjustments, make sure that no one has
any body parts in the sweep of the seat and
the steering wheel.
If there is a risk of becoming trapped by
Rthe steering wheel: move the steering
wheel adjustment lever.
Rthe seat: press the switch for seat adjust-
ment.
The adjustment process is stopped.
You can stop the adjustment process by press-
ing one of the memory function's position but-
tons. This function is only available on vehicles
with memory function.
GWARNING
If children activate the EASY-ENTRY/EXIT fea-
ture, they can become trapped, particularly
when unattended. There is a risk of injury.
When leaving the vehicle, always take the
SmartKey with you and lock the vehicle. Never
leave children unsupervised in the vehicle.
GWARNING
If you drive off while the EASY-ENTRY/EXIT
feature is making adjustments, you could lose
control of the vehicle. There is a risk of an
accident.
Always wait until the adjustment process is
complete before driving off.
The EASY-ENTRY/EXIT feature makes getting in
and out of your vehicle easier.
You can activate and deactivate the EASY-
ENTRY/EXIT feature using the multimedia sys-
tem (see the Digital Operator's Manual).
Position of the steering wheel and the
driver's seat when the EASY-ENTRY/
EXIT feature is active
The steering wheel tilts upwards and the driver's seat moves backwards if you:
Rremove the SmartKey from the ignition lock
Rwith the start/stop button: open the driv-
er's door; the ignition must be switched off
Rwith the SmartKey: open the driver's door;
the SmartKey must be in position 0or 1in the
ignition lock (
Ypage 121)
iThe steering wheel only tilts upwards and
the driver's seat only moves backwards if the
driving position is stored after the seat or
steering column has been adjusted.
The last position of the steering wheel or seat is
stored if:
Rthe ignition is switched off
Rthe setting is stored with the memory function
(Ypage 103).
iThe steering wheel only moves upwards if it
has not already reached the upper stop. The
driver's seat only moves backwards if it is not
already in the rearmost position.
Steering wheel99
Seats, steering wheel and mirrors
Z
Page 102 of 338
Position of the steering wheel and the
driver's seat for driving
The steering wheel and the driver's seat are
moved to the previously set position if:
Rthe driver's door is closed and you insert the
SmartKey into the ignition lock
Ryou close the driver's door when the ignition
is switched on
Ryou press the Start/Stop button once
iThe steering wheel and the driver's seat only
return to the last set position if the driving
position is stored after the seat or steering
column has been adjusted.
The last position of the steering wheel or seat is
stored if:
Rthe ignition is switched off
Rthe setting is stored with the memory function
(Ypage 103).
Crash-responsive EASY-EXIT feature
If the crash-responsive EASY-EXIT feature is trig-
gered in an accident, the steering column will
move upwards when the driver's door is opened
or the SmartKey is removed from the ignition
lock. This makes it easier to exit the vehicle and rescue the occupants.
The crash-responsive EASY-EXIT feature is only
operational if the EASY-EXIT/ENTRY feature is
activated in the multimedia system (see the sep-
arate Operator's Manual).
Mirrors
Exterior mirrors
Important safety notes
GWARNING
You could lose control of your vehicle if you do the following while driving:
Radjust the driver's seat, head restraint,
steering wheel or mirrors
Rfasten the seat belt
There is a risk of an accident.
Adjust the driver's seat, head restraint, steer- ing wheel and mirror and fasten your seat belt
before starting the engine.
GWARNING
The exterior mirror on the front-passenger
side reduces the size of the image. Visible
objects are actually closer than they appear.
This means that you could misjudge the dis-
tance from road users traveling behind, e.g.
when changing lane. There is a risk of an acci-
dent.
For this reason, always make sure of the
actual distance from the road users traveling
behind by glancing over your shoulder.
Adjusting the exterior mirrors
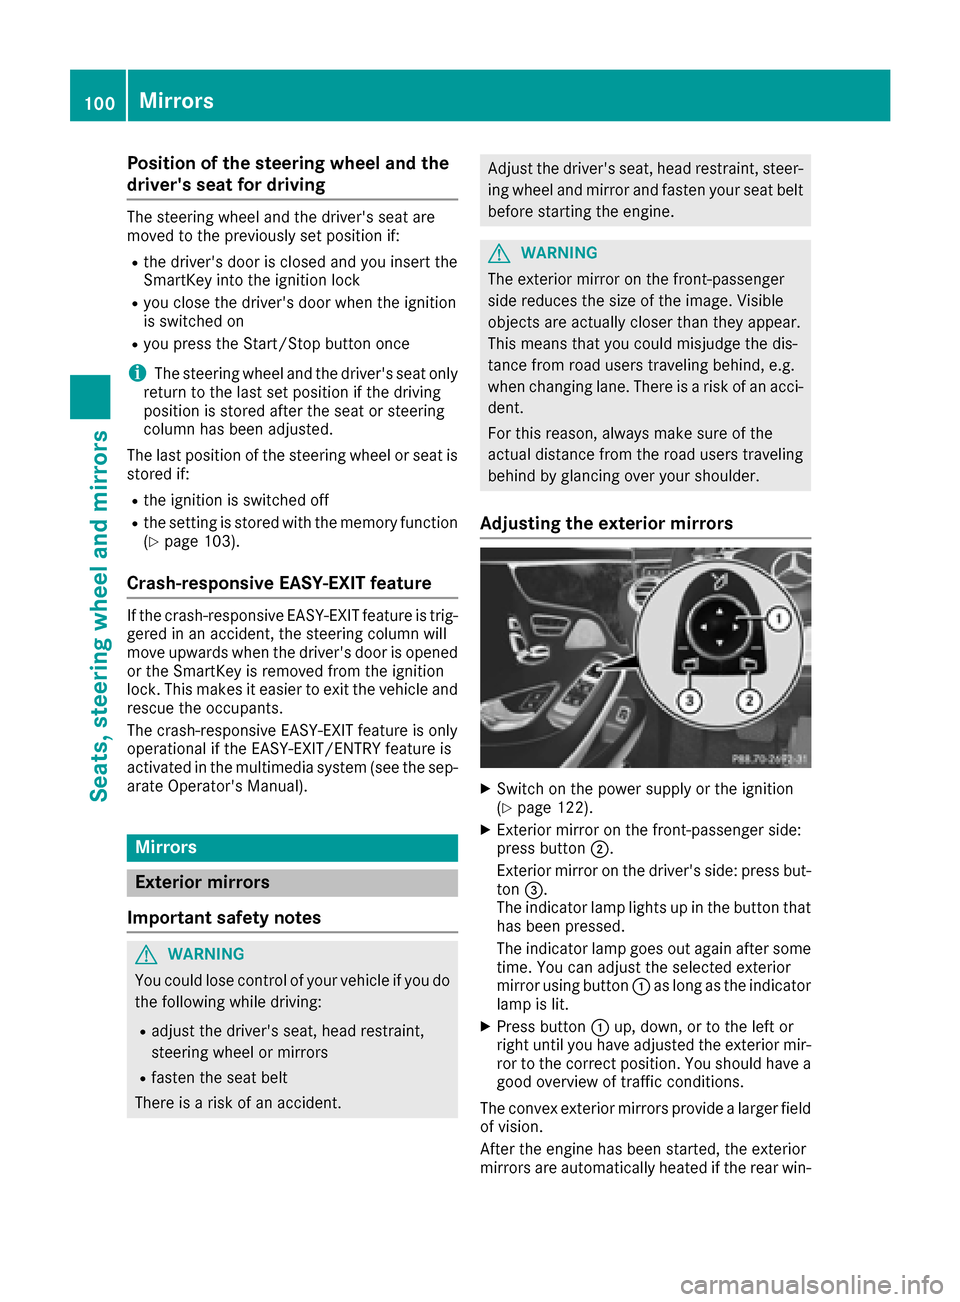
XSwitch on the power supply or the ignition
(Ypage 122).
XExterior mirror on the front-passenger side:
press button 0044.
Exterior mirror on the driver's side: press but-
ton 0087.
The indicator lamp lights up in the button that
has been pressed.
The indicator lamp goes out again after some
time. You can adjust the selected exterior
mirror using button 0043as long as the indicator
lamp is lit.
XPress button 0043up, down, or to the left or
right until you have adjusted the exterior mir- ror to the correct position. You should have a
good overview of traffic conditions.
The convex exterior mirrors provide a larger field of vision.
After the engine has been started, the exterior
mirrors are automatically heated if the rear win-
100Mirrors
Seats, steering wheel and mirrors
Page 104 of 338
The mirrors do not go into anti-glare mode if
reverse gear is engaged or if the interior lighting
is switched on.
Parking position for the exterior mir-
ror on the front-passenger side
Setting and storing the parking position
You can set the front-passenger side exterior
mirror such that you can see the rear wheel on
that side as soon as you engage reverse gear.
You can store this position.
Storing using reverse gear
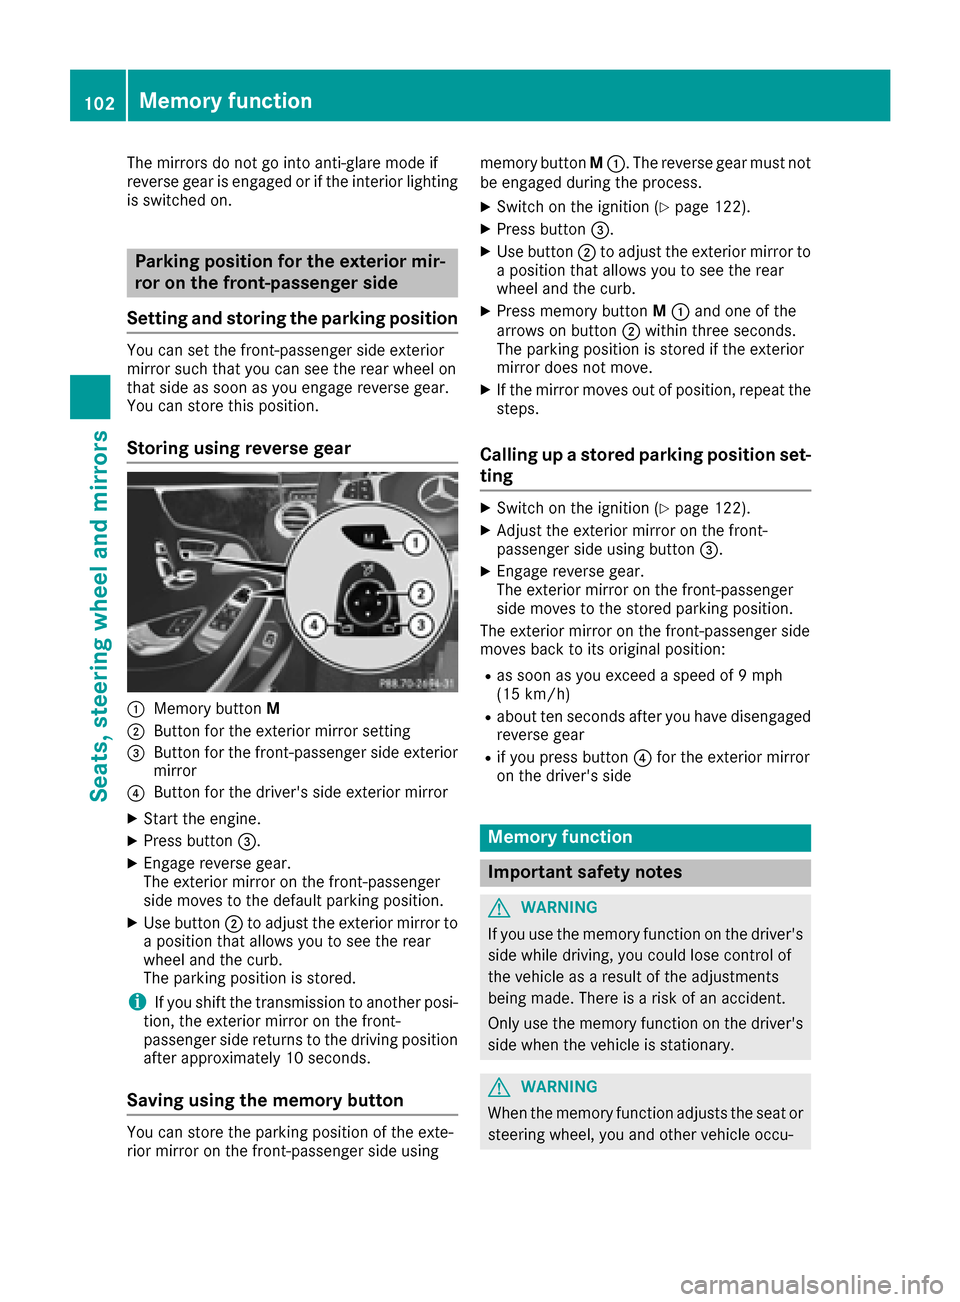
0043Memory button M
0044Button for the exterior mirror setting
0087Button for the front-passenger side exterior
mirror
0085Button for the driver's side exterior mirror
XStart the engine.
XPress button0087.
XEngage reverse gear.
The exterior mirror on the front-passenger
side moves to the default parking position.
XUse button0044to adjust the exterior mirror to
a position that allows you to see the rear
wheel and the curb.
The parking position is stored.
iIf you shift the transmission to another posi-
tion, the exterior mirror on the front-
passenger side returns to the driving position
after approximately 10 seconds.
Saving using the memory button
You can store the parking position of the exte-
rior mirror on the front-passenger side using memory button
M0043. The reverse gear must not
be engaged during the process.
XSwitch on the ignition (Ypage 122).
XPress button 0087.
XUse button0044to adjust the exterior mirror to
a position that allows you to see the rear
wheel and the curb.
XPress memory button M0043 and one of the
arrows on button 0044within three seconds.
The parking position is stored if the exterior
mirror does not move.
XIf the mirror moves out of position, repeat the
steps.
Calling up a stored parking position set-
ting
XSwitch on the ignition (Ypage 122).
XAdjust the exterior mirror on the front-
passenger side using button 0087.
XEngage reverse gear.
The exterior mirror on the front-passenger
side moves to the stored parking position.
The exterior mirror on the front-passenger side
moves back to its original position:
Ras soon as you exceed a speed of 9 mph
(15 km/h)
Rabout ten seconds after you have disengaged
reverse gear
Rif you press button 0085for the exterior mirror
on the driver's side
Memory function
Important safety notes
GWARNING
If you use the memory function on the driver's side while driving, you could lose control of
the vehicle as a result of the adjustments
being made. There is a risk of an accident.
Only use the memory function on the driver's
side when the vehicle is stationary.
GWARNING
When the memory function adjusts the seat or steering wheel, you and other vehicle occu-
102Memory function
Seats, steering wheel and mirrors
Page 105 of 338
pants – particularly children – could become
trapped. There is a risk of injury.
While the memory function is making adjust-
ments, make sure that no one has any body
parts in the sweep of the seat or steering
wheel. If somebody becomes trapped, imme-diately release the memory function position
button. The adjustment process is stopped.
GWARNING
Children could become trapped if they acti-
vate the memory function, particularly when
unattended. There is a risk of injury.
When leaving the vehicle, always take the
SmartKey with you and lock the vehicle. Never
leave children unsupervised in the vehicle.
The memory function can be used at any time,
even if the power supply is switched off.
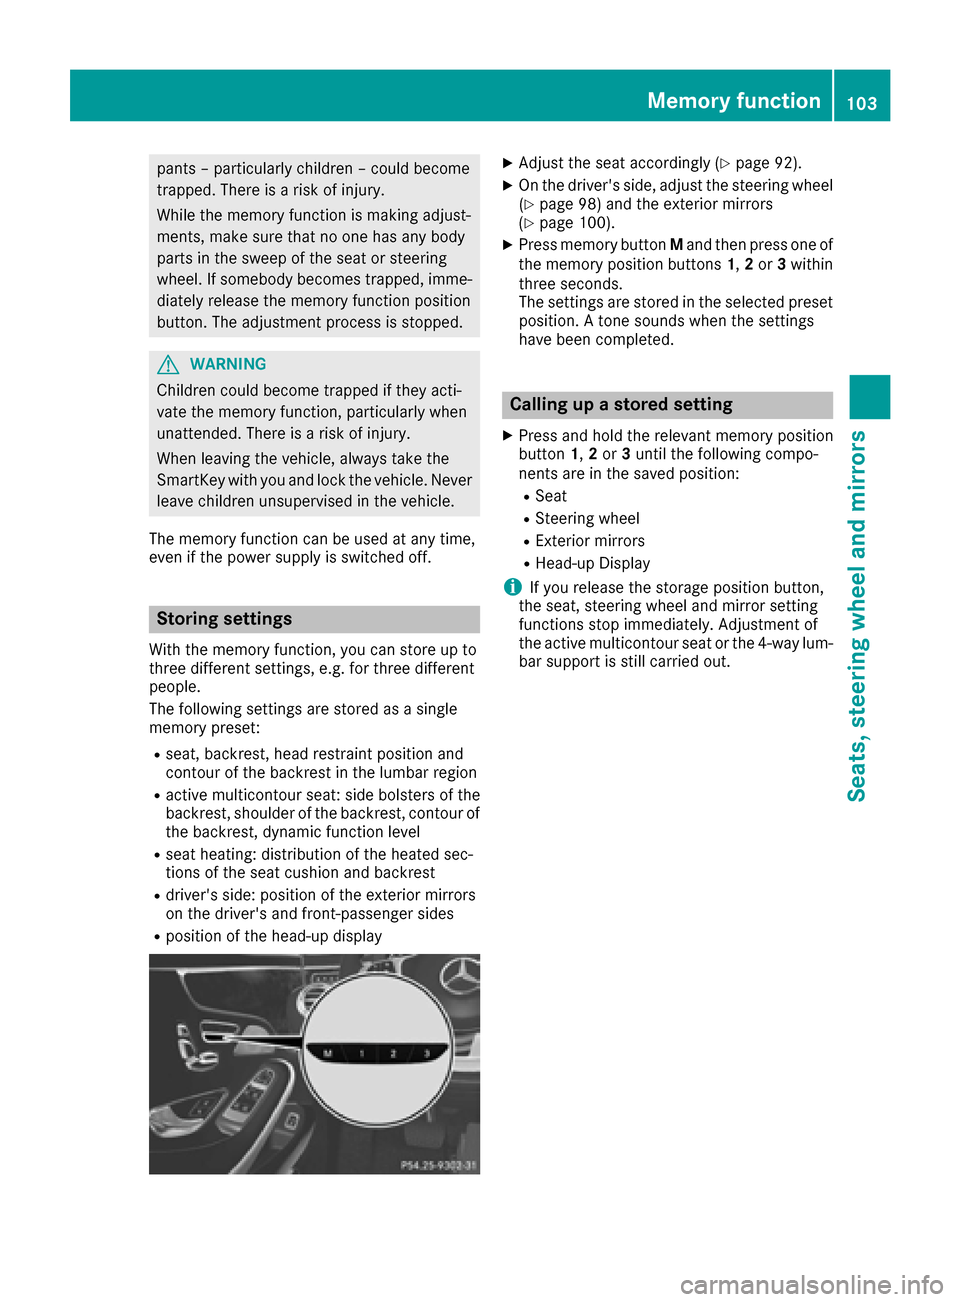
Storing settings
With the memory function, you can store up to
three different settings, e.g. for three different
people.
The following settings are stored as a single
memory preset:
Rseat, backrest, head restraint position and
contour of the backrest in the lumbar region
Ractive multicontour seat: side bolsters of the
backrest, shoulder of the backrest, contour of the backrest, dynamic function level
Rseat heating: distribution of the heated sec-
tions of the seat cushion and backrest
Rdriver's side: position of the exterior mirrors
on the driver's and front-passenger sides
Rposition of the head-up display
XAdjust the seat accordingly (Ypage 92).
XOn the driver's side, adjust the steering wheel(Ypage 98) and the exterior mirrors
(Ypage 100).
XPress memory button Mand then press one of
the memory position buttons 1,2or 3within
three seconds.
The settings are stored in the selected preset
position. A tone sounds when the settings
have been completed.
Calling up a stored setting
XPress and hold the relevant memory position
button 1,2or 3until the following compo-
nents are in the saved position:
RSeat
RSteering wheel
RExterior mirrors
RHead-up Display
iIf you release the storage position button,
the seat, steering wheel and mirror setting
functions stop immediately. Adjustment of
the active multicontour seat or the 4-way lum-
bar support is still carried out.
Memory function103
Seats, steering wheel and mirrors
Z
Page 190 of 338

Right control panel
0076RRejects or ends a call
RExits the telephone book/redial
memory
0061RMakes or accepts a call
RSwitches to the redial memory
0081
0082RAdjusts the volume
0063RMute
00E3RSwitches on the Voice Control Sys-
tem (see the separate operating
instructions)
Multifunction display
0043Top status bar
0044Display
0087Bottom status bar
Display panel 0044shows the selected menu or
submenu and display messages.
XTo open the menu list: press the00E2but-
ton on the steering wheel.
The menu list appears in display panel 0044.
Possible top status bar displays:
R--‡ Outside temperature (Ypage 186)
R003E Turn signal, left (Ypage 105)
R0058Low-beam headlamps (Ypage 105)
R0057High-beam headlamps (Ypage 105)
R0060Parking lamps and license plate lamps
(Ypage 105)
R003D Turn signal, right (Ypage 105)
Possible bottom status bar displays:
R00D6 ECO start/stop function (Ypage 124)
R00D9HOLD function (Ypage 154)
R005DActive Parking Assist (Ypage 163)
R00CE Adaptive Highbeam Assist Plus
(Ypage 106)
R004F DISTRONIC PLUS Steering Assist and
Stop&Go Pilot (Ypage 153)
R--- km/hAdditional speedometer
(Ypage 201)
Head-up display
General notes
The Head-up Display projects information from
the navigation system and the driver assistance
system above the dashboard into the driver's
field of vision. The Head-up Display allows the
driver to see all of the information without hav-
ing to take their eyes off the road.
A requirement for the display of the contents is that the following functions are available in the
vehicle and are switched on:
RCruise control
RDISTRONIC PLUS
RTraffic Sign Assist
RNavigation
Important safety notes
The Head-up Display is only an aid and is not a
substitute for attentive driving.
Speed limits and overtaking restrictions are not
always correctly displayed. Traffic signs always
have priority over the Traffic Sign Assist display.
The visibility of the Head-up Display is influ-
enced by the following conditions:
Rthe driver's seat position
Rthe positioning of the display image
Rthe general ambient light
Rsunglasses with polarization filters
Rwet roads
Rblocking of sunlight by objects on the display
cover
In the event of extreme sunlight, sections of the
display may fade. This can be reversed by
switching the Head-up Display off and on again.
iVehicles with the head-up display are equip-
ped with a special windshield. Should repairs
be necessary, have the windshield replaced at
a qualified specialist workshop.
188Displays and operation
On-board computer and displays
Page 202 of 338
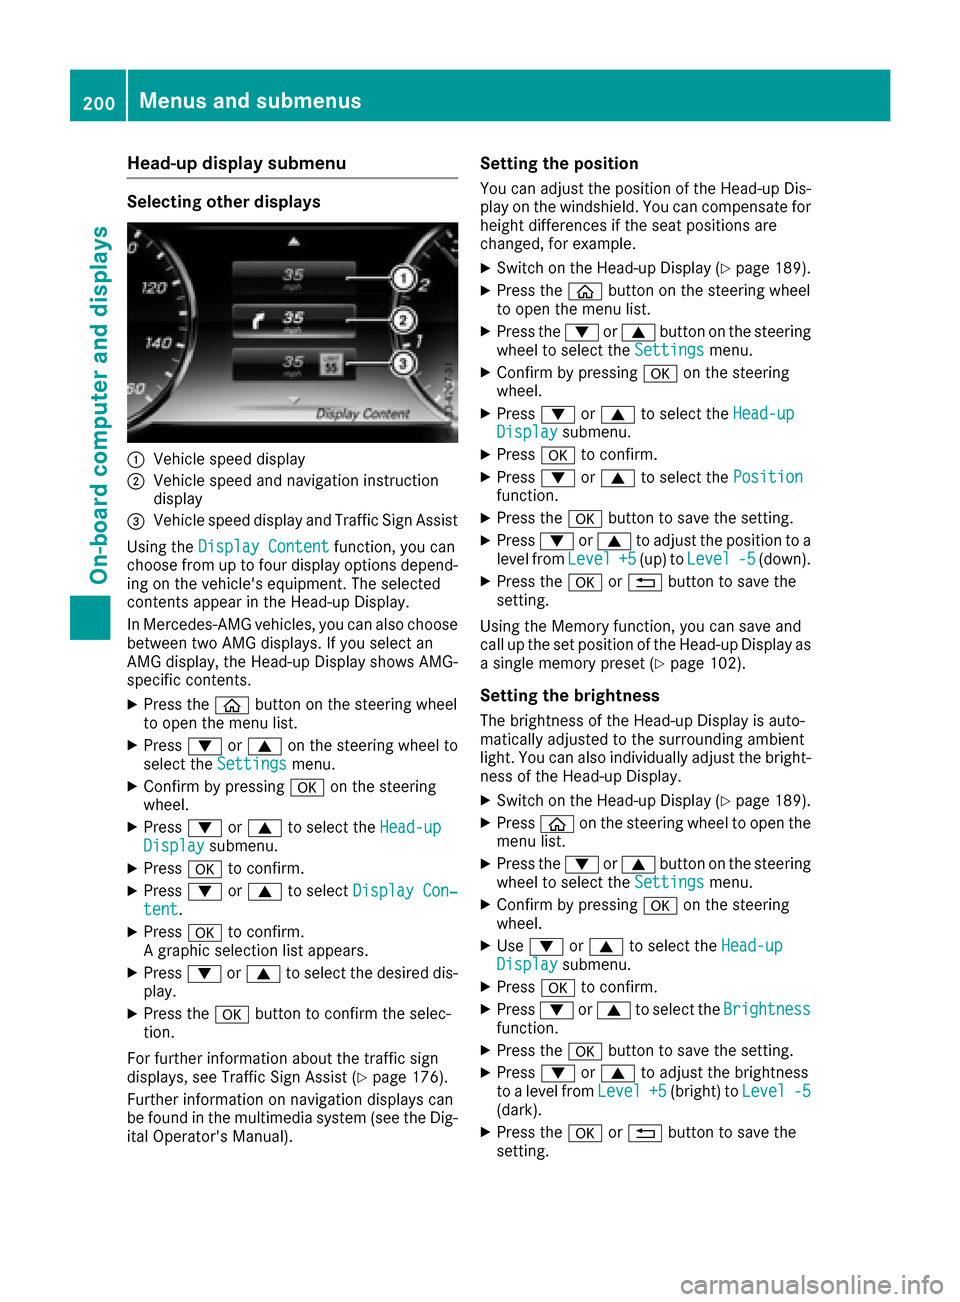
Head-up display submenu
Selecting other displays
0043Vehicle speed display
0044Vehicle speed and navigation instruction
display
0087Vehicle speed display and Traffic Sign Assist
Using the Display Content
function, you can
choose from up to four display options depend-
ing on the vehicle's equipment. The selected
contents appear in the Head-up Display.
In Mercedes-AMG vehicles, you can also choose
between two AMG displays. If you select an
AMG display, the Head-up Display shows AMG-
specific contents.
XPress the 00E2button on the steering wheel
to open the menu list.
XPress 0064or0063 on the steering wheel to
select the Settingsmenu.
XConfirm by pressing 0076on the steering
wheel.
XPress 0064or0063 to select the Head-upDisplaysubmenu.
XPress0076to confirm.
XPress 0064or0063 to select Display Con‐tent.
XPress0076to confirm.
A graphic selection list appears.
XPress 0064or0063 to select the desired dis-
play.
XPress the 0076button to confirm the selec-
tion.
For further information about the traffic sign
displays, see Traffic Sign Assist (
Ypage 176).
Further information on navigation displays can
be found in the multimedia system (see the Dig-
ital Operator's Manual).
Setting the position
You can adjust the position of the Head-up Dis-
play on the windshield. You can compensate for
height differences if the seat positions are
changed, for example.
XSwitch on the Head-up Display (Ypage 189).
XPress the 00E2button on the steering wheel
to open the menu list.
XPress the 0064or0063 button on the steering
wheel to select the Settingsmenu.
XConfirm by pressing 0076on the steering
wheel.
XPress 0064or0063 to select the Head-upDisplaysubmenu.
XPress0076to confirm.
XPress 0064or0063 to select the Positionfunction.
XPress the0076button to save the setting.
XPress 0064or0063 to adjust the position to a
level from Level+5(up) toLevel-5(down).
XPress the 0076or0038 button to save the
setting.
Using the Memory function, you can save and
call up the set position of the Head-up Display as
a single memory preset (
Ypage 102).
Setting the brightness
The brightness of the Head-up Display is auto-
matically adjusted to the surrounding ambient
light. You can also individually adjust the bright-
ness of the Head-up Display.
XSwitch on the Head-up Display (Ypage 189).
XPress 00E2on the steering wheel to open the
menu list.
XPress the 0064or0063 button on the steering
wheel to select the Settingsmenu.
XConfirm by pressing 0076on the steering
wheel.
XUse 0064 or0063 to select the Head-upDisplaysubmenu.
XPress0076to confirm.
XPress 0064or0063 to select the Brightnessfunction.
XPress the0076button to save the setting.
XPress 0064or0063 to adjust the brightness
to a level from Level+5(bright) toLevel-5(dark).
XPress the0076or0038 button to save the
setting.
200Menus and submenus
On-board computer and displays
Page 273 of 338
The garage door opener is compatible with
devices which operate in the frequency range
of 280 to 433 MHz.
RReplace the batteries in garage door remote
control0083. This increases the likelihood that
garage door remote control 0083will transmit a
strong and precise signal to the integrated
garage door opener.
RWhen programming, hold remote control 0083
at varying distances and angles from but-
tons 0044to0085 which you are programming. Try
various angles at a distance between 2and
8 inches (5to 20 cm) or at the same angle but
at varying distances.
RIf another remote control 0083is available for
the same garage door drive, repeat the same
programming steps with this remote control
0083. Before performing these steps, make sure
that new batteries have been installed in
garage door drive remote control 0083.
RNote that some remote controls only transmit
for a limited amount of time (the indicator
lamp on the remote control goes out). Press
button0084on remote control 0083again before
transmission ends.
RAlign the antenna cable of the garage door
opener unit. This can improve signal recep-
tion/transmission.
Opening/closing the garage door
After it has been programmed, the integrated
garage door opener performs the function of the
garage door system remote control. Please also
read the operating instructions for the garage
door system.
XTurn the SmartKey to position 2in the ignition
lock (Ypage 121).
XPress button 0044,0087or0085 which you have
programmed to operate the garage door.
Garage door system with a fixed code: indi-
cator lamp 0043lights up green.
Garage door system with a rolling code: indi-
cator lamp 0043flashes green.
The transmitter will transmit a signal as long
as the button is pressed. The transmission is
halted after a maximum of ten seconds and
indicator lamp 0043lights up yellow.
XPress button 0044,0087or0085 again if necessary.
Clearing the memory
Make sure that you clear the memory of the
integrated garage door opener before selling the
vehicle.
XTurn the SmartKey to position 2in the ignition
lock (Ypage 121).
XPress and hold buttons 0044and 0085.
The indicator lamp initially lights up yellow
and then green.
XRelease buttons 0044and 0085.
The memory of the integrated garage door
opener in the rear-view mirror is cleared.
Floormats
GWARNING
Objects in the driver's footwell can restrict the pedal travel or obstruct a depressed pedal.
The operating and road safety of the vehicle is
jeopardized. There is a risk of an accident.
Make sure that all objects in the vehicle are
stowed correctly, and that they cannot enter
the driver's footwell. Install the floormats
securely and as specified in order to ensure
sufficient clearance for the pedals. Do not use
loose floormats and do not place floormats on
top of one another.
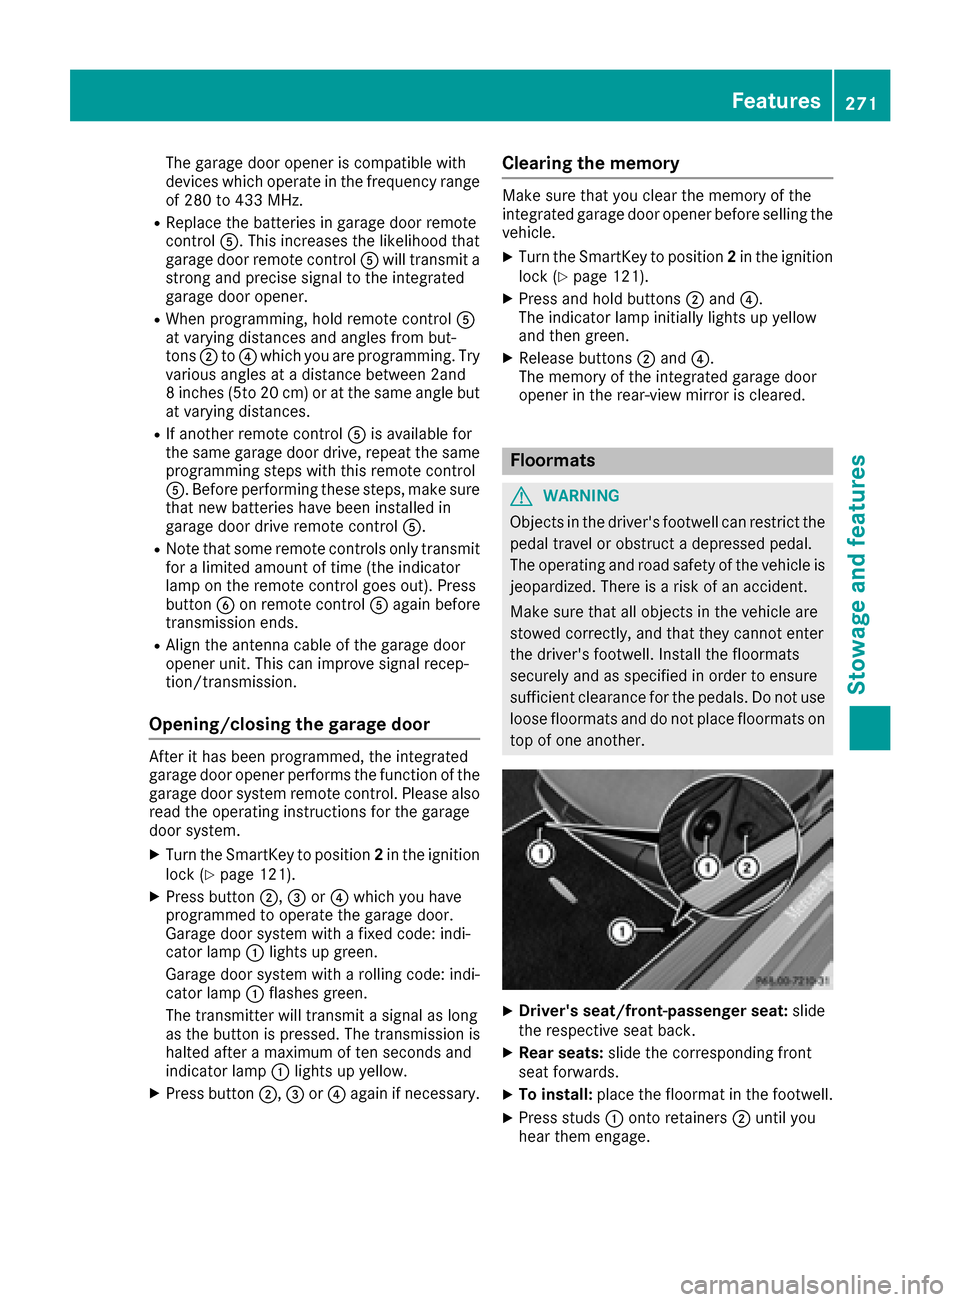
XDriver's seat/front-passenger seat: slide
the respective seat back.
XRear seats: slide the corresponding front
seat forwards.
XTo install: place the floormat in the footwell.
XPress studs 0043onto retainers 0044until you
hear them engage.
Features271
Stowage and features
Z