2017 MERCEDES-BENZ S-Class COUPE change time
[x] Cancel search: change timePage 103 of 338

dow defroster is switched on and the outside
temperature is low.
Folding the exterior mirrors in or outelectrically
XSwitch on the power supply or the ignition
(Ypage 122).
XBriefly press 0043.
Both exterior mirrors fold in or out.
iMake sure that the exterior mirrors are
always folded out fully while driving. They
could otherwise vibrate.
iIf you are driving faster than 30 mph
(47 km/h), you can no longer fold in the exte-
rior mirrors.
Resetting the exterior mirrors
If the battery has been disconnected or com-
pletely discharged, the exterior mirrors must be
reset. The exterior mirrors will otherwise not
fold in when you activate the Automatic Mir‐
ror Foldingin the multimedia system.
XSwitch on the power supply or the ignition
(Ypage 122).
XPress button0043.
Folding the exterior mirrors in or out
automatically
When theAutomatic Mirror Foldingfunc-
tion is activated in the multimedia system (see
Digital Operator's Manual):
Rthe exterior mirrors fold in automatically as
soon as you lock the vehicle from the outside.
Rthe exterior mirrors fold out automatically
again as soon as you unlock the vehicle.
iIf the exterior mirrors have been folded in
manually, they do not fold out.
Exterior mirror pushed out of position
If an exterior mirror has been pushed out of
position, proceed as follows:
XPress and hold button 0043until you hear a click
and the mirror engages audibly into position
(
Ypage 101).
The mirror housing is engaged again and you
can adjust the exterior mirrors as usual
(
Ypage 100).
Automatic anti-glare mirrors
GWARNING
Electrolyte may escape if the glass in an auto-
matic anti-glare mirror breaks. The electrolyte
is harmful and causes irritation. It must not
come into contact with your skin, eyes, res-
piratory organs or clothing or be swallowed.
There is a risk of injury.
If you come into contact with the electrolyte,
observe the following:
RRinse off the electrolyte from your skin
immediately with water.
RImmediately rinse the electrolyte out of
your eyes thoroughly with clean water.
RIf the electrolyte is swallowed, immediately
rinse your mouth out thoroughly. Do not
induce vomiting.
RIf electrolyte comes into contact with your
skin or hair or is swallowed, seek medical
attention immediately.
RImmediately change out of clothing which
has come into contact with electrolyte.
RIf an allergic reaction occurs, seek medical
attention immediately.
The exterior mirror on the driver's side and the
rear-view mirror automatically go into anti-glare
mode if:
Rthe ignition is switched on
Rincident light from headlamps strikes the sen-
sor in the rear-view mirror
Mirrors101
Seats, steering wheel and mirrors
Z
Page 116 of 338
Setting climate control to automatic
General notes
In automatic mode, the set temperature is main-
tained automatically at a constant level. The
system automatically regulates the temperature
of the dispensed air, the airflow and the air dis-
tribution.
During automatic controlling, the "Cooling with
air dehumidification" function is activated.
Setting climate control to automatic
XTurn the SmartKey to position 2in the ignition
lock (Ypage 121).
XSet the desired temperature using the 0082
rocker switch.
XTo activate: press the0058rocker switch up
or down.
The indicator lamp in the 0058rocker switch
lights up.
XTo switch to manual operation: press the
0097 rocker switch up or down.
The indicator lamp in the 0058rocker switch
goes out.
In automatic mode, if you adjust the airflow or
air distribution manually, the indicator lamp on
the 0058 rocker switch goes out. The function
which has not been changed manually, however,
continues to be controlled automatically. When
the manually set function switches back to auto-
matic mode, the indicator lamp on the 0058
rocker switch lights up again.
Adjusting the climate mode settings
In automatic mode you can select the following
airflow settings for the driver's and front-
passenger areas:
FOCUS high airflow, slightly cooler setting
MEDIUM medium airflow, standard setting
DIFFUSE low airflow, slightly warmer and draft- free setting
XTo set:set the climate mode using the mul-
timedia system (Ypage 247).
Setting the temperature
General notes
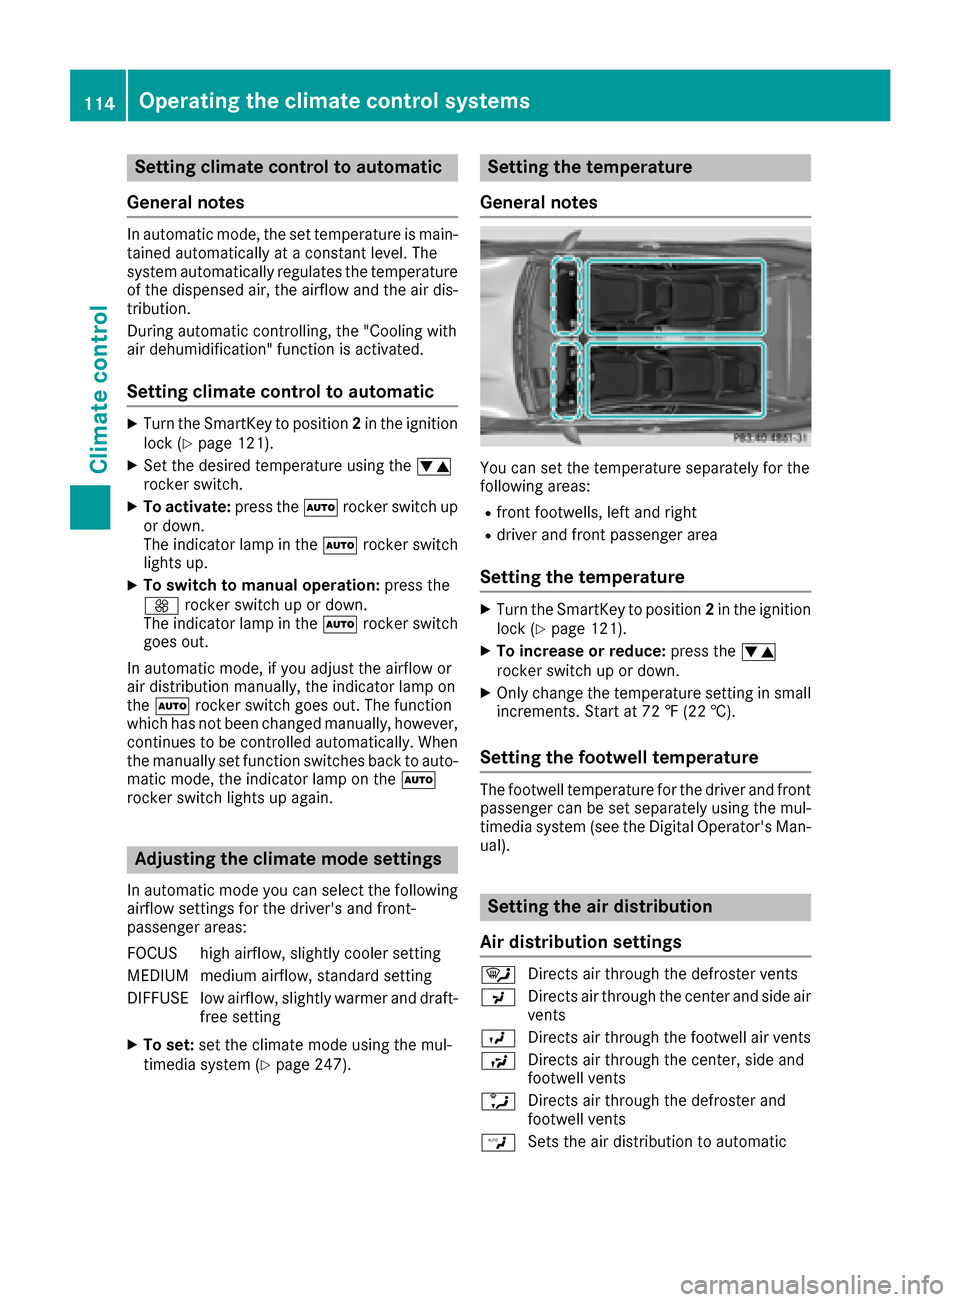
You can set the temperature separately for the
following areas:
Rfront footwells, left and right
Rdriver and front passenger area
Setting the temperature
XTurn the SmartKey to position 2in the ignition
lock (Ypage 121).
XTo increase or reduce: press the0082
rocker switch up or down.
XOnly change the temperature setting in small
increments. Start at 72 ‡ (22 †).
Setting the footwell temperature
The footwell temperature for the driver and front
passenger can be set separately using the mul-
timedia system (see the Digital Operator's Man-
ual).
Setting the air distribution
Air distribution settings
0061 Directs air through the defroster vents
009C Directs air through the center and side air
vents
009B Directs air through the footwell air vents
009F Directs air through the center, side and
footwell vents
0086 Directs air through the defroster and
footwell vents
00A2 Sets the air distribution to automatic
114Operating the climate control systems
Climate control
Page 117 of 338
Setting the air distribution via the mul-
timedia system
The air distribution for the left and right sides of
the driver's and front-passenger areas can be
adjusted using the multimedia system (see the
Digital Operator's Manual).
Setting the airflow
General notes
You can select different airflow settings for the
driver's and front-passenger sides.
Setting the airflow
XTurn the SmartKey to position 2in the ignition
lock (Ypage 121).
XTo increase or reduce: press the0097
rocker switch up or down.
iYou can also set the airflow using the mul-
timedia system (see the Digital Operator's
Manual).
Activating or deactivating the syn-
chronization function
Climate control can be set centrally using the
synchronization function. The settings for tem-
perature, air distribution and airflow on the driv-
er's side are adopted for the front-passenger
side.
XTo activate or deactivate: activate or deac-
tivate the "Synchronization" function via the
multimedia system (see the Digital Operator's
Manual).
The synchronization function deactivates if the
settings for the front-passenger side are
changed.
Defrosting the windshield
General notes
You can use this function to defrost the wind-
shield or to clear a fogged up windshield or front
side windows on the inside.
Switch off the "Windshield defrosting" function
as soon as the windshield is clear again.
Switching the "Windshield defrosting"
function on or off
XTurn the SmartKey to position 2in the ignition
lock (Ypage 121).
XTo activate: press the0064rocker switch on
the front control panel up or down.
The indicator lamp in the 0064rocker switch
lights up.
The climate control system switches to the
following functions:
Rhigh airflow
Rhigh temperature
Rair distribution to the windshield and front
side windows
Rair-recirculation mode off
Rwindshield heating on
Rcooling with air dehumidification on
XTo deactivate: press the0064rocker switch
up or down.
The indicator lamp in the 0064rocker switch
goes out. The previously selected settings are restored. Air-recirculation mode remains
deactivated.
Defrosting the windows
Windows fogged up on the inside
XSwitch on automatic mode using the 0058
rocker switch.
XIf the windows continue to fog up: activate the
"Windshield defrosting" function using the
0064 rocker switch. The windshield heating is
switched on.
iYou should only select this setting until the
windshield is clear again.
Windows fogged up on the outside
XActivate the windshield wipers.
XSwitch on automatic mode using the 0058
rocker switch.
iIf you clean the windows regularly, they do
not fog up so quickly.
Operating the climate control systems115
Climate control
Page 122 of 338

Notes on breaking-in a new vehicle
Important safety notes
The sensor system of some driving and driving
safety systems adjusts automatically while a
certain distance is being driven after the vehiclehas been delivered or after repairs. Full system
effectiveness is not reached until the end of this
teach-in procedure.
New and replaced brake pads and discs only
reach their optimum braking effect after several hundred kilometers of driving. Compensate for
this by applying greater force to the brake pedal.
The first 1000 miles (1500 km)
The more you look after the engine when it is
new, the more satisfied you will be with its per-
formance in the future.
RYou should therefore drive at varying vehicle
and engine speeds for the first 1000 miles
(1500 km).
RAvoid heavy loads, e.g. driving at full throttle,during this period.
RWhen shifting gears manually, upshift in good
time, before the tachometer needle reaches
00C3 of the way to the red area of the tachom-
eter.
RDo not manually shift to a lower gear to brake
the vehicle.
RTry to avoid depressing the accelerator pedal
beyond the point of resistance (kickdown).
RAll vehicles (except Mercedes-AMG vehi-
cles): ideally, for the first 1,000 miles
(1,500 km), drive in drive program E.
Additional breaking-in notes for Mercedes-AMG vehicles:
RDo not drive faster than 85 mph (140 km/h)
for the first 1,000 miles (1,500 km).
ROnly allow the engine to reach a maximum
engine speed of 4,500 rpm briefly.
RChange gear in good time.
RIdeally, for the first 1,000 miles (1,500 km),
drive in program C.
After 1000 miles (1500 km),you can incre
ase
th eengin espeed gradually and accelerate th e
vehicl eto full speed.
You should also observ ethese note son break-
in g in if th eengin eor part sof th edrive train on
your vehicl ehav ebeen replaced. Always observ
eth emaximum permissibl e
speed.
Driving
Imp ortant safety notes
GWARNIN G
Objects in th edriver's footwell can restrict th e
pedal travel or obstruct adepressed pedal .
The operating and roa dsafet yof th evehicl eis
jeopardized. There is aris kof an accident.
Mak esur ethat all objects in th evehicl eare
stowed correctly, and that they canno tente r
th edriver's footwell. Install th efloormats
securel yand as specified in order to ensur e
sufficien tclearance for th epedals. Do no tuse
loos efloormats and do no tplac efloormats on
to pof on eanother.
GWARNIN G
Unsuitable footwear can hinder correc tusage
of th epedals, e.g. :
Rshoes withthick sole s
Rshoes withhigh heels
Rslipper s
There is aris kof an accident.
Wear suitable footwear to ensur ecorrec t
usage of th epedals.
GWARNIN G
If you switch off th eignition while driving,
safety-relevant function sare only available
wit hlimitations, or no tat all. This could affect,
for example, th epowe rsteerin gand th ebrak e
boostin geffect. You will require considerably
mor eeffort to steer and brake. There is aris k
of an accident.
Do no tswitch off th eignition while driving.
GWARNIN G
If th eparkin gbrak ehas no tbeen full y
release dwhen driving, th eparkin gbrak ecan :
Roverheat and caus e afire
Rlose it shold function .
120Driving
Driving and parking
Page 125 of 338
GWARNING
Combustion engines emit poisonous exhaust
gases such as carbon monoxide. Inhaling
these exhaust gases leads to poisoning. There
is a risk of fatal injury. Therefore never leave
the engine running in enclosed spaces with-
out sufficient ventilation.
GWARNING
Flammable materials introduced through
environmental influence or by animals can
ignite if in contact with the exhaust system or
parts of the engine that heat up. There is a risk
of fire.
Carry out regular checks to make sure that
there are no flammable foreign materials in
the engine compartment or in the exhaust
system.
General notes
During a cold start, the engine runs at higher
speeds to enable the catalytic converter to
reach its operating temperature. The sound of
the engine may change during this time.
Automatic transmission
XShift the transmission to position P
(Ypage 128).
The transmission position display in the mul-
tifunction display shows P(
Ypage 129).
You can start the engine in transmission posi-
tion Pand N.
Starting procedure with the SmartKey
To start the engine using the SmartKey instead
of the Start/Stop button, pull the Start/Stop
button out of the ignition lock.
XTurn the SmartKey to position 3in the ignition
lock and release it as soon as the engine is
running (
Ypage 121).
Starting procedure with the Start/Stop
button
The Start/Stop button can be used to start the
vehicle manually without inserting the SmartKey
into the ignition lock. The Start/Stop button must be inserted in the ignition lock and the
SmartKey must be in the vehicle. This mode for
starting the engine operates independently of
the ECO start/stop automatic engine start func-
tion.
You can start the engine if a valid SmartKey is in
the vehicle. Always take the SmartKey with you
when leaving the vehicle, even if you only leave
it for a short time. Pay attention to the important
safety notes.
XDepress the brake pedal and keep it
depressed.
XPress the Start/Stop button once
(Ypage 121).
The engine starts.
Starting procedure via smartphone
Observe the important safety notes on starting
the engine (Ypage 122).
You can also start your engine via your smart-
phone from outside the vehicle. In this case, the
previously selected climate control setting is
activated. In this way you can cool or heat the
interior of the vehicle before starting the jour-
ney.
Only start the engine via your smartphone if it is
safe to start and run the engine where your vehi-
cle is parked.
Observe the legal stipulations in the area where your vehicle is parked. Engine start via smart-
phone may be limited to certain countries or
regions.
You can execute a maximum of two consecutive
starting attempts via your smartphone. If you
insert the SmartKey into the ignition lock, you
can carry out two more starting attempts.
Once you have started the engine, you can
switch the engine off via your smartphone at any
time.
You can only start the engine via your smart-
phone if:
Rthe SmartKey is in the ignition lock
Rpark position Pis selected
Rthe accelerator pedal is not depressed
Rthe anti-theft alarm system is not activated
Rthe panic alarm is not activated
Rthe hazard warning lamps are switched off
Rthe hood is closed.
Rthe doors are closed and locked
Rthe windows and sliding sunroof are closed
Driving123
Driving and parking
Z
Page 135 of 338
All vehicles (except Mercedes-AMG vehi-
cles:)Mand the selected gear appear in the
multifunction display.
Shifting gears
If you pull on the left or right steering wheel
paddle shifter, the automatic transmission
switches to manual drive programMfor a limi-
ted amount of time. Depending on which steer- ing wheel paddle shifter is pulled, the automatic
transmission immediately shifts into the next
gear down or up, if permitted.
XTo shift up: pull the right-hand steering wheel
paddle shifter (Ypage 132).
The automatic transmission shifts up to the
next gear.
If the maximum engine speed on the currently
engaged gear is reached and you continue to accelerate, the automatic transmission auto-
matically shifts up in order to prevent engine
damage.
Mercedes-AMG vehicles: the automatic
transmission will not shift up to the next gear
when the engine speed is very low.
XTo shift down: pull on the left-hand steering
wheel paddle shifter (Ypage 132).
The automatic transmission shifts down to
the next gear.
If the engine exceeds the maximum engine
speed when shifting down, the automatic
transmission protects against engine damage
by not shifting down.
Automatic down shifting occurs when coast-
ing.
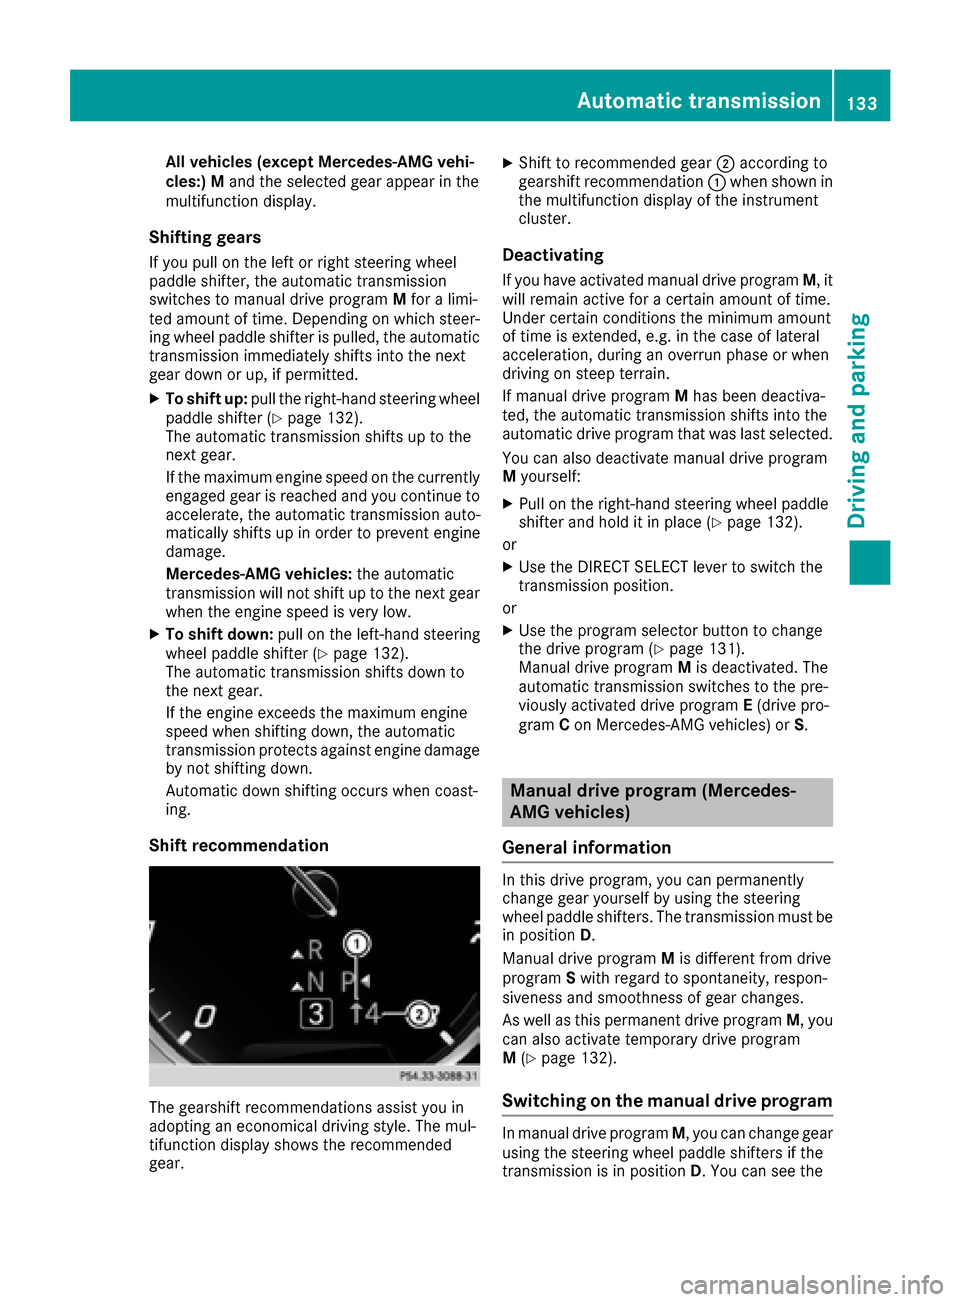
Shift recommendation
The gearshift recommendations assist you in
adopting an economical driving style. The mul-
tifunction display shows the recommended
gear.
XShift to recommended gear 0044according to
gearshift recommendation 0043when shown in
the multifunction display of the instrument
cluster.
Deactivating
If you have activated manual drive program M, it
will remain active for a certain amount of time.
Under certain conditions the minimum amount
of time is extended, e.g. in the case of lateral
acceleration, during an overrun phase or when
driving on steep terrain.
If manual drive program Mhas been deactiva-
ted, the automatic transmission shifts into the
automatic drive program that was last selected.
You can also deactivate manual drive program
M yourself:
XPull on the right-hand steering wheel paddle
shifter and hold it in place (Ypage 132).
or
XUse the DIRECT SELECT lever to switch the
transmission position.
or
XUse the program selector button to change
the drive program (Ypage 131).
Manual drive program Mis deactivated. The
automatic transmission switches to the pre-
viously activated drive program E(drive pro-
gram Con Mercedes-AMG vehicles) or S.
Manual drive program (Mercedes-
AMG vehicles)
General information
In this drive program, you can permanently
change gear yourself by using the steering
wheel paddle shifters. The transmission must be
in position D.
Manual drive program Mis different from drive
program Swith regard to spontaneity, respon-
siveness and smoothness of gear changes.
As well as this permanent drive program M, you
can also activate temporary drive program
M (
Ypage 132).
Switching on the manual drive program
In manual drive program M, you can change gear
using the steering wheel paddle shifters if the
transmission is in position D. You can see the
Automatic transmission133
Driving and parking
Z
Page 144 of 338
The percent value is the average value of the
three bars. The three bars and the mean value
begin at the value of 50%. A higher percentage
indicates a more economical driving style.
The ECO display does not indicate the actual fuel
consumption. A fixed percentage count in the
ECO display does not indicate a fixed consump-
tion.
Apart from driving style, consumption is
dependent on many factors such as, e.g.:
RLoad
RTire pressure
RCold start
RChoice of route
RActive electrical consumers
These factors are not included in the ECO dis-
play.
The evaluation of your driving style is carried out
using the following three categories:
RAccel.(evaluation of all acceleration pro-
cesses)
-The bar fills up: moderate acceleration,
especially at higher speeds
-The bar empties: sporty acceleration
RConstant(assessment of driving behavior at
all times)
-The bar fills up: constant speed and avoid-
ance of unnecessary acceleration and
deceleration
-The bar empties: fluctuations in speed
RCoasting(assessment of all deceleration
processes)
-The bar fills up: anticipatory driving, keep-
ing your distance and early release of the
accelerator. The vehicle can coast without
use of the brakes.
-The bar empties: frequent braking
An economical driving style specially requires
driving at moderate engine speeds.
To achieve a higher value in the categories
Accel.
and Constant:
Robserve the gearshift recommendations.
Rdrive in drive program E.
On long journeys at a constant speed, e.g. on the
highway, only the bar for Constant
will change.
The ECO display summarizes the driving char-
acteristics from the start of the journey to its
completion. For this reason, the bars change
dynamically at the beginning of the journey. On
longer journeys, there are fewer changes. For more dynamic changes, carry out a manual
reset.
Show the ECO display (
Ypage 190).
Braking
Important safety notes
GWARNING
If you shift down on a slippery road surface in an attempt to increase the engine's braking
effect, the drive wheels could lose their grip.
There is an increased danger of skidding and
accidents.
Do not shift down for additional engine brak-
ing on a slippery road surface.
Downhill gradients
!On long and steep gradients, you must
reduce the load on the brakes by shifting to a
lower gear in good time. This allows you to
take advantage of the engine's braking effect.
This helps you to avoid overheating the
brakes and wearing them out excessively.
When you take advantage of engine braking, a
drive wheel may not turn for some time, e.g.
on a slippery road surface. This could cause
damage to the drive train. This type of damage
is not covered by the Mercedes-Benz war-
ranty.
Heavy and light loads
GWARNING
If you rest your foot on the brake pedal while
driving, the braking system can overheat. This increases the stopping distance and can even
cause the braking system to fail. There is a
risk of an accident.
Never use the brake pedal as a footrest. Never
depress the brake pedal and the accelerator
pedal at the same time.
!Depressing the brake pedal constantly
results in excessive and premature wear to
the brake pads.
If the brakes have been subjected to a heavy
load, do not stop the vehicle immediately. Drive
142Driving tips
Driving and parking
Page 147 of 338
If you leave the engine or the auxiliary heatingrunning, make sure the exhaust pipe and area
around the vehicle are clear of snow. To
ensure an adequate supply of fresh air, open a
window on the side of the vehicle that is not
facing into the wind.
Have your vehicle winter-proofed at a qualified
specialist workshop at the onset of winter.
Drive particularly carefully on slippery road sur-
faces. Avoid sudden acceleration, steering and
braking maneuvers. Do not use the cruise con-
trol or DISTRONIC PLUS.
If the vehicle threatens to skid or cannot be
stopped when moving at low speed:
XShift the transmission to position N.
The outside temperature indicator is not
designed to serve as an ice-warning device and
is therefore unsuitable for that purpose.
Changes in the outside temperature are dis-
played after a short delay.
Indicated temperatures just above the freezing
point do not guarantee that the road surface is
free of ice. The road may still be icy, especially in
wooded areas or on bridges.
You should pay special attention to road condi-
tions when temperatures are around freezing
point.
For more information on driving with snow
chains, see (
Ypage 305).
For more information on driving with summer
tires, see (
Ypage 305).
Observe the notes in the "Winter operation" sec-
tion (
Ypage 305).
Driving systems
Mercedes-Benz Intelligent Drive
Mercedes-Benz Intelligent Drive stands for inno-
vative driver assistance and safety systems
which enhance comfort and support the driver in
critical situations. With these intelligent co-ordi-
nated systems Mercedes-Benz has set a mile-
stone on the path towards autonomous driving.
Mercedes-Benz Intelligent Drive embraces all
elements of active and passive safety in one well
thought out system – for the safety of the vehi-
cle occupants and that of other road users. Further information on driving safety systems
(
Ypage 61).
Cruise control
General notes
Cruise control maintains a constant road speed
for you. It brakes automatically in order to avoid
exceeding the set speed. Change into a lower
gear in good time on long and steep downhill
gradients. This is especially important if the
vehicle is laden. By doing so, you will make use
of the braking effect of the engine. This relieves
the load on the brake system and prevents the
brakes from overheating and wearing too
quickly.
You can use cruise control if you want to drive at
a steady speed for a prolonged period of time.
You can store any road speed above 20 mph
(30 km/h).
Important safety notes
If you fail to adapt your driving style, cruise con-
trol can neither reduce the risk of an accident
nor override the laws of physics. Cruise control
cannot take into account the road, traffic and
weather conditions. Cruise control is only an
aid. You are responsible for maintaining a safe
distance to the vehicle in front, for vehicle
speed, for braking in good time and for staying in
lane.
Do not use cruise control:
Rin road and traffic conditions which do not
allow you to maintain a constant speed, e.g. in
heavy traffic or on winding roads
Ron slippery road surfaces. Braking or accel-
erating could cause the drive wheels to lose
traction and the vehicle could then skid
Rwhen there is poor visibility, e.g. due to fog,
heavy rain or snow
If there is a change of drivers, advise the new
driver of the speed stored.
Driving systems145
Driving and parking
Z