2017 MERCEDES-BENZ S-Class CABRIOLET lights
[x] Cancel search: lightsPage 110 of 338

When the engine is running and the vehicle is
stationary: if you move the selector lever from a
driving position toP, the daytime running lamps
and low-beam headlamps go out after three
minutes.
When the engine is running, the vehicle is sta-
tionary and in bright ambient light: if you turn the
light switch to the Tposition, the daytime
running lamps and parking lamps switch on.
If the engine is running and you turn the light
switch to the Lposition, the manual settings
take precedence over the daytime running
lamps.
Low-beam headlamps
GWARNING
When the light switch is set to Ã, the low-
beam headlamps may not be switched on
automatically if there is fog, snow or other
causes of poor visibility due to the weather
conditions such as spray. There is a risk of an
accident.
In such situations, turn the light switch to
L.
Even if the light sensor does not detect that it is
dark, the parking lamps and low-beam head-
lamps switch on when the ignition is switched on and the light switch is set to the Lposition.
This is a particularly useful function in the event
of rain and fog.
XTo switch on the low-beam headlamps:
turn the SmartKey in the ignition lock to posi- tion 2or start the engine.
XTurn the light switch to the Lposition.
The green Lindicator lamp in the instru-
ment cluster lights up.
Rear fog lamp
The rear fog lamp improves visibility of your
vehicle for the traffic behind in the event of thick
fog. You must observe the legal requirements
for the country in which you are currently driving
when operating the rear fog lamp.
XTo switch on the rear fog lamp: turn the
SmartKey in the ignition lock to position 2or
start the engine.
XTurn the light switch to the LorÃ
position.
XPress the Rbutton.
The yellow Rindicator lamp in the instru-
ment cluster lights up.
Parking lamps
!If the battery charge is very low, the parking
lamps or standing lamps are automatically
switched off to enable the next engine start.
Always park your vehicle safely and in a well lit
area, in accordance with the relevant legal
stipulations. Avoid using the Tparking
lamps over a period of several hours. If pos-
sible, switch on the right-hand Xor left-
hand W standing lamps.
XTo switch on the parking lamps: turn the
light switch to the Tposition.
The green Tindicator lamp on the instru-
ment cluster lights up.
Standing lamps
Switching on the standing lamps ensures the
corresponding side of the vehicle is illuminated.
XTo switch on the standing lamps: turn the
Smart Key to position 0in the ignition lock or
remove the SmartKey.
XTurn the light switch to the W(left-hand
side of the vehicle) or X(right-hand side of
the vehicle) position.
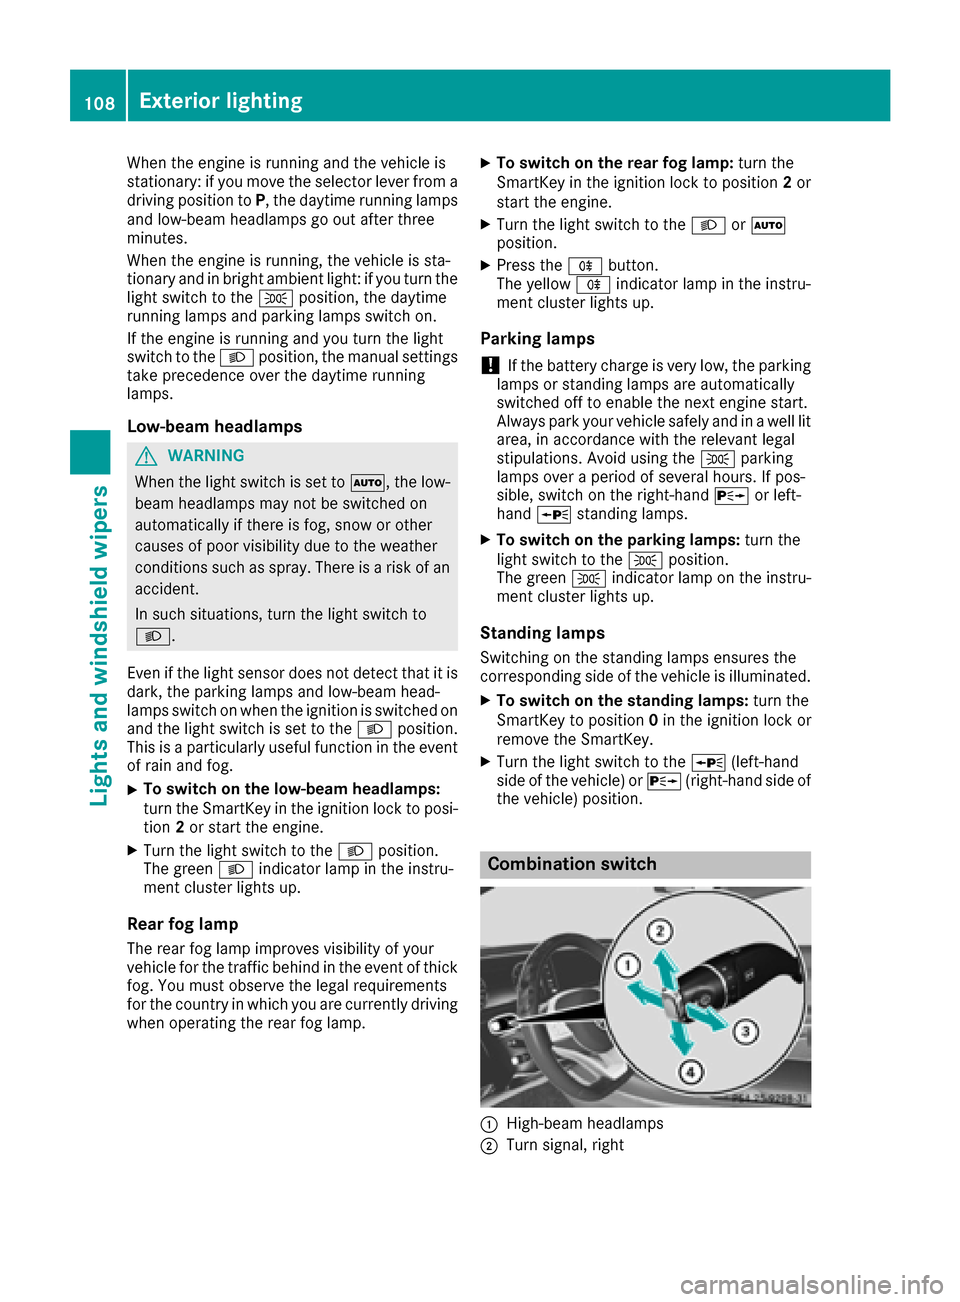
Combination switch
:High-beam headlamps
;Turn signal, right
108Exterior lighting
Lights and windshield wipers
Page 111 of 338

=High-beam flasher
?Turn signal, left
XTo indicate briefly:press the combination
switch briefly to the pressure point in direc-
tion of arrow ;or?.
The corresponding turn signal flashes three
times.
XTo indicate: press the combination switch
beyond the pressure point in direction of
arrow ;or?.
XTo switch on the high-beam headlamps:
turn the light switch to the LorÃ
position.
XPress the combination switch beyond the
pressure point in the direction of arrow :.
In the Ãposition, the high-beam head-
lamps are switched on only when it is dark and
the engine is running.
The blue Kindicator lamp on the instru-
ment cluster lights up when the high-beam
headlamps are switched on.
XTo switch off the high-beam headlamps:
move the combination switch back to its nor-
mal position.
The blue Kindicator lamp on the instru-
ment cluster goes out.
Vehicles with Adaptive Highbeam Assist
Plus:
If Adaptive Highbeam Assist Plus is activated, it
automatically controls activation and deactiva-
tion of the high-beam headlamps (
Ypage 109).
XHigh-beam flasher: pull the combination
switch in the direction of arrow =.
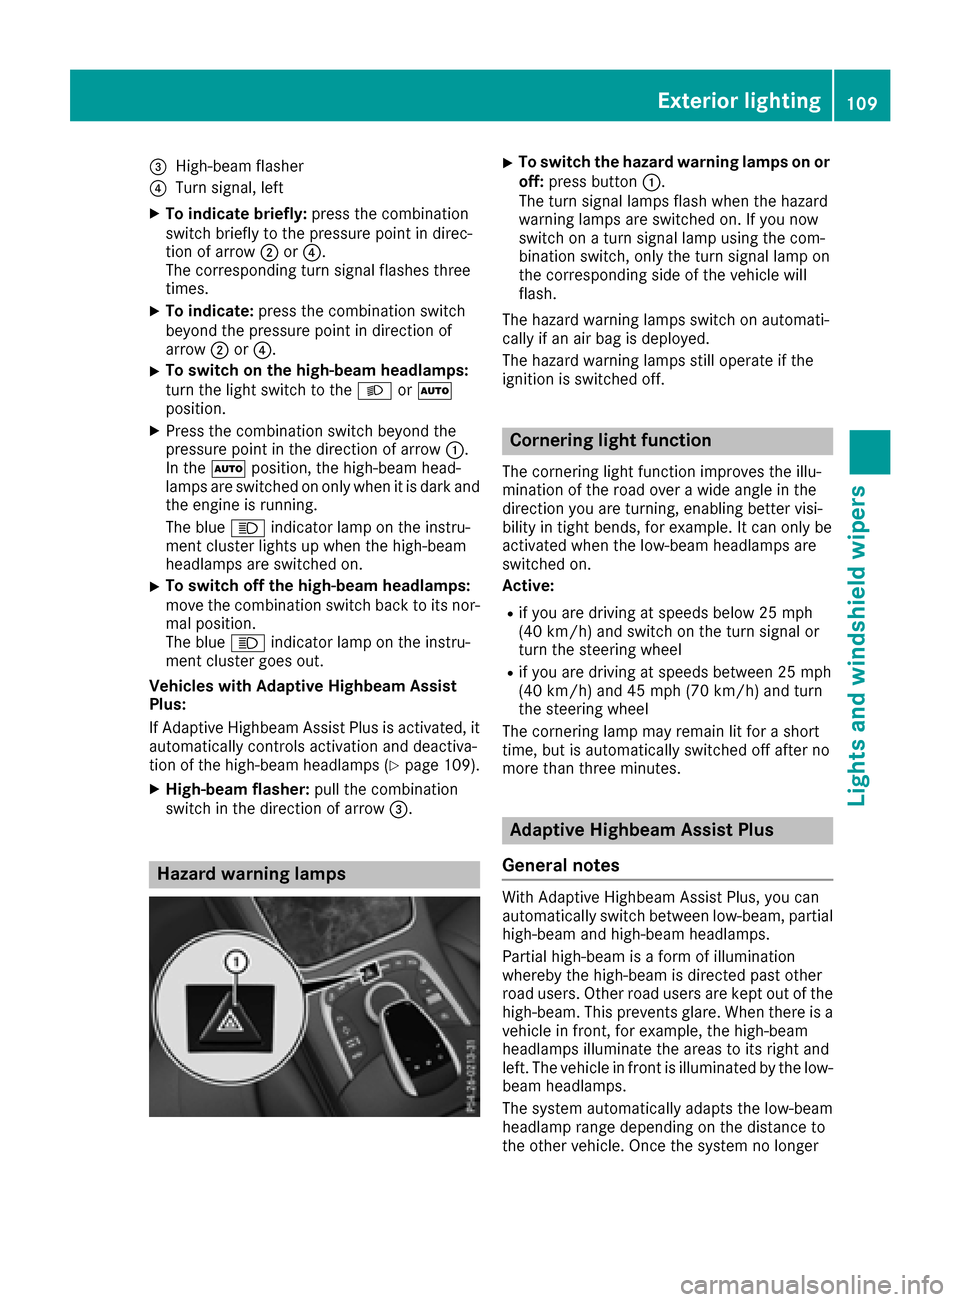
Hazard warning lamps
XTo switch the hazard warning lamps on or
off: press button :.
The turn signal lamps flash when the hazard
warning lamps are switched on. If you now
switch on a turn signal lamp using the com-
bination switch, only the turn signal lamp on
the corresponding side of the vehicle will
flash.
The hazard warning lamps switch on automati-
cally if an air bag is deployed.
The hazard warning lamps still operate if the
ignition is switched off.
Cornering light function
The cornering light function improves the illu-
mination of the road over a wide angle in the
direction you are turning, enabling better visi-
bility in tight bends, for example. It can only be
activated when the low-beam headlamps are
switched on.
Active:
Rif you are driving at speeds below 25 mph
(40 km/h) and switch on the turn signal or
turn the steering wheel
Rif you are driving at speeds between 25 mph
(40 km/h) and 45 mph (70 km/h) and turn
the steering wheel
The cornering lamp may remain lit for a short
time, but is automatically switched off after no
more than three minutes.
Adaptive Highbeam Assist Plus
General notes
With Adaptive Highbeam Assist Plus, you can
automatically switch between low-beam, partial
high-beam and high-beam headlamps.
Partial high-beam is a form of illumination
whereby the high-beam is directed past other
road users. Other road users are kept out of the
high-beam. This prevents glare. When there is a
vehicle in front, for example, the high-beam
headlamps illuminate the areas to its right and
left. The vehicle in front is illuminated by the low-
beam headlamps.
The system automatically adapts the low-beam
headlamp range depending on the distance to
the other vehicle. Once the system no longer
Exterior lighting109
Lights and windshield wipers
Z
Page 112 of 338

detects any other vehicles, it reactivates the
high-beam headlamps.
If the reflected light from the high-beam head-
lamps or partial high-beam headlamps from traf-
fic signs is too strong, the lights are automati-
cally dimmed. Glare for the driver caused by the
reflections is thus avoided.
The system's optical sensor is located behind
the windshield near the overhead control panel.
Important safety notes
GWARNING
Adaptive Highbeam Assist Plus does not react
to road users:
Rwho have no lights, e.g. pedestrians
Rwho have poor lighting, e.g. cyclists
Rwhose lighting is blocked, e.g. by a barrier
In very rare cases, Adaptive Highbeam Assist
Plus may not react to road users who do have
lights, or may recognize them too late. In this,
or in similar situations, the automatic high-
beam headlamps will not be deactivated or
will be activated regardless. There is a risk of
an accident.
Always carefully observe the traffic conditions
and switch off the high-beam headlamps in
good time.
Adaptive Highbeam Assist Plus cannot take into
account road, weather or traffic conditions.
Adaptive Highbeam Assist Plus is only an aid.
You are responsible for adjusting the vehicle's
lighting to the prevailing light, visibility and traf-
fic conditions.
In particular, the detection of obstacles can be
impaired if:
Rthere is poor visibility, e.g. due to fog, heavy
rain or snow
Rthere is dirt on the sensors or anything else
covering the sensors
Switching Adaptive Highbeam Assist
Plus on/off
XTo switch on: turn the light switch to the
à position.
XPress the combination switch forwards
beyond the pressure point (Ypage 108).
The _ indicator lamp on the multifunction
display lights up when it is dark and the light
sensor switches on the low-beam headlamps.
If you are driving at speeds above approx-
imately 16 mph (25 km/h):
The headlamp range is set automatically
depending on the distance between the vehi-
cle and other road users.
If you are driving at speeds above approx-
imately 19 mph (30 km/ h)and no other road
users are detected:
The high-beam headlamps are switched on
automatically. The Kindicator lamp on the
instrument cluster also lights up.
If other road users are detected, the partial
high-beam headlamps are automatically
switched on.
If you are driving at speeds below approx-
imately 16 mph (25 km/h) or the roads are
adequately illuminated:
The partial high-beam or high-beam head-
lamps are switched off automatically. The
K indicator lamp on the instrument cluster
goes out. The _indicator lamp on the
multifunction display remains lit.
XTo switch off: move the combination switch
back to its normal position or move the light
switch to another position.
The _ indicator lamp on the multifunction
display goes out.
Headlamps fogged up on the inside
Certain climatic and physical conditions may
cause moisture to form in the headlamp. This
moisture does not affect the functionality of the
headlamp.
110Exterior lighting
Lights and windshield wipers
Page 113 of 338

Interior lighting
Overview of interior lighting
Front overhead control panel
:p Left-han dfron treading lamp
;u Rear interio rlighting
=p Right-hand fron treading lamp
?| Automatic interio rlighting control
Ac Interio rlighting
Interior lighting control
General notes
In order to preven tth evehicle's battery from
discharging ,th einterio rlighting function sare
automatically deactivated after som etime
except for when th eSmartKey is in position 2in
th eignition lock.
The color ,brightness, zone and display ligh tfor
th eambien tlighting are set usin gth emultime-
dia system; see th eDigital Operator's Manual.
The interio rlighting control can be operate d
usin gth efron toverhead control panel.
Automatic interior lighting control
XTo switch on or off :press th e| button.
When th eautomatic interio rlighting control is
activated, th ebutto nis flus hwit hth eover-
head control panel.
The interio rlighting automatically switches on if
you:
Runlock th evehicl e
Ropenadoor
Rremove th eSmartKey from th eignition loc k
The interio rligh tis activated for ashort while
when th eSmartKey is remove dfrom th eignition lock. This delaye
dswitch-off can be adjusted via
th emultimedia system (see Digital Operator's
Manual).
Manual interior lighting control
XTo switch th einterior lighting on or off :
press th ec button.
XTo switch th erea rcompartmen tinterior
lighting on/off: press theu button.
XTo switch th ereadin glam pon or off :press
th ep button.
Replacing bulbs
The fron tand rear ligh tclusters of your vehicl e
are equipped wit hLE Dligh tbulbs .Do no t
replace th eLE Dligh tsource sof your vehicl e
yourself .Contac t aqualified specialist work-
sho pwhic hhas th enecessar yspecialist knowl-
edge and tools to carry out th ewor krequired.
Lamps are an important aspect of vehicl esafety.
You must therefor emak esur ethat these func-
tion correctl yat all times .Hav eth eheadlamp
setting checke dregularly.
Windshield wipers
Switching the windshield wipers
on/off
!
Do no toperate th ewindshield wiper swhen
th ewindshield is dry, as this could damag e
th ewiper blades. Moreover, dust that has col-
lecte don th ewindshield can scratch th eglass
if wipin gtakes plac ewhen th ewindshield is
dry.
If it is necessar yto switch on th ewindshield
wiper sin dry weather conditions, always use
washe rfluid when operating th ewindshield
wipers.
!If th ewindshield wiper sleav esmears on th e
windshield after th evehicl ehas been washe d
in an automatic car wash, wax or other resi-
dues may be th ereason for this. Clean th e
windshield usin gwashe rfluid after washing
th evehicl ein an automatic car wash.
!Intermittent wipin gwit hrain sensor :due to
optical influence sand th ewindshield becom-
ing dirt yin dry weather conditions, th ewind-
Windshield wipers111
Lights and windshield wipers
Z
Page 114 of 338

shield wipers may be activated inadvertently.
This could then damage the windshield wiper
blades or scratch the windshield.
For this reason, you should always switch off
the windshield wipers in dry weather.
1$ Windshield wiper off
2ÄIntermittent wiping, normal
3ÅIntermittent wiping, frequent
4°Continuous wipe, slow
5¯Continuous wipe, fast
BíSingle wipe
î Wipe with washer fluid
XSwitch on the ignition.
XTurn the combination switch to the corre-
sponding position.
In the ÅorÄ position, the appropriate
wiping frequency is set automatically according
to the intensity of the rain. In the Åposition,
the rain sensor is more sensitive than in the
Ä position, causing the windshield wiper to
wipe more frequently.
The washer fluid is fed through the wiper blades;
when the screen is wiped with washer fluid
î, the water is emitted directly from the
blades.
If you push and hold the combination switch
beyond the point of resistance in direction of
arrow B, the manual wash program is activa-
ted. If you push and hold the combination switch
briefly beyond the point of resistance in direc-
tion of arrow B, the automatic wash program is
activated.
If the wiper blades are worn, the windshield will
no longer be wiped properly. This could prevent
you from observing the traffic conditions.
Replacing the wiper blades
Important safety notes
GWARNING
If the windshield wipers begin to move while
you are changing the wiper blades, you could be trapped by the wiper arm. There is a risk of
injury.
Always switch off the windshield wipers and
ignition before changing the wiper blades.
!To avoid damaging the wiper blades, make
sure that you touch only the wiper arm of the
wiper.
!Never open the hood if a windshield wiper
arm has been folded away from the wind-
shield.
Hold the windshield wiper arm firmly when
you change the wiper blade. If you release the
windshield wiper arm without a wiper blade
and it falls onto the windshield, the windshield
may be damaged by the force of the impact.
Mercedes-Benz recommends that you have
the wiper blades changed at a qualified spe-
cialist workshop.
!Always position the windshield wiper arms
vertically before folding them away from the
windshield. By doing so, you will avoid dam-
age to the hood.
Replacing the wiper blades
Moving the wiper arms to a vertical posi-
tion
XSwitch off the engine.
XRemove your foot from the brake pedal.
XSet the windshield wiper to the °position
on the combination switch.
XPress the Start/Stop button repeatedly until
the windshield wiper starts.
XWhen the wiper arms are vertical to the hood,
press the Start/Stop button.
XFold the wiper arm away from the windshield.
112Windshield wipers
Lights and windshield wipers
Page 115 of 338

Removing the wiper blades
XTo bring the wiper blade into the removal
position:hold onto the wiper arm with one
hand. With the other hand, turn the wiper
blade in the direction of arrow :beyond the
point of resistance.
The wiper blade engages in the removal posi-
tion with an audible click.
XTo remove a wiper blade: firmly press
release knob ;and pull the wiper blade
upwards =.
Installing the wiper blades
XPush the new wiper blade in the direction of
arrow:onto the wiper arm until tab ;
engages.
XPush the wiper blade out of the removal posi- tion in the direction of arrow =beyond the
point of resistance.
The wiper blade disengages with an audible
click and is freely movable again.
XMake sure that the wiper blade is seated cor-
rectly.
XFold the wiper arm back onto the windshield.
Problems with the windshield wipers
ProblemPossible causes/consequences and MSolutions
The windshield wipers
are jammed.Leaves or snow, for example, are obstructing windshield wiper move-
ment. The wiper motor has been deactivated.
XSwitch off the engine.
XOpen the driver's door.
The vehicle electronics now have status 0. This is the same as the
SmartKey having been removed.
XRemove the cause of the obstruction.
XSwitch the windshield wipers back on.
The windshield wipers
fail completely.The windshield wiper drive is malfunctioning.
XSelect another wiper speed on the combination switch.
XHave the windshield wipers checked at a qualified specialist work-
shop.
Windshield wipers113
Lights and windshield wipers
Z
Page 117 of 338

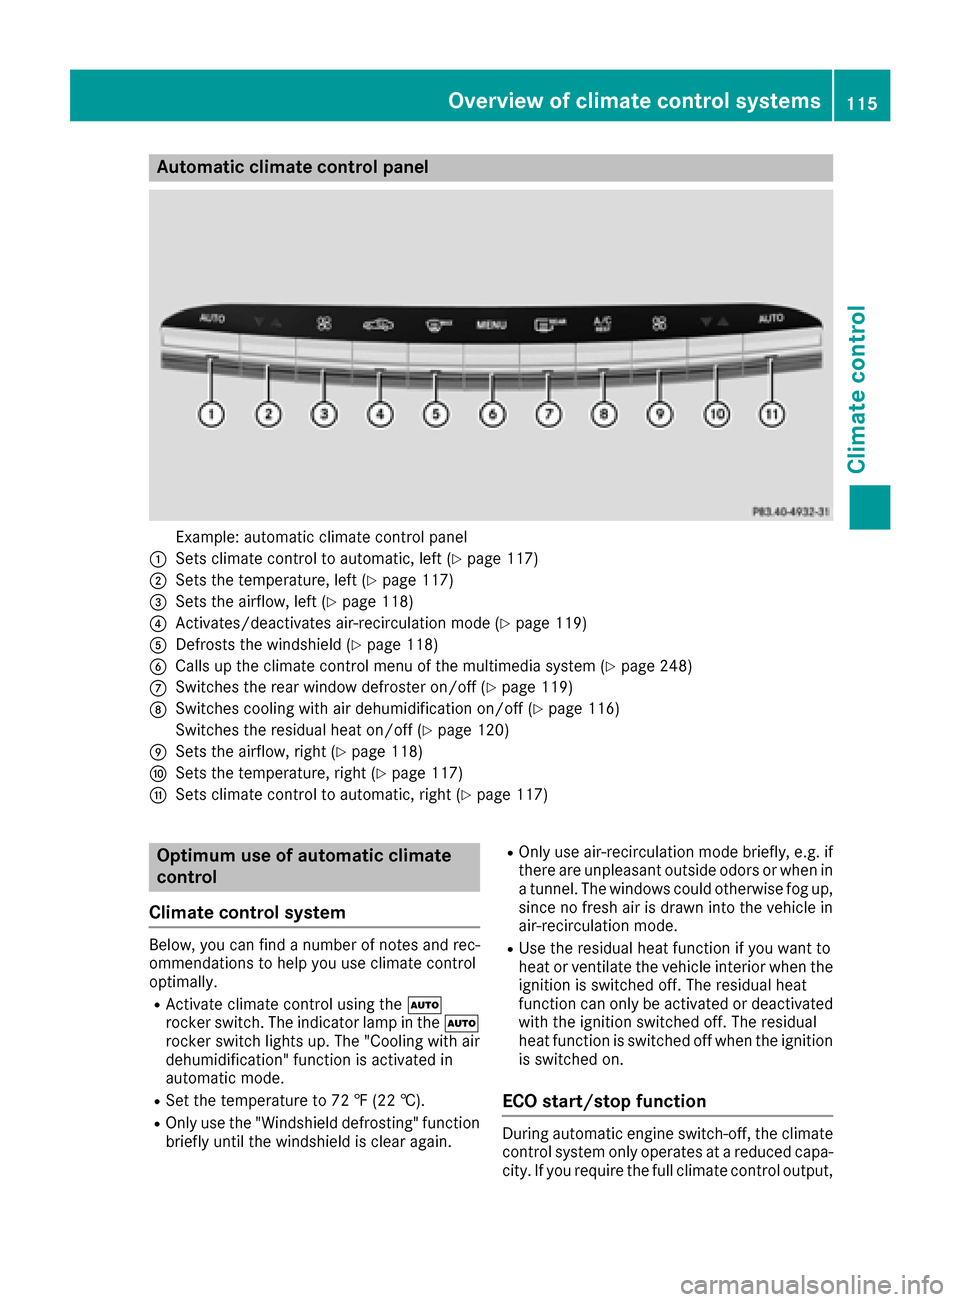
Automa tic climate control panel
Example: automatic climat econtrol panel
:Sets climat econtrol to automatic, lef t (Ypage 117)
;Sets thetemperature, lef t (Ypage 117)
=Sets theairflow, lef t (Ypage 118)
?Activates/deactivates air-recirculation mod e (Ypage 119)
ADefroststh ewindshield (Ypage 118)
BCalls up theclimat econtrol men uof th emultimedia system (Ypage 248)
CSwitches therear window defroste ron/off (Ypage 119)
DSwitches coolin gwit hair dehumidification on/off (Ypage 116)
Switches th eresidual heat on/off (
Ypage 120)
ESets theairflow, right (Ypage 118)
FSets thetemperature, right (Ypage 117)
GSets climatecontrol to automatic, right (Ypage 117)
Optimum use ofautomatic climate
control
Climate control system
Below, you can fin d anumber of note sand rec -
ommendation sto help you use climat econtrol
optimally.
RActivat eclimat econtrol usin gth eÃ
rocke rswitch .The indicator lamp in th eÃ
rocke rswitch lights up. The "Cooling wit hair
dehumidification "function is activated in
automatic mode.
RSe tth etemperature to 72 ‡(22 †).
ROnly use th e"Windshield defrosting "function
briefl yuntil th ewindshield is clear again .
ROnly use air-recirculation mod ebriefly, e.g. if
there are unpleasant outside odor sor when in
a tunnel. The windows could otherwise fog up,
since no fresh air is draw nint oth evehicl ein
air-recirculation mode.
RUse th eresidual heat function if you want to
heat or ventilat eth evehicl einterior when th e
ignition is switched off .The residual heat
function can only be activated or deactivated
wit hth eignition switched off .The residual
heat function is switched off when th eignition
is switched on .
ECO start/stop function
During automatic engin eswitch-off ,th eclimat e
control system only operate sat areduce dcapa-
city. If you require th efull climat econtrol output ,
Overview of climate control systems115
Climate control
Page 118 of 338

you can switch off theECO start/sto pfunction
by pressing th eECO butto n (Ypage 129).
Operating the climate contro l sys-
tems
Activating/deactivating climate con-
tr ol
Gene ral notes
Whe nth eclimat econtrol is switched off ,th eair
supply and air circulation are also switched off .
The windows could fog up. Therefore ,switch off
climat econtrol only briefl y
Switc hon climat econtrol primarily usin gth e
à rockerswitch (
Ypage 117).
Activating/deactivating
XTurn theSmartKey to position 2in th eignition
loc k (Ypage 124).
XTo activate: set theairflow to level 1or higher
usin gth eK rockerswitch .
XTo deactivate: set theairflow to level 0usin g
th eK rockerswitch .
Switching cooling with air dehumidi-
ficationon/off
Gene ral notes
If you deactivat eth e"Coolin gwit hair-dehumid -
ification "function ,th eair inside th evehicl ewill no
tbe cooled .The air inside th evehicl ewill also
no tbe dehumidified. The windows can fog up
mor equickly. Therefore ,only deactivat eth e
"Coolin gwit hair-dehumidification "function
briefly.
The "Coolin gwit hair dehumidification "function
is only available when th eengin eis running .The
air inside th evehicl eis cooled and dehumidifie d
accordin gto th etemperature selected.
Condensation may dri pfrom th eunderside of
th evehicl ewhen it is in coolin gmode. This is
normal and no t asign that there is amalfunc -
tion .
Acti vating/deactivating
XTo activate: press theÁ rockerswitch up
or down .
The indicato rlamp abov eth erocke rswitch
lights up.
XTo switch off :press th eÁ rockerswitch
up or down .
The indicato rlamp abov eth erocke rswitch
goe sout .
Problems with the "Cooling with air dehumidification" function
ProblemPossible causes/consequences and MSolutions
The indicatorlamp in th e
Á buttonflashes
three times or remain s
off .Cooling wit hair
dehumidification can
also no longer be activa-
te dusin gth emultimedia
system; see th eDigital
Operator' sManual.Cooling wit hair dehumidification has been deactivated due to amal-
function .
XVisitaqualified specialist workshop .
116Operating the climate control systems
Climate control