2017 MERCEDES-BENZ GLS display
[x] Cancel search: displayPage 51 of 390
In the following situation, the side impact air bag
and the Emergency Tensioning Device are deac-
tivated: R
OCS has not categorized the person on the
front-passenger seat as an adult or a person
of corresponding stature and R
the seat belt tongue of the seat belt is not
inserted into the front-passenger seat belt
buckle
Requirements To be classified correctly, the front passenger
must sit: R
with the seat belt fastened correctly R
in an almost upright position with their back
against the seat backrest R
with their feet resting on the floor, if possible
If the front passenger does not observe these
conditions, OCS may produce a false classifica-
tion, e.g. because the front passenger: R
transfers their weight by supporting them-
selves on a vehicle armrest R
sits in such a way that their weight is raised
from the seat cushion
If it is absolutely necessary to install a child
restraint system on the front-passenger seat, be
sure to observe the correct positioning of the
child restraint system. Never place objects
under or behind the child restraint system, e.g. a
cushion. The entire base of the child restraint
system must always rest on the seat cushion of
the front-passenger seat. The backrest of the
forward-facing child restraint system must lie as
flat as possible against the backrest of the front-
passenger seat.
The child restraint system must not touch the
roof or be subjected to a load by the head
restraint. Adjust the angle of the seat backrest
and the head restraint position accordingly.
Only then can OCS be guaranteed to function
correctly. Always observe the child restraint sys-
tem manufacturer's installation and operating
instructions. Occupant Classification System opera-
tion (OCS)
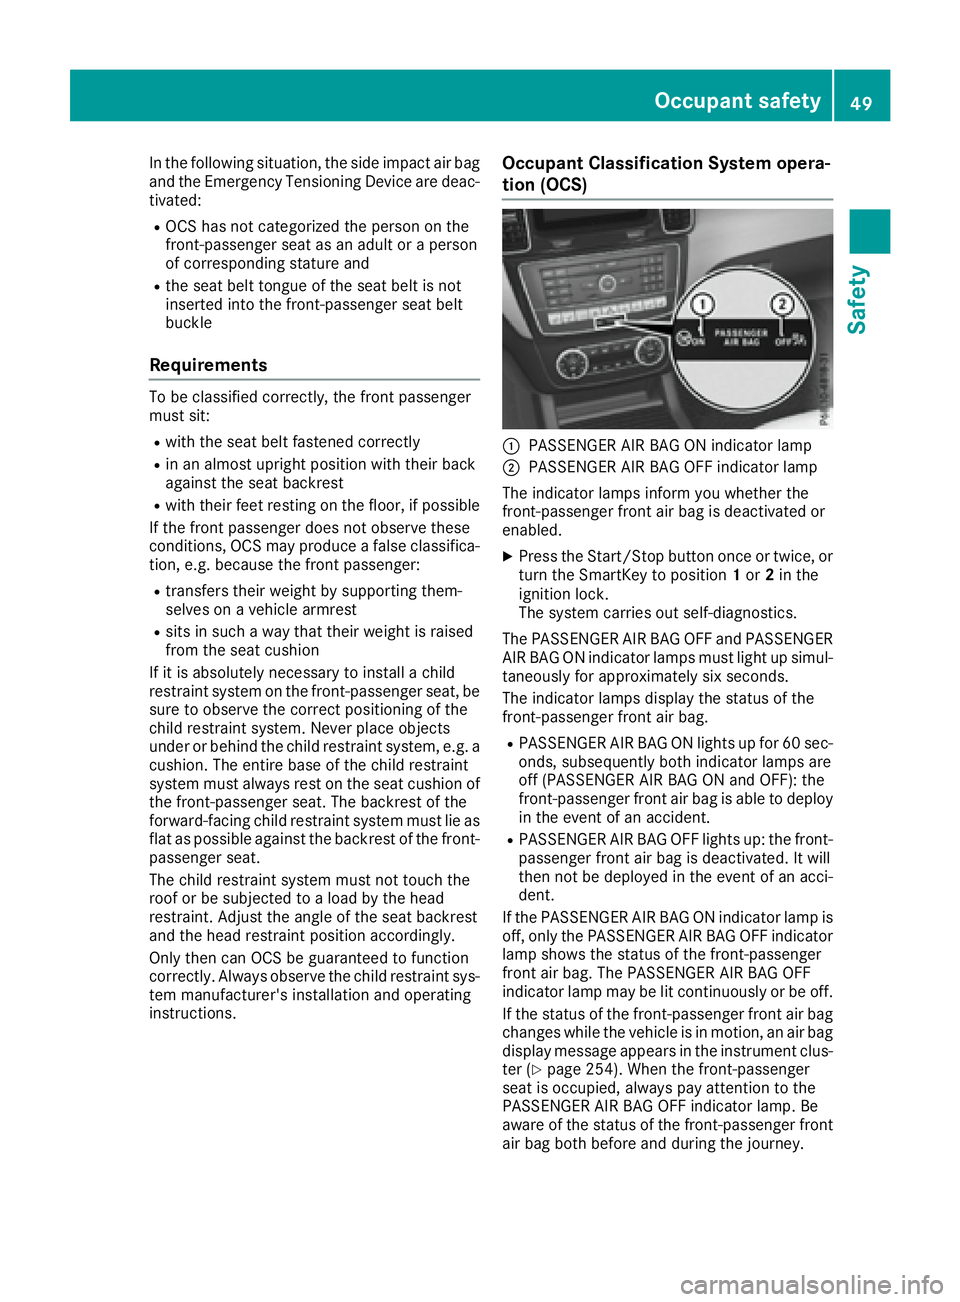
�C
PASSENGER AIR BAG ON indicator lamp �D
PASSENGER AIR BAG OFF indicator lamp
The indicator lamps inform you whether the
front-passenger front air bag is deactivated or
enabled. X
Press the Start/Stop button once or twice, or
turn the SmartKey to position 1 or 2 in the
ignition lock.
The system carries out self-diagnostics.
The PASSENGER AIR BAG OFF and PASSENGER
AIR BAG ON indicator lamps must light up simul-
taneously for approximately six seconds.
The indicator lamps display the status of the
front-passenger front air bag. R
PASSENGER AIR BAG ON lights up for 60 sec-
onds, subsequently both indicator lamps are
off (PASSENGER AIR BAG ON and OFF): the
front-passenger front air bag is able to deploy
in the event of an accident. R
PASSENGER AIR BAG OFF lights up: the front-
passenger front air bag is deactivated. It will
then not be deployed in the event of an acci-
dent.
If the PASSENGER AIR BAG ON indicator lamp is
off, only the PASSENGER AIR BAG OFF indicator
lamp shows the status of the front-passenger
front air bag. The PASSENGER AIR BAG OFF
indicator lamp may be lit continuously or be off.
If the status of the front-passenger front air bag
changes while the vehicle is in motion, an air bag
display message appears in the instrument clus-
ter ( Y
page 254). When the front-passenger
seat is occupied, always pay attention to the
PASSENGER AIR BAG OFF indicator lamp. Be
aware of the status of the front-passenger front
air bag both before and during the journey.Occupant safety 49
Safety Z
Page 54 of 390
passenger seat may not be used. Do not
install a child restraint system on the front-
passenger seat. Have the Occupant Classifi-
cation System (OCS) checked and repaired
immediately at a qualified specialist work-
shop.
G WARNING
Objects between the seat surface and the
child restraint system could affect OCS oper-
ation. This could result in the front-passenger
air bag not functioning as intended during an
accident. This poses an increased risk of
injury or even fatal injury.
Do not place any objects between the seat
surface and the child restraint system. The
entire base of the child restraint system must
always rest on the seat cushion of the front-
passenger seat. The backrest of the forward- facing child restraint system must, as far as
possible, be resting on the backrest of the
front-passenger seat. Always comply with the
child restraint system manufacturer's instal-
lation instructions.
After the system self-test, the PASSENGER AIR
BAG OFF or PASSENGER AIR BAG ON indicator
lamp displays the status of the front-passenger
front air bag ( Y
page 49). If the front-passenger
front air bag is enabled, the PASSENGER AIR
BAG ON indicator lamp lights up for 60 seconds
and then goes out.
If the PASSENGER AIR BAG ON indicator lamp is
off, only the PASSENGER AIR BAG OFF indicator
lamp shows the status of the front-passenger
front air bag. The PASSENGER AIR BAG OFF
indicator lamp may be lit continuously or be off.
For more information about the OCS, see "Prob-
lems with the Occupant Classification System"
( Y
page 52).
Problems with the Occupant Classification System (OCS) Be sure to observe the notes on "System self-test" ( Y
page 51).52
Occupant safety
Safety
Page 71 of 390
Trailer stabilization is active above speeds of
about 37 mph (60 km/ h) .
ESP ®
trailer stabilization does not work if ESP ®
is deactivated or disabled because of a malfunc-
tion.
Crosswind Assist General information Strong crosswind gusts can impair the ability of
your vehicle to drive straight ahead. The cross-
wind driving assistance function integrated in
ESP ®
noticeably reduces these impairments.
ESP ®
intervenes automatically according to the
direction and intensity of the crosswinds affect-
ing your vehicle.
ESP ®
intervenes with stabilizing braking to
assist you in keeping the vehicle in the lane.
Crosswind Assist is active at vehicle speeds
above 50 mph (80 km/h) when driving straight
ahead or cornering gently.
Important safety notes Crosswind Assist does not work if ESP ®
is
switched off or deactivated because of a mal-
function.
EBD (electronic brake force distribu-
tion)
General information EBD monitors and controls the brake pressure
on the rear wheels to improve driving stability
while braking.
Important safety notes
i Observe the "Important safety notes" sec-
tion for driving safety systems ( Y
page 63).
G WARNING
If EBD is malfunctioning, the rear wheels can
lock, e.g. under full braking. This increases the
risk of skidding and an accident.
You should therefore adapt your driving style
to the different handling characteristics. Have
the brake system checked at a qualified spe-
cialist workshop. Observe information regarding indicator and
warning lamps ( Y
page 277) as well as display
messages ( Y
page 247).
ADAPTIVE BRAKE ADAPTIVE BRAKE enhances braking safety and
offers increased braking comfort. In addition to
the braking function, ADAPTIVE BRAKE also has
the HOLD function ( Y
page 185) and hill start
assist ( Y
page 141).
Active Brake Assist with cross-traffic
function
General information
i Pay attention to the important safety notes
in the "Driving safety systems" section
( Y
page 63).
Active Brake Assist with cross-traffic function
can help you to minimize the risk of a collision
with a vehicle in front or a pedestrian and reduce
the effects of such a collision. If the Active Brake
Assist with cross-traffic function detects a risk
of collision, you will be warned visually and
acoustically and, if necessary, your brake appli-
cation will be assisted according to the situa-
tion. If you do not react, the system can also
react by braking automatically. In the event of a
detected risk of collision due to crossing traffic,
you will also be visually and acoustically warned
as well as assisted by the brake boosting effect
according to the situation.
Active Brake Assist with cross-traffic function is
only available in vehicles with the Driving Assis-
tance Plus package.
For Active Brake Assist with cross-traffic func-
tion to assist you when driving, the radar sensor
system and the camera system must be opera-
tional.
If the radar sensor system or the camera system
is malfunctioning, Active Brake Assist with
cross-traffic function is restricted or no longer
available. The brake system is still available with
co mplete brake boosting effect and BAS.
The radar sensor system and camera system
help Active Brake Assist with cross-traffic func-
tion to detect obstacles that are in the path of
your vehicle for an extended period of time.
In addition, pedestrians in the path of your vehi-
cle can be detected.Driving safet y system s 69
Safet y Z
Page 101 of 390
Folding the seats up/down (third row of
seats) General notes
! Mak e sure that there is nothing on th e fol -
ded-down seat s in th e cargo compartment.
The cargo compartmen t must be empty for
th e third row of seat s to be folded up. The
seat s or th e object s in th e cargo compart-
men t could otherwise be damaged.
Mak e sure that th e seat s in th e third row are
empty and no t blocke d before foldin g them
down .
The 3r d row of seat s consist s of two electrically
foldable individual seats, whic h can be lowered
int o th e cargo compartment.
If th e seat is no t correctly locke d in position , th e
display message : 3rd Sea t Row , Right Not
Locked appear s in th e multifunction display.
If you fol d th e seat bac k until it engages, th e
display message disappears.
Pull th e backrest firmly to ensure that it is fully
engaged.
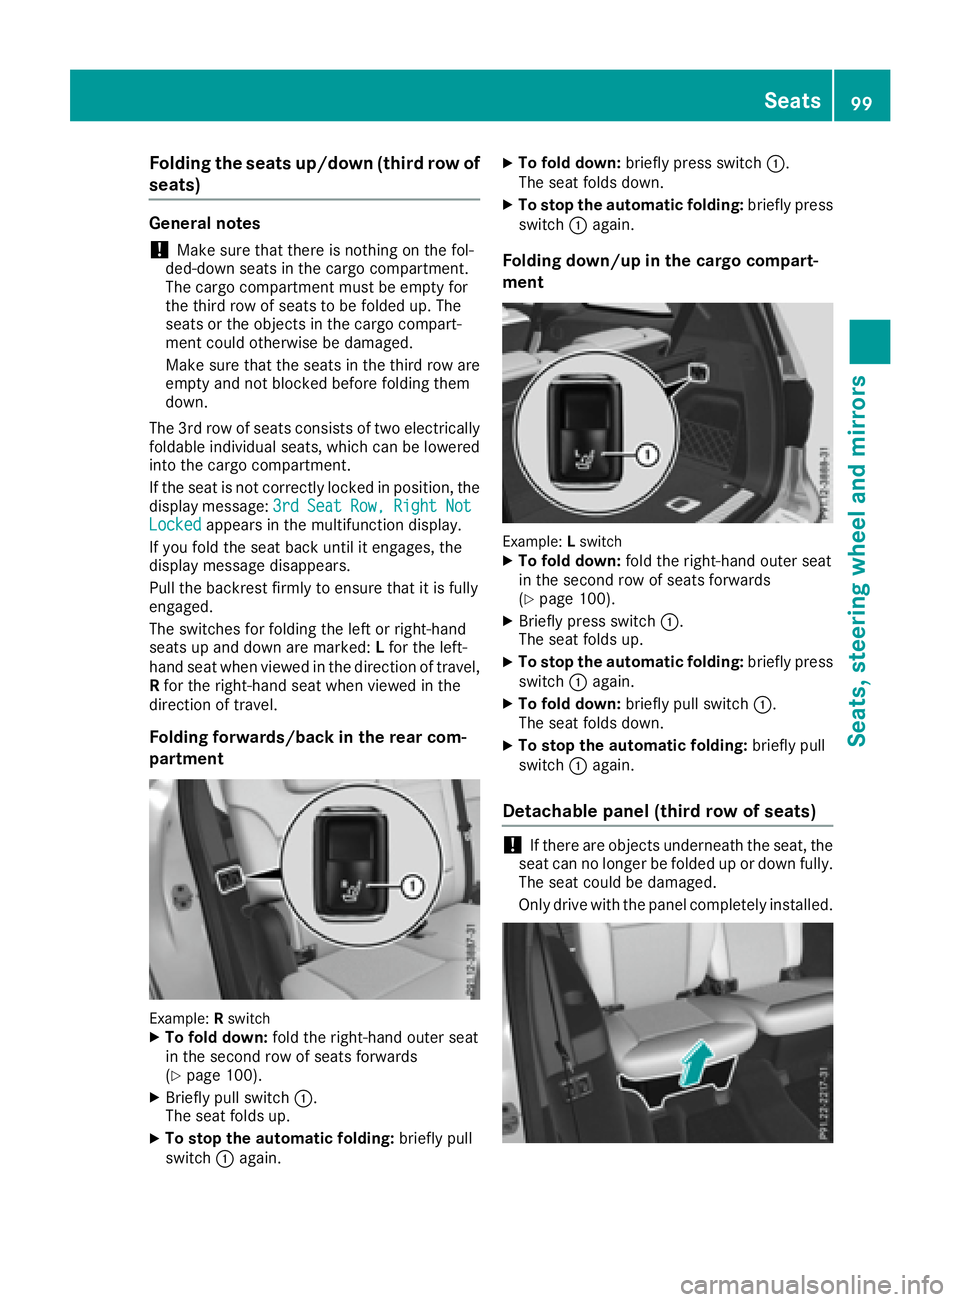
The switches for foldin g th e lef t or right-hand
seat s up and down are marked: L for th e left-
han d seat when viewed in th e direction of travel ,
R for th e right-hand seat when viewed in th e
direction of travel .
Folding forwards/back in the rear com-
pa rt ment
Example: R switchX
To fold down : fol d th e right-hand outer seat
in th e secon d row of seat s forwards
( Y
page 100). X
Briefly pull switch �C .
The seat folds up. X
To stop th e automatic folding: briefly pull
switch �C again . X
To fold down : briefly press switch �C .
The seat folds down .X
To stop th e automatic folding: briefly press
switch �C again .
Folding down/up in th e cargo compar t-
ment
Example: L switch X
To fold down : fol d th e right-hand outer seat
in th e secon d row of seat s forwards
( Y
page 100). X
Briefly press switch �C .
The seat folds up. X
To stop th e automatic folding: briefly press
switch �C again . X
To fold down : briefly pull switch �C .
The seat folds down .X
To stop th e automatic folding: briefly pull
switch �C again .
Detachable panel (third row of seats)
! If there are object s underneat h th e seat , th e
seat can no longer be folded up or down fully.
The seat could be damaged.
Only driv e wit h th e panel completely installed.Seats 99
Seats, steering wheel and mirrors Z
Page 102 of 390
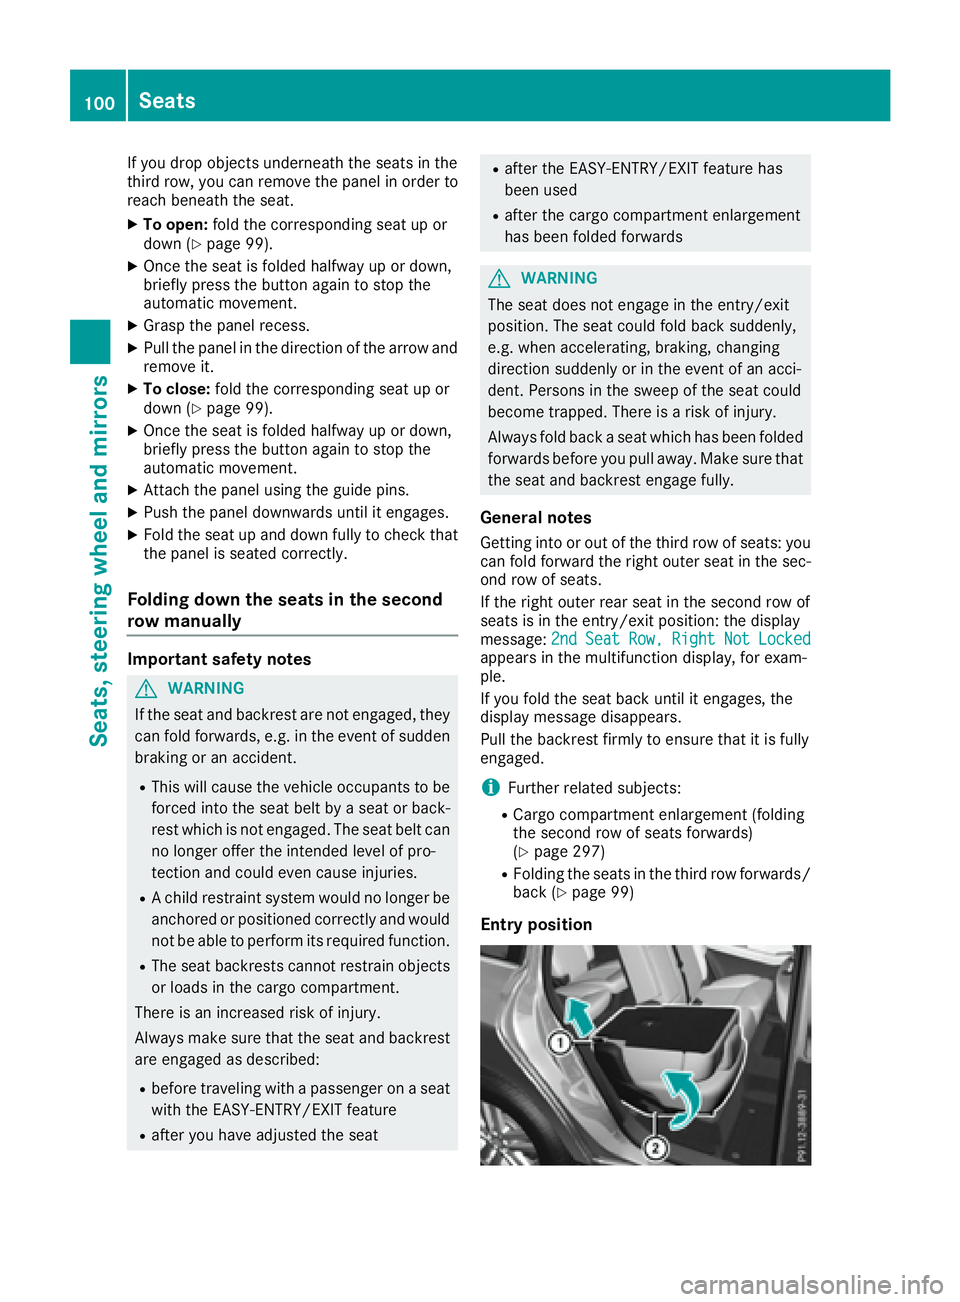
If you drop objects underneath the seats in the
third row, you can remove the panel in order to
reach beneath the seat. X
To open: fold the corresponding seat up or
down ( Y
page 99).X
Once the seat is folded halfway up or down,
briefly press the button again to stop the
automatic movement. X
Grasp the panel recess. X
Pull the panel in the direction of the arrow and
remove it. X
To close: fold the corresponding seat up or
down ( Y
page 99).X
Once the seat is folded halfway up or down,
briefly press the button again to stop the
automatic movement. X
Attach the panel using the guide pins. X
Push the panel downwards until it engages. X
Fold the seat up and down fully to check that
the panel is seated correctly.
Folding down the seats in the second
row manually
Important safety notes
G WARNING
If the seat and backrest are not engaged, they
can fold forwards, e.g. in the event of sudden
braking or an accident. R
This will cause the vehicle occupants to be
forced into the seat belt by a seat or back-
rest which is not engaged. The seat belt can
no longer offer the intended level of pro-
tection and could even cause injuries. R
A child restraint system would no longer be
anchored or positioned correctly and would
not be able to perform its required function. R
The seat backrests cannot restrain objects
or loads in the cargo compartment.
There is an increased risk of injury.
Always make sure that the seat and backrest
are engaged as described: R
before traveling with a passenger on a seat
with the EASY-ENTRY/EXIT feature R
after you have adjusted the seat R
after the EASY-ENTRY/EXIT feature has
been used R
after the cargo compartment enlargement
has been folded forwards
G WARNING
The seat does not engage in the entry/exit
position. The seat could fold back suddenly,
e.g. when accelerating, braking, changing
direction suddenly or in the event of an acci-
dent. Persons in the sweep of the seat could
become trapped. There is a risk of injury.
Always fold back a seat which has been folded
forwards before you pull away. Make sure that
the seat and backrest engage fully.
General notes Getting into or out of the third row of seats: you
can fold forward the right outer seat in the sec-
ond row of seats.
If the right outer rear seat in the second row of
seats is in the entry/exit position: the display
message: 2nd Seat Row, Right Not Locked
appears in the multifunction display, for exam-
ple.
If you fold the seat back until it engages, the
display message disappears.
Pull the backrest firmly to ensure that it is fully
engaged.
i Further related subjects: R
Cargo compartment enlargement (folding
the second row of seats forwards)
( Y
page 297) R
Folding the seats in the third row forwards/
back ( Y
page 99)
Entry position100
Seats
Seats, steering wheel and mirrors
Page 105 of 390
One of the outer seats of the second row is in the
entry/exit position: the multifunction display
shows, e.g. the 2nd Seat Row, Right Not
Locked display message.
If you fold the seat back until it engages, the
display message disappears.
Pull the backrest firmly to ensure that it is fully
engaged.
i Further related subjects: R
Cargo compartment enlargement (folding
the second row of seats forwards)
( Y
page 297) R
Folding the seats in the third row forwards/
back ( Y
page 99)
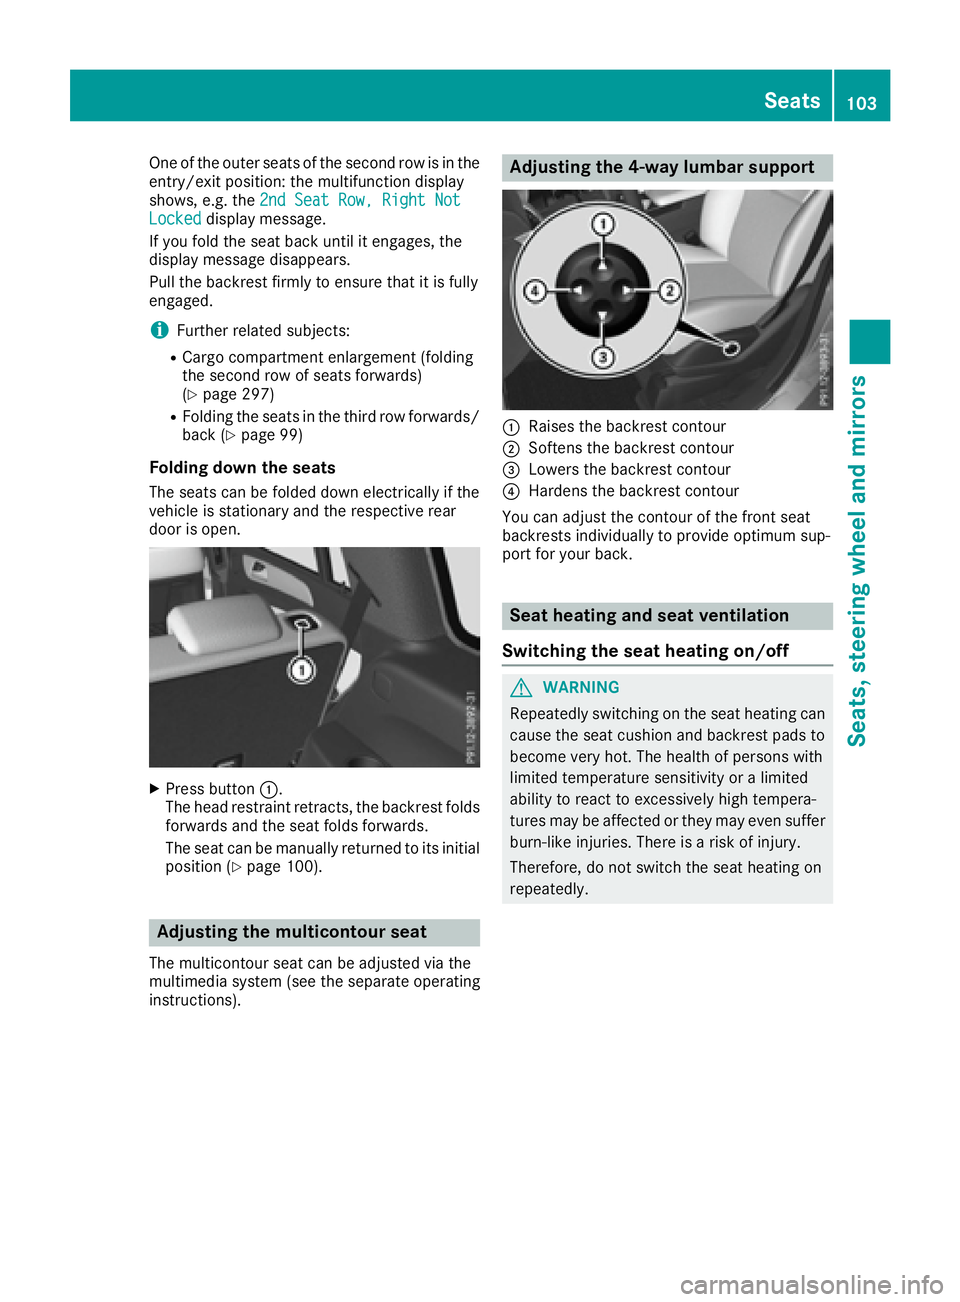
Folding down the seats The seats can be folded down electrically if the
vehicle is stationary and the respective rear
door is open.
X
Press button �C .
The head restraint retracts, the backrest folds
forwards and the seat folds forwards.
The seat can be manually returned to its initial
position ( Y
page 100).
Adjusting the multicontour seat The multicontour seat can be adjusted via the
multimedia system (see the separate operating
instructions). Adjusting the 4-way lumbar support
�C
Raises the backrest contour �D
Softens the backrest contour �
Page 128 of 390
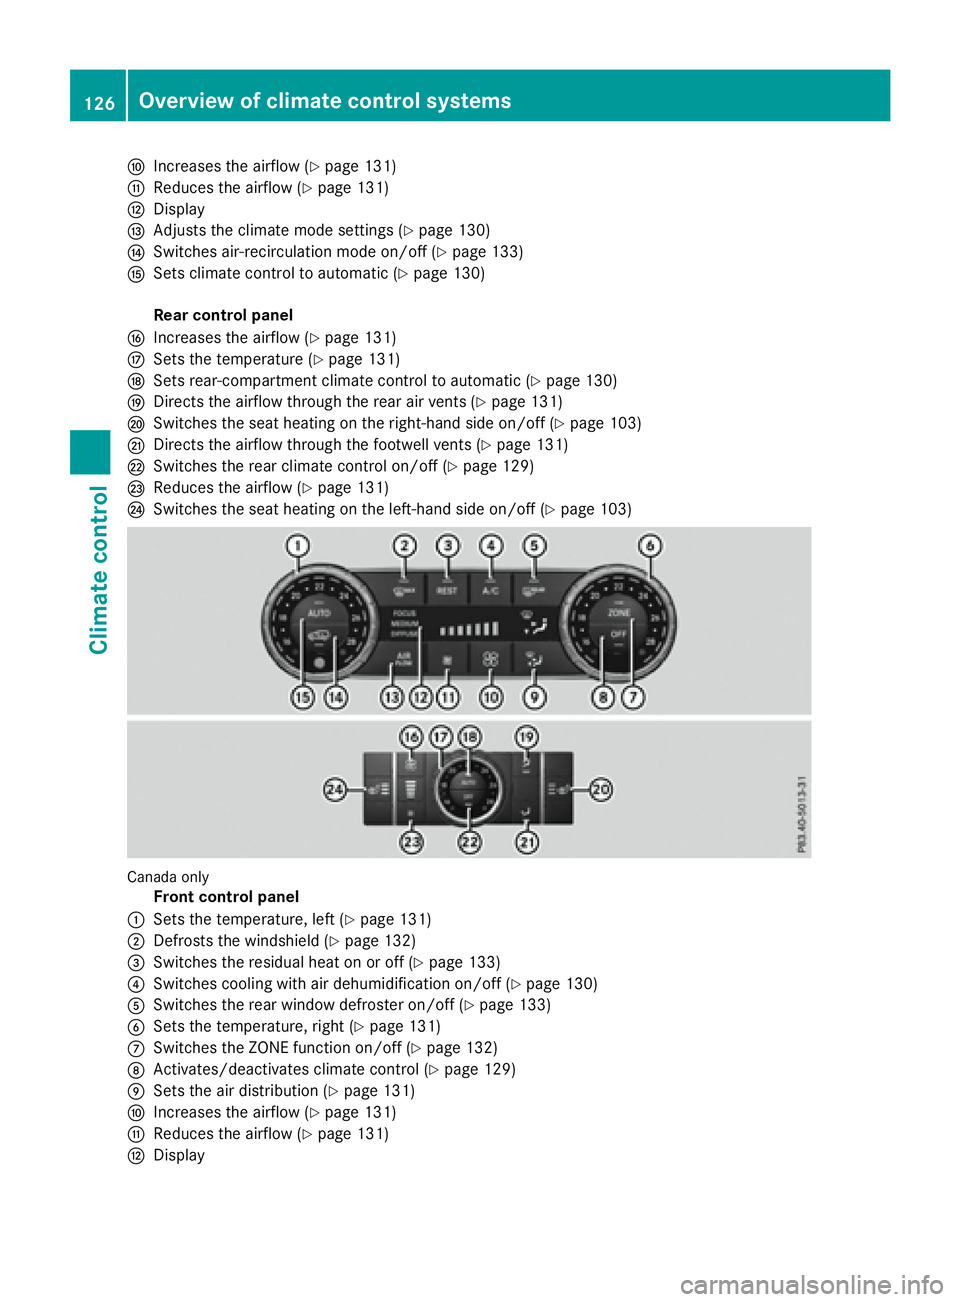
�n
Increases the airflow ( Y
page 131)�o
Reduces the airflow ( Y
page 131)�p
Display�q
Adjusts the climate mode settings ( Y
page 130)�r
Switches air-recirculation mode on/off ( Y
page 133)�s
Sets climate control to automatic ( Y
page 130)
Rear control panel�t
Increases the airflow ( Y
page 131)�u
Sets the temperature ( Y
page 131)�v
Sets rear-compartment climate control to automatic ( Y
page 130)�w
Directs the airflow through the rear air vents ( Y
page 131)�x
Switches the seat heating on the right-hand side on/off ( Y
page 103)�y
Directs the airflow through the footwell vents ( Y
page 131)�z
Switches the rear climate control on/off ( Y
page 129)�{
Reduces the airflow ( Y
page 131)�|
Switches the seat heating on the left-hand side on/off ( Y
page 103)
Canada only
Front control panel�C
Sets the temperature, left ( Y
page 131)
�D
Defrosts the windshield ( Y
page 132)
�
Page 130 of 390
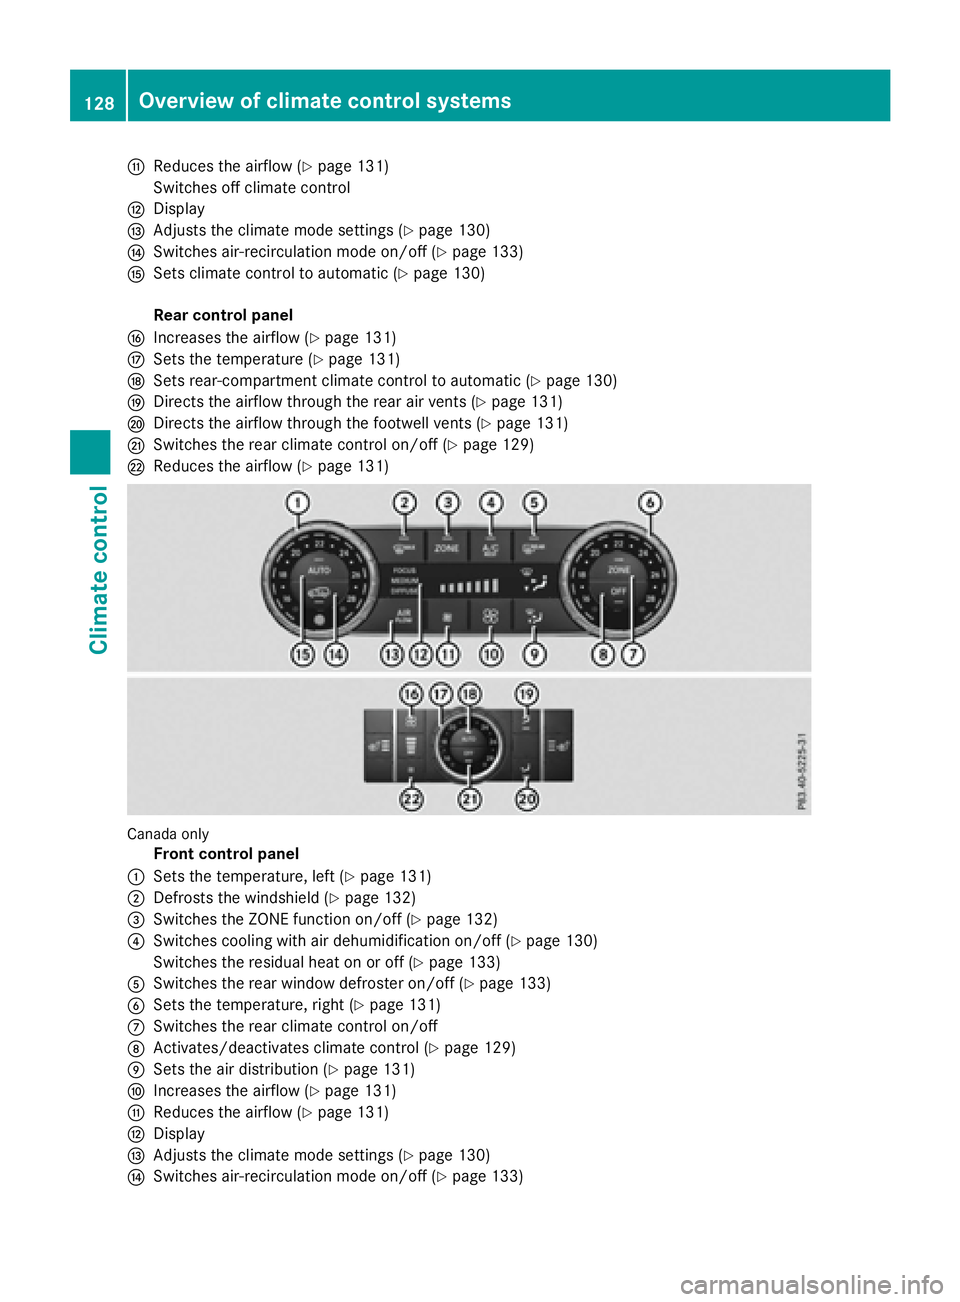
�o
Reduces th e airflow ( Y
page 131)
Switches off climat e control�p
Display�q
Adjusts th e climat e mod e setting s ( Y
page 130)�r
Switches air-recirculation mod e on/off ( Y
page 133)�s
Sets climat e control to automatic ( Y
page 130)
Rea r control panel�t
Increase s th e airflow ( Y
page 131)�u
Sets th e temperature ( Y
page 131)�v
Sets rear-compartmen t climat e control to automatic ( Y
page 130)�w
Directs th e airflow throug h th e rear air vents ( Y
page 131)�x
Directs th e airflow throug h th e footwell vents ( Y
page 131)�y
Switches th e rear climat e control on/off ( Y
page 129)�z
Reduces th e airflow ( Y
page 131)
Canad a only
Front control panel�C
Sets th e temperature, lef t ( Y
page 131)�D
Defrost s th e windshield ( Y
page 132)�