2017 MERCEDES-BENZ GLS ESP
[x] Cancel search: ESPPage 74 of 390
Up to a speed of approximately 44 mph
(70 km/h) the Active Brake Assist with cross-
traffic function assists you with braking in haz-
ardous situations with: R
stationary obstacles in the path of the vehicle,
e.g. stopped or parked vehicles R
stationary pedestrians in the path of the vehi-
cle R
obstacles crossing your path that move in the
detection range of the sensors and are detec-
ted X
Keep the brake pedal depressed until the
emergency braking situation is over.
ABS prevents the wheels from locking.
You can prevent the intervention of Active Brake
Assist with cross-traffic function at any time by: R
depressing the accelerator pedal further R
activating kickdown R
releasing the brake pedal
The braking application of Active Brake Assist
with cross-traffic function is ended automati-
cally if: R
you maneuver to avoid the obstacle R
there is no longer a risk of collision R
there is no longer an obstacle detected in
front of your vehicle
STEER CONTROL
General information STEER CONTROL helps you by transmitting a
noticeable steering force to the steering wheel
in the direction required for vehicle stabilization.
This steering assistance is provided in particular
if: R
both right wheels or both left wheels are on a
wet or slippery road surface when you brake R
the vehicle starts to skid
Important safety notes
i Observe the "Important safety notes" sec-
tion ( Y
page 63). No steering assistance is provided from STEER
CONTROL, if: R
ESP ®
is deactivated R
ESP ®
is malfunctioning R
the steering is malfunctioning
If ESP ®
is malfunctioning, you will be assisted
further by the electrical power steering.
Protection against theft
Immobilizer X
To activate with the SmartKey: remove the
SmartKey from the ignition lock. X
To activate with KEYLESS-GO: switch the
ignition off and open the driver's door. X
To deactivate: switch on the ignition.
The immobilizer prevents your vehicle from
being started without the correct SmartKey.
When leaving the vehicle, always take the
SmartKey with you and lock the vehicle. Anyone
can start the engine if a valid SmartKey has been
left inside the vehicle.
i The immobilizer is always deactivated when
you start the engine.
In the event that the engine cannot be started
(yet the vehicle's battery is charged), the sys-
tem is not operational. Contact an authorized
Mercedes-Benz Center or call
1-800-FOR-MERCedes (in the USA) or
1-800-387-0100 (in Canada).
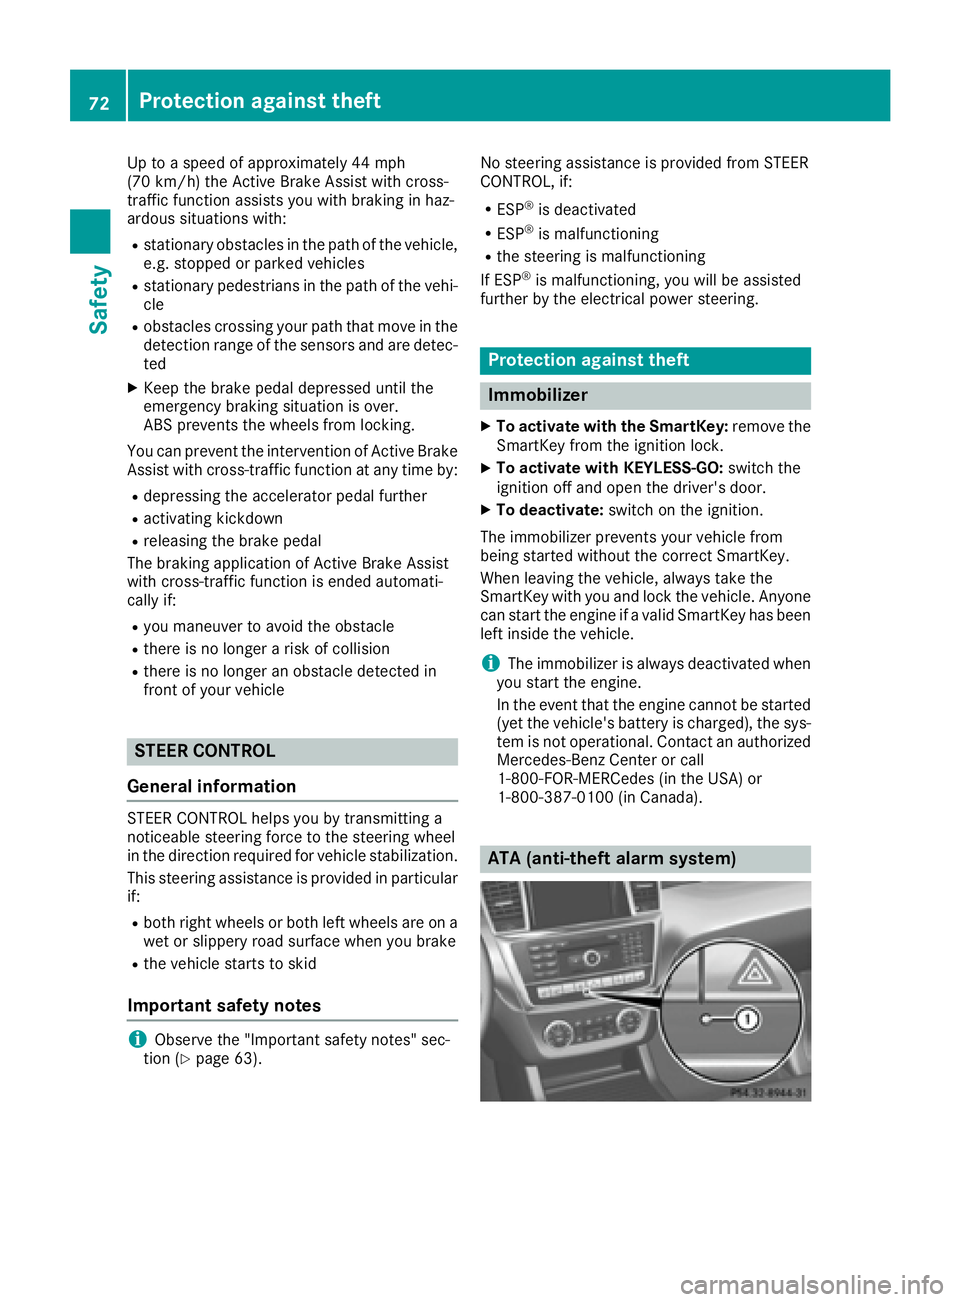
ATA (anti-theft alarm system)72
Protection against theft
Safety
Page 77 of 390
If activated in the multimedia system, the loca-
tor lighting also lights up in the dark (see sepa-
rate operating instructions). X
To open the tailgate automatically from
outside the vehicle: press and hold the �T
button until the tailgate opens.
Vehicles with KEYLESS-GO: X
To close the tailgate automatically from
outside the vehicle: if the SmartKey is loca-
ted in the immediate vicinity of the vehicle,
press the �T button on the SmartKey.
When the tailgate closes you can then release
the button.
KEYLESS-GO
General notes Bear in mind that the engine can be started by
any of the vehicle occupants if there is a KEY-
LESS-GO key in the vehicle ( Y
page 140).
Locking/unlocking centrally You can start, lock or unlock the vehicle using
KEYLESS-GO. To do this, you only need carry the
SmartKey with you. You can combine the func-
tions of KEYLESS-GO with those of a conven-
tional SmartKey. Unlock the vehicle by using
KEYLESS-GO, for instance, and lock it using the
�7 button on the SmartKey.
The driver's door and the door at which the han-
dle is used, must both be closed. The SmartKey
must be outside the vehicle. When locking or
unlocking with KEYLESS-GO, the distance
between the SmartKey and the corresponding
door handle must not be greater than 3 ft (1 m).
KEYLESS-GO checks whether a valid SmartKey
is in the vehicle by periodically establishing a
radio connection between the vehicle and the
SmartKey. This happens: R
when starting the engine R
while driving R
when the external door handles are touched R
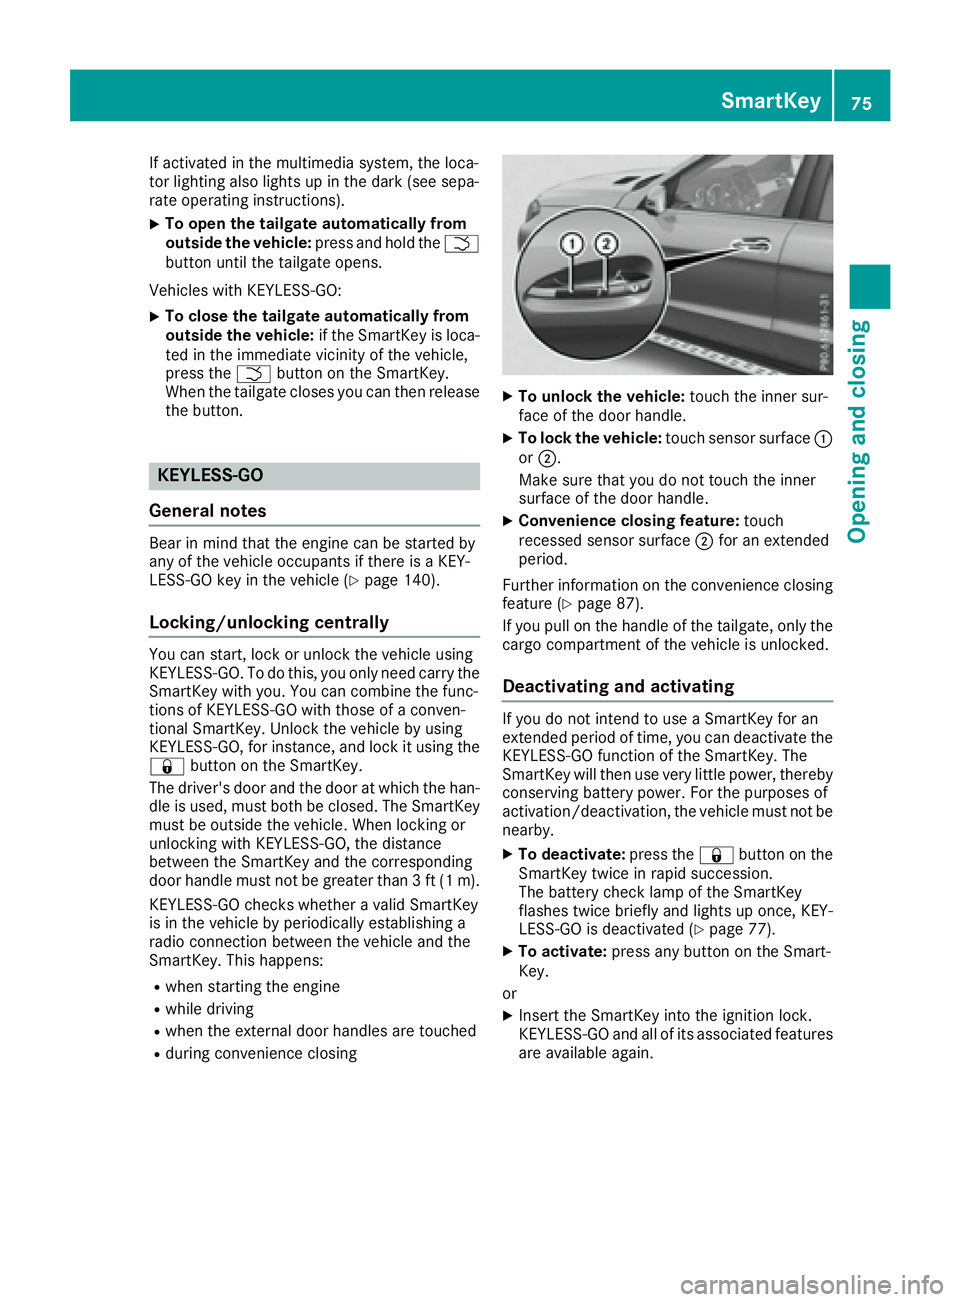
during convenience closing X
To unlock the vehicle: touch the inner sur-
face of the door handle. X
To lock the vehicle: touch sensor surface �C
or �D .
Make sure that you do not touch the inner
surface of the door handle. X
Convenience closing feature: touch
recessed sensor surface �D for an extended
period.
Further information on the convenience closing
feature ( Y
page 87).
If you pull on the handle of the tailgate, only the
cargo compartment of the vehicle is unlocked.
Deactivating and activating If you do not intend to use a SmartKey for an
extended period of time, you can deactivate the
KEYLESS-GO function of the SmartKey. The
SmartKey will then use very little power, thereby
conserving battery power. For the purposes of
activation/deactivation, the vehicle must not be
nearby. X
To deactivate: press the �7 button on the
SmartKey twice in rapid succession.
The battery check lamp of the SmartKey
flashes twice briefly and lights up once, KEY-
LESS-GO is deactivated ( Y
page 77).X
To activate: press any button on the Smart-
Key.
or X
Insert the SmartKey into the ignition lock.
KEYLESS-GO and all of its associated features
are available again. SmartKey 75
Opening and closing Z
Page 84 of 390
G WARNING
If objects, luggage or loads are not secured or
not secured sufficiently, they could slip, tip
over or be flung around and thereby hit vehicle
occupants. There is a risk of injury, particu-
larly in the event of sudden braking or a sud-
den change in direction.
Always store objects so that they cannot be
flung around. Secure objects, luggage or
loads against slipping or tipping before the
journey.
! The tailgate swings upwards and to the rear
when opened. Therefore, make sure that
there is sufficient clearance above and behind
the tailgate.
The opening dimensions of the tailgate can be
found in the "Vehicle data" section
( Y
page 384).
You should preferably place luggage or loads in
the cargo compartment. Observe the loading
guidelines ( Y
page 294).
Do not leave the SmartKey in the cargo com-
partment. You could otherwise lock yourself
out.
You can: R
close the tailgate manually from outside R
open and close the tailgate automatically
from outside R
open and close the tailgate automatically
from inside R
limit the opening angle of the tailgate R
unlock the tailgate from inside with the emer-
gency release
Tailgate reversing feature On vehicles with the tailgate remote closing fea-
ture, the tailgate is equipped with automatic
obstacle recognition with a reversing feature. If
a solid object blocks or restricts the tailgate
when automatically opening or closing, this pro-
cedure is stopped. If the tailgate is stopped dur-
ing the closing procedure, it will open again
automatically. The automatic obstacle recogni-
tion with reversing feature is only an aid. It is not
a substitute for your attentiveness when open-
ing and closing the tailgate. G WARNING
The reversing feature does not respond: R
to soft, light and thin objects, e.g. fingers R
over the last �
Page 88 of 390
G WARNING
If children operate the side windows they
could become trapped, particularly if they are
left unsupervised. There is a risk of injury.
Activate the override feature for the rear side
windows. When leaving the vehicle, always
take the SmartKey with you and lock the vehi-
cle. Never leave children unsupervised in the
vehicle.
Side window reversing feature The side windows are equipped with an auto-
matic reversing feature. If a solid object blocks
or restricts a side window during the closing
process, the side window opens again automat-
ically. However, the automatic reversing feature
is only an aid and does not relieve you of the
responsibility of paying attention when closing a
side window.
G WARNING
The reversing feature does not react: R
to soft, light and thin objects, e.g. small fin-
gers R
over the last 1/6 in(4 mm) of the closing
movement R
during resetting R
when closing the side window again man-
ually immediately after automatic reversing
This means that the reversing feature cannot
prevent someone being trapped in these sit-
uations. There is a risk of injury.
Make sure that no body parts are in close
proximity during the closing procedure. If
someone becomes trapped, press the switch
to open the side window again.
Opening and closing the side win-
dows
The switches for all side windows are located on
the driver's door. There is also a switch on each
door for the corresponding side window.
The switches on the driver's door take prece-
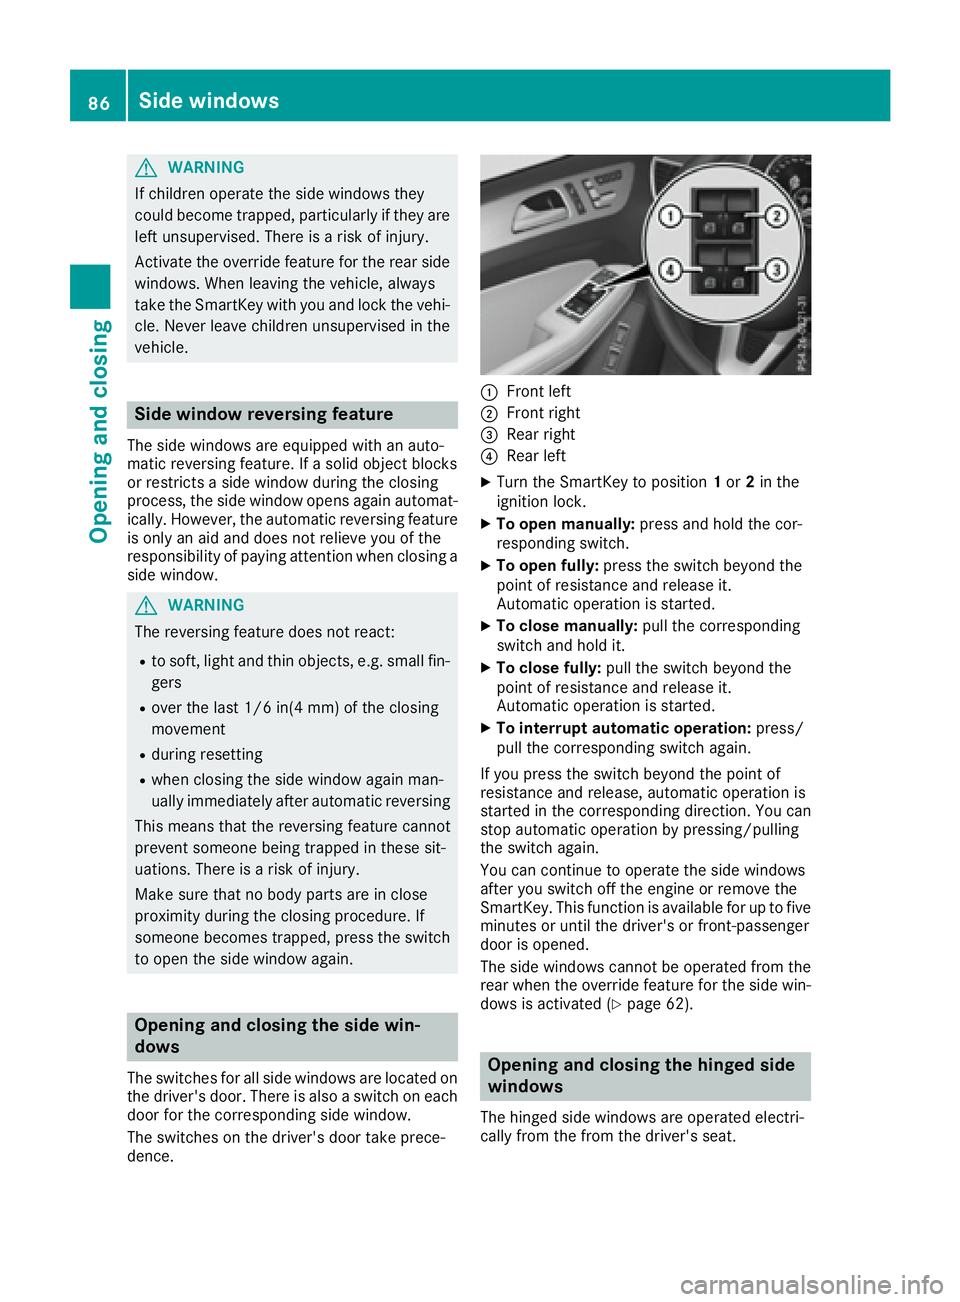
dence. �C
Front left �D
Front right �
Page 90 of 390
Vehicles with KEYLESS-GO: R
Release the sensor surfaces on the exterior
door handle to interrupt the closing proce-
dure. R
To open, pull the same door handle immedi-
ately and hold it firmly. The door windows and
the sliding sunroof will open for as long as the
door handle is held but the door is not
opened.
Notes on the automatic reversing feature for: R
the side window ( Y
page 86)R
the sliding sunroof ( Y
page 90)R
the panorama roof with power tilt/sliding
panel ( Y
page 90)
Using the SmartKey The SmartKey must be close to the vehicle. For
vehicles without KEYLESS-GO, the SmartKey
must be near the driver's door handle. X
Vehicles without KEYLESS-GO: point the tip
of the SmartKey at the door handle on the
driver's door. X
Press and hold the �7 button until the side
windows and the sliding sunroof or the pano-
rama roof with power tilt/sliding panel are
fully closed. X
Make sure that all the side windows and the
sliding sunroof or panorama roof with power
tilt/sliding panel are closed.
On vehicles with a panorama roof with power
tilt/sliding panel: X
Press and hold the �7 button again until the
roller sunblinds of the panorama roof with
power tilt/sliding panel close. X
To interrupt convenience closing: release
the �7 button. Using KEYLESS-GO X
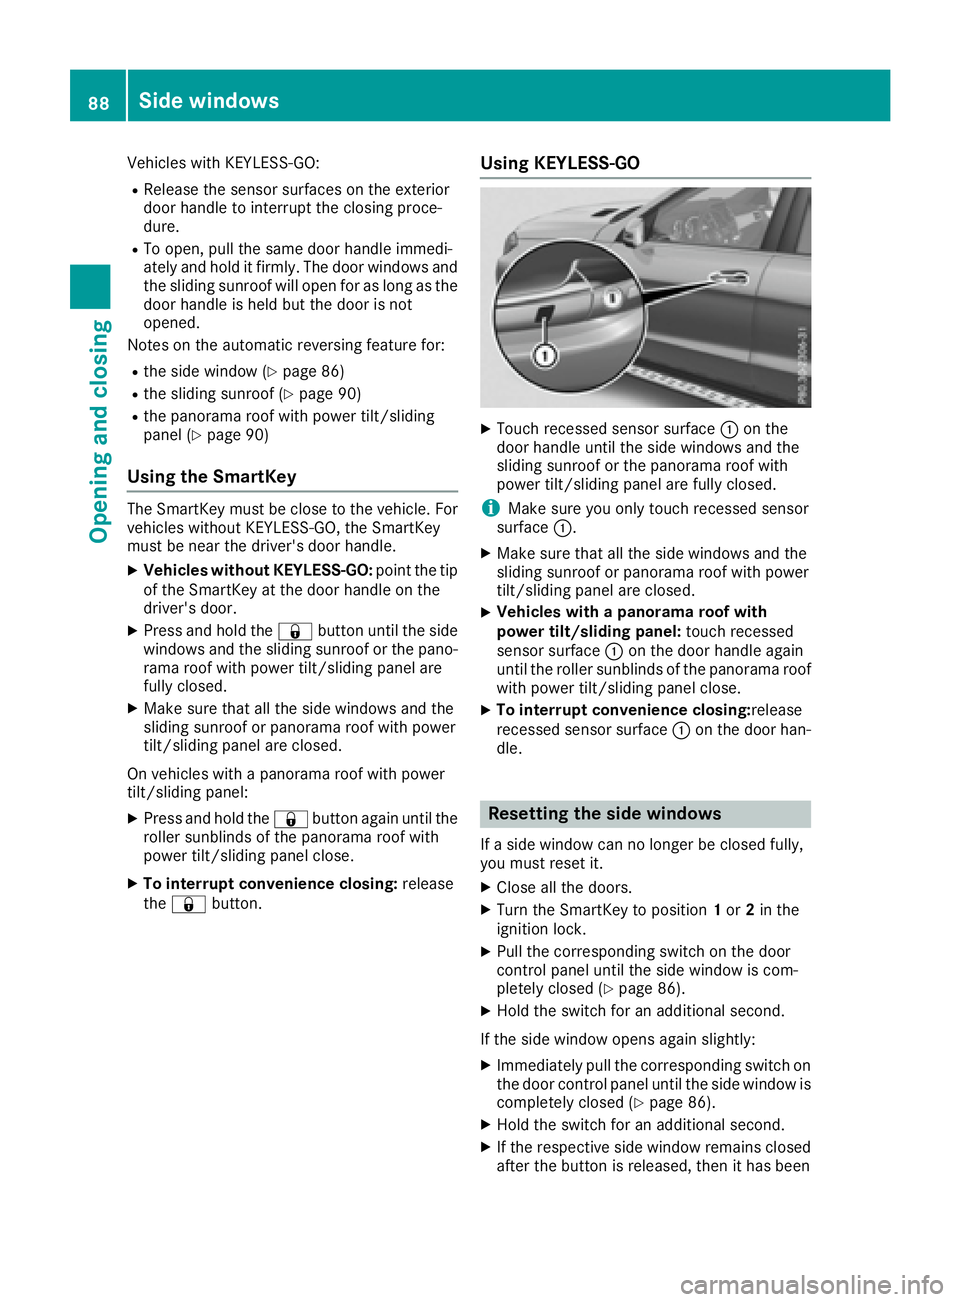
Touch recessed sensor surface �C on the
door handle until the side windows and the
sliding sunroof or the panorama roof with
power tilt/sliding panel are fully closed.
i Make sure you only touch recessed sensor
surface �C . X
Make sure that all the side windows and the
sliding sunroof or panorama roof with power
tilt/sliding panel are closed. X
Vehicles with a panorama roof with
power tilt/sliding panel: touch recessed
sensor surface �C on the door handle again
until the roller sunblinds of the panorama roof
with power tilt/sliding panel close. X
To interrupt convenience closing: release
recessed sensor surface �C on the door han-
dle.
Resetting the side windows If a side window can no longer be closed fully,
you must reset it. X
Close all the doors. X
Turn the SmartKey to position 1 or 2 in the
ignition lock. X
Pull the corresponding switch on the door
control panel until the side window is com-
pletely closed ( Y
page 86).X
Hold the switch for an additional second.
If the side window opens again slightly: X
Immediately pull the corresponding switch on
the door control panel until the side window is
completely closed ( Y
page 86).X
Hold the switch for an additional second. X
If the respective side window remains closed
after the button is released, then it has been88
Side windows
Opening and closing
Page 91 of 390
set correctly. If this is not the case, repeat the
steps above.
Problems with the side windows
G WARNING
If you close a side window again immediately after it has been blocked or reset, the side window
closes with increased or maximum force. The reversing feature is then not active. Parts of the
body could be trapped in the closing area in the process. This poses an increased risk of injury or
even fatal injury.
Make sure that no parts of the body are in the closing area. To stop the closing process, release
the switch or push the switch again to reopen the side window.
Problem
Possible causes/consequences and �P Solutions
A side window cannot be
closed because it is
blocked by objects, e.g.
leaves in the window
guide. X
Remove the objects. X
Close the side window.
A side window cannot be
closed and you cannot
see the cause. If a side window is obstructed during closing and reopens again
slightly: X
Immediately after the window blocks, pull the corresponding switch
again until the side window has closed.
The side window is closed with increased force.
If a side window is obstructed again during closing and reopens again
slightly: X
Immediately after the window blocks, pull the corresponding switch
again until the side window has closed.
The sliding sunroof is closed without the automatic reversing fea-
ture.
Sliding sunroof
Important safety notes Your vehicle may be equipped with a sliding
sunroof or a panorama roof with power tilt/slid-
ing panel. In the following section, the term
"sliding sunroof" refers to both sliding sunroof
variants.
G WARNING
While opening and closing the sliding sunroof,
body parts in close proximity could become
trapped. There is a risk of injury. Make sure that no body parts are in close
proximity during the opening and closing pro-
cedures.
If somebody becomes trapped: R
release the switch immediately, or R
during automatic operation, push the
switch briefly in any direction
The opening or closing procedure will be stop-
ped.Sliding sunroof 89
Opening and closing Z
Page 92 of 390
G WARNING
If children operate the sliding sunroof they
could become trapped, particularly if they are
left unsupervised. There is a risk of injury.
When leaving the vehicle, always take the
SmartKey with you and lock the vehicle. Never
leave children unsupervised in the vehicle.
! Only open the sliding sunroof if it is free of
snow and ice. Otherwise, malfunctions may
occur.
Do not allow anything to protrude from the
sliding sunroof. Otherwise, the seals could be
damaged.
! The weather can change abruptly. It could
start to rain or snow. Make sure that the slid-
ing sunroof is closed when you leave the vehi-
cle. The vehicle electronics can be damaged if
water enters the vehicle interior.
Resonance noises can occur in addition to the
usual airflow noises when the sliding sunroof is
open. They are caused by minor pressure fluc-
tuations in the vehicle interior. Change the posi-
tion of the sliding sunroof or open a side win-
dow. The noise will be reduced or eliminated.
Sliding sunroof reversing feature Your vehicle may be equipped with a sliding
sunroof or a panorama roof with power tilt/slid-
ing panel. In the following section, the term
"sliding sunroof" refers to both sliding sunroof
variants.
The sliding sunroof is equipped with an auto-
matic reversing feature. If a solid object blocks
or restricts the sliding sunroof during the closing
process, the sliding sunroof opens again auto-
matically. However, the automatic reversing
feature is only an aid and does not relieve you of
the responsibility of paying attention when clos-
ing the sliding sunroof.
G WARNING
The reversing feature does not react: R
to soft, light and thin objects, e.g. small fin-
gers R
over the last 1/6 in (4 mm) of the closing
movement R
during resetting R
when closing the sliding sunroof again man-
ually immediately after automatic reversing
This means that the reversing feature cannot
prevent someone being trapped in these sit-
uations. There is a risk of injury.
Make sure that no body parts are in close
proximity during the closing procedure.
If somebody becomes trapped: R
release the switch immediately, or R
press the switch in any direction during the
automatic closing process
The closing process is stopped.
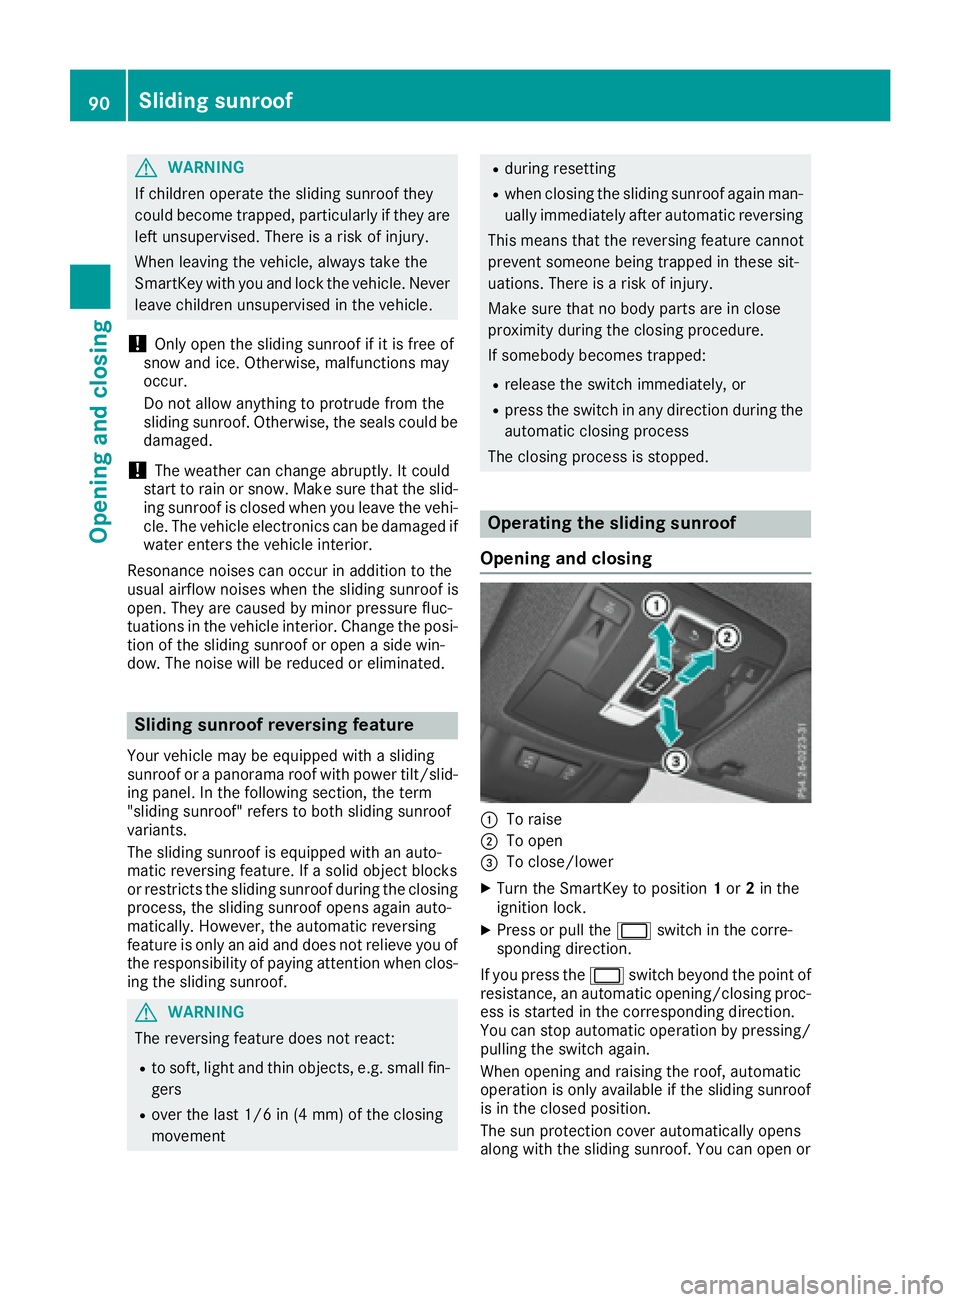
Operating the sliding sunroof
Opening and closing
�C
To raise �D
To open �
Page 102 of 390
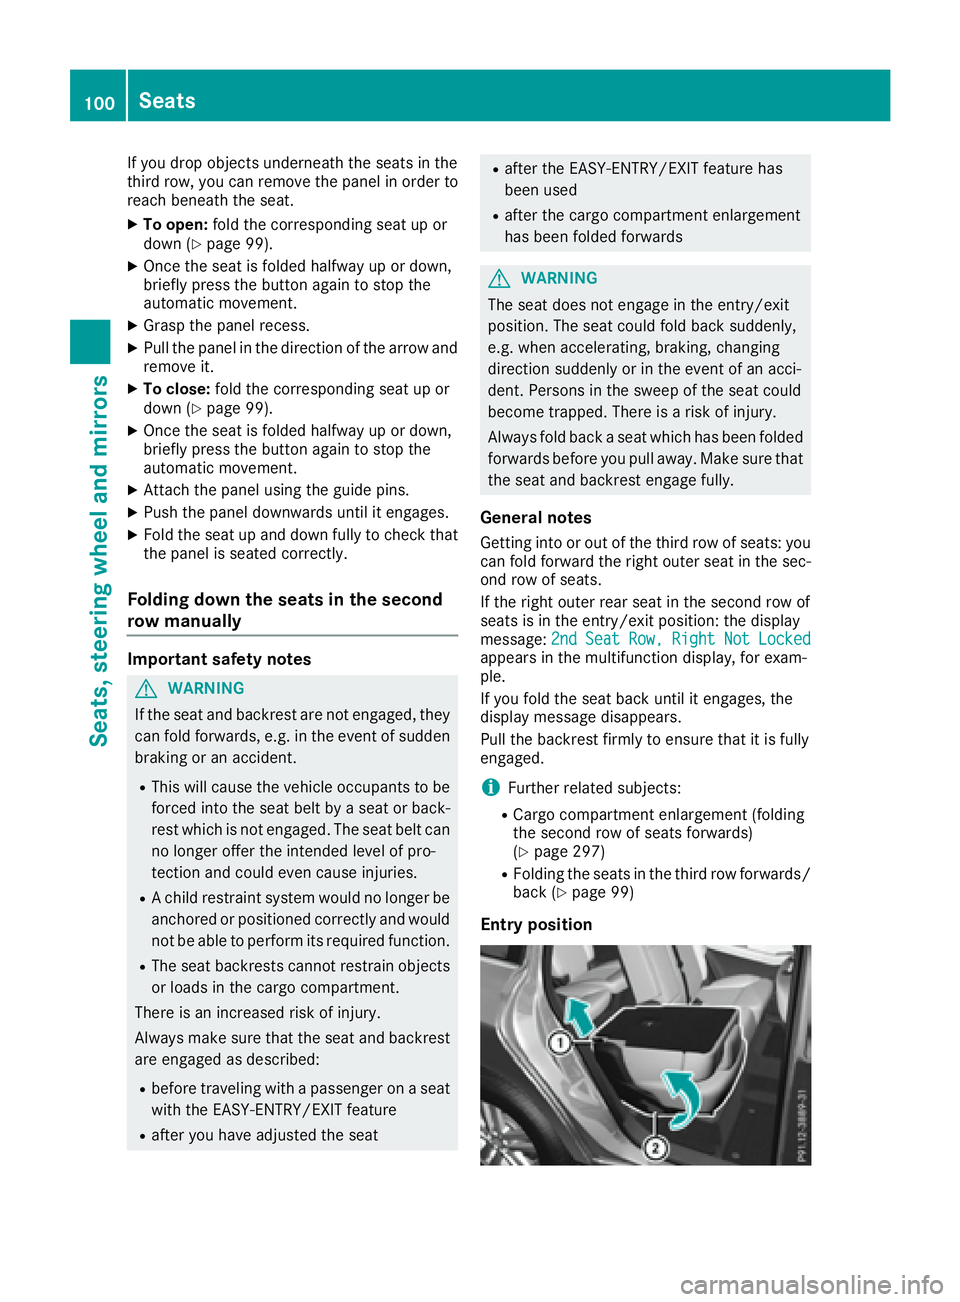
If you drop objects underneath the seats in the
third row, you can remove the panel in order to
reach beneath the seat. X
To open: fold the corresponding seat up or
down ( Y
page 99).X
Once the seat is folded halfway up or down,
briefly press the button again to stop the
automatic movement. X
Grasp the panel recess. X
Pull the panel in the direction of the arrow and
remove it. X
To close: fold the corresponding seat up or
down ( Y
page 99).X
Once the seat is folded halfway up or down,
briefly press the button again to stop the
automatic movement. X
Attach the panel using the guide pins. X
Push the panel downwards until it engages. X
Fold the seat up and down fully to check that
the panel is seated correctly.
Folding down the seats in the second
row manually
Important safety notes
G WARNING
If the seat and backrest are not engaged, they
can fold forwards, e.g. in the event of sudden
braking or an accident. R
This will cause the vehicle occupants to be
forced into the seat belt by a seat or back-
rest which is not engaged. The seat belt can
no longer offer the intended level of pro-
tection and could even cause injuries. R
A child restraint system would no longer be
anchored or positioned correctly and would
not be able to perform its required function. R
The seat backrests cannot restrain objects
or loads in the cargo compartment.
There is an increased risk of injury.
Always make sure that the seat and backrest
are engaged as described: R
before traveling with a passenger on a seat
with the EASY-ENTRY/EXIT feature R
after you have adjusted the seat R
after the EASY-ENTRY/EXIT feature has
been used R
after the cargo compartment enlargement
has been folded forwards
G WARNING
The seat does not engage in the entry/exit
position. The seat could fold back suddenly,
e.g. when accelerating, braking, changing
direction suddenly or in the event of an acci-
dent. Persons in the sweep of the seat could
become trapped. There is a risk of injury.
Always fold back a seat which has been folded
forwards before you pull away. Make sure that
the seat and backrest engage fully.
General notes Getting into or out of the third row of seats: you
can fold forward the right outer seat in the sec-
ond row of seats.
If the right outer rear seat in the second row of
seats is in the entry/exit position: the display
message: 2nd Seat Row, Right Not Locked
appears in the multifunction display, for exam-
ple.
If you fold the seat back until it engages, the
display message disappears.
Pull the backrest firmly to ensure that it is fully
engaged.
i Further related subjects: R
Cargo compartment enlargement (folding
the second row of seats forwards)
( Y
page 297) R
Folding the seats in the third row forwards/
back ( Y
page 99)
Entry position100
Seats
Seats, steering wheel and mirrors