2017 MERCEDES-BENZ GLE43AMG SUV steering wheel
[x] Cancel search: steering wheelPage 102 of 366
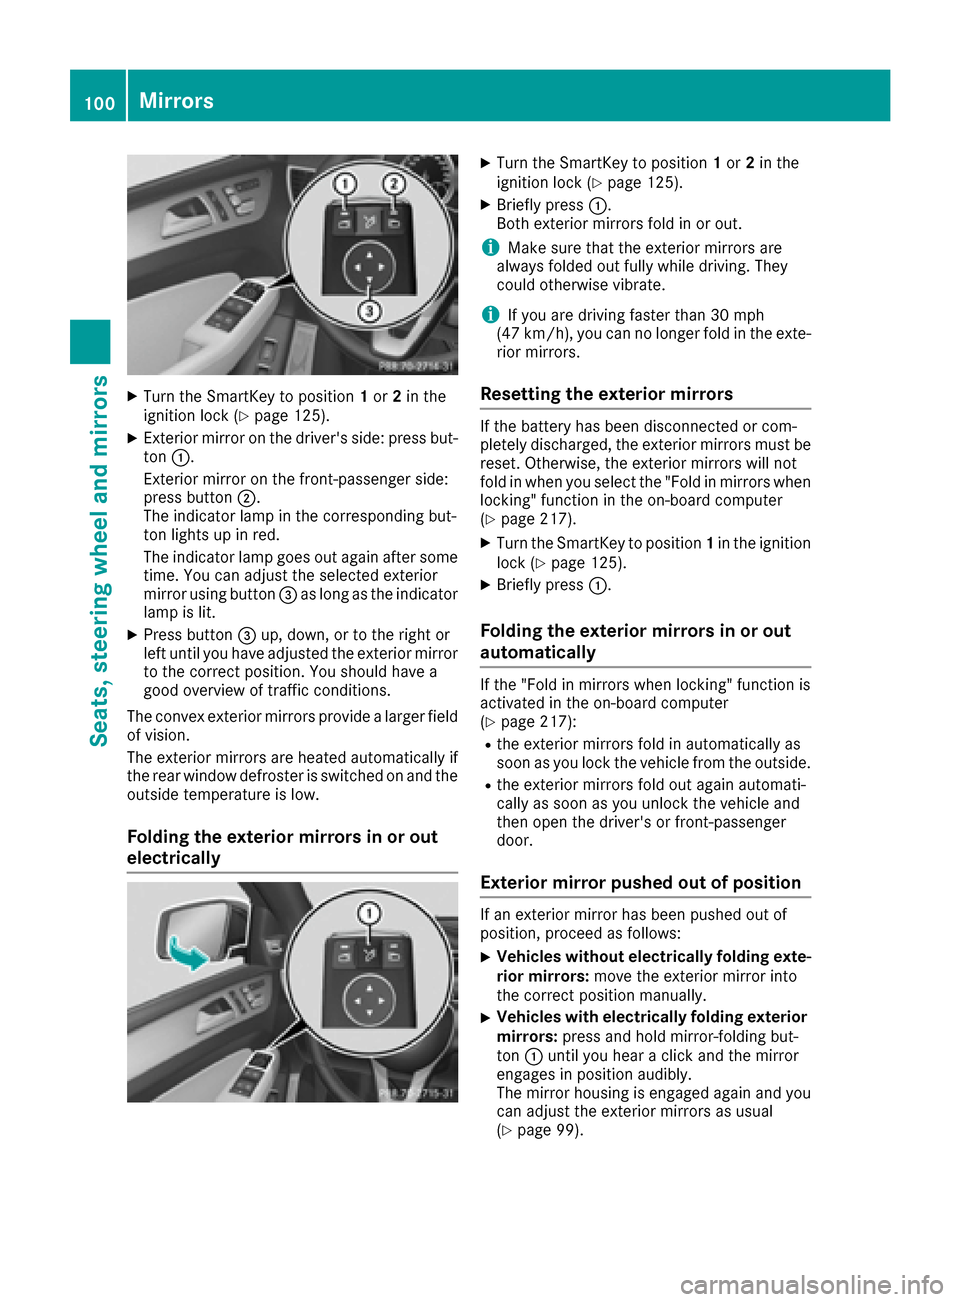
XTurn the SmartKey to position1or 2in the
ignition lock (Ypage 125).
XExterior mirror on the driver's side: press but-
ton :.
Exterior mirror on the front-passenger side:
press button ;.
The indicator lamp in the corresponding but-
ton lights up in red.
The indicator lamp goes out again after some
time. You can adjust the selected exterior
mirror using button =as long as the indicator
lamp is lit.
XPress button =up, down, or to the right or
left until you have adjusted the exterior mirror
to the correct position. You should have a
good overview of traffic conditions.
The convex exterior mirrors provide a larger field
of vision.
The exterior mirrors are heated automatically if
the rear window defroster is switched on and the
outside temperature is low.
Folding the exterior mirrors in or out
electrically
XTurn the SmartKey to position 1or 2in the
ignition lock (Ypage 125).
XBriefly press :.
Both exterior mirrors fold in or out.
iMake sure that the exterior mirrors are
always folded out fully while driving. They
could otherwise vibrate.
iIf you are driving faster than 30 mph
(47 km/h), you can no longer fold in the exte-
rior mirrors.
Resetting the exterior mirrors
If the battery has been disconnected or com-
pletely discharged, the exterior mirrors must be
reset. Otherwise, the exterior mirrors will not
fold in when you select the "Fold in mirrors when
locking" function in the on-board computer
(
Ypage 217).
XTurn the SmartKey to position 1in the ignition
lock (Ypage 125).
XBriefly press :.
Folding the exterior mirrors in or out
automatically
If the "Fold in mirrors when locking" function is
activated in the on-board computer
(
Ypage 217):
Rthe exterior mirrors fold in automatically as
soon as you lock the vehicle from the outside.
Rthe exterior mirrors fold out again automati-
cally as soon as you unlock the vehicle and
then open the driver's or front-passenger
door.
Exterior mirror pushed out of position
If an exterior mirror has been pushed out of
position, proceed as follows:
XVehicles without electrically folding exte-
rior mirrors: move the exterior mirror into
the correct position manually.
XVehicles with electrically folding exterior
mirrors: press and hold mirror-folding but-
ton :until you hear a click and the mirror
engages in position audibly.
The mirror housing is engaged again and you
can adjust the exterior mirrors as usual
(
Ypage 99).
100Mirrors
Seats, steering wheel and mirrors
Page 103 of 366
Automa tic anti-glare mirrors
GWARNING
Electrolyt emay escape if th eglas sin an auto -
matic anti-glare mirror breaks .The electrolyt e
is harmful and causes irritation .It mus tno t
come int ocontact wit hyour skin, eyes ,res -
piratory organs or clothing or be swallowed.
There is aris kof injury.
If you come int ocontact wit hth eelectrolyte,
observ eth efollowing:
RRins eoff th eelectrolyt efrom your skin
immediately wit hwater.
RImmediately rinse th eelectrolyt eout of
your eyes thoroughly wit hclean water.
RIf th eelectrolyt eis swallowed, immediately
rinse your mout hout thoroughly. Do no t
induce vomiting .
RIf electrolytecomes int ocontact wit hyour
skin or hair or is swallowed, see kmedical
attention immediately.
RImmediately chang eout of clothing whic h
has come int ocontact wit helectrolyte.
RIf an allergic reaction occurs, see kmedical
attention immediately.
The rear-view mirror and th eexterio rmirror on
th edriver's side automatically go int oanti-glare
mod eif th efollowin gcondition sare met simul-
taneously:
Rth eignition is switched on and
Rinciden tligh tfrom headlamp sstrikes th esen -
sor in th erear-view mirror
The mirror sdo no tgo int oanti-glare mod eif
revers egear is engage dor if th e
i
nterior lighting
is switched on .
Parking position for the exteri or mir-
ror on the front-passenger side
Setting and stori ng the parking position
You can position th efront-passenger side exte -
rio rmirror in suc h away that you can see th e
rear whee lon that side as soo nas you engage
revers egear .You can store this position .
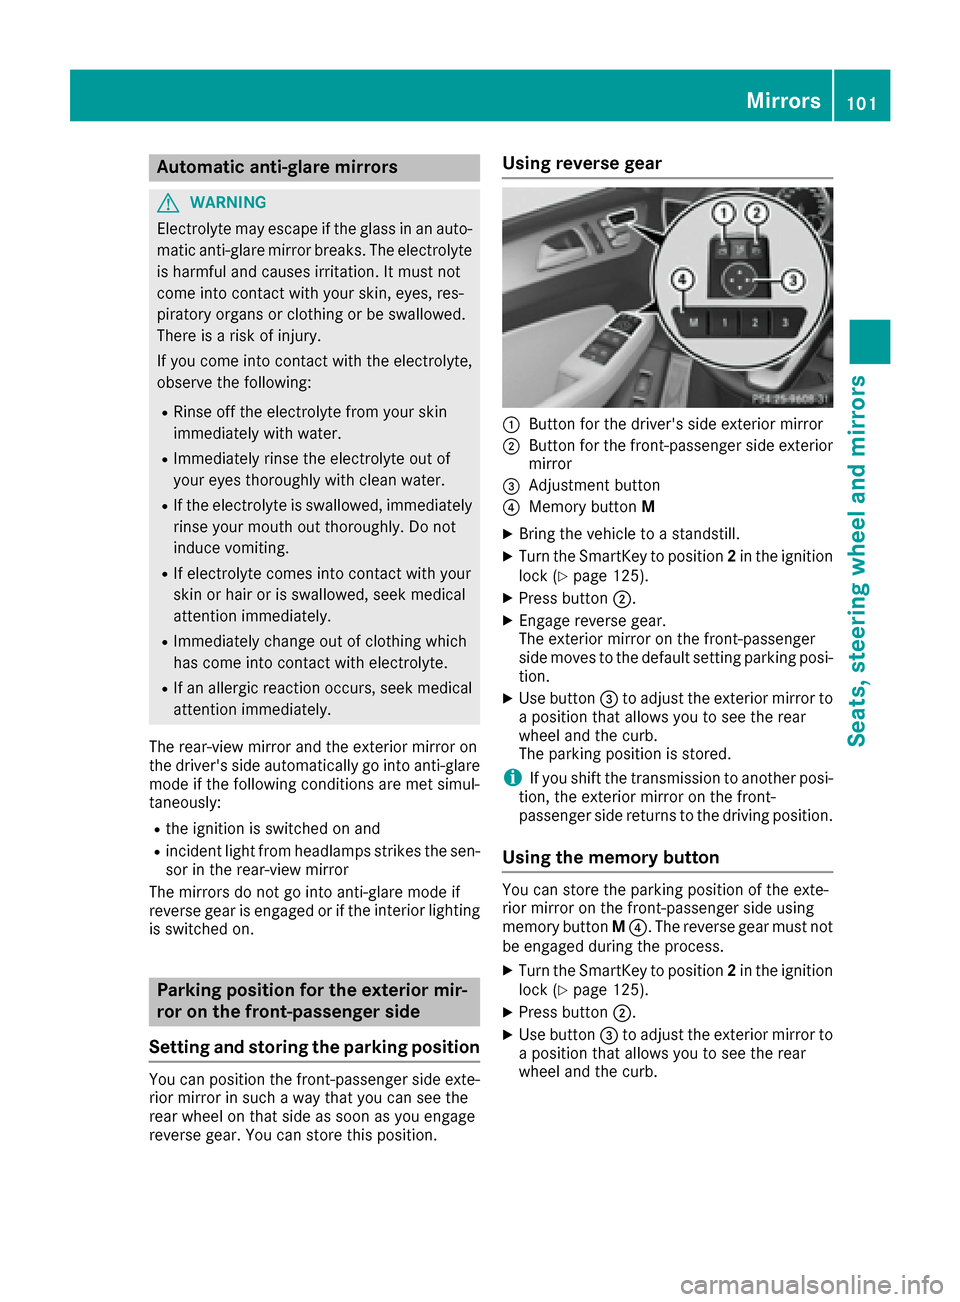
Using reverse gear
:Buttonfor th edriver's side exterio rmirror
;Butto nfor th efront-passenger side exterio r
mirror
=Adjustmen tbutto n
?Memory butto nM
XBring th evehicl eto astandstill.
XTurn th eSmartKey to position 2in th eignition
loc k (Ypage 125).
XPress butto n;.
XEngage revers egear .
The exterio rmirror on th efront-passenger
side moves to th edefault setting parking posi-
tion .
XUse butto n= to adjust th eexterio rmirror to
a position that allows you to see th erear
whee land th ecurb.
The parking position is stored.
iIf you shif tth etransmission to another posi-
tion ,th eexterio rmirror on th efront-
passenger side return sto th edrivin gposition .
Using the mem orybutton
You can store th eparking position of th eexte -
rio rmirror on th efront-passenger side usin g
memory butto nM ?. The revers egear mus tno t
be engage dduring th eprocess.
XTurn th eSmartKey to position 2in th eignition
loc k (Ypage 125).
XPress butto n;.
XUse butto n= to adjust th eexterio rmirror to
a position that allows you to see th erear
whee land th ecurb.
Mirrors101
Seats, steering wheel and mirrors
Z
Page 104 of 366
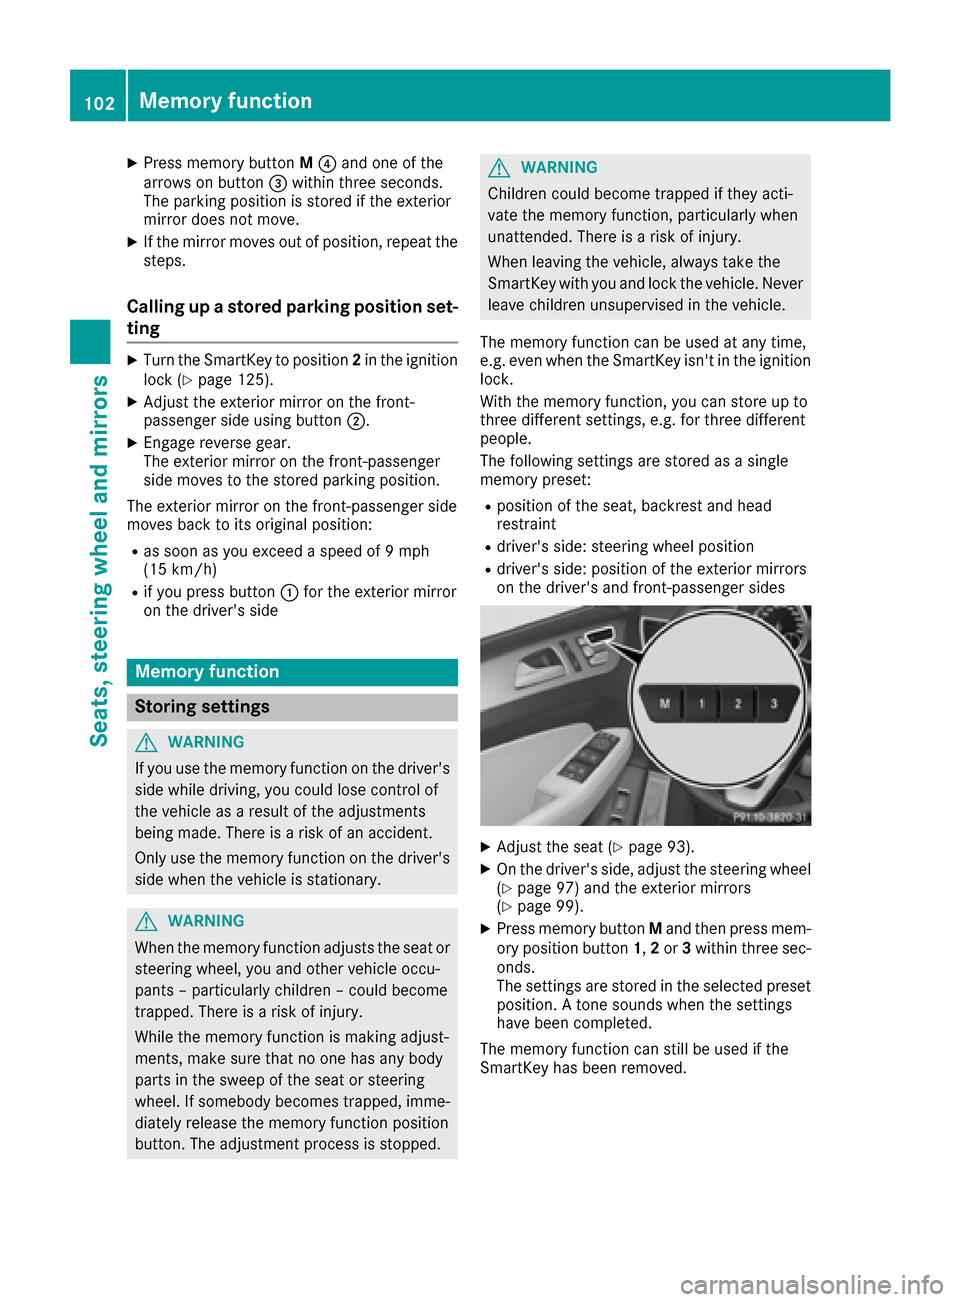
XPress memory buttonM? and one of the
arrows on button =within three seconds.
The parking position is stored if the exterior
mirror does not move.
XIf the mirror moves out of position, repeat the
steps.
Calling up a stored parking position set-
ting
XTurn the SmartKey to position 2in the ignition
lock (Ypage 125).
XAdjust the exterior mirror on the front-
passenger side using button ;.
XEngage reverse gear.
The exterior mirror on the front-passenger
side moves to the stored parking position.
The exterior mirror on the front-passenger side
moves back to its original position:
Ras soon as you exceed a speed of 9 mph
(15 km/h)
Rif you press button :for the exterior mirror
on the driver's side
Memory function
Storing settings
GWARNING
If you use the memory function on the driver's side while driving, you could lose control of
the vehicle as a result of the adjustments
being made. There is a risk of an accident.
Only use the memory function on the driver's
side when the vehicle is stationary.
GWARNING
When the memory function adjusts the seat or steering wheel, you and other vehicle occu-
pants – particularly children – could become
trapped. There is a risk of injury.
While the memory function is making adjust-
ments, make sure that no one has any body
parts in the sweep of the seat or steering
wheel. If somebody becomes trapped, imme-
diately release the memory function position
button. The adjustment process is stopped.
GWARNING
Children could become trapped if they acti-
vate the memory function, particularly when
unattended. There is a risk of injury.
When leaving the vehicle, always take the
SmartKey with you and lock the vehicle. Never
leave children unsupervised in the vehicle.
The memory function can be used at any time,
e.g. even when the SmartKey isn't in the ignition
lock.
With the memory function, you can store up to
three different settings, e.g. for three different
people.
The following settings are stored as a single
memory preset:
Rposition of the seat, backrest and head
restraint
Rdriver's side: steering wheel position
Rdriver's side: position of the exterior mirrors
on the driver's and front-passenger sides
XAdjust the seat (Ypage 93).
XOn the driver's side, adjust the steering wheel (Ypage 97) and the exterior mirrors
(Ypage 99).
XPress memory button Mand then press mem-
ory position button 1,2or 3within three sec-
onds.
The settings are stored in the selected preset
position. A tone sounds when the settings
have been completed.
The memory function can still be used if the
SmartKey has been removed.
102Memory function
Seats, steering wheel and mirrors
Page 105 of 366

Calling up a stored setting
XPress and hold the relevant storage position
button1,2or 3until the seat, steering wheel
and exterior mirrors are in the stored position.
The setting procedure is interrupted as soon as
you release the storage position buttons.
Memory function103
Seats, steering wheel and mirrors
Z
Page 108 of 366

The blueKindicator lamp in the instru-
ment cluster lights up when the high-beam
headlamps are switched on.
XTo switch off the high-beam head-
lamps: move the combination switch back to
its normal position.
The blue Kindicator lamp in the instru-
ment cluster goes out.
Vehicles with Adaptive Highbeam Assist: if
Adaptive Highbeam Assist is activated, it auto-
matically controls activation and deactivation of
the high-beam headlamps (
Ypage 107).
Hazard warning lamps
XTo switch on the hazard warning
lamps: press button :.
All turn signals flash. If you now switch on a
turn signal using the combination switch, only
the turn signal lamp on the corresponding
side of the vehicle will flash.
XTo switch off the hazard warning lamps:
press button :.
The hazard warning lamps automatically switch
on if:
Ran air bag is deployed or
Rthe vehicle decelerates rapidly from a speed
of above 45 mph (70 km/h) and comes to a
standstill
The hazard warning lamps switch off automati-
cally if the vehicle reaches a speed of above
6 mph (10 km/h) again after a full brake appli-
cation.
iThe hazard warning lamps still operate if the
ignition is switched off.
Intelligent Light System
General notes
The Intelligent Light System is a system that
adjusts the headlamps automatically to suit the
prevailing driving and weather conditions. It
offers advanced functions for improved illumi-
nation of the road surface, e.g. depending on the
vehicle speed or weather conditions. The sys-
tem includes the active light function, cornering
light function, highway mode and extended
range fog lamps. The system is only active when
it is dark.
You can activate or deactivate the "Intelligent
Light System" using the on-board computer
(
Ypage 216).
Active light function
The active light function is a system that moves
the headlamps according to the steering move-
ments of the front wheels. In this way, relevant
areas remain illuminated while driving. This
allows you to identify pedestrians, cyclists and
animals.
Active: when the lights are switched on.
Vehicles with Lane Keeping Assist: the active
light function evaluates the course of the lane in
which you are driving and pre-emptively con-
trols the active light function.
Vehicles with the drive program S+(Sport Plus):
when the drive program is activated, the active
light function headlamps swing in and out. This
shows that the light setting is in sport mode. The
dynamism of the active light function increases.
Cornering light function
The cornering light function improves the illu-
mination of the road over a wide angle in the
direction you are turning, enabling better visi-
bility in tight bends, for example. It can only be
activated when the low-beam headlamps are
switched on.
Active:
Rif you are driving at speeds below 25 mph
(40 km/h) and switch on the turn signal or
turn the steering wheel
Rif you are driving at speeds between 25 mph
(40 km/h) and 45 mph (70 km/h) and turn
the steering wheel
106Exterior lighting
Lights and windshield wipers
Page 109 of 366

The cornering lamp may remain lit for a short
time, but is automatically switched off after no
more than three minutes.
Cornering light function with traffic circle
function:
The cornering light function is activated on both
sides before entering a traffic circle through an
evaluation of the current GPS position of the
vehicle. It remains active until after the vehicle
has left the traffic circle. In this way, pedestrians
crossing the road, for example, are illuminated
by your vehicle in good time.
Highway mode
Highway mode increases the range of the beam.
Active:if you are driving at a speed above
110 km/h and do not make any large steering
movements for at least 1,000 m or if you are
driving at a speed above 130 km/h.
Not active: if you are driving at speeds below
80 km/h following activation.
Extended range fog lamps
The extended range fog lamps reduce the glare
experienced by the driver and improve the illu-
mination of the edge of the road.
Active: if you are driving at speeds below
40 mph (70 km/ h)and you switch on the rear
fog lamp.
Not active: if, following activation, you are driv-
ing at speeds above 60 mph (100km/ h)or if you
switch off the rear fog lamp
Cornering light function
The cornering light function improves the illu-
mination of the road over a wide angle in the
direction you are turning, enabling better visi-
bility in tight bends, for example. It can only be
activated when the low-beam headlamps are
switched on.
Active:
Rif you are driving at speeds below 25 mph
(40 km/h) and switch on the turn signal or
turn the steering wheel
Rif you are driving at speeds between 25 mph
(40 km/h) and 45 mph (70 km/h) and turn
the steering wheel The cornering lamp may remain lit for a short
time, but is automatically switched off after no
more than three minutes.
Cornering light function with traffic circle
function:
The cornering light function is activated on both
sides before entering a traffic circle through an
evaluation of the current GPS position of the
vehicle. It remains active until after the vehicle
has left the traffic circle. In this way, pedestrians
crossing the road, for example, are illuminated
by your vehicle in good time.
Adaptive Highbeam Assist
General notes
You can use this function to set the headlamps
to change between low beam and high beam
automatically. The system recognizes vehicles
with their lights on, either approaching from the
opposite direction or traveling in front of your
vehicle, and consequently switches the head-
lamps from high beam to low beam.
The system automatically adapts the low-beam
headlamp range depending on the distance to
the other vehicle. Once the system no longer
detects any other vehicles, it reactivates the
high-beam headlamps.
The system's optical sensor is located behind
the windshield near the overhead control panel.
Important safety notes
GWARNING
Adaptive Highbeam Assist does not recognize
road users:
Rwho have no lights, e.g. pedestrians
Rwho have poor lighting, e.g. cyclists
Rwhose lighting is blocked, e.g. by a barrier
On very rare occasions, Adaptive Highbeam
Assist may fail to recognize other road users
that have lights, or may recognize them too
late. In this, or in similar situations, the auto-
matic high-beam headlamps will not be deac-
tivated or will be activated regardless. There is a risk of an accident.
Exterior lighting107
Lights and windshield wipers
Z
Page 137 of 366
ANeutral
Do not shift the transmission toN
while driving. Otherwise, the auto-
matic transmission could be dam-
aged.
No power is transmitted from the
engine to the drive wheels.
Releasing the brakes will allow you to
move the vehicle freely, e.g. to push
it or tow it.
If ESP
®is deactivated or faulty: shift
the transmission to position Nif the
vehicle is in danger of skidding, e.g.
on icy roads.
If you switch the engine off with the
transmission in position Ror D, the
automatic transmission shifts to N
automatically.
!Rolling in neutral Ncan damage
the drive train.
7Drive
The automatic transmission changes
gear automatically. All forward gears
are available.
Driving tips
Changing gear
The automatic transmission shifts to the indi-
vidual gears automatically when it is in trans-
mission position D. This automatic gear shifting
behavior is determined by:
Rthe selected drive program
Rthe position of the accelerator pedal
Rthe road speed
Accelerator pedal position
Your style of driving influences how the auto-
matic transmission shifts gear:
Rlittle throttle: early upshifts
Rmore throttle: late upshifts
Kickdown
Use kickdown for maximum acceleration.
XDepress the accelerator pedal beyond the
pressure point.
The automatic transmission shifts to a lower
gear depending on the engine speed.
XEase off the accelerator pedal once the
desired speed is reached.
The automatic transmission shifts back up.
Rocking the vehicle free
Shifting the transmission repeatedly between
gears Dand Rmay help to free the vehicle if it
has become stuck in slush or snow. The vehi-
cle's engine management system limits the
speed to a maximum of 5 mph (9 km/h) when
shifting back and forth. To shift back and forth
between transmission positions Dand R, move
the DIRECT SELECT lever up and down past the
point of resistance.
Towing a trailer
XDrive in the middle of the engine speed range
on uphill gradients.
XDepending on the uphill or downhill gradient,
use the left-hand steering wheel paddle
shifter (
Ypage 136) to select a lower gear,
even if cruise control or Distance Pilot
DISTRONIC are activated.
Drive programs
Slippery drive program
The Slippery drive program has the following
characteristics:
Rreduced engine and transmission settings for
optimum propulsion on slippery or snow-cov-
ered roads.
Roptimized ESP®stability control on slippery or
snow-covered roads.
Rthe vehicle has improved driving stability on
slippery or snow-covered roads, for example.
Automatic transmission135
Driving an d parking
Z
Page 138 of 366
Comfort drive program
TheComfort drive program has the following
characteristics:
Rcomfort-oriented engine and transmission
settings.
Roptimal fuel consumption resulting from the
automatic transmission shifting up sooner.
Rthe vehicle pulling away more gently in
forward and reverse gears, unless the accel-
erator pedal is depressed fully.
Rthe automatic transmission shifting up
sooner. This results in the vehicle being driven
at lower engine speeds and the wheels being
less likely to spin.
Sport drive program
The Sport drive program has the following char-
acteristics:
Rsporty engine and transmission settings.
Rthe automatic transmission shifting up later.
the fuel consumption possibly being higher as
a result of the later automatic transmission
shift points.
Rthe suspension exhibits sporty damping (vehi-
cles with AIRMATIC).
Sport Plus drive program
The Sport Plus drive program has the following
characteristics:
Rthe vehicle exhibits particularly sporty driving
characteristics.
Rthe vehicle pulling away in first gear.
Rthe automatic transmission shifting up later.
the fuel consumption possibly being higher as
a result of the later automatic transmission
shift points.
Rthe suspension exhibits particularly firm
springing and damping settings (vehicles with AIRMATIC).
Rthe ECO start/stop function is deactivated, it
can, however, be activated again using the
ECO button (
Ypage 130).
Individual drive program
In the Individual drive program, the following
properties of the drive program can be selected:
Rthe drive (engine and transmission manage-
ment)
Rthe transmission
Rthe suspension
Rall vehicles (except Mercedes-AMG vehicles):
the steering
Rall vehicles (except Mercedes-AMG vehicles):
availability of the ECO start/stop function
To select the gears in the Individualdrive pro-
gram permanently using the steering wheel pad-
dle shifters, select the permanent manual gear-
shift program.
Information about configuring the Individual
drive program with the multimedia system can
be found in the Digital Operator's Manual.
Manual gear shifting
General notes
You can change gear yourself using the steering
wheel paddle shifters. The transmission must be
in position D.
Depending on which steering wheel paddle
shifter is pulled, the automatic transmission
immediately shifts into the next gear down or
up, if permitted.
To use manual shifting, you have two options:
Rtemporary setting
Rpermanent setting
If you activate manual gearshifting, the multi-
function display will show the current gear
instead of transmission position D.
If manual gearshifting is deactivated, the gears
will be selected automatically.
136Automatic transmission
Driving and parking