2017 MERCEDES-BENZ GLE43AMG SUV seats
[x] Cancel search: seatsPage 95 of 366
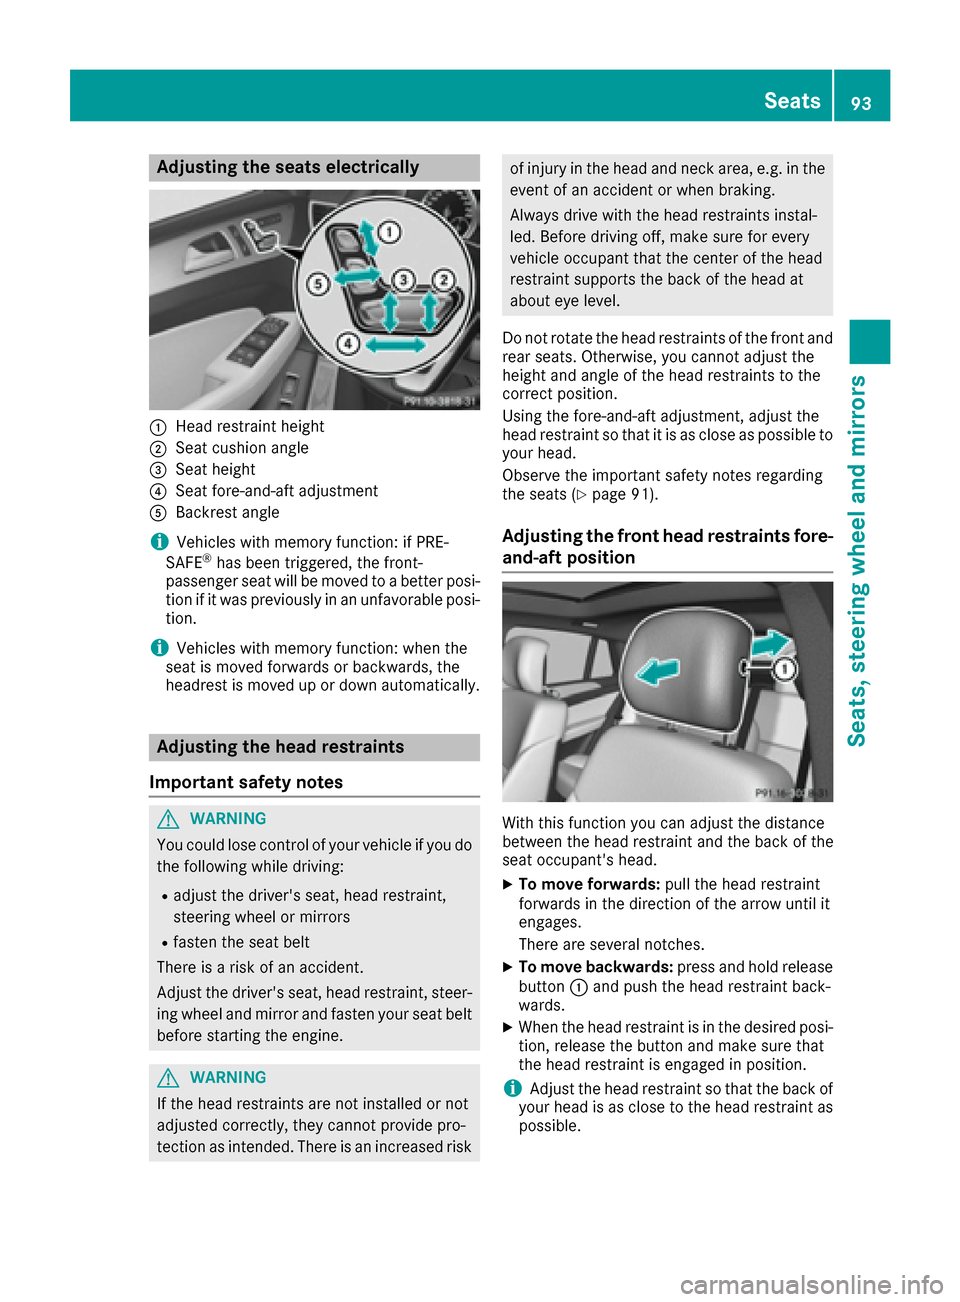
Adjusting the seats electrically
:Headrestrain theight
;Seat cushion angle
=Seat height
?Seat fore-and-af tadjustmen t
ABackrest angle
iVehicles wit hmemory function :if PRE -
SAFE®has been triggered ,th efront-
passenger seat will be moved to abette rposi-
tion if it was previously in an unfavorable posi-
tion .
iVehicles wit hmemory function :when th e
seat is moved forward sor backwards ,th e
headres tis moved up or down automatically.
Adjusting the head restraints
Import ant safety notes
GWARNIN G
You could lose control of your vehicl eif you do
th efollowin gwhile driving:
Radjust th edriver's seat ,head restraint,
steering whee lor mirror s
Rfastenth eseat belt
There is aris kof an accident.
Adjus tth edriver's seat ,head restraint, steer -
ing whee land mirror and faste nyour seat belt
before starting th eengine.
GWARNIN G
If th ehead restraints are no tinstalled or no t
adjusted correctly, they canno tprovid epro -
tection as intended. There is an increased ris k
of injury in thehead and neck area, e.g. in th e
event of an acciden tor when braking .
Always drive wit hth ehead restraints instal -
led. Befor edrivin goff ,mak esur efor every
vehicl eoccupant that th ecenter of th ehead
restrain tsupport sth ebac kof th ehead at
about eye level.
Do no trotate th ehead restraints of th efron tand
rear seats. Otherwise ,you canno tadjust th e
height and angle of th ehead restraints to th e
correc tposition .
Using th efore-and-af tadjustment, adjust th e
head restrain tso that it is as close as possibl eto
your head .
Observ eth eimportant safet ynote sregarding
th eseat s (
Ypage 91).
Adjusting the front head restraints fore-
and-aft position
Withthis function you can adjust th edistanc e
between th ehead restrain tand th ebac kof th e
seat occupant's head .
XTo moveforwards :pull th ehead restrain t
forward sin th edirection of th earrow until it
engages.
There are several notches .
XTo movebackwards :press and hold release
butto n: and push th ehead restrain tback-
wards.
XWhen th ehead restrain tis in th edesired posi-
tion ,release th ebutto nand mak esur ethat
th ehead restrain tis engage din position .
iAdjustth ehead restrain tso that th ebac kof
your head is as close to th ehead restrain tas
possible.
Seats93
Seats, steering wheel and mirrors
Z
Page 96 of 366
Adjusting the heightofthe head
restraints electri cally
XTo adjust thehea drestrain theight :slid e
th eswitch for head restrain tadjustmen t
(
Ypage 93 )up or down in the direction of the
arrow.
Adjusting the luxury head restraints
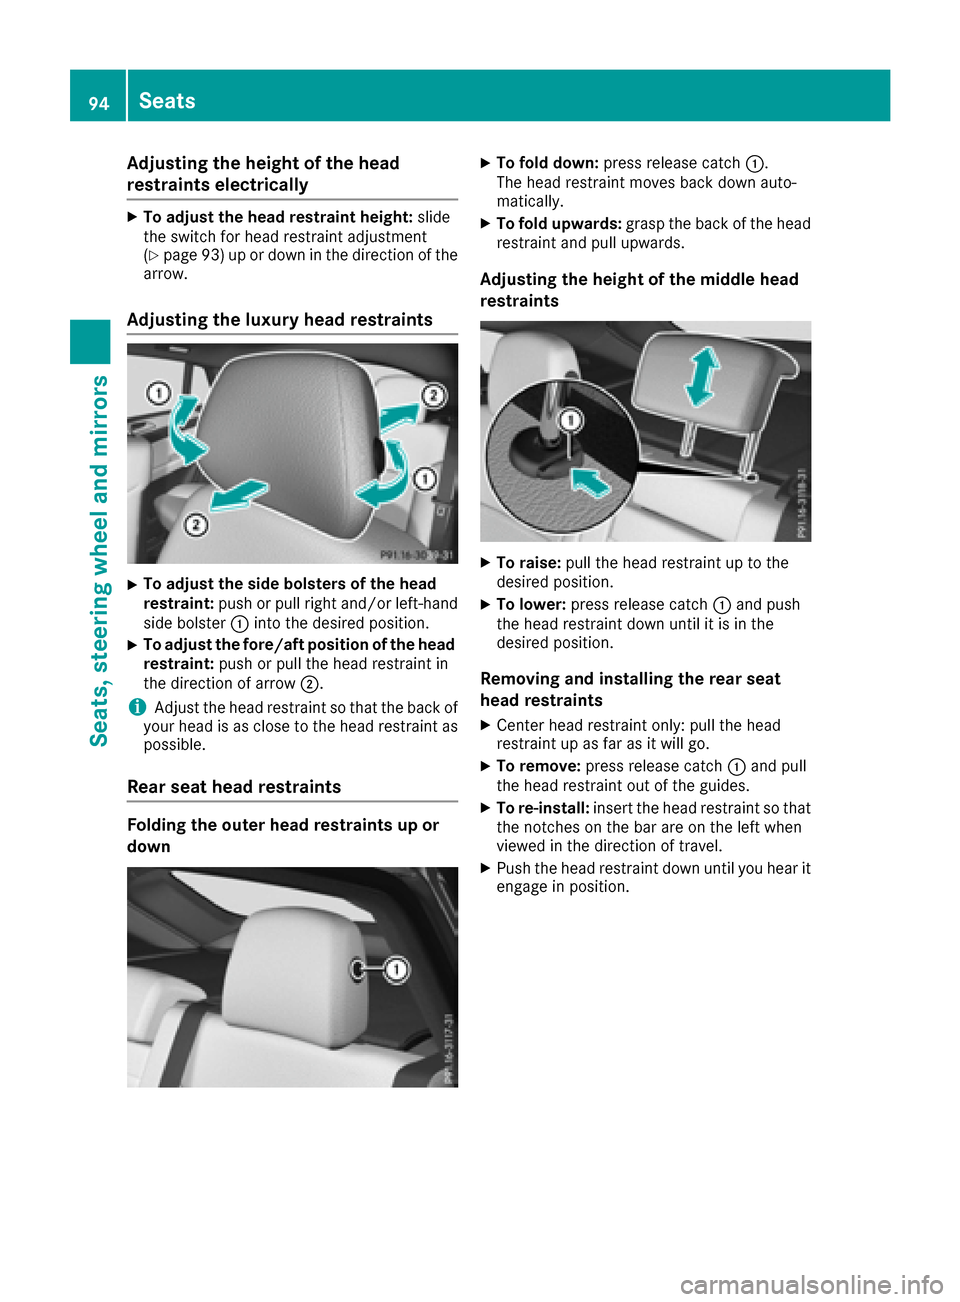
XTo adjust the side bolsters of the head
restraint: push or pull right and/or left-hand
side bolster :into the desired position.
XTo adjust the fore/aft position of the head
restraint: push or pull the head restraint in
the direction of arrow ;.
iAdjust the head restraint so that the back of
your head is as close to the head restraint as
possible.
Rear seat head restraints
Folding the outer head restraints up or
down
XTo fold down: press release catch :.
The head restraint moves back down auto-
matically.
XTo fold upwards: grasp the back of the head
restraint and pull upwards.
Adjusting the height of the middle head
restraints
XTo raise: pull the head restraint up to the
desired position.
XTo lower: press release catch :and push
the head restraint down until it is in the
desired position.
Removing and installing the rear seat
head restraints
XCenter head restraint only: pull the head
restraint up as far as it will go.
XTo remove: press release catch :and pull
the head restraint out of the guides.
XTo re-install: insert the head restraint so that
the notches on the bar are on the left when
viewed in the direction of travel.
XPush the head restraint down until you hear it engage in position.
94Seats
Seats, steering wheel and mirrors
Page 97 of 366

Adjusting the angleofthe rear seat
backrests
You can adjust th eangle of th ebackrest sin th e
secon drow of seats. There are several possibl e
deten tpositions.
XPull th elef tor right release lever ;upwards
in th edirection of th earrow until relevan t
backrest :is fully released.
XPull backrest :forward sin th edirection of
th earrow and allow it to engage .
XTo ensurethat th ebackrest has engaged, lean
firmly against backrest :.
Adjusting themulticontour seat
The multicontour seat can be adjusted via th e
multimedia system (see th eseparat eoperating
instructions).
Adjusting the 4-way lumbar support
:Raises th ebackrest contour
;Soften sth ebackrest contour
=Lowers th ebackrest contour
?Harden sth ebackrest contour You can adjust th
econtour of th efron tseat
backrest sindividually to provid eoptimum sup-
por tfor your back.
Seat heating and seat ventilati on
Switching the seat heating on/off
GWARNIN G
Repeatedly switching on th eseat heating can
caus eth eseat cushion and backrest pads to
become ver yhot .The healt hof person swit h
limite dtemperature sensitivit yor alimite d
abilit yto reac tto excessivel yhigh tempera-
tures may be affecte dor they may eve nsuffer
burn-like injuries. There is aris kof injury.
Therefore ,do no tswitch th eseat heating on
repeatedly.
Driver's and front-passenger seat
Rear seat s
The three red indicator lamp sin th ebutto nindi-
cat eth eheating level you hav eselected.
The system automatically switches down from
level 3to level 2after approximately eigh t
minutes.
Seats95
Seats, steering wheel and mirrors
Z
Page 98 of 366
The system automatically switches down from
level2to level 1after approximately ten
minutes.
The system automatically switches off approx-
imately 35 minutes after it is set to level 1.
XTurn the SmartKey to position1or 2in the
ignition lock (Ypage 125).
XTo switch on: press button:repeatedly
until the desired heating level is set.
XTo switch off: press button:repeatedly
until all the indicator lamps go out.
iIf the battery voltage is too low, the seat
heating may switch off.
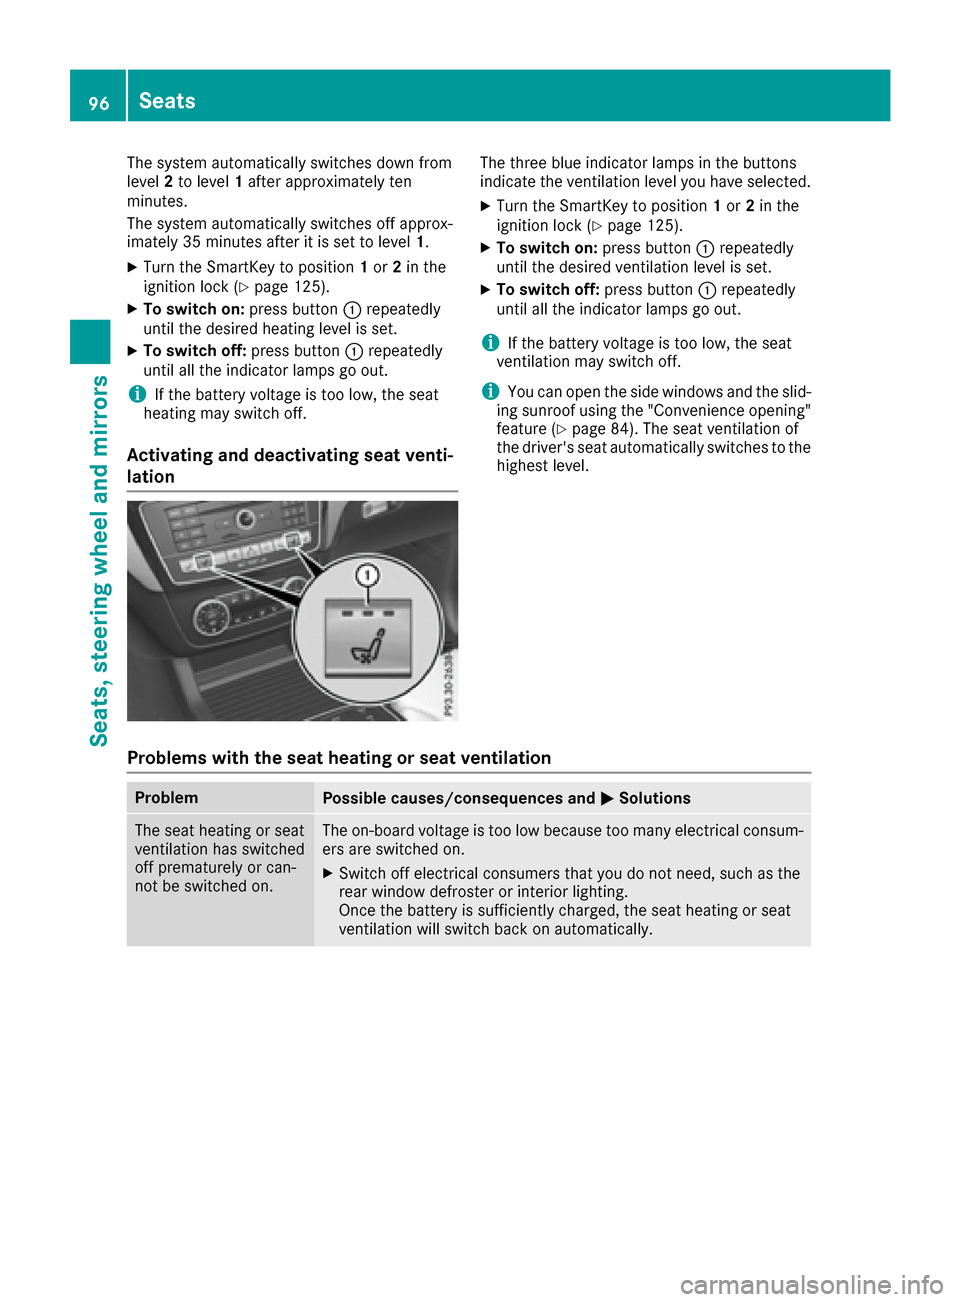
Activating and deactivating seat venti-
lation
The three blue indicator lamps in the buttons
indicate the ventilation level you have selected.
XTurn the SmartKey to position 1or 2in the
ignition lock (Ypage 125).
XTo switch on: press button:repeatedly
until the desired ventilation level is set.
XTo switch off: press button:repeatedly
until all the indicator lamps go out.
iIf the battery voltage is too low, the seat
ventilation may switch off.
iYou can open the side windows and the slid-
ing sunroof using the "Convenience opening"
feature (
Ypage 84). The seat ventilation of
the driver's seat automatically switches to the
highest level.
Problems with the seat heating or seat ventilation
ProblemPossible causes/consequences and MSolutions
The seat heating or seat
ventilation has switched
off prematurely or can-
not be switched on.The on-board voltage is too low because too many electrical consum-
ers are switched on.
XSwitch off electrical consumers that you do not need, such as the
rear window defroster or interior lighting.
Once the battery is sufficiently charged, the seat heating or seat
ventilation will switch back on automatically.
96Seats
Seats, steering wheel and mirrors
Page 99 of 366
Steering wheel
Important safety notes
GWARNING
You could lose control of your vehicle if you do the following while driving:
Radjust the driver's seat, head restraint,
steering wheel or mirrors
Rfasten the seat belt
There is a risk of an accident.
Adjust the driver's seat, head restraint, steer-
ing wheel and mirror and fasten your seat belt before starting the engine.
GWARNING
Children could injure themselves if they
adjust the steering wheel. There is a risk of
injury.
When leaving the vehicle, always take the
SmartKey with you and lock the vehicle. Never
leave children unsupervised in the vehicle.
The electrically adjustable steering wheel can
still be adjusted when there is no SmartKey in
the ignition lock.
Adjusting the steering wheel man-
ually
GWARNING
If the steering wheel is unlocked while the
vehicle is in motion, it could change position
unexpectedly. This could cause you to lose
control of the vehicle. There is a risk of an
accident.
Before starting off, make sure the steering
wheel is locked. Never unlock the steering
wheel while the vehicle is in motion.
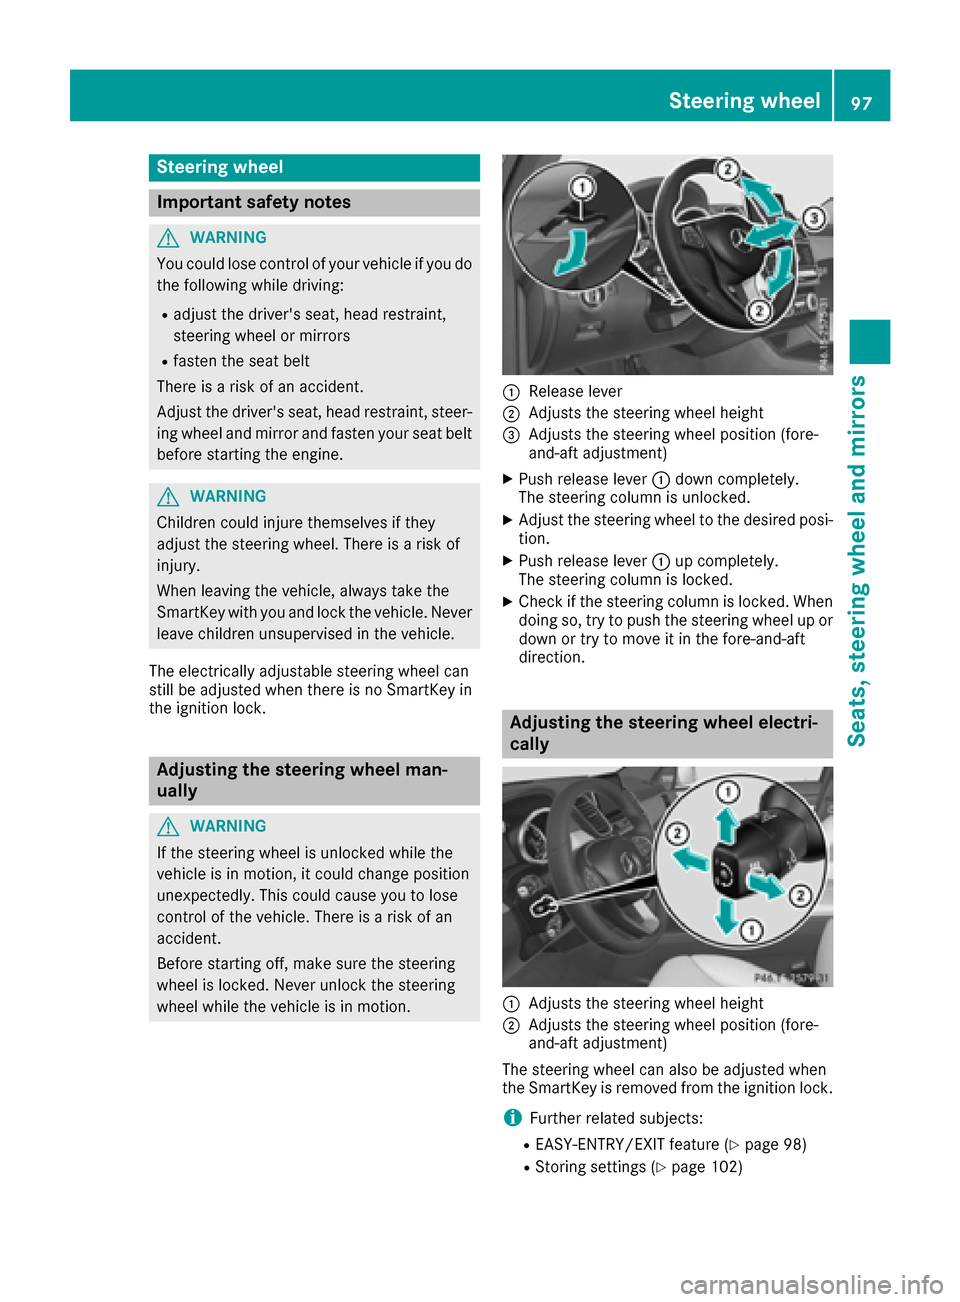
:Release lever
;Adjusts the steering wheel height
=Adjusts the steering wheel position (fore-
and-aft adjustment)
XPush release lever :down completely.
The steering column is unlocked.
XAdjust the steering wheel to the desired posi-
tion.
XPush release lever :up completely.
The steering column is locked.
XCheck if the steering column is locked. When
doing so, try to push the steering wheel up or down or try to move it in the fore-and-aft
direction.
Adjusting the steering wheel electri-
cally
:Adjusts the steering wheel height
;Adjusts the steering wheel position (fore-
and-aft adjustment)
The steering wheel can also be adjusted when
the SmartKey is removed from the ignition lock.
iFurther related subjects:
REASY-ENTRY/EXIT feature (Ypage 98)
RStoring settings (Ypage 102)
Steering wheel97
Seats, steering wheel and mirrors
Z
Page 100 of 366
Steering wheel heating
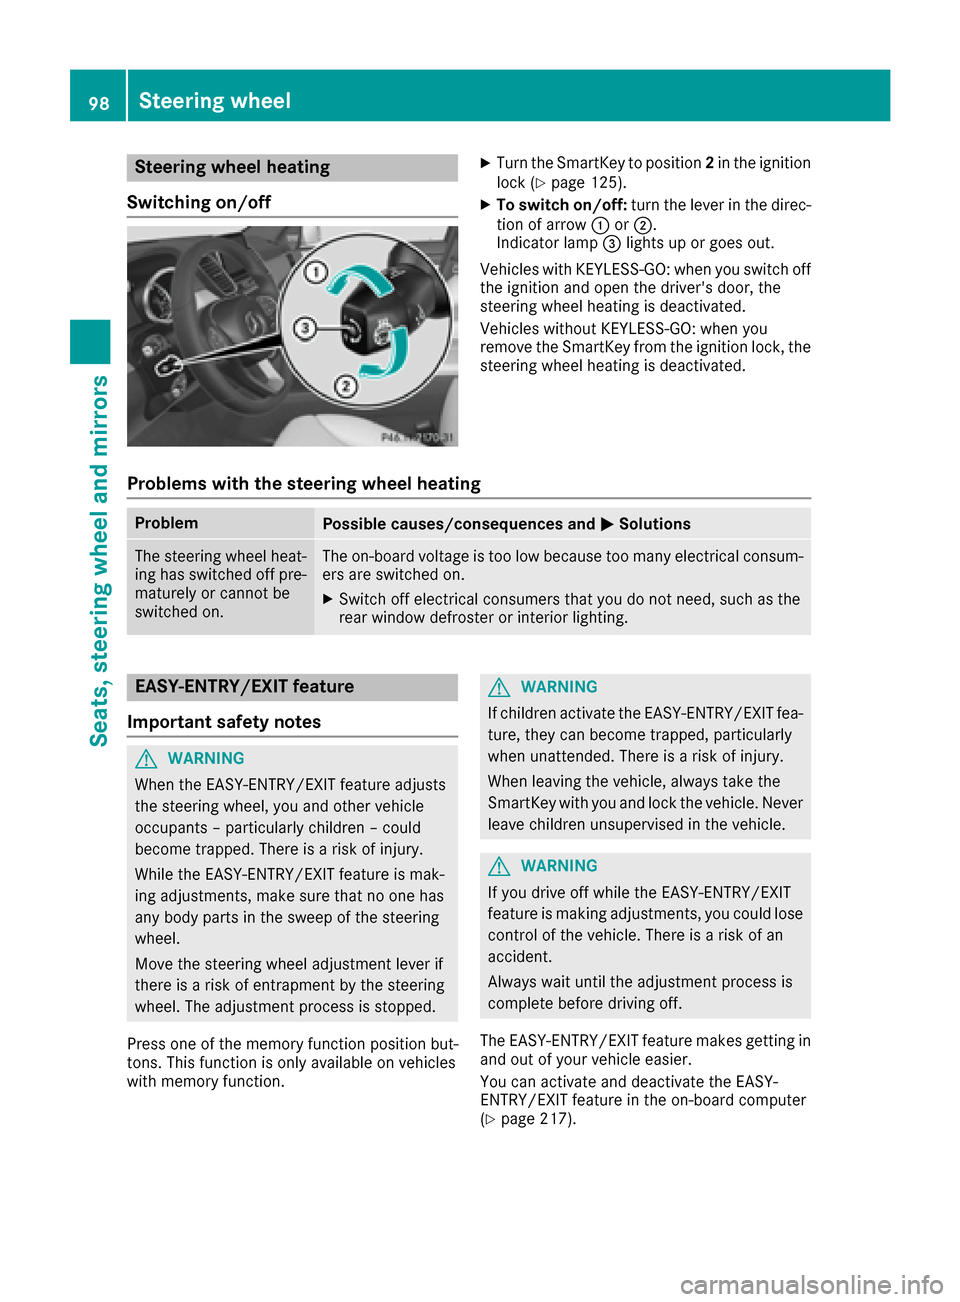
Switching on/offXTurn the SmartKey to position 2in the ignition
lock (Ypage 125).
XTo switch on/off: turn the lever in the direc-
tion of arrow :or;.
Indicator lamp =lights up or goes out.
Vehicles with KEYLESS-GO: when you switch off
the ignition and open the driver's door, the
steering wheel heating is deactivated.
Vehicles without KEYLESS-GO: when you
remove the SmartKey from the ignition lock, the steering wheel heating is deactivated.
Problems with the steering wheel heating
ProblemPossible causes/consequences and MSolutions
The steering wheel heat-
ing has switched off pre-
maturely or cannot be
switched on.The on-board voltage is too low because too many electrical consum-
ers are switched on.
XSwitch off electrical consumers that you do not need, such as the
rear window defroster or interior lighting.
EASY-ENTRY/EXIT feature
Important safety notes
GWARNING
When the EASY-ENTRY/EXIT feature adjusts
the steering wheel, you and other vehicle
occupants – particularly children – could
become trapped. There is a risk of injury.
While the EASY-ENTRY/EXIT feature is mak-
ing adjustments, make sure that no one has
any body parts in the sweep of the steering
wheel.
Move the steering wheel adjustment lever if
there is a risk of entrapment by the steering
wheel. The adjustment process is stopped.
Press one of the memory function position but-
tons. This function is only available on vehicles
with memory function.
GWARNING
If children activate the EASY-ENTRY/EXIT fea-
ture, they can become trapped, particularly
when unattended. There is a risk of injury.
When leaving the vehicle, always take the
SmartKey with you and lock the vehicle. Never
leave children unsupervised in the vehicle.
GWARNING
If you drive off while the EASY-ENTRY/EXIT
feature is making adjustments, you could lose
control of the vehicle. There is a risk of an
accident.
Always wait until the adjustment process is
complete before driving off.
The EASY-ENTRY/EXIT feature makes getting in
and out of your vehicle easier.
You can activate and deactivate the EASY-
ENTRY/EXIT feature in the on-board computer
(
Ypage 217).
98Steering wheel
Seats, steering wheel and mirrors
Page 101 of 366
Position of the steering wheel when the
EASY-ENTRY/EXIT feature is active
The steering wheel swings upwards when you:
Rremove the SmartKey from the ignition lock
Ropen the driver's door with KEYLESS-GO in
position1
Ropen the driver's door and the SmartKey is in
position0or 1in the ignition lock
iThe steering wheel only moves upwards if it
has not already reached the upper stop.
Position of the steering wheel for driv-
ing
The steering wheel is moved to the last selected
position when:
Rthe driver's door is closed
Ryou insert the SmartKey into the ignition lock
or
Ryou press the Start/Stop button once on vehi-
cles with KEYLESS-GO
When you close the driver's door with the igni-
tion switched on, the steering wheel is also
automatically moved to the previously set posi-
tion.
The last position of the steering column is stored when you:
Rswitch the ignition off
Rsave the setting with the memory function
(Ypage 102).
Crash-responsive EASY-EXIT feature
If the crash-responsive EASY-EXIT feature is trig-
gered in an accident, the steering column will
move upwards when the driver's door is opened.This occurs irrespective of the position of the
SmartKey in the ignition lock. This makes it eas-
ier to exit the vehicle and rescue the occupants.
The crash-responsive EASY-EXIT feature is only
operational if the EASY-EXIT/ENTRY feature is
activated in the on-board computer
(
Ypage 217).
Mirrors
Rear-view mirror
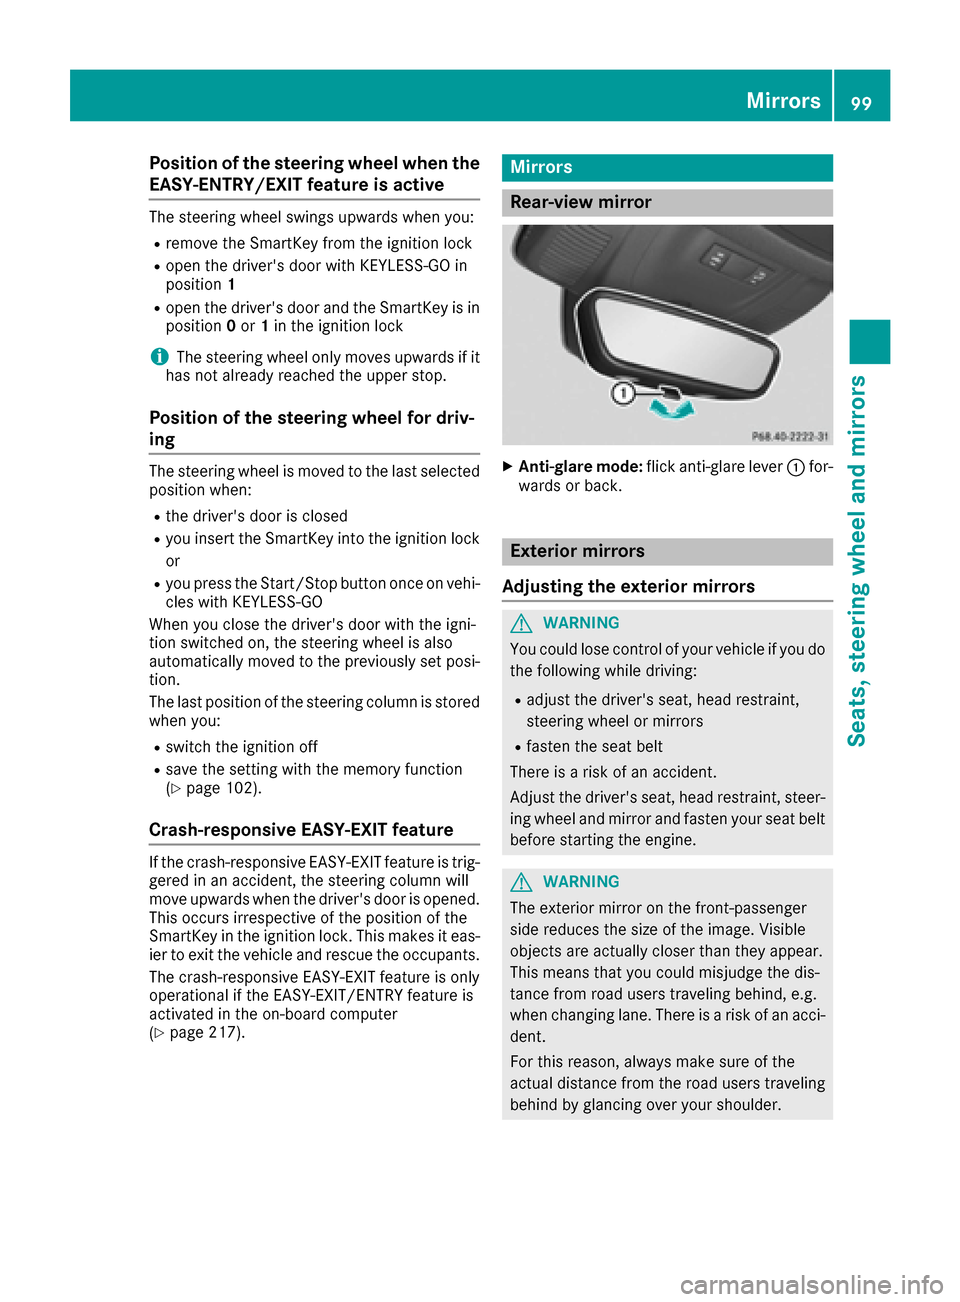
XAnti-glare mode: flick anti-glare lever :for-
wards or back.
Exterior mirrors
Adjusting the exterior mirrors
GWARNING
You could lose control of your vehicle if you do the following while driving:
Radjust the driver's seat, head restraint,
steering wheel or mirrors
Rfasten the seat belt
There is a risk of an accident.
Adjust the driver's seat, head restraint, steer-
ing wheel and mirror and fasten your seat belt before starting the engine.
GWARNING
The exterior mirror on the front-passenger
side reduces the size of the image. Visible
objects are actually closer than they appear.
This means that you could misjudge the dis-
tance from road users traveling behind, e.g.
when changing lane. There is a risk of an acci-
dent.
For this reason, always make sure of the
actual distance from the road users traveling
behind by glancing over your shoulder.
Mirrors99
Seats, steering wheel and mirrors
Z
Page 102 of 366
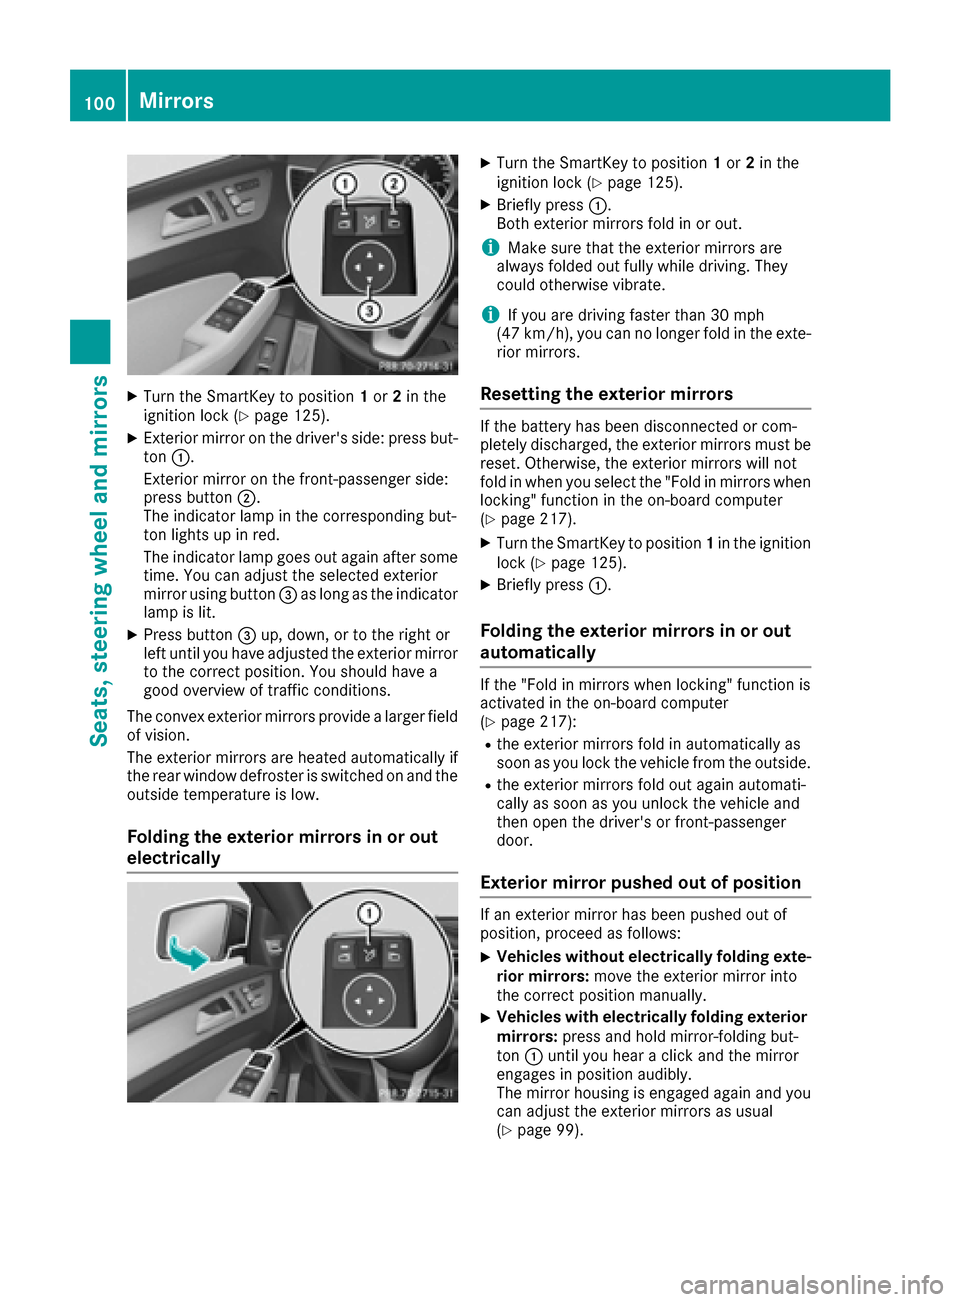
XTurn the SmartKey to position1or 2in the
ignition lock (Ypage 125).
XExterior mirror on the driver's side: press but-
ton :.
Exterior mirror on the front-passenger side:
press button ;.
The indicator lamp in the corresponding but-
ton lights up in red.
The indicator lamp goes out again after some
time. You can adjust the selected exterior
mirror using button =as long as the indicator
lamp is lit.
XPress button =up, down, or to the right or
left until you have adjusted the exterior mirror
to the correct position. You should have a
good overview of traffic conditions.
The convex exterior mirrors provide a larger field
of vision.
The exterior mirrors are heated automatically if
the rear window defroster is switched on and the
outside temperature is low.
Folding the exterior mirrors in or out
electrically
XTurn the SmartKey to position 1or 2in the
ignition lock (Ypage 125).
XBriefly press :.
Both exterior mirrors fold in or out.
iMake sure that the exterior mirrors are
always folded out fully while driving. They
could otherwise vibrate.
iIf you are driving faster than 30 mph
(47 km/h), you can no longer fold in the exte-
rior mirrors.
Resetting the exterior mirrors
If the battery has been disconnected or com-
pletely discharged, the exterior mirrors must be
reset. Otherwise, the exterior mirrors will not
fold in when you select the "Fold in mirrors when
locking" function in the on-board computer
(
Ypage 217).
XTurn the SmartKey to position 1in the ignition
lock (Ypage 125).
XBriefly press :.
Folding the exterior mirrors in or out
automatically
If the "Fold in mirrors when locking" function is
activated in the on-board computer
(
Ypage 217):
Rthe exterior mirrors fold in automatically as
soon as you lock the vehicle from the outside.
Rthe exterior mirrors fold out again automati-
cally as soon as you unlock the vehicle and
then open the driver's or front-passenger
door.
Exterior mirror pushed out of position
If an exterior mirror has been pushed out of
position, proceed as follows:
XVehicles without electrically folding exte-
rior mirrors: move the exterior mirror into
the correct position manually.
XVehicles with electrically folding exterior
mirrors: press and hold mirror-folding but-
ton :until you hear a click and the mirror
engages in position audibly.
The mirror housing is engaged again and you
can adjust the exterior mirrors as usual
(
Ypage 99).
100Mirrors
Seats, steering wheel and mirrors