2017 MERCEDES-BENZ GLE43AMG SUV buttons
[x] Cancel search: buttonsPage 98 of 366

The system automatically switches down from
level2to level 1after approximately ten
minutes.
The system automatically switches off approx-
imately 35 minutes after it is set to level 1.
XTurn the SmartKey to position1or 2in the
ignition lock (Ypage 125).
XTo switch on: press button:repeatedly
until the desired heating level is set.
XTo switch off: press button:repeatedly
until all the indicator lamps go out.
iIf the battery voltage is too low, the seat
heating may switch off.
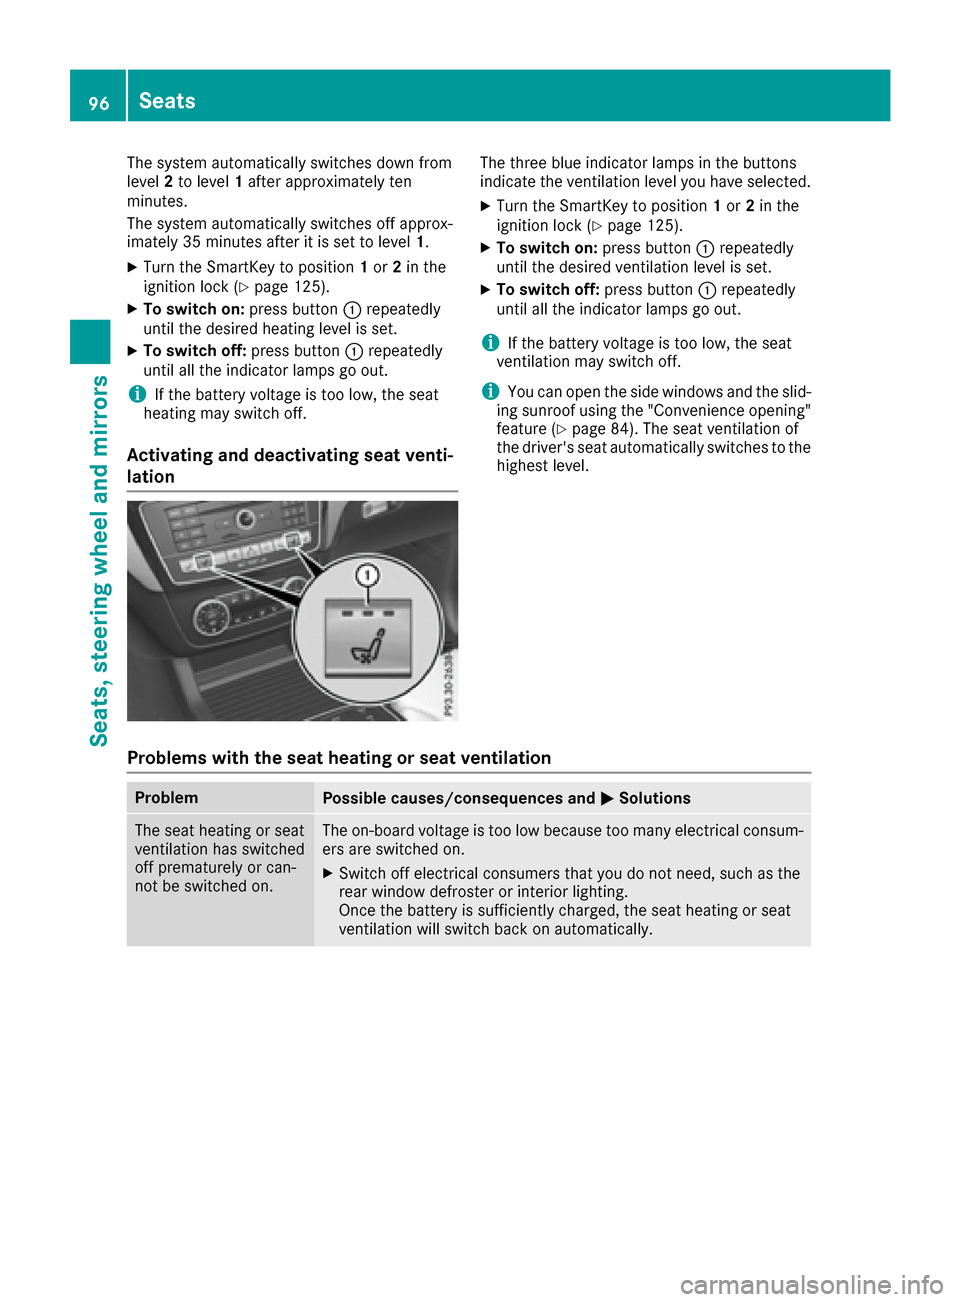
Activating and deactivating seat venti-
lation
The three blue indicator lamps in the buttons
indicate the ventilation level you have selected.
XTurn the SmartKey to position 1or 2in the
ignition lock (Ypage 125).
XTo switch on: press button:repeatedly
until the desired ventilation level is set.
XTo switch off: press button:repeatedly
until all the indicator lamps go out.
iIf the battery voltage is too low, the seat
ventilation may switch off.
iYou can open the side windows and the slid-
ing sunroof using the "Convenience opening"
feature (
Ypage 84). The seat ventilation of
the driver's seat automatically switches to the
highest level.
Problems with the seat heating or seat ventilation
ProblemPossible causes/consequences and MSolutions
The seat heating or seat
ventilation has switched
off prematurely or can-
not be switched on.The on-board voltage is too low because too many electrical consum-
ers are switched on.
XSwitch off electrical consumers that you do not need, such as the
rear window defroster or interior lighting.
Once the battery is sufficiently charged, the seat heating or seat
ventilation will switch back on automatically.
96Seats
Seats, steering wheel and mirrors
Page 105 of 366

Calling up a stored setting
XPress and hold the relevant storage position
button1,2or 3until the seat, steering wheel
and exterior mirrors are in the stored position.
The setting procedure is interrupted as soon as
you release the storage position buttons.
Memory function103
Seats, steering wheel and mirrors
Z
Page 119 of 366

IAdjusts the climate mode settings (Ypage 118)
JSwitches air-recirculation mode on/off (Ypage 121)
KSets climate control to automatic (Ypage 118)
Rear control panel
LIncreases the airflow (Ypage 119)
MSets the temperature (Ypage 119)
NSets rear-compartment climate control to automatic (Ypage 118)
ODirects the airflow through the rear air vents (Ypage 119)
PSwitches the seat heating on the right-hand side on/off (Ypage 95)
QDirects the airflow through the footwell vents (Ypage 119)
RSwitches the rear climate control on/off (Ypage 117)
SReduces the airflow (Ypage 119)
TSwitches the seat heating on the left-hand side on/off (Ypage 95)
Information about using automatic
climate control
Optimum use of the automatic climate
control
The following contains notes and recommenda-
tions on optimum use of the dual-zone or 3-zone
automatic climate control.
RYou can switch on climate control by using the
à and¿ orà andÁ buttons.
The indicator lamps in the Ãand
¿ buttons or the ÃandÁ buttons
light up.
RVehicles with 3-zone climate control:in
automatic mode, you can also use the
ñ button to set a climate mode (FOCUS/
MEDIUM/DIFFUSE). The MEDIUM level is
recommended.
RSet the temperature to 72 ‡ (22 †).
ROnly use the "Windshield defrosting" function
briefly until the windshield is clear again.
ROnly use air-recirculation mode briefly, e.g. if
there are unpleasant outside odors or when in
a tunnel. The windows could otherwise fog up,
since no fresh air is drawn into the vehicle in
air-recirculation mode.
RVehicles with 3-zone climate control:use
the ZONE function to adopt the temperature
settings on the driver's side for the front-
passenger side and the rear compartment as
well. The indicator lamp above the ábut-
ton goes out.
RVehicles with 3-zone climate control:use
the "residual heat" function if you want to heat or ventilate the vehicle interior when the igni-
tion is switched off. The residual heat functio
n
ca
n only be activated or deactivated with the
ignition switched off.
RIf you change the settings of the climate con-
trol system, the climate status display
appears for approximately three seconds at
the bottom of the screen in the multimedia
system display. You will see the current set-
tings of the various climate control functions.
During automatic engine switch-off, the climate
control system only operates at a reduced capa-
city. If you require the full climate control output,
you can switch off the ECO start/stop function
by pressing the ECO button (
Ypage 130).
Operating the climate control sys-
tems
Activating/deactivating climate con-
trol
General notes
When the climate control is switched off, the air
supply and air circulation are also switched off.
The windows could fog up. Therefore, switch off
climate control only briefly
Activate climate control primarily using the
à button (
Ypage 118).
In the rear compartment, you can also switch
climate control on and off using the Ãand
^ buttons.
Operating the climate control systems117
Climate control
Page 121 of 366

Setting the temperature
Dual-zone automatic climate control
Different temperatures can be set for the driv-
er's and front-passenger sides.
XTurn the SmartKey to position 2in the ignition
lock (Ypage 125).
XTo increase or decrease: turn control:or
B counter-clockwise or clockwise
(
Ypage 113).
Only change the temperature setting in small
increments. Start at 72 ‡ (22 †).
3-zone automatic climate control
You can select different temperature settings
for the driver's and front-passenger sides as well
as for the rear compartment.
XTurn the SmartKey to position 2in the ignition
lock (Ypage 125).
XTo increase or decrease temperature in
the front compartment: turn control:or
B counter-clockwise or clockwise
(
Ypage 115).
Only change the temperature setting in small increments. Start at 72 ‡ (22 †).
XTo increase or reduce the temperature in
the rear compartment using the front con-
trol panel: press theábutton.
The indicator lamp in the ábutton goes
out.
The temperature setting for the driver's side
is adopted for the rear compartment and the
front-passenger side.
XTurn thumbwheel :to the left or right
(Ypage 115).
Only change the temperature setting in small
increments. Start at 72 ‡ (22 †).
XTo increase or decrease the rear compart-
ment temperature using the rear control
panel: turn control Mcounter-clockwise or
clockwise on the rear control panel
(
Ypage 115).
Only change the temperature setting in small
increments. Start at 72 ‡ (22 †).
Setting the air distribution
Air distribution settings
Front control panel
P Directs the airflow through the center
vents
O Directs air through the footwell air vents
S Directs the airflow through the center
and footwell vents
¯ Directs air through the defroster vents
b Directs the airflow through the defroster
and center vents (Canada only)
a Directs air through the defroster and
footwell vents
_ Directs the airflow through the defroster,
center and footwell air vents (Canada
only)
Rear control panel
M Directs the airflow through the rear cen-
ter and B-pillar air vents
O Directs air through the footwell air vents
iUsing the rear control panel, you can also
activate both air distribution positions simul-
taneously. In order to do this, press both air
distribution buttons. The air is then routed
through all rear air vents.
iRegardless of the air distribution setting,
airflow is always directed through the side air
vents. The side air vents can only be closed
when the controls on the side air vents are
turned downwards.
Adjusting
XTurn the SmartKey to position 2in the ignition
lock (Ypage 125).
XPress the _button repeatedly until the
desired symbol appears in the display.
Setting the airflow
XTurn the SmartKey to position 2in the ignition
lock (Ypage 125).
XTo increase: press theKbutton.
XTo reduce: press theIbutton.
Operating the climate control systems119
Climate control
Page 209 of 366

There is a short delay before a change in outside
temperature appears in the multifunction dis-
play.
Coolant temperature gauge
GWARNING
Opening the hood when the engine is over-
heated or when there is a fire in the engine
compartment could expose you to hot gases
or other service products. There is a risk of
injury.
Let an overheated engine cool down before
opening the hood. If there is a fire in the
engine compartment, keep the hood closed
and contact the fire department.
!A display message is shown if the coolant
temperature is too high.
If the coolant temperature is over 248 ‡
(120 †), do not continue driving. The engine
will otherwise be damaged.
The coolant temperature gage is in the instru-
ment cluster on the right-hand side (
Ypage 33).
Under normal operating conditions and with the
specified coolant level, the coolant temperature
may rise to 248 ‡ (120 †).
Operating the on-board computer
Overview
:Multifunction display
;Right control panel
=Left control panel
XTo activate the on-board computer: turn
the SmartKey to position 1in the ignition lock.
You can control the multifunction display and
the settings in the on-board computer using the
buttons on the multifunction steering wheel.
Vehicles with the COMAND multimedia system:
you can find further information on the Voice
Control System in the separate operating
instructions.
Vehicles with the Audio 20 multimedia system:
you can find further information on voice-oper-
ated navigation in the manufacturer's operating
instructions.
Displays and operation207
On-board computer and displays
Z
Page 219 of 366

Convenience submenu
Activating/deactivating the EASY-
ENTRY/EXIT feature
GWARNING
When the EASY-ENTRY/EXIT feature adjusts
the steering wheel, you and other vehicle
occupants – particularly children – could
become trapped. There is a risk of injury.
While the EASY-ENTRY/EXIT feature is mak-
ing adjustments, make sure that no one has
any body parts in the sweep of the steering
wheel.
If somebody becomes trapped:
Rpress one of the memory function position
buttons, or
Rmove the switch for steering wheel adjust-
ment in the opposite direction to that in
which the steering wheel is moving.
The adjustment process is stopped.
XPress the =or; button on the steering
wheel to select the Sett.menu.
XPress the:or9 button to select the
Conveniencesubmenu.
XPress ato confirm.
XUsing :or9, select the EasyEntry/Exitfunction.
If the EasyEntry/Exitfunction is activated,
the vehicle steering wheel is displayed in
orange in the multifunction display.
XPress the abutton to save the setting.
Further information on the EASY-ENTRY/EXIT
feature (
Ypage 98).
Switching the seat belt adjustment on/off
XPress the =or; button on the steering
wheel to select the Settingsmenu.
XPress the:or9 button to select the
Conveniencesubmenu.
XPress ato confirm.
XPress the :or9 button to select the
Belt Adjustmentfunction.
If the BeltAdjustmentfunction is activated,
the vehicle seat belt is shown in orange in the
multifunction display.
XPress the abutton to save the setting. For further information on belt adjustment, see
(
Ypage 43).
Switching the fold-in mirrors when lock-
ing feature on/off
This function is only available when the vehicle is
equipped with the electrical fold-in function.
When you activate the
Auto.
MirrorFoldingfunction, the exterior mirrors are folded in when
the vehicle is locked. The exterior mirrors fold
out automatically again as soon as you unlock
the vehicle.
XPress the=or; button on the steering
wheel to select the Sett.menu.
XPress the:or9 button to select the
Conveniencesubmenu.
XPress ato confirm.
XPress the :or9 button to select the
Auto. Mirror Foldingfunction.
If the Auto. Mirror Foldingfunction is
switched on, the multifunction display shows
the exterior mirror in orange.
XPress the abutton to save the setting.
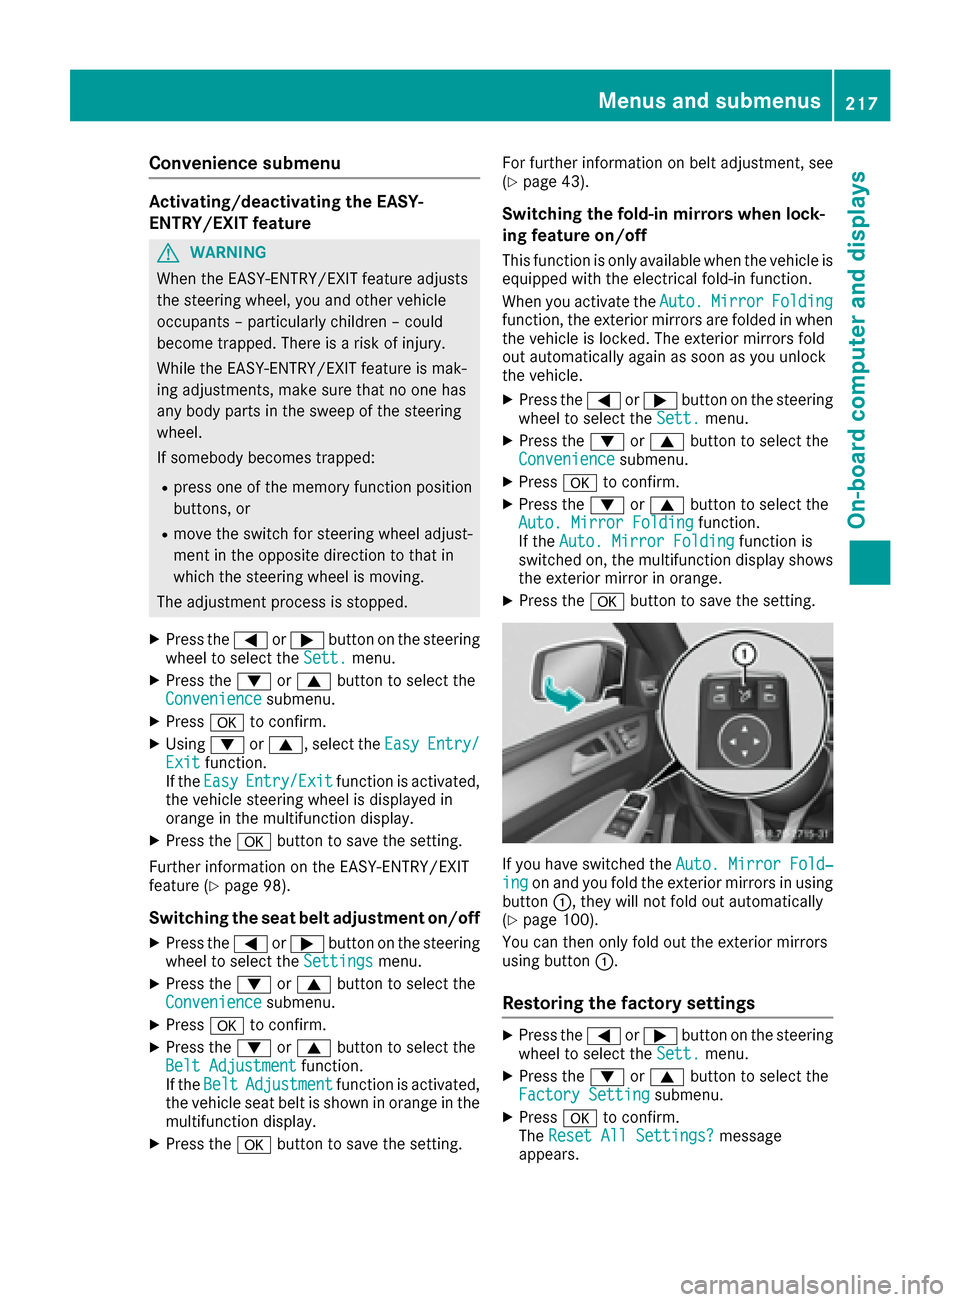
If you have switched the Auto. Mirror Fold‐ingon and you fold the exterior mirrors in using
button :, they will not fold out automatically
(
Ypage 100).
You can then only fold out the exterior mirrors
using button :.
Restoring the factory settings
XPress the=or; button on the steering
wheel to select the Sett.menu.
XPress the:or9 button to select the
Factory Settingsubmenu.
XPress ato confirm.
The Reset All Settings?message
appears.
Menus and submenus217
On-board computer and displays
Z
Page 285 of 366

mbrace
General notes
The mbrace system is only available in the USA.
You must have a license agreement to activate
the mbrace service. Make sure that your system
is activated and operational. To log in, press the
ï MB Info call button. If any of the steps
mentioned are not carried out, the system may
not be activated.
If you have questions about the activation, con-
tact one of the following telephone hotlines:
Mercedes-Benz Customer Assistance Center at
1-800-FOR-MERCedes (1-800-367-6372) or
1-866-990-9007
Shortly after successfully registering with the
mbrace service, a user ID and password will be
sent to you by mail. You can use this password
to log onto the mbrace area under "Owners
Online" at http://www.mbusa.com .
The system is available if:
Rit has been activated and is operational
Rthe corresponding mobile phone network is
available for transmitting data to the Cus-
tomer Center
Ra service subscription is available
Determining the location of the vehicle on a map
is only possible if:
RGPS reception is available.
Rthe vehicle position can be forwarded to the
Customer Assistance Center.
The mbrace system
To adjust the volume during a call, proceed as
follows:
XPress the WorX button on the multi-
function steering wheel.
or
XUse the volume control on the multimedia
system.
The system offers various services, e.g.:
RAutomatic and manual emergency call
RRoadside Assistance call
RMB Info call
You can find information and a description of all
available features under "Owners Online" at
http://www.mbusa.co m.
System self-test
After you have switched on the ignition, the sys-
tem carries out a self-diagnosis.
A malfunction in the system has been detected
if one of the following occurs:
RThe indicator lamp in the SOS button does not
come on during the system self-test.
RThe indicator lamp in the FRoadside
Assistance button does not light up during
self-diagnosis of the system.
RThe indicator lamp in the ïMB Info call
button does not light up during self-diagnosis
of the system.
RThe indicator lamp in one or more of the fol-
lowing buttons continues to light up red after
the system self-diagnosis:
-SOS button
-F Roadside Assistance call button
-ïMB Info call button
RTheInoperativeor the Service NotActivatedmessage appears in the multi-
function display after the system self-diagno-
sis.
If a malfunction is indicated as outlined above,
the system may not operate as expected. In the event of an emergency, help will have to be
summoned by other means.
Have the system checked at the nearest author-
ized Mercedes-Benz Center or contact the fol-
lowing service hotlines:
Mercedes-Benz Customer Assistance Center at 1-800-FOR-MERCedes (1-800-367-6372) or
1-866-990-9007
Emergency call
Important safety notes
GWARNING
It can be dangerous to remain in the vehicle,
even if you have pressed the SOS button in an emergency if:
Ryou see smoke inside or outside of the vehi-
cle, e.g. if there is a fire after an accident
Rthe vehicle is on a dangerous section of
road
Rthe vehicle is not visible or cannot easily beseen by other road users, particularly when
dark or in poor visibility conditions
Features283
Stowage and features
Z
Page 292 of 366

door opener, contact an authorized Mercedes-
Benz Center.
Alternatively, you can call the following tele-
phone assistance services:
RUSA:Mercedes-Benz Customer Assistance
Center at 1-800-FOR-MERCedes
RCanada: Customer Service at
1-800-387-0100
RHomeLink®hotline 1-800-355-3515 (free of
charge)
More information on HomeLink
®and/or com-
patible products is also available online at
http://www.homelink.co m.
Notes on the declaration of conformity
(
Ypage 27).
USA: FCC ID: CB2HMIHL4
Canada: IC: 279B-HMIHL4
Important safety notes
GWARNING
When you operate or program the garage door
with the integrated garage door opener, per-
sons in the range of movement of the garage
door can become trapped or struck by the
garage door. There is a risk of injury.
When using the integrated garage door
opener, always make sure that nobody is
within the range of movement of the garage
door.
GWARNING
Combustion engines emit poisonous exhaust
gases such as carbon monoxide. Inhaling
these exhaust gases leads to poisoning. There
is a risk of fatal injury. Therefore never leave
the engine running in enclosed spaces with-
out sufficient ventilation.
Programming
Programming buttons
Pay attention to the "Important safety notes"
(Ypage 290).
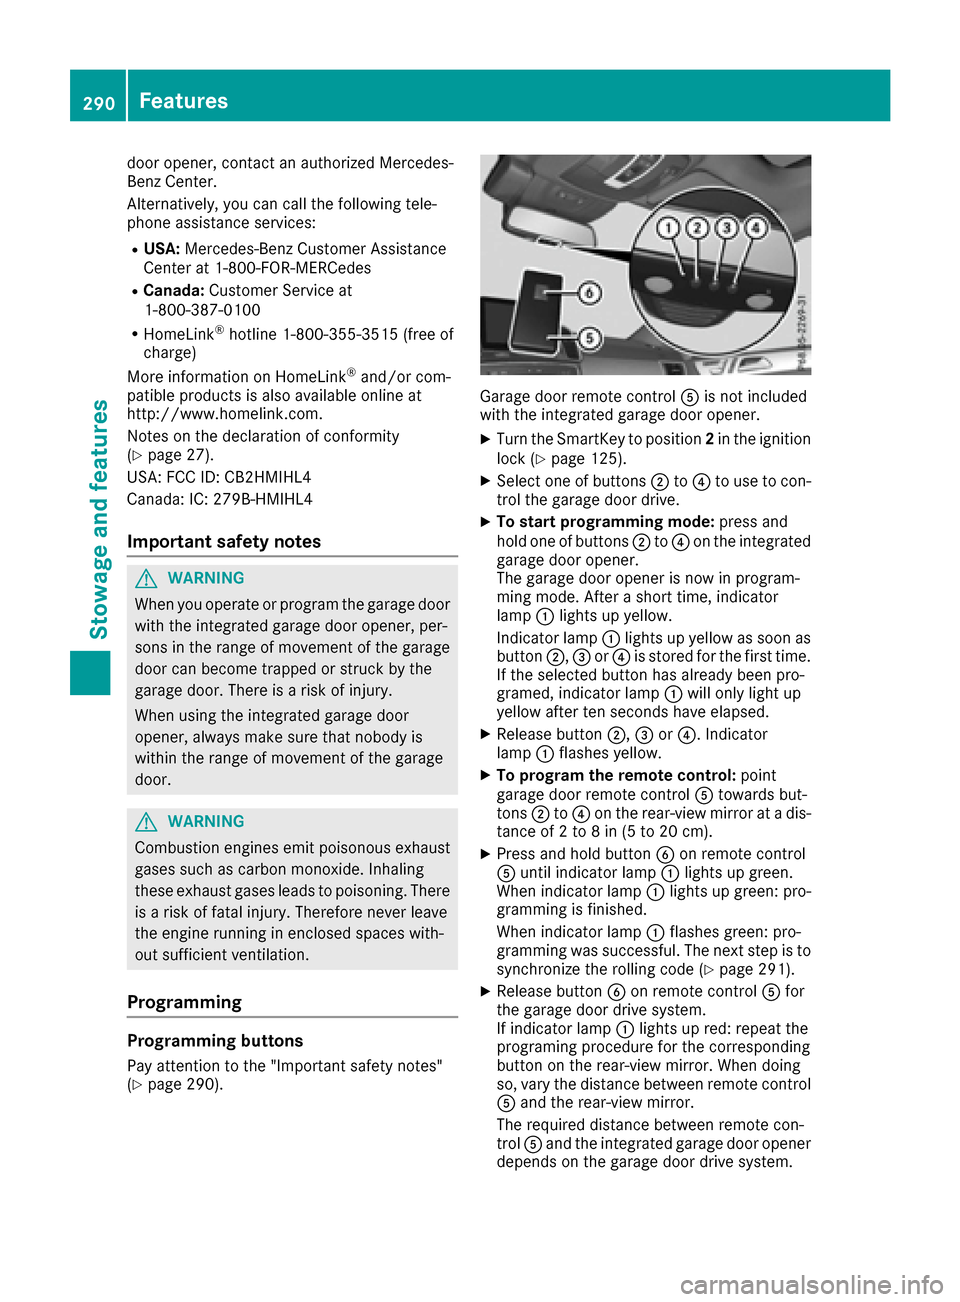
Garage door remote control Ais not included
with the integrated garage door opener.
XTurn the SmartKey to position 2in the ignition
lock (Ypage 125).
XSelect one of buttons ;to? to use to con-
trol the garage door drive.
XTo start programming mode: press and
hold one of buttons ;to? on the integrated
garage door opener.
The garage door opener is now in program-
ming mode. After a short time, indicator
lamp :lights up yellow.
Indicator lamp :lights up yellow as soon as
button ;,=or? is stored for the first time.
If the selected button has already been pro-
gramed, indicator lamp :will only light up
yellow after ten seconds have elapsed.
XRelease button ;,=or?. Indicator
lamp :flashes yellow.
XTo program the remote control: point
garage door remote control Atowards but-
tons ;to? on the rear-view mirror at a dis-
tance of 2 to 8 in (5 to 20 cm).
XPress and hold button Bon remote control
A until indicator lamp :lights up green.
When indicator lamp :lights up green: pro-
gramming is finished.
When indicator lamp :flashes green: pro-
gramming was successful. The next step is to synchronize the rolling code (
Ypage 291).
XRelease button Bon remote control Afor
the garage door drive system.
If indicator lamp :lights up red: repeat the
programing procedure for the corresponding
button on the rear-view mirror. When doing
so, vary the distance between remote control
A and the rear-view mirror.
The required distance between remote con-
trol Aand the integrated garage door opener
depends on the garage door drive system.
290Features
Stowage and features