2017 MERCEDES-BENZ GLE43AMG SUV height adjustment
[x] Cancel search: height adjustmentPage 19 of 366

Rear-view mirrorAnti-glare (manual) .......................... 99
Dipping (automatic) ....................... 101
Refrigerant (air-conditioning sys-
tem)
Important safety notes .................. 357
Refueling
Fuel gauge ....................................... 33
Important safety notes .................. 139
Refueling process .......................... 140
see Fuel
Remote control
Garage door opener ....................... 289
Programming (garage door
opener) .......................................... 290
Replacing bulbs
General notes ................................ 109
Reporting safety defects .................... 29
Rescue card ......................................... 29
Reserve (fuel tank)
see Fuel
Reserve fuel
Display message ............................ 236
Warning lamp ................................. 259
Residual heat (climate control) ........ 121
Restraint system
Display message ............................ 229
Introduction ..................................... 39
Warning lamp ................................. 258
Warning lamp (function) ................... 40
Reversing feature
Panorama sliding sunroof ................ 87
Roller sunblind ................................. 88
Side windows ................................... 83
Tailgate ............................................ 79
Reversing lamps (display mes-
sage) ................................................... 233
Roadside Assistance (breakdown) .... 26
Roller sunblind
Panorama roof with power tilt/
sliding panel ..................................... 88
Roof carrier ........................................ 277
Roof lining and carpets (cleaning
guidelines) ......................................... 305
Roof load (maximum) ........................ 358
Route (navigation)
see Route guidance (navigation) Route guidance
see also Digital Operator's Man-
ual .................................................. 263
Route guidance (navigation) ............ 210
S
Safety
Children in the vehicle ..................... 55
see Occupant safety
see Operating safety
SD card
Inserting ........................................ 268
Inserting/removing ........................ 268
Removing ....................................... 268
SD memory card
see also Digital Operator's Man-
ual .................................................. 263
Selecting ........................................ 212
Search & Send
see also Digital Operator's Man-
ual .................................................. 263
Seat belts
Adjusting the driver's and front-
passenger seat belt ......................... 43
Adjusting the height ......................... 42
Cleaning ......................................... 305
Correct usage .................................. 42
Fastening ......................................... 42
Important safety guidelines ............. 41
Introduction ..................................... 40
Releasing ......................................... 43
Switching belt adjustment on/off
(on-board computer) ...................... 217
Warning lamp ................................. 250
Warning lamp (function) ................... 43
Seats
Adjusting (electrically) ..................... 93
Adjusting the 4-way lumbar sup-
port .................................................. 95
Adjusting the head restraint ............ 93
Calling up a stored setting (mem-
ory function) .................................. 103
Cleaning the cover ......................... 305
Correct driver's seat position ........... 91
Folding the rear bench seat for-
wards/back ................................... 273
Important safety notes .................... 91
Index17
Page 94 of 366

GWARNING
You could lose control of your vehicle if you do the following while driving:
Radjust the driver's seat, head restraint,
steering wheel or mirrors
Rfasten the seat belt
There is a risk of an accident.
Adjust the driver's seat, head restraint, steer-
ing wheel and mirror and fasten your seat belt before starting the engine.
GWARNING
If you adjust the seat height carelessly, you or
other vehicle occupants could be trapped and
thereby injured. Children in particular could
accidentally press the electrical seat adjust-
ment buttons and become trapped. There is a
risk of injury.
While moving the seats, make sure that your
hands or other body parts do not get under the
lever assembly of the seat adjustment sys-
tem.
GWARNING
If the head restraints are not installed or not
adjusted correctly, they cannot provide pro-
tection as intended. There is an increased risk
of injury in the head and neck area, e.g. in the event of an accident or when braking.
Always drive with the head restraints instal-
led. Before driving off, make sure for every
vehicle occupant that the center of the head
restraint supports the back of the head at
about eye level.
GWARNING
The seat belt does not offer the intended level of protection if you have not moved the back-
rest to an almost vertical position. When brak-
ing or in the event of an accident, you could
slide underneath the seat belt and sustain
abdomen or neck injuries, for example. This
poses an increased risk of injury or even fatal injury.
Adjust the seat properly before beginning
your journey. Always ensure that the backrest
is in an almost vertical position and that the
shoulder section of your seat belt is routed
across the center of your shoulder.
!To avoid damage to the seats and the seat
heating, observe the following information:
Rkeep liquids from spilling on the seats. If
liquid is spilled on the seats, dry them as
soon as possible.
Rif the seat covers are damp or wet, do not
switch on the seat heating. The seat heat-
ing should also not be used to dry the seats.
Rclean the seat covers as recommended;
see "Interior care".
Rdo not transport heavy loads on the seats.
Do not place sharp objects on the seat
cushions, e.g. knives, nails or tools. The
seats should only be occupied by passen-
gers, if possible.
Rwhen the seat heating is in operation, do
not cover the seats with insulating materi-
als, e.g. blankets, coats, bags, seat covers,
child seats or booster seats.
!Make sure that there are no objects in the
footwell under or behind the seats when mov-
ing the seats back. There is a risk that the
seats and/or the objects could be damaged.
iThe head restraints cannot be removed from
the front and rear seats.
For more information, contact a qualified spe-
cialist workshop.
iFurther related subjects:
RCargo compartment enlargement (folding
down the rear bench seat) (Ypage 273)
92Seats
Seats, steering wheel and mirrors
Page 95 of 366

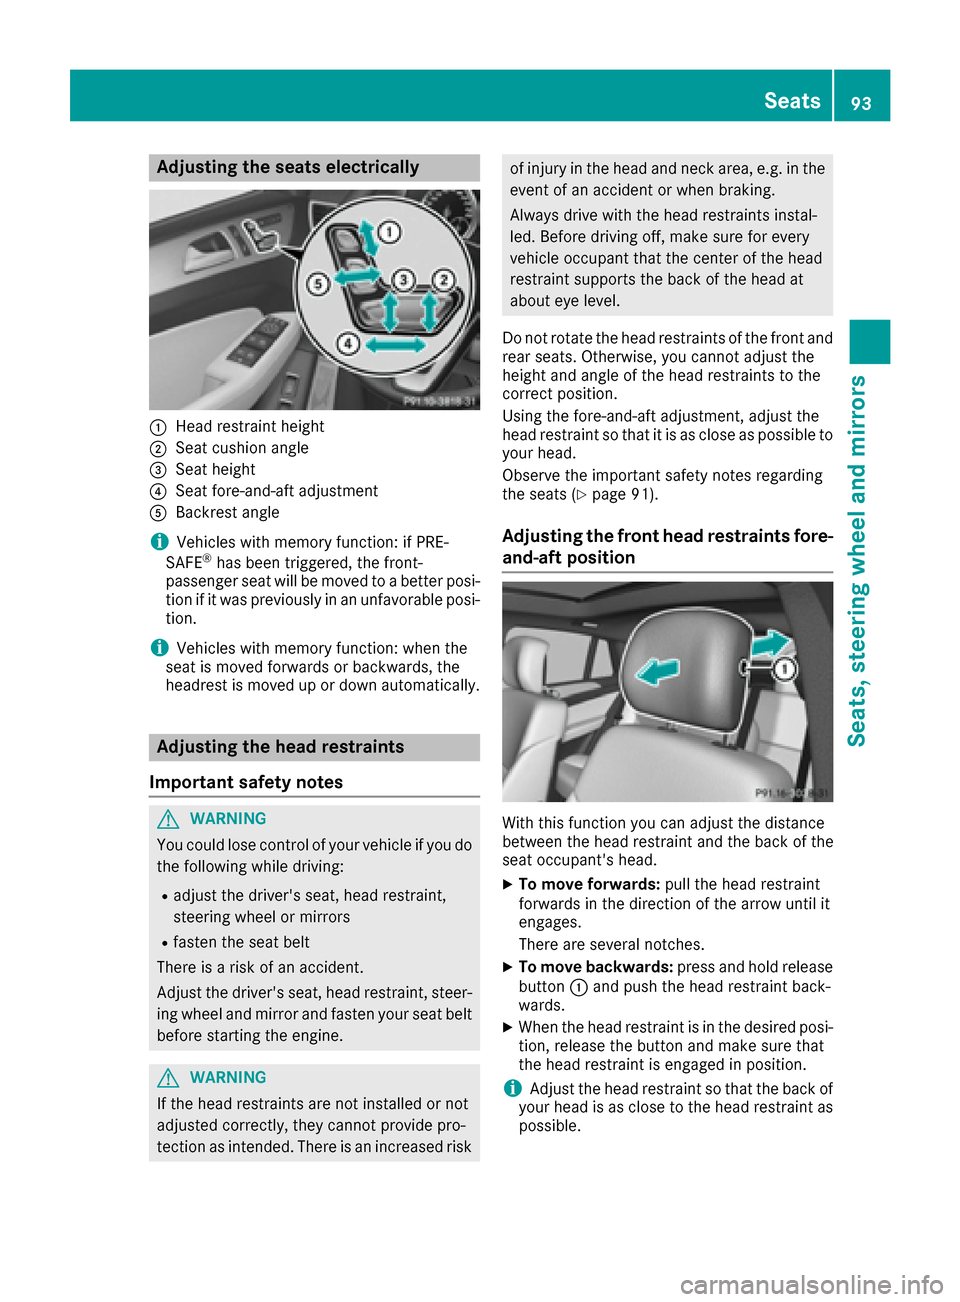
Adjusting the seats electrically
:Headrestrain theight
;Seat cushion angle
=Seat height
?Seat fore-and-af tadjustmen t
ABackrest angle
iVehicles wit hmemory function :if PRE -
SAFE®has been triggered ,th efront-
passenger seat will be moved to abette rposi-
tion if it was previously in an unfavorable posi-
tion .
iVehicles wit hmemory function :when th e
seat is moved forward sor backwards ,th e
headres tis moved up or down automatically.
Adjusting the head restraints
Import ant safety notes
GWARNIN G
You could lose control of your vehicl eif you do
th efollowin gwhile driving:
Radjust th edriver's seat ,head restraint,
steering whee lor mirror s
Rfastenth eseat belt
There is aris kof an accident.
Adjus tth edriver's seat ,head restraint, steer -
ing whee land mirror and faste nyour seat belt
before starting th eengine.
GWARNIN G
If th ehead restraints are no tinstalled or no t
adjusted correctly, they canno tprovid epro -
tection as intended. There is an increased ris k
of injury in thehead and neck area, e.g. in th e
event of an acciden tor when braking .
Always drive wit hth ehead restraints instal -
led. Befor edrivin goff ,mak esur efor every
vehicl eoccupant that th ecenter of th ehead
restrain tsupport sth ebac kof th ehead at
about eye level.
Do no trotate th ehead restraints of th efron tand
rear seats. Otherwise ,you canno tadjust th e
height and angle of th ehead restraints to th e
correc tposition .
Using th efore-and-af tadjustment, adjust th e
head restrain tso that it is as close as possibl eto
your head .
Observ eth eimportant safet ynote sregarding
th eseat s (
Ypage 91).
Adjusting the front head restraints fore-
and-aft position
Withthis function you can adjust th edistanc e
between th ehead restrain tand th ebac kof th e
seat occupant's head .
XTo moveforwards :pull th ehead restrain t
forward sin th edirection of th earrow until it
engages.
There are several notches .
XTo movebackwards :press and hold release
butto n: and push th ehead restrain tback-
wards.
XWhen th ehead restrain tis in th edesired posi-
tion ,release th ebutto nand mak esur ethat
th ehead restrain tis engage din position .
iAdjustth ehead restrain tso that th ebac kof
your head is as close to th ehead restrain tas
possible.
Seats93
Seats, steering wheel and mirrors
Z
Page 99 of 366

Steering wheel
Important safety notes
GWARNING
You could lose control of your vehicle if you do the following while driving:
Radjust the driver's seat, head restraint,
steering wheel or mirrors
Rfasten the seat belt
There is a risk of an accident.
Adjust the driver's seat, head restraint, steer-
ing wheel and mirror and fasten your seat belt before starting the engine.
GWARNING
Children could injure themselves if they
adjust the steering wheel. There is a risk of
injury.
When leaving the vehicle, always take the
SmartKey with you and lock the vehicle. Never
leave children unsupervised in the vehicle.
The electrically adjustable steering wheel can
still be adjusted when there is no SmartKey in
the ignition lock.
Adjusting the steering wheel man-
ually
GWARNING
If the steering wheel is unlocked while the
vehicle is in motion, it could change position
unexpectedly. This could cause you to lose
control of the vehicle. There is a risk of an
accident.
Before starting off, make sure the steering
wheel is locked. Never unlock the steering
wheel while the vehicle is in motion.
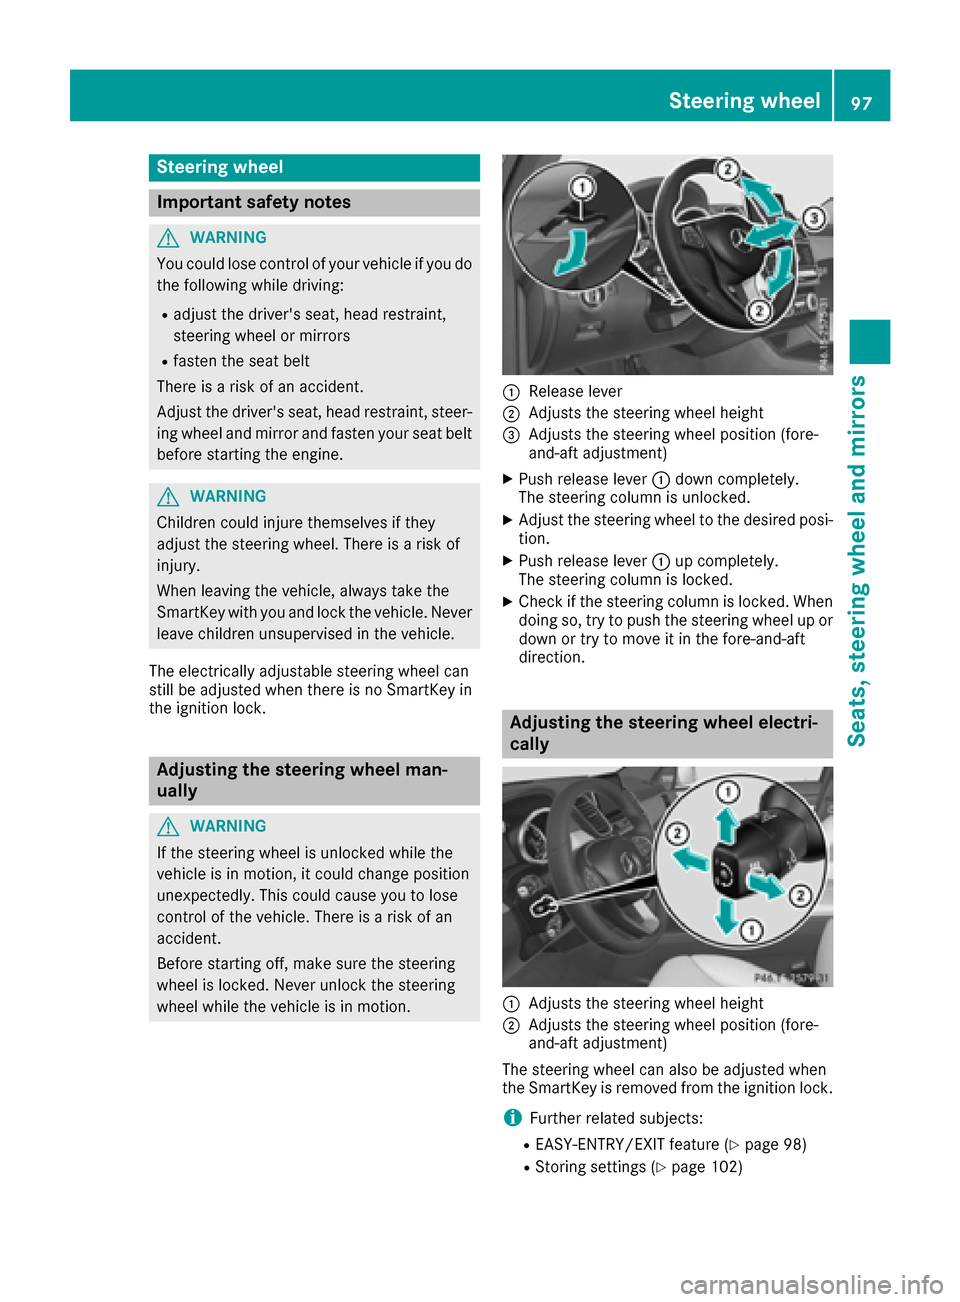
:Release lever
;Adjusts the steering wheel height
=Adjusts the steering wheel position (fore-
and-aft adjustment)
XPush release lever :down completely.
The steering column is unlocked.
XAdjust the steering wheel to the desired posi-
tion.
XPush release lever :up completely.
The steering column is locked.
XCheck if the steering column is locked. When
doing so, try to push the steering wheel up or down or try to move it in the fore-and-aft
direction.
Adjusting the steering wheel electri-
cally
:Adjusts the steering wheel height
;Adjusts the steering wheel position (fore-
and-aft adjustment)
The steering wheel can also be adjusted when
the SmartKey is removed from the ignition lock.
iFurther related subjects:
REASY-ENTRY/EXIT feature (Ypage 98)
RStoring settings (Ypage 102)
Steering wheel97
Seats, steering wheel and mirrors
Z
Page 175 of 366

If you press the%ora button on the
multifunction steering wheel, the message will
disappear.
The raised level setting is canceled if you:
Rdrive at speeds above 50 mph (80 km/h) (all
vehicles except Mercedes-AMG vehicles)
Rdrive at speeds above 43 mph (70 km/h)
(Mercedes-AMG vehicles)
Rdrive at speed s between 40 mph (64 km/h)
and 50 mph (80 km/h) for approximately 20
seconds (all vehicles except Mercedes-AMG
vehicles)
Rdrive at speeds between 40 mph (64 km/h)
and 43 mph (70 km/h) for approximately 20
seconds (Mercedes-AMG vehicles)
Rdrive at speeds above 19 mph (30 km/h) with
a trailer
The raised vehicle level remains saved when you
are not driving within these speed ranges.
Setting the normal vehicle level
!Make sure that there is enough ground
clearance when the vehicle is being lowered.
It could otherwise hit the ground, damaging
the underbody.
XStart the engine.
If indicator lamp ;is lit:
XPress button :.
Indicator lamp ;flashes while the vehicle is
being lowered, and goes out as soon as the
desired vehicle level is reached.
Vehicles with no trailer coupled: the vehi-
cle is adjusted to the height of the selected
drive program (
Ypage 132).
Vehicles with a trailer coupled: the vehicle
is adjusted to normal level regardless of the
drive program selected (
Ypage 132). The
vehicle remains at the normal level, even if the
drive program is changed.
During the adjustment, the Lowering
mes-
sage appears in the multifunction display.
If you press the %ora button on the
multifunction steering wheel, the message will
disappear.
AMG adaptive sport suspension sys-
tem
General notes
iThe AMG adaptive sport suspension system
is available for Mercedes-AMG vehicles and
for the Mercedes-AMG GLE 43 4MATIC.
The electronically controlled damping system
works continuously. This improves driving
safety and ride comfort.
The damping is tuned individually to each wheel
and depends on:
Ryour driving style, e.g. sporty
Rthe road surface condition, e.g. bumps
Ryour individual selection of Sport, Sport + or
Comfort
The suspension setting can be adjusted using
the corresponding button in the center console
or the DYNAMIC SELECT controller
(
Ypage 132).
Each time you start the engine with the Smart-
Key or the Start/Stop button, Comfort mode is
activated. For further information about starting
the engine, see (
Ypage 126).
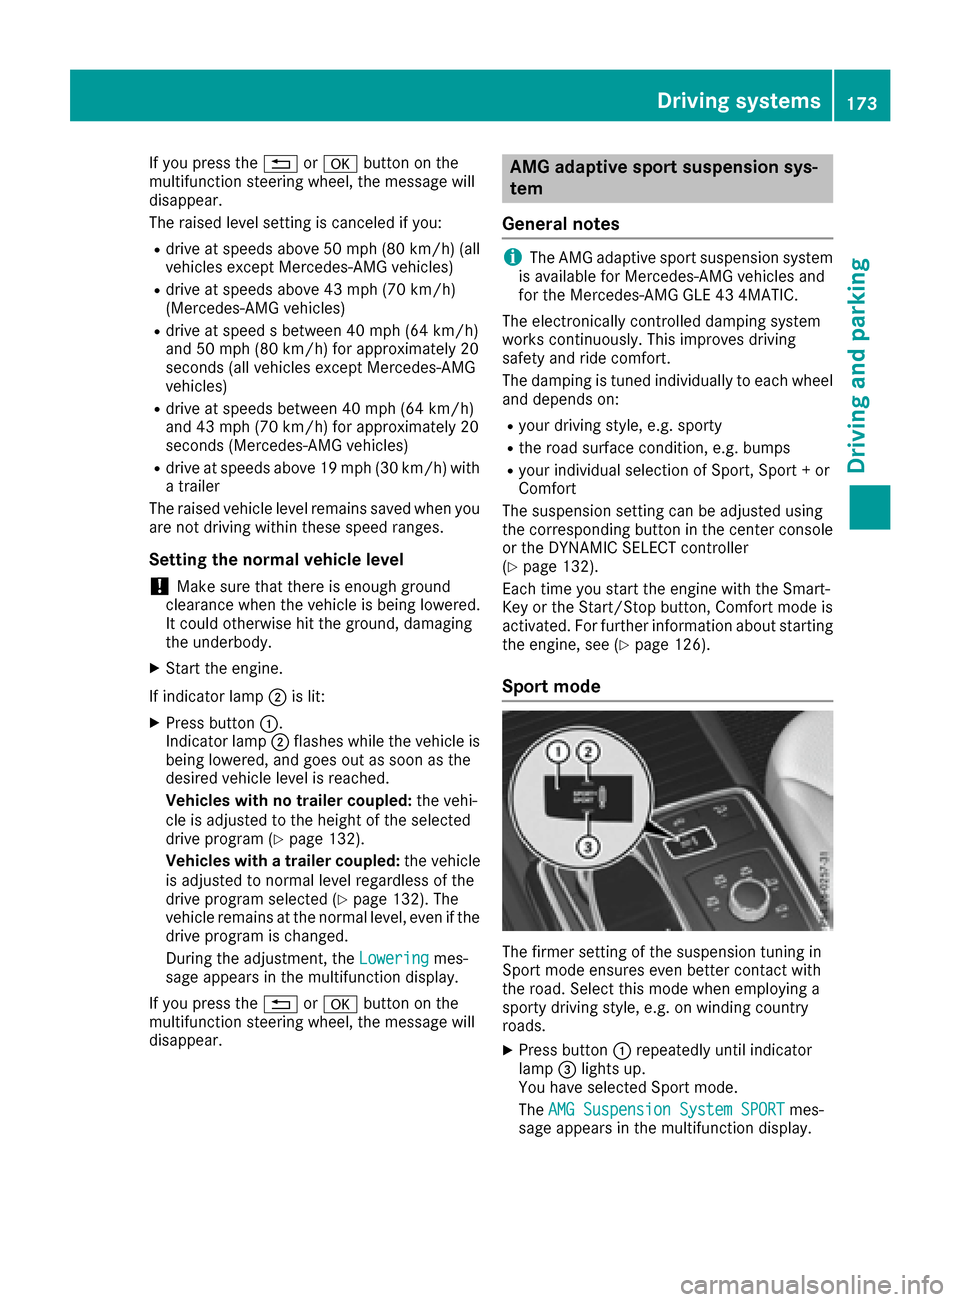
Sport mode
The firmer setting of the suspension tuning in
Sport mode ensures even better contact with
the road. Select this mode when employing a
sporty driving style, e.g. on winding country
roads.
XPress button :repeatedly until indicator
lamp =lights up.
You have selected Sport mode.
The AMG Suspension System SPORT
mes-
sage appears in the multifunction display.
Driving systems173
Driving and parking
Z